The Krotos Studio Journal

Learn.
Perform.
Sound better.

Guides, deep dives and product updates from the team building the fastest way to design sound. Written for editors, filmmakers and creators.

50+
articles
5
categories
Weekly
new drops
Thank you! Your submission has been received!
Oops! Something went wrong while submitting the form.
Latest

Fresh signal from the studio

All articles

How-to guide
This is some text inside of a div block.

Making Game Audio with Krotos Studio and Unreal Engine 5

Sound Designer Paul Renard shares an awesome demo where he creates the sounds for a video game from scratch using Krotos Studio and Unreal Engine 5.

JJ Lyon
December 19, 2025
Read Story↗

Producing Game Audio with Krotos Studio and Unreal Engine 5

Sound Designer Paul Renard shares an awesome demo where he creates the sounds for a video game from scratch using Krotos Studio and Unreal Engine 5.

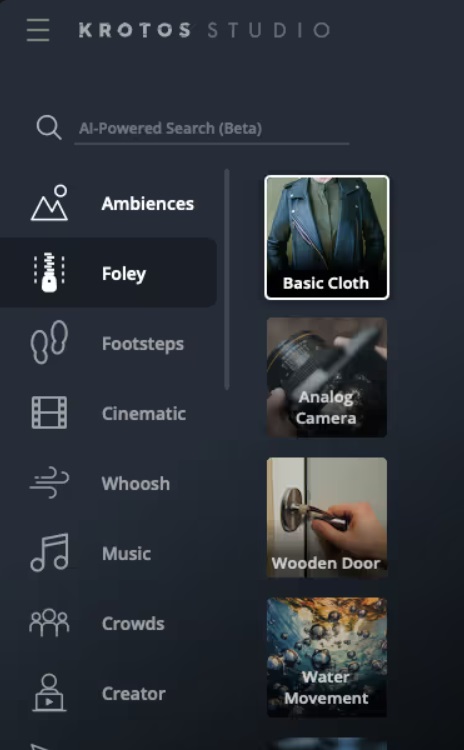
Paul uses ambiences, cloth Foley and footsteps for the character and level, and gets creative with the vehicle interior preset to create the obstacle sound effects in the game. Furthermore, all of the doors, interface sounds and notifications were used with Krotos Studio!

"The sounds were made with Krotos Studio. It's a fun and fast way to get the sounds you want!" - Paul Renard

Want to save time and make even more unique sound effects? Whether you're Creating Game Audio or Video Game Trailer SFX, Krotos Studio gives you the best of both!

How-to guide
This is some text inside of a div block.

Exploring Krotos Studio’s Cartoon Sound Effects

We added a cartoon sound effects category to Krotos Studio, full of all kinds of boing, whistle and crash SFX.

JJ Lyon
December 19, 2025
Read Story↗

We added a cartoon sound effects category to Krotos Studio, full of all kinds of boing, whistle and crash SFX. We couldn't resist trying them out on a quirky animation by Clim Studio. We talk through what went into this sound design below!

Bring cartoon worlds to life with animation cues with this advice on Animation sound effects using Krotos Studio, and go customized when you Create your first Ambience Preset.

Tube Squeaks & Fart Sound Effects

We have a purple ball being squeezed through a glass pipe, before popping out of the top.

The new Balloon Squeak sound effect preset was a great choice for this, and of course we had to use the new Fart Attack preset for the pop!

You get a new sound with each click, so it was super easy to add dynamic sounds that don’t repeat.

For comic effect, we added a toot from the new Party Blower preset for the last loop of the animation. Our squeaky tube is complete!

Whoosh Sound Effects For the Donut

Next, we tackled the donut pendulum, using the Fire Force whoosh preset for size and momentum of the donut.

All good donuts need a some sprinkles, so we added the new Flashback Twinkle preset to add some sweet shimmer to the sound.

Sound Design Tip: The motion of a pendulum is slowest at its highest point, and fastest as it is swinging. Match your sounds to the pendulum's motion—louder for fast swings, softer for slow ones. Krotos Studio's whooshes, can move between  left and right speakers which adds even more immersion.

Friction Sound Effects

We blended realistic and cartoon sounds for the marble's motion. The Mouse Click preset was used for the marble's contact with the ramp and the Cabinet Drawer  preset added the rolling sound.

Finally, we got to have some fun with our new cartoon presets, layering them on top of our realistic layers. We used both the Acme Whistle and Sliding Whistle presets to add some comedic mickey-mousing to this motion, Tex Avery style.

Sound Design Tip: Rolling sounds change with speed—faster equals higher pitch.
Sound Design Tip: Pan and fade your sounds to follow the marble's movement, creating a more realistic audio experience.

Multi Layered Sound Effects are a breeze with Krotos Studio

By embracing Krotos Studio's cartoon presets, we added a playful and dynamic layer to our animation, proving that sound design can be as fun as it is creative.

By auditioning sounds on the fly and adding them to the time line, we could add a range of characterful and interesting sounds to an already quirky animation. Just think what you could do for your projects!

Check out the finished design below

How-to guide
This is some text inside of a div block.

How to choose game audio software for fast sound design

This guide highlights common pitfalls, a better selection approach, a practical workflow, real-world examples, final QA checks, and where Krotos fits in.

JJ Lyon
December 19, 2025
Read Story↗

Quickly choose game audio software that speeds up your sound design without creating extra work. This guide highlights common pitfalls, a better selection approach, a practical workflow, real-world examples, final QA checks, and where Krotos fits in.

Common mistakes that slow down game audio workflows

If your project is slowing because audio keeps catching up, you are not alone. A few repeat offenders account for most wasted hours: choosing feature-heavy tools that are overkill, leaving engine integration to the end, messy file naming and versions, leaning only on massive libraries or manual mic tweaks, and skipping in‑engine testing until the build is near final. Each one seems reasonable on its own, but together they make delivery painful.

Tool-related pitfalls

Picking a DAW or editor because it has every imaginable feature can backfire when you need speed and predictability. A full mixing suite or a sound design sandbox is great, but when the task is to prototype 50 footstep variations or generate dozens of UI clicks, a heavyweight tool that slows auditioning, export or batch workflows adds friction. Likewise, picking standalone tools without thinking about how you will get files into middleware or the engine often creates rework. You end up converting, renaming, and recreating because export options are limited or formats are proprietary. Evaluate tools for quick audition, straightforward export, and how easily they slot into FMOD, Wwise or an engine import pipeline.

Workflow and organisation pitfalls

Poor naming, no templates and last-minute exports are a time tax you pay repeatedly. When folders are ambiguous and versions live in different locations, you waste minutes that become hours. Not having a naming convention tied to middleware events or RTPCs makes mapping slower and error prone. Relying solely on huge libraries or manual layering also costs time; hunting for the one right hit in a library can take longer than resynthesising or templating a quick variation. Finally, assuming a timeline mix will translate to runtime often fails because spatialisation, randomisation and memory budgets change behaviour. Treat organisation as part of the creative process and you will ship faster.

A faster, more resilient approach to choosing game audio software

You want tools that make it faster to get usable sounds, not software that looks impressive on a spec sheet. Prioritise solutions that let you audition quickly, export clearly named stems or event-ready files, and support templating so you can scale. Embrace modular toolchains where a specialised generator or procedural tool handles rapid creation, while a DAW or mastering tool handles final polish. Use procedural generation, batch processing and presets to create many variations with minimum repetition. Build an engine-first habit, testing early and often so you avoid late surprises. And if you use AI-assisted tools, be explicit about provenance and licensing so the legal side does not slow delivery.

Principles to prioritise

When evaluating game audio software, use practical selection criteria. Speed to result, meaning how fast you can go from idea to usable file. Integration, meaning clear export formats and simple import steps into FMOD, Wwise or game engines. Scalability, meaning templates, batch processes and programmatic variation. Predictable outputs, meaning consistent sample rates, bit depth and filename patterns. If a tool satisfies these, it becomes an ally instead of an obstacle.

Red flags when evaluating tools

Watch for common warning signs. Poor export options or locked proprietary formats are a no go, because they force extra conversion work. Tools with slow iteration loops, for example long rendering times for small changes, are unsuitable for fast prototyping. Beware of tools that do not expose metadata or versioning, because manual metadata entry is error prone. Finally, unclear provenance or licensing for generated sounds is a red flag. If the tool cannot clearly show where a sound came from and how it can be used, keep looking.

Step-by-step workflow for fast sound design with game audio software

A reliable, fast workflow splits the job into clear, repeatable steps. Start with a minimal and prioritised sound spec based on gameplay. Run short tool trials on a real in‑game example to confirm speed and fit. Set up templates, presets and naming rules before you scale, then batch-export stems or event-ready files in an engine-friendly structure. Iterate with quick in‑engine tests and keep a versioned backup strategy so you can roll back if needed.

Step 1: define the minimal sound spec

Define what the game actually needs for each build stage. For an early prototype, you might only need one footstep per surface type, a basic UI click, and a single ambient loop. Later builds demand more variation and adaptive behaviours. For each sound type, write a short spec: purpose, priority, acceptable fidelity, and performance constraints like memory, polyphony and CPU cost. This keeps the team aligned and prevents over-design early on.

Step 3: set up templates and libraries

Create templates for common categories: footsteps, UI FX, weapon hits, ambiences. Templates should include naming rules, stem layout, normalisation levels and a small set of preset variations. For example, a footstep template could include heel, toe and cloth layers, each as separate stems, plus a priority tag and surface parameter. Use consistent versioning like v001, v002 in filenames and keep a central library of reusable presets. These templates reduce repetition and make batch processing straightforward.

Step 6: test and iterate in‑engine

Build a rapid loop for in‑engine testing: import your exported files, hook them up to events or RTPCs, play a short test level and listen for context issues. Check how sounds attenuate, randomise, and interact with occlusion or reverbs. If something is too loud or repetitive, tweak priority, random ranges or layer balances in your tool, export a new batch and reimport. Keep every working iteration saved with a clear version tag so you can revert if a later change causes problems.

Real workflows for common game audio tasks

Real projects always return to a handful of recurring tasks. Below are compact, practical pipelines that focus on speed and consistency so you can produce assets that are ready for middleware and engine integration.

Footsteps: from capture to middleware

Capture or source your raw footsteps with a clear shot list: surface, shoe type and action. Normalise and trim files to consistent levels, then create pressure variants by altering attack, EQ and low frequency content. Build templated stems: impact, texture and cloth for each step. Batch-export these stems using your naming convention and include metadata for surface type and priority. In middleware, map each stem to a surface parameter and set up random ranges for pitch and volume so playback feels natural without manual tweaking.

Ambient loops: building adaptive layers

Author ambiences as loopable stems with clear crossfade points. Divide into layers such as base bed, texture swells and spot elements. Create LOD layers for different memory budgets, for example a single mono bed for low-end targets and layered stereo beds for high-end. Mark precise loop points and crossfade ranges at the file level so middleware can crossfade seamlessly. In engine, design adaptive rules that fade or swap layers based on distance, time of day or player state to keep CPU and memory predictable.

Combat FX: hybrid procedural + sampled approach

For hits and whooshes, combine sampled sources with procedural elements. Start with a sampled core hit, layer a procedural rumble for low end and add a generated whoosh shaped to the projectile speed. Use automated variation tools to create subtle pitch and timing differences across dozens of exports. Map impact intensity to RTPCs to drive layering dynamically in middleware, so a weak hit uses only the sampled core while a strong hit triggers added procedural elements for weight.

Final checks before shipping audio to the engine or editor

Before you hand files over, run a short but thorough QA sweep. Confirm file names, metadata and version tags comply with project standards. Do a loudness and clipping review, check export formats and sample rates. Verify middleware events and parameters are present and correctly linked, and confirm the performance budget is being respected. Log licences and provenance for any third party or generated assets. Finally, back up the final build and note known issues for the team to address post‑integration.

Quick QA pass

Create a short checklist you can run in 10 to 20 minutes. Load the sounds in context, check transitions and randomisation to avoid audible repeats, and listen for clicks at loop points. Test on a lower spec build to confirm memory and CPU behaviour, then spot check metadata such as event names and parameter mappings. If anything fails, document the fix and repeat the export with a new version tag so the pipeline remains predictable.

Where Krotos tools fit into a fast game audio pipeline

Krotos tools are built to accelerate SFX creation without turning the creative process into rote labour. Use them to sculpt sounds in real time, generate variations quickly, and produce batches of stems ready for import. They excel when you need a rapid set of usable assets for temp mixes, quick prototyping, or to expand a sound palette without re-recording. Their workflow focus helps you build templates and export consistent files for middleware import.

Krotos can be particularly useful at the early prototyping and iteration stages. Create dozens of hits, whooshes or ambient elements fast, export them as ready‑to‑import stems and map those into FMOD or Wwise styled systems. For editors and filmmakers, Krotos tools provide quick soundbeds and editorial FX that sit comfortably in Premiere Pro or DaVinci Resolve timelines for temp mixes. Always document provenance and licensing for any generated or prebuilt assets so the legal side is covered.

Use-cases for video editors and filmmakers

For editors and filmmakers working in Premiere Pro or DaVinci Resolve, the main wins are speed and usability. Need a temp ambience for an edit or a quick set of whooshes for a montage? Krotos tools let you generate usable, polished sounds in minutes instead of hours of library searching and tweaking. The result is faster editorial passes and fewer last-minute requests to sound teams.

Use-cases for sound designers and game audio teams

Sound designers and game teams benefit from fast prototyping and mass variation. Use Krotos to create many variations of footsteps, weapon impacts or creature sounds, then feed those stems into your FMOD or Wwise style pipelines. This reduces reliance on slow manual layering and large static libraries, and lets you explore more creative options within the constraints of memory and performance.

If you want to test whether Krotos improves your speed, try this simple task: pick three common in‑game events such as a footstep, an impact and a UI click. Set a 60 minute timer, create 10 variations of each, export them with a clear naming scheme, and import them into your middleware to check mapping and randomisation. Compare the time and quality with your usual process and note where the tool saved you time.

Try Krotos for yourself: download a trial or demo from the Krotos website, join the community forums and socials to grab presets and tips, and run the quick test task above to measure speed gains in your own pipeline.

Frequently asked questions

How to be a sound designer for games?

Start by building a practical toolset and a small, tight portfolio of work that shows your ability to design audio for gameplay. Learn middleware such as FMOD or Wwise, a DAW for editing and mixing, and one or two specialised tools for synthesis or procedural generation. Focus on projects that let you demonstrate event mapping, adaptive layering and optimisation for performance. Collaborate on mods, game jams or indie projects to get real engine experience, and document your process so potential employers or collaborators understand how you solve problems, not just what the final audio sounds like.

Practically, you should also get comfortable with versioning, naming conventions and export pipelines so your assets can be easily integrated. Practice rapid prototyping and in‑engine testing, because the ability to iterate fast and deliver predictable files is often valued more than theoretical knowledge.

Is Fmod used in AAA games?

Yes, FMOD is used across many levels of the industry. It is a widely adopted middleware solution known for event driven audio, parameter control and runtime flexibility, which makes it suitable for a range of projects. The important point is that both FMOD and other middleware tools are commonly chosen because they let audio teams work independently from programmers and designers once the integration layer is agreed.

For any project, pick the middleware that matches team skills and technical constraints, and focus on clear export and mapping workflows so your sounds behave predictably at runtime. The specific choice is less important than reliable integration and testing habits.

What is the best software to make music for games?

There is no single best software, because needs vary by project. Composers often use DAWs like Logic, Cubase, Reaper or Ableton Live for composition and production. The choice depends on your workflow preferences, instrument libraries, and how you plan to implement adaptive music. If you require interactive music systems, consider middleware or engines that support dynamic stems, or tools that export segmented stems ready for runtime layering.

Match the tool to your delivery needs. If you need to provide multiple stems, stems with tempo maps or cue markers, pick a DAW that makes exporting these elements quick and consistent. Practice delivering small, adaptive bundles early so integration into the engine is straightforward.

What software is used for sound design?

Sound designers use a mix of tools: a DAW for editing and mixing, middleware for event mapping and runtime behaviour, and specialised tools for synthesis or procedural audio. Common combinations include a DAW like Pro Tools, Reaper or Nuendo, plus middleware such as FMOD or Wwise for game integration. Specialist tools can speed up creative tasks, for example procedural generators or sculpting tools for whooshes, ambiences and creature sounds.

Choose tools that support rapid audition, batch export and predictable file outputs. Importantly, pair your creative tools with strong organisational practices so the assets you create are simple to map and optimise within the engine.

How-to guide
This is some text inside of a div block.

From Placeholder to Playable: Real-Time Sound Design Workflows That Supercharge Indie Game Development

This guide walks through a practical, indie-friendly workflow using Krotos Studio (plus optional Krotos tools) so the audio can move from placeholder to playable fast without sacrificing quality.

JJ Lyon
December 19, 2025
Read Story↗

From Placeholder to Playable: Real-Time Sound Design Workflows That Supercharge Indie Game Development

You can spend hours swapping placeholder sounds and still end up with something that feels… flat. The visuals are there. The gameplay is there. But the world doesn’t feel real.

That’s where real-time sound design helps. Instead of hunting through libraries, guessing, exporting, re-importing, then repeating the whole loop, real-time workflows let creators perform and shape sound on the fly. You hear what works immediately, commit what you like, and move on with momentum intact.

This guide walks through a practical, indie-friendly workflow using Krotos Studio (plus optional Krotos tools) so the audio can move from placeholder to playable fast without sacrificing quality.

TL; DR

  • Real-time sound design can reduce the “export / import / tweak / repeat” loop by letting creators audition and shape sound instantly.
  • Indie-friendly audio prototyping works best when sounds are performed in context, then committed as clean variations for implementation.
  • Krotos Studio supports fast sound creation and customisation, with drag-and-drop workflows into edit and DAW timelines in tools like Premiere Pro, DaVinci Resolve, and Pro Tools.
  • A simple “placeholder to playable” pipeline is: define intent → perform variations → commit/print → label cleanly → drop into the build → iterate.
  • Use real-time controls to create variation (intensity, size, speed, material) so sounds don’t feel copied-and-pasted.
  • Keep it production-ready by planning naming, loudness targets, and a repeatable “variation pack” approach for key SFX types.
  • If you need more extreme or specialised sound design (weapons, creatures, dynamic textures), Krotos’ wider toolset can extend the workflow.

What “real-time sound design” means in practice

In game audio, “real-time” gets used in a few ways. For an indie workflow, this guide focuses on the part that matters most day-to-day:

Real-time sound design is the ability to create, shape, and audition sound quickly while staying in flow, instead of constantly stopping to rebuild audio from scratch.

That means:

  • Performing and adjusting sound while you work
  • Getting immediate feedback in context (your scene, your cut, your gameplay capture)
  • Generating variations quickly so the world feels alive, not repetitive

If you want a deeper academic grounding on procedural or real-time approaches, check out the Audio Engineering Society (AES), the only professional society devoted exclusively to audio technology.

Why placeholders get stuck

Placeholders aren’t the enemy. They’re necessary. The problem is that placeholders tend to linger because audio iteration becomes a time sink.

Common reasons:

  • Sounds are chosen in isolation, then don’t fit in context
  • Every change requires exporting, importing, and re-testing
  • It’s hard to create enough variation, so repetition shows up fast
  • Audio polish gets left until the end… when there’s no time left

Real-time workflows solve this by making sound design feel like a creative pass you can do early and improve continuously.

The “Placeholder to Playable” workflow

This is a practical workflow you can reuse across projects. The goal is simple: build playable sound quickly, with enough quality and variation that it holds up in the game even before final polish.

Step 1: Define the sound’s job (not just what it is)

Before touching tools, answer:

  • What does the sound communicate? (feedback, weight, danger, humour, reward)
  • Where will it be heard? (quiet exploration, loud combat, UI-only, cutscene)
  • How often will it repeat? (once per minute vs 10 times per second)

This dictates how much variation you need and how “present” it should be.

Quick rule:

  • The more often it repeats, the more variation it needs.
  • The more it drives gameplay feedback, the clearer it needs to be.

Step 2: Build a “prototype palette”

Indie projects move fast, so set up a small, reusable palette of core SFX categories. Start with what the player hears most:

  • Footsteps / movement (walk, run, land)
  • UI feedback (hover, confirm, error)
  • Interactions (pick up, open, hit)
  • Impacts (light, medium, heavy)
  • Weapons / tools (if relevant)
  • Ambience beds (room tone, wind, distant life)

The point isn’t perfection. It’s giving yourself a base you can perform and refine quickly.

Krotos Studio is built for fast, real-time sound creation and customisation, which fits exactly this kind of “palette first” workflow.

Step 3: Perform variations in real time

This is where the workflow becomes a superpower.

Instead of choosing one sound and repeating it, perform a small set of variations immediately:

  • Soft / hard
  • Close / distant
  • Small / large
  • Slow / fast
  • Clean / gritty

A useful starting point is 5–12 variations per high-frequency sound (like footsteps or UI clicks) and around 3–6 variations for lower-frequency sounds.

Why this matters:

  • Variation is what makes audio feel “alive”
  • Variation prevents repetition fatigue
  • Variation is faster to create now than to patch later

Step 4: Commit the results

Once it feels right in context, commit it as real audio files:

  • Keep takes short and organised
  • Commit in small bundles (e.g. Footstep_Concrete_Walk_01–12)
  • Don’t over-edit at this stage, focus on “playable”

Think of this as your “alpha audio” pass:

  • Clean enough to ship internally
  • Varied enough to feel intentional
  • Lightweight enough to replace later if needed

If you want more detail on Krotos’ sound effects process for indie devs, check out our Indie Game Sound Effects Process

Step 5: Label like a professional

A simple naming structure prevents chaos:

Category_Context_Variation_Intensity_Number

Examples:

  • Footstep_Concrete_Walk_Med_01
  • UI_Confirm_Short_Light_03
  • Impact_Metal_Large_Hard_05

Also keep a consistent folder structure:

  • /SFX/Footsteps/
  • /SFX/UI/
  • /SFX/Impacts/
  • /AMB/Beds/
  • /AMB/OneShots/

This makes implementation faster, debugging easier, and outsourcing/hand-off less painful.

Step 6: Test in the build early and iterate with intention

Drop your “playable” set into the game and listen for:

  • Repetition (same sound too often)
  • Masking (SFX disappearing under music/ambience)
  • Frequency clutter (too many sounds fighting in the same range)
  • Level consistency (one sound jumping out unexpectedly)

Then iterate in small passes:

  • Add 3–5 more variations where repetition shows
  • Tighten envelopes where sounds feel slow
  • Rebalance levels in the category, not one file at a time

Where Krotos Studio fits in and how to use it without breaking flow

Krotos Studio is built around speed and creative control: create, customise, and audition sound quickly, then move the results straight into your timeline/work session without constant friction.

A practical approach is to treat Krotos Studio as your “sound sketchbook”:

  • Use it to generate and shape ideas fast
  • Build variation packs for high-frequency SFX
  • Commit what works
  • Keep moving

If you’re wearing multiple hats (dev, editor, trailer-maker), that speed matters. It’s the difference between “audio later” and “audio happening now.”

Mini playbooks & quick examples you can copy

Example 1: Footsteps that don’t repeat

  1. Pick the surface (concrete/wood/grass)
  2. Perform 8–12 variations (light/medium/hard)
  3. Keep transients crisp (footsteps should read instantly)
  4. Export as a named pack
  5. In-engine, randomise + slightly vary pitch/volume (subtle)

Result: footsteps that feel natural without sounding like a loop.

Example 2: UI sounds that feel satisfying (not noisy)

  1. Decide emotional intent (friendly, sharp, premium, playful)
  2. Build 3 micro-layers: tick + tone + subtle tail
  3. Perform 5–8 variations (short/medium, bright/dark)
  4. Keep them short so they don’t clutter
  5. Test against real UI cadence (menus, settings, inventory)

Result: UI that feels responsive and polished.

Example 3: Impacts with weight (fast)

  1. Define the object (metal/wood/stone)
  2. Perform 6 variations: light/medium/heavy
  3. Add a controlled low-end “thump” for weight (but don’t overdo it)
  4. Make sure each hit has a distinct transient
  5. Test in context with animation timing

Result: impacts that sell gameplay physics even in early builds.

When to bring in specialist tools

Sometimes you need audio that goes beyond the basics: creatures, weapons, signature “hero” moments, or evolving textures.

That’s when specialised toolsets can help extend your workflow, depending on what you’re building:

  • Creature and character vocal processing (e.g. Dehumaniser for creature and monster voices)
  • Weapon design and layered sound effect systems (e.g. Weaponiser for designing and performing SFX in real time)
  • Realistic Foley performance inside a DAW workflow (e.g. Reformer Pro for performing Foley within your DAW)

A quick “indie reality check” for a sustainable workflow

To keep audio playable without burning time:

  • Aim for “90% playable” early, then refine later
  • Prioritise the top 20% of sounds players hear 80% of the time
  • Build variation packs first, micro-edits second
  • Test in the game often (context reveals problems instantly)

Polish is important. But playable audio early is what makes polish possible later.

FAQs

What is real-time sound design for games?

Real-time sound design is an approach where sound effects are created, shaped, and auditioned quickly while staying in flow (often by performing variations and tweaking parameters live), rather than relying on slow export/import cycles. The goal is faster iteration and better “in-context” decision-making during development.

Is real-time sound design the same as procedural audio?

Not exactly. Procedural audio usually means sound generated or shaped by rules/algorithms (often at runtime). Real-time sound design can include procedural approaches, but in many production workflows it also refers to performable tools that let creators audition, customise, and commit variations rapidly during sound creation.

How many variations should each sound effect have?

It depends on how often the sound repeats:

  • High-frequency sounds (footsteps, UI clicks) often benefit from around 5–12 variations
  • Medium-frequency sounds (impacts, interactions) often work well with around 3–6 variations

The more often a sound repeats, the more variation it needs to avoid fatigue.

Why do placeholder sounds make a game feel “flat”?

Placeholders are often generic, repeated, and not designed around the game’s pacing or visuals. When the same few sounds repeat, the world loses realism and gameplay feedback feels less satisfying.

How does Krotos Studio help speed up sound design?

Krotos Studio is designed to support fast sound creation and customisation, with real-time auditioning and quick variation-building so sound effects can move from early prototypes to playable assets without constant tool-switching.

What’s the fastest workflow to go from placeholder to playable?

A practical “placeholder to playable” workflow is:

  1. define the sound’s job in gameplay
  2. perform and audition variations in context
  3. commit/print the results as clean files
  4. label consistently and drop into the build
  5. test in-game and add variation where repetition shows up

Can real-time workflows still produce “shipping quality” audio?

Yes—especially when the workflow includes a clean commit step, consistent naming, and regular in-build testing. Many teams start with “playable” sets and progressively refine hero sounds and high-visibility moments as development continues.

Where can indie developers learn more about Krotos workflows?

Krotos has an indie-focused sound effects workflow walkthrough for indie developers. Check it out here: https://www.krotosaudio.com/indie-game-sound-effects-process/.

Don’t let audio be the last-minute scramble

Real-time workflows turn sound design into something you can do alongside development, not after it. The biggest win isn’t just speed, it’s consistency. 

When audio evolves with the project, the game feels cohesive long before launch.

Further reading

How-to guide
This is some text inside of a div block.

How to improve your DaVinci Resolve sound effects workflow

Video Creator, Editor and Filmmaker Sebastian Friedrich reveals why Krotos Studio will change sound design for his content, forever.

JJ Lyon
December 19, 2025
Read Story↗
"Searching hours on end for the perfect-fitting sound effect for your edit is over!" - Sebastian Friedrich

Sebastian Friedrich is a Video Creator, Editor and Filmmaker. Below, he reveals why Krotos Studio will change sound design for his content, forever.

Sebastian highlights why he uses Krotos Studio for sound effects when creating content.

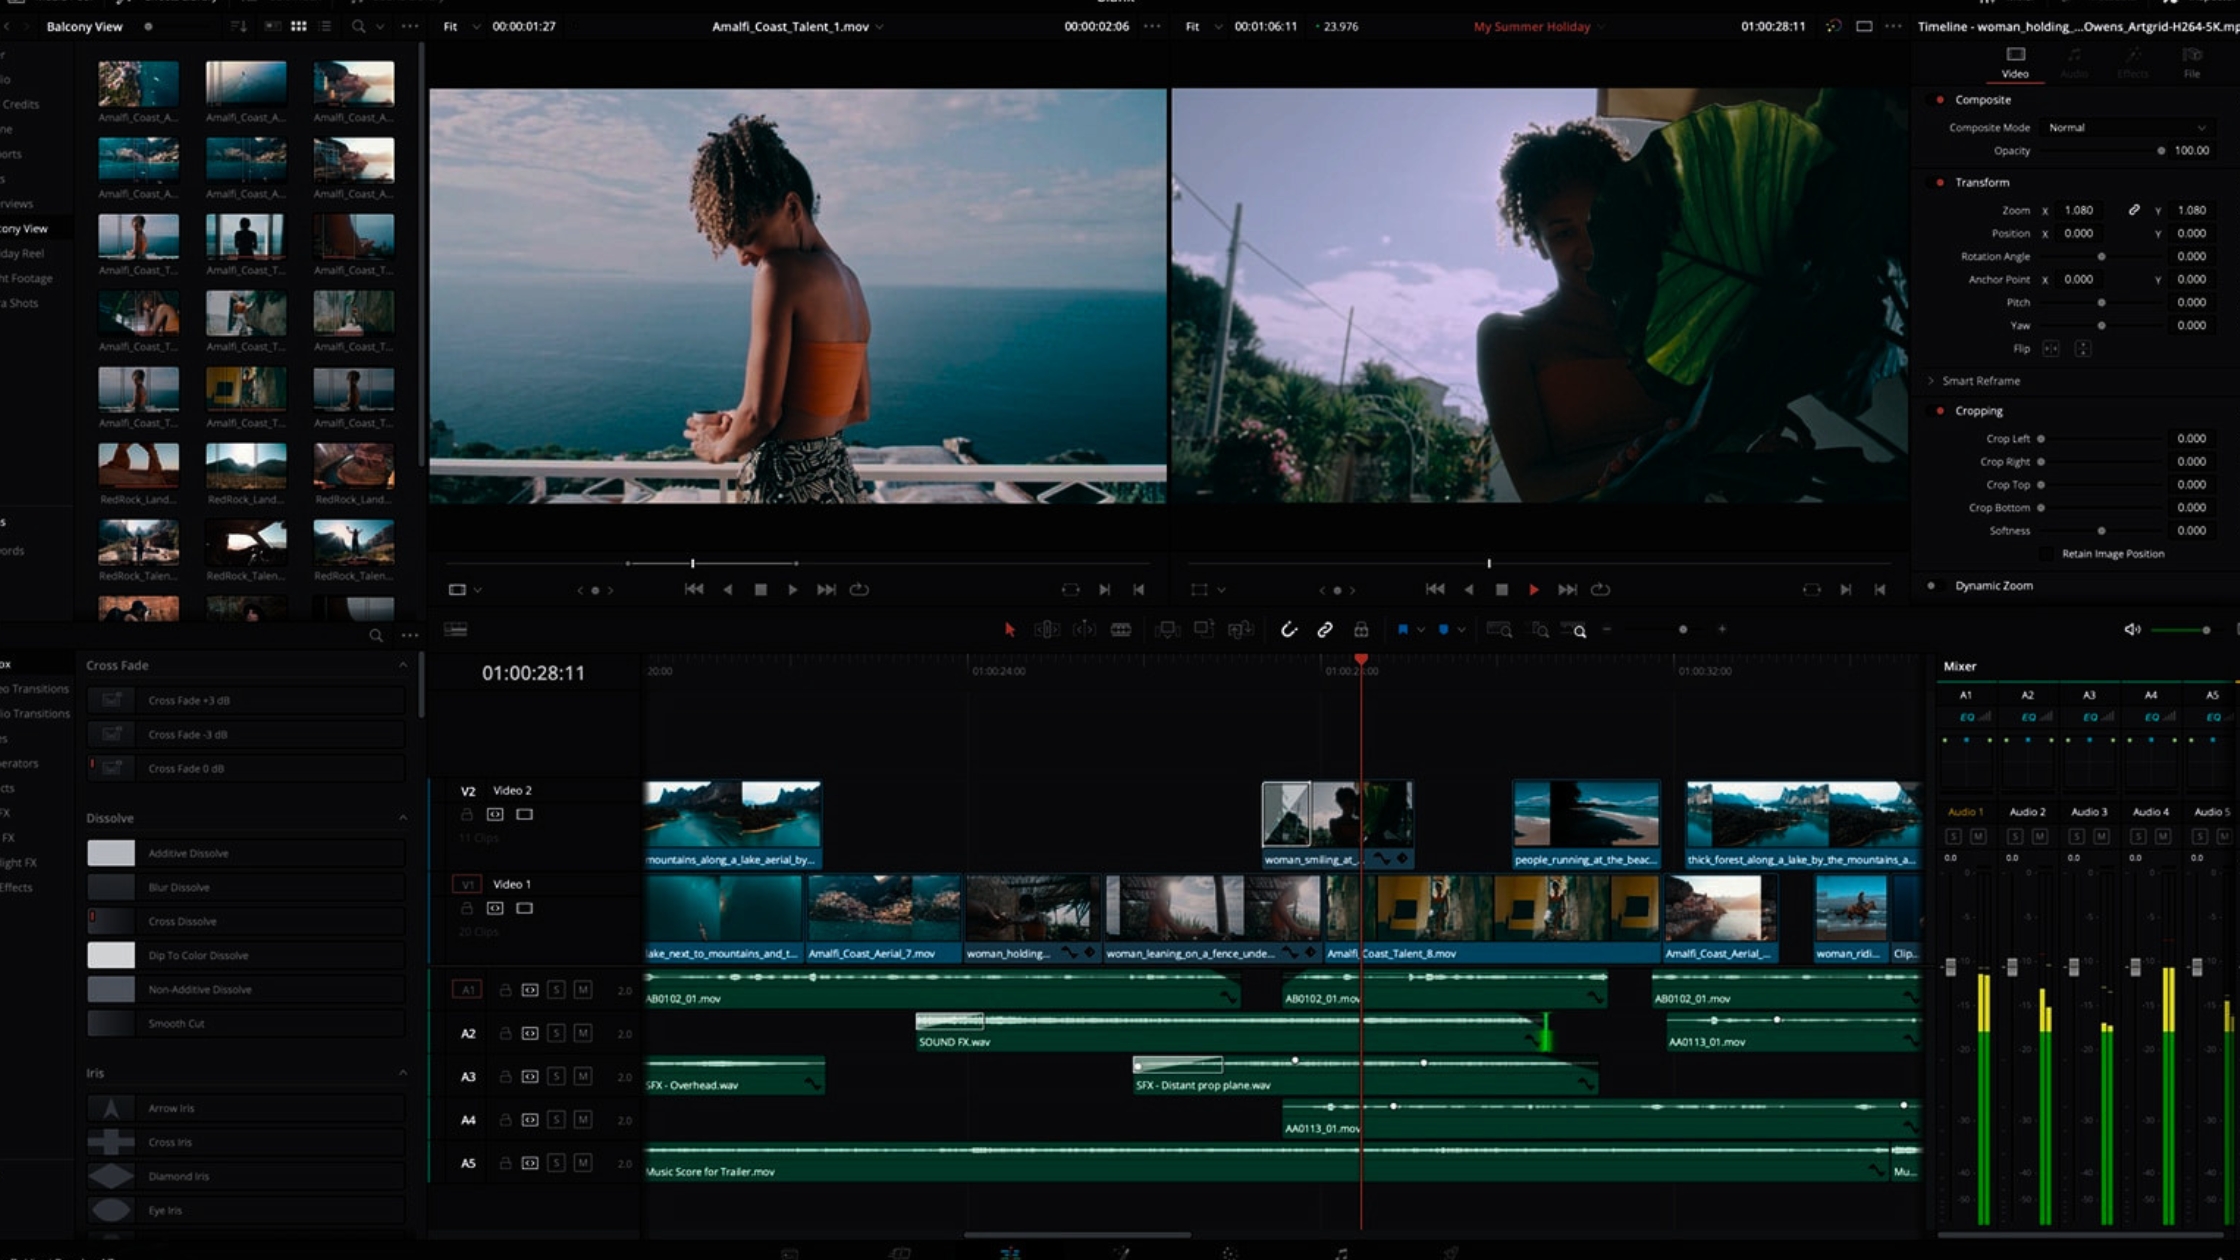
"This is a standalone software that perfectly integrates into your DaVinci Resolve workflow. It lets you watch back your video in real-time while you create the sound effects of the scene you're working on.

Then, after you've designed the sound effect, it lets you drag and drop from Krotos Studio onto your timeline".

Check out Sebastian's YouTube Channel for more DaVinci Content.

For a more comprehensive reference on your NLE, check out How to Do Anything with Audio in DaVinci Resolve. You can also find more efficient tools with our guide to the Best Sound Design Software for Filmmakers on a Budget. You can also explore a wide range of assets in our free sound effects library.

How-to guide
This is some text inside of a div block.

How to Do Anything with Audio in DaVinci Resolve

It’s not just a pro-level video editing suite! Resolve also shines in the audio department, and here we’re going to be exploring its audio capabilities

JJ Lyon
December 19, 2025
Read Story↗

It’s not just a pro-level video editing suite! Resolve also shines in the audio department, and here we’re going to be exploring its audio capabilities

Blackmagic Design’s DaVinci Resolve stands out from other video editing applications, not only because of its stellar video editing capabilities but also thanks to its advanced Fairlight audio editing workstation.

As opposed to other NLEs, in which audio capabilities can be seen as secondary or even an afterthought, Fairlight is practically an internal DAW (Digital Audio Workstation) within DaVinci Resolve that allows for professional audio engineering within the media suite.

Fairlight’s capabilities let it perform tasks that you’d probably have to do externally with most other video editors to get the same results. For instance, Adobe’s Premiere Pro – although it allows for some internal audio processing – relies on Adobe Audition as a standalone, external DAW.

Let’s jump into DaVinci Resolve together and walk through some of its audio features and potential uses.

Adding audio tracks in DaVinci Resolve

First, you’ll need to import some media into the Media pool by right-clicking anywhere in the Media Pool panel and selecting Import Media (or pressing Ctrl-I). Then, you’ll need to select some audio files to import into your project, and finally, drag and drop one of them onto your timeline.

You can add a new audio track from the Edit page by right-clicking one of your existing tracks and selecting Add New Track. If you’re aiming for ambient sound design, sound effects, or music, you’ll want to ensure you choose a stereo or 5.1 surround sound track.

If you’re planning on working with dialogue, you’ll most often want to opt for a mono track, as is most commonplace for any type of vocal within an audio mix. Mono is usually best for vocal tracks because it keeps the vocal centred and clear, avoiding amplifying any unwanted background noise across the stereo field.

Adjusting audio levels in DaVinci Resolve

If you want to increase or decrease the volume of a specified audio track in DaVinci Resolve, you can adjust the volume slider from the mixer panel in the bottom right of the screen. Each mixer channel will be named after its corresponding track on the timeline. Alternatively, if you want to alter the volume of a single clip, you can select the clip, and change its volume from the Inspector window (open the Inspector window by clicking the tab at the top right of the screen).

You can also gain access to the audio mixer in the Fairlight editor page (by clicking the music icon in the bottom toolbar), where you’ll also have more audio editing capabilities.

Separating audio from video in DaVinci Resolve

When a video (with audio attached) is imported into DaVinci Resolve, it will be linked to its corresponding audio clip by default. In order to detach the audio, click on the chain link icon in the toolbar (next to the magnet). Alternatively, you can press Ctrl-Shift-L to ‘link/unlink’ audio and video on a selected clip

Recording Audio in DaVinci Resolve

To set up recording (from a microphone) in your project, head over to the Fairlight editor, and add a new mono track. Then, from the mixer panel, simply click the No Input dropdown field and select Input. You’ll be met with a Patch Input/Output panel. On the left-hand side of the panel, you can select your input source, and on the right-hand side, you can select the desired track.

The default settings should suffice, but if you have advanced signal routing, you may need to make adjustments. Once your input and track are selected, you can hit the Patch button to assign your settings. Now, you can arm your recording track by clicking the track’s R button (next to the Solo and Mute buttons), and you’ll be recording once playback begins.

Zooming in and out in DaVinci Resolve

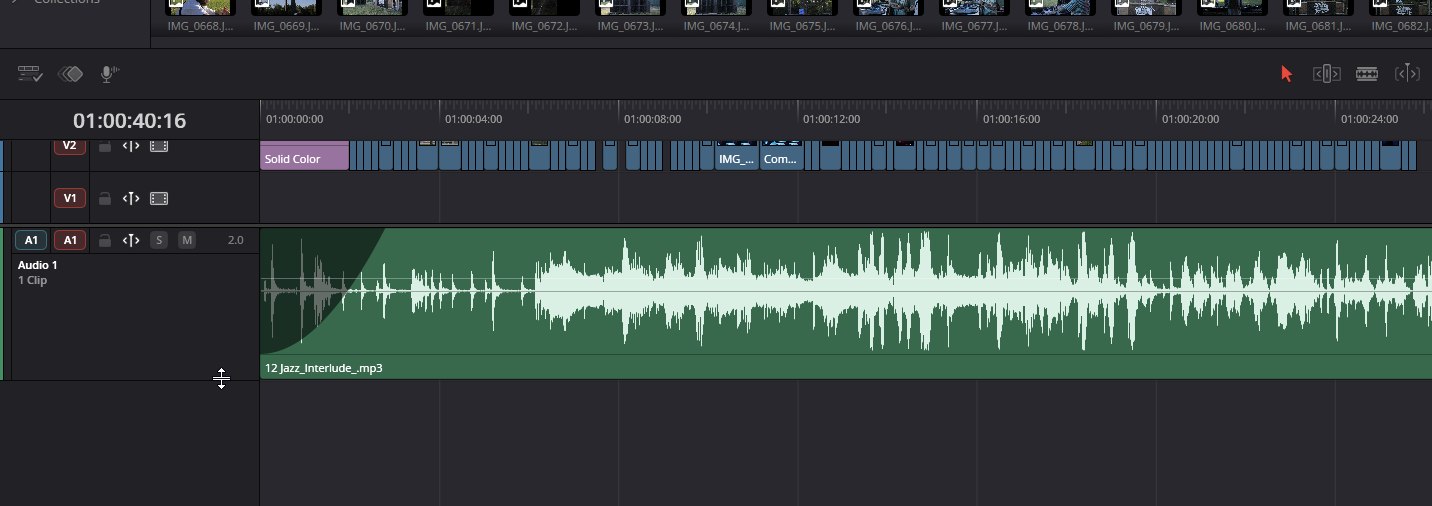
If you want to get a more detailed look at your audio waveforms, you can click the Track Display Options button in the top-left of the Timeline toolbar, enabling the Full Waveform and Waveforms Borders views. You can then zoom in and out of the waveform on the timeline by holding your Alt key and scrolling with the mouse scroll wheel.

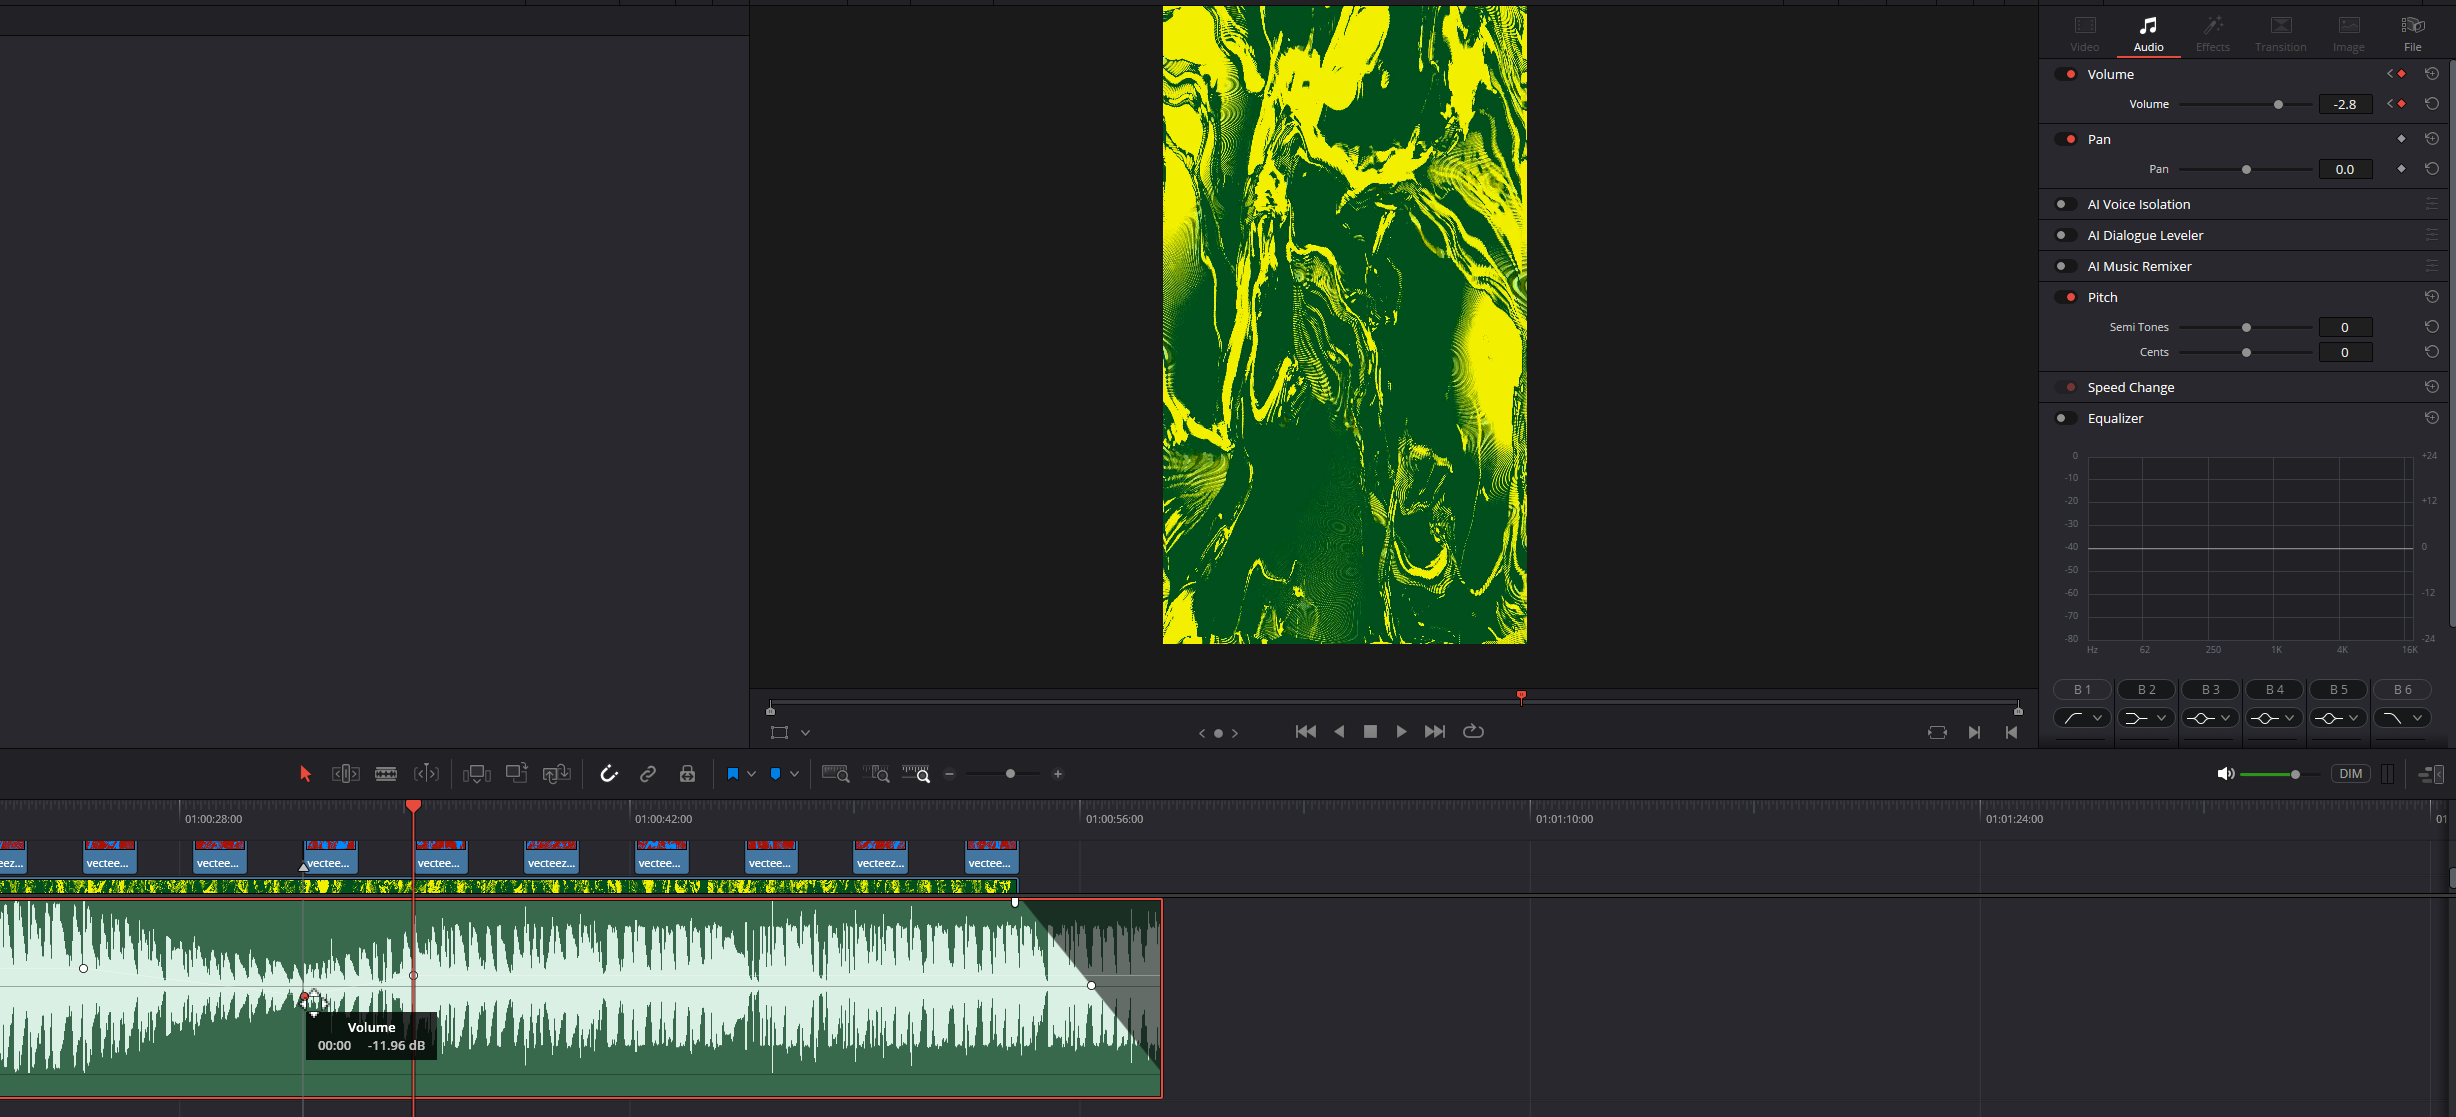
From the Track Display Options, you can also enable the Gain Line view, which will give you further control over your audio’s volume by adding a changeable gain line to each audio clip, which you can interact with by clicking and dragging up or down. This is useful if you want to adjust the volume of an individual clip, rather than affecting the entire audio track.

You can also expand a track’s width to get a better view of its contents by clicking and dragging its border in the left-hand side column of the Timeline.

Adding audio keyframes in DaVinci Resolve

Adding keyframes to your audio can be a great way to automate various parameters across time during playback.

Let’s say you want to automate your volume using keyframes. First, set your Playhead on the Timeline where you want your first keyframe to be. Then, select your clip and navigate to the Inspector panel. From the Inspector panel, you can click the Keyframe button to the right of your volume controls. This will add a keyframe in the current Playhead point on your Timeline.

From there, reset your playhead to the point where you want your automation to stop, place another keyframe, and adjust the volume to the newly desired value. You’ll notice that the audio will now gradually change over time from your first keyframe’s location, to the second keyframe’s location.

Using Krotos Studio in DaVinci Resolve

You can use Krotos Studio directly within DaVinci resolve as a plugin. This allows you to record audio directly to the timeline in the Fairlight tab, or dragging and dropping Stereo WAV files into your project. See more about this is in our video below:

Fading in and out in DaVinci Resolve

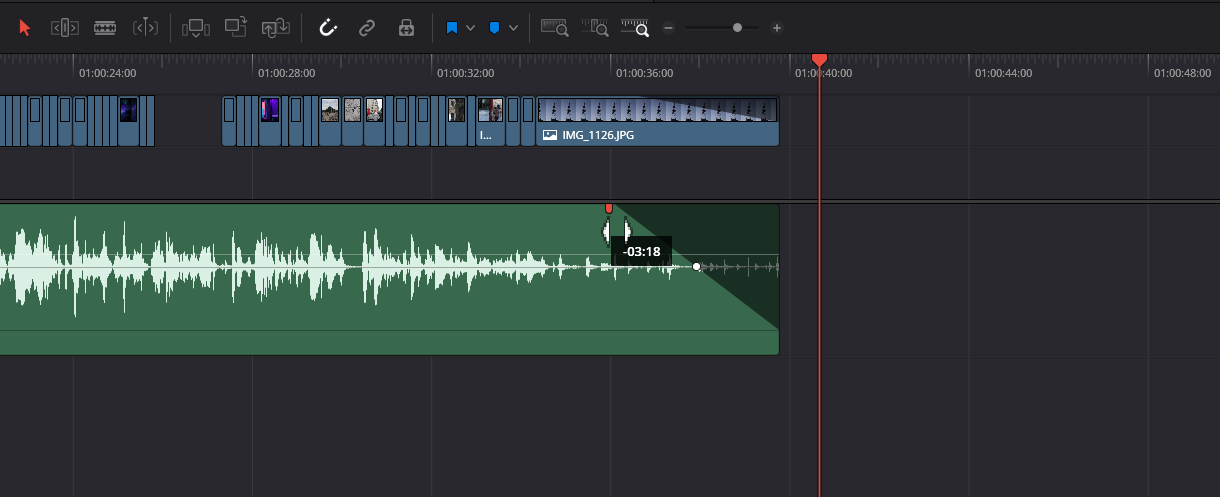
In DaVinci Resolve, there are two ways to add fades (in or out) to your audio clip. The first method is to set your Playhead on the desired start/end point of your safe in/out, select the audio clip, and then, using the Trim drop-down menu, select Fade In to Playhead or Fade Out to Playhead. You can also hit Alt-Shift-D (for fade in) or Alt-Shift-G (for fade out).

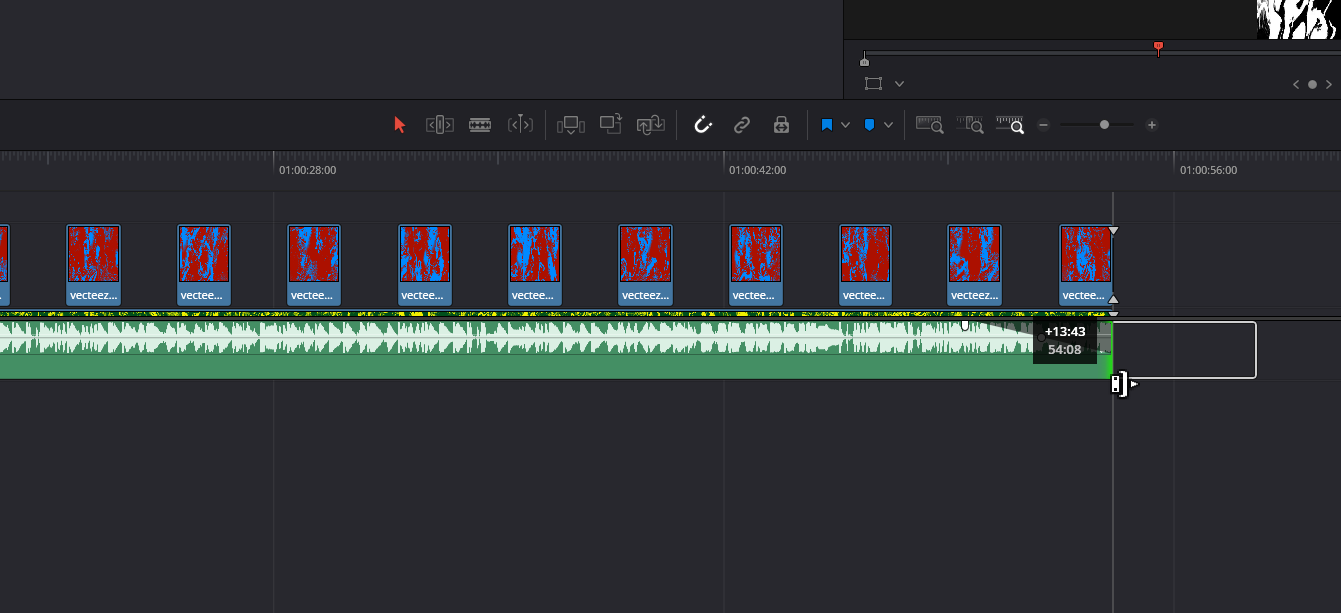
Alternatively, and perhaps more efficiently, you can click and drag the white markers at the top corners (left or right) of your audio clip to manually set your fade in/out times.

Crossfading in DaVinci Resolve

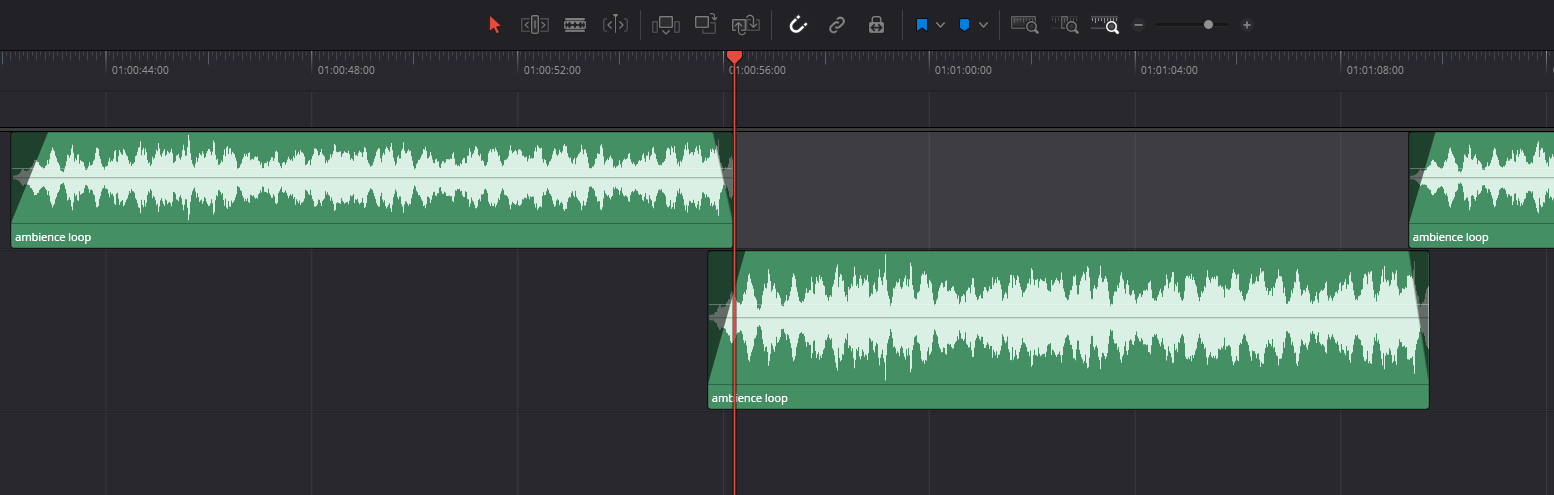
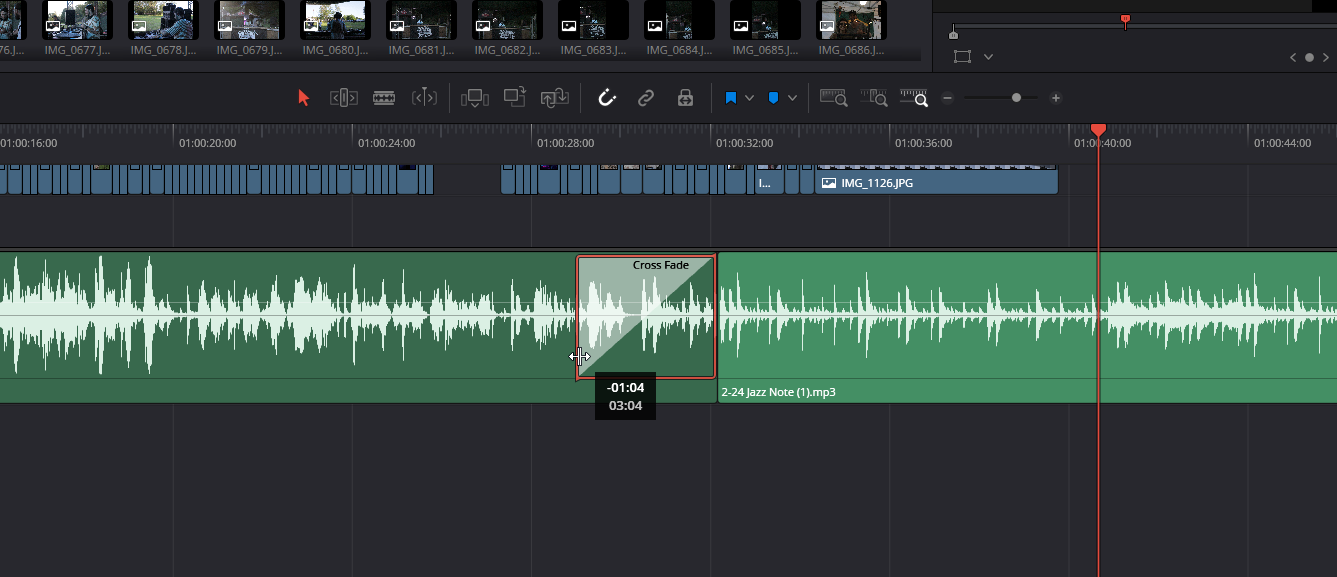
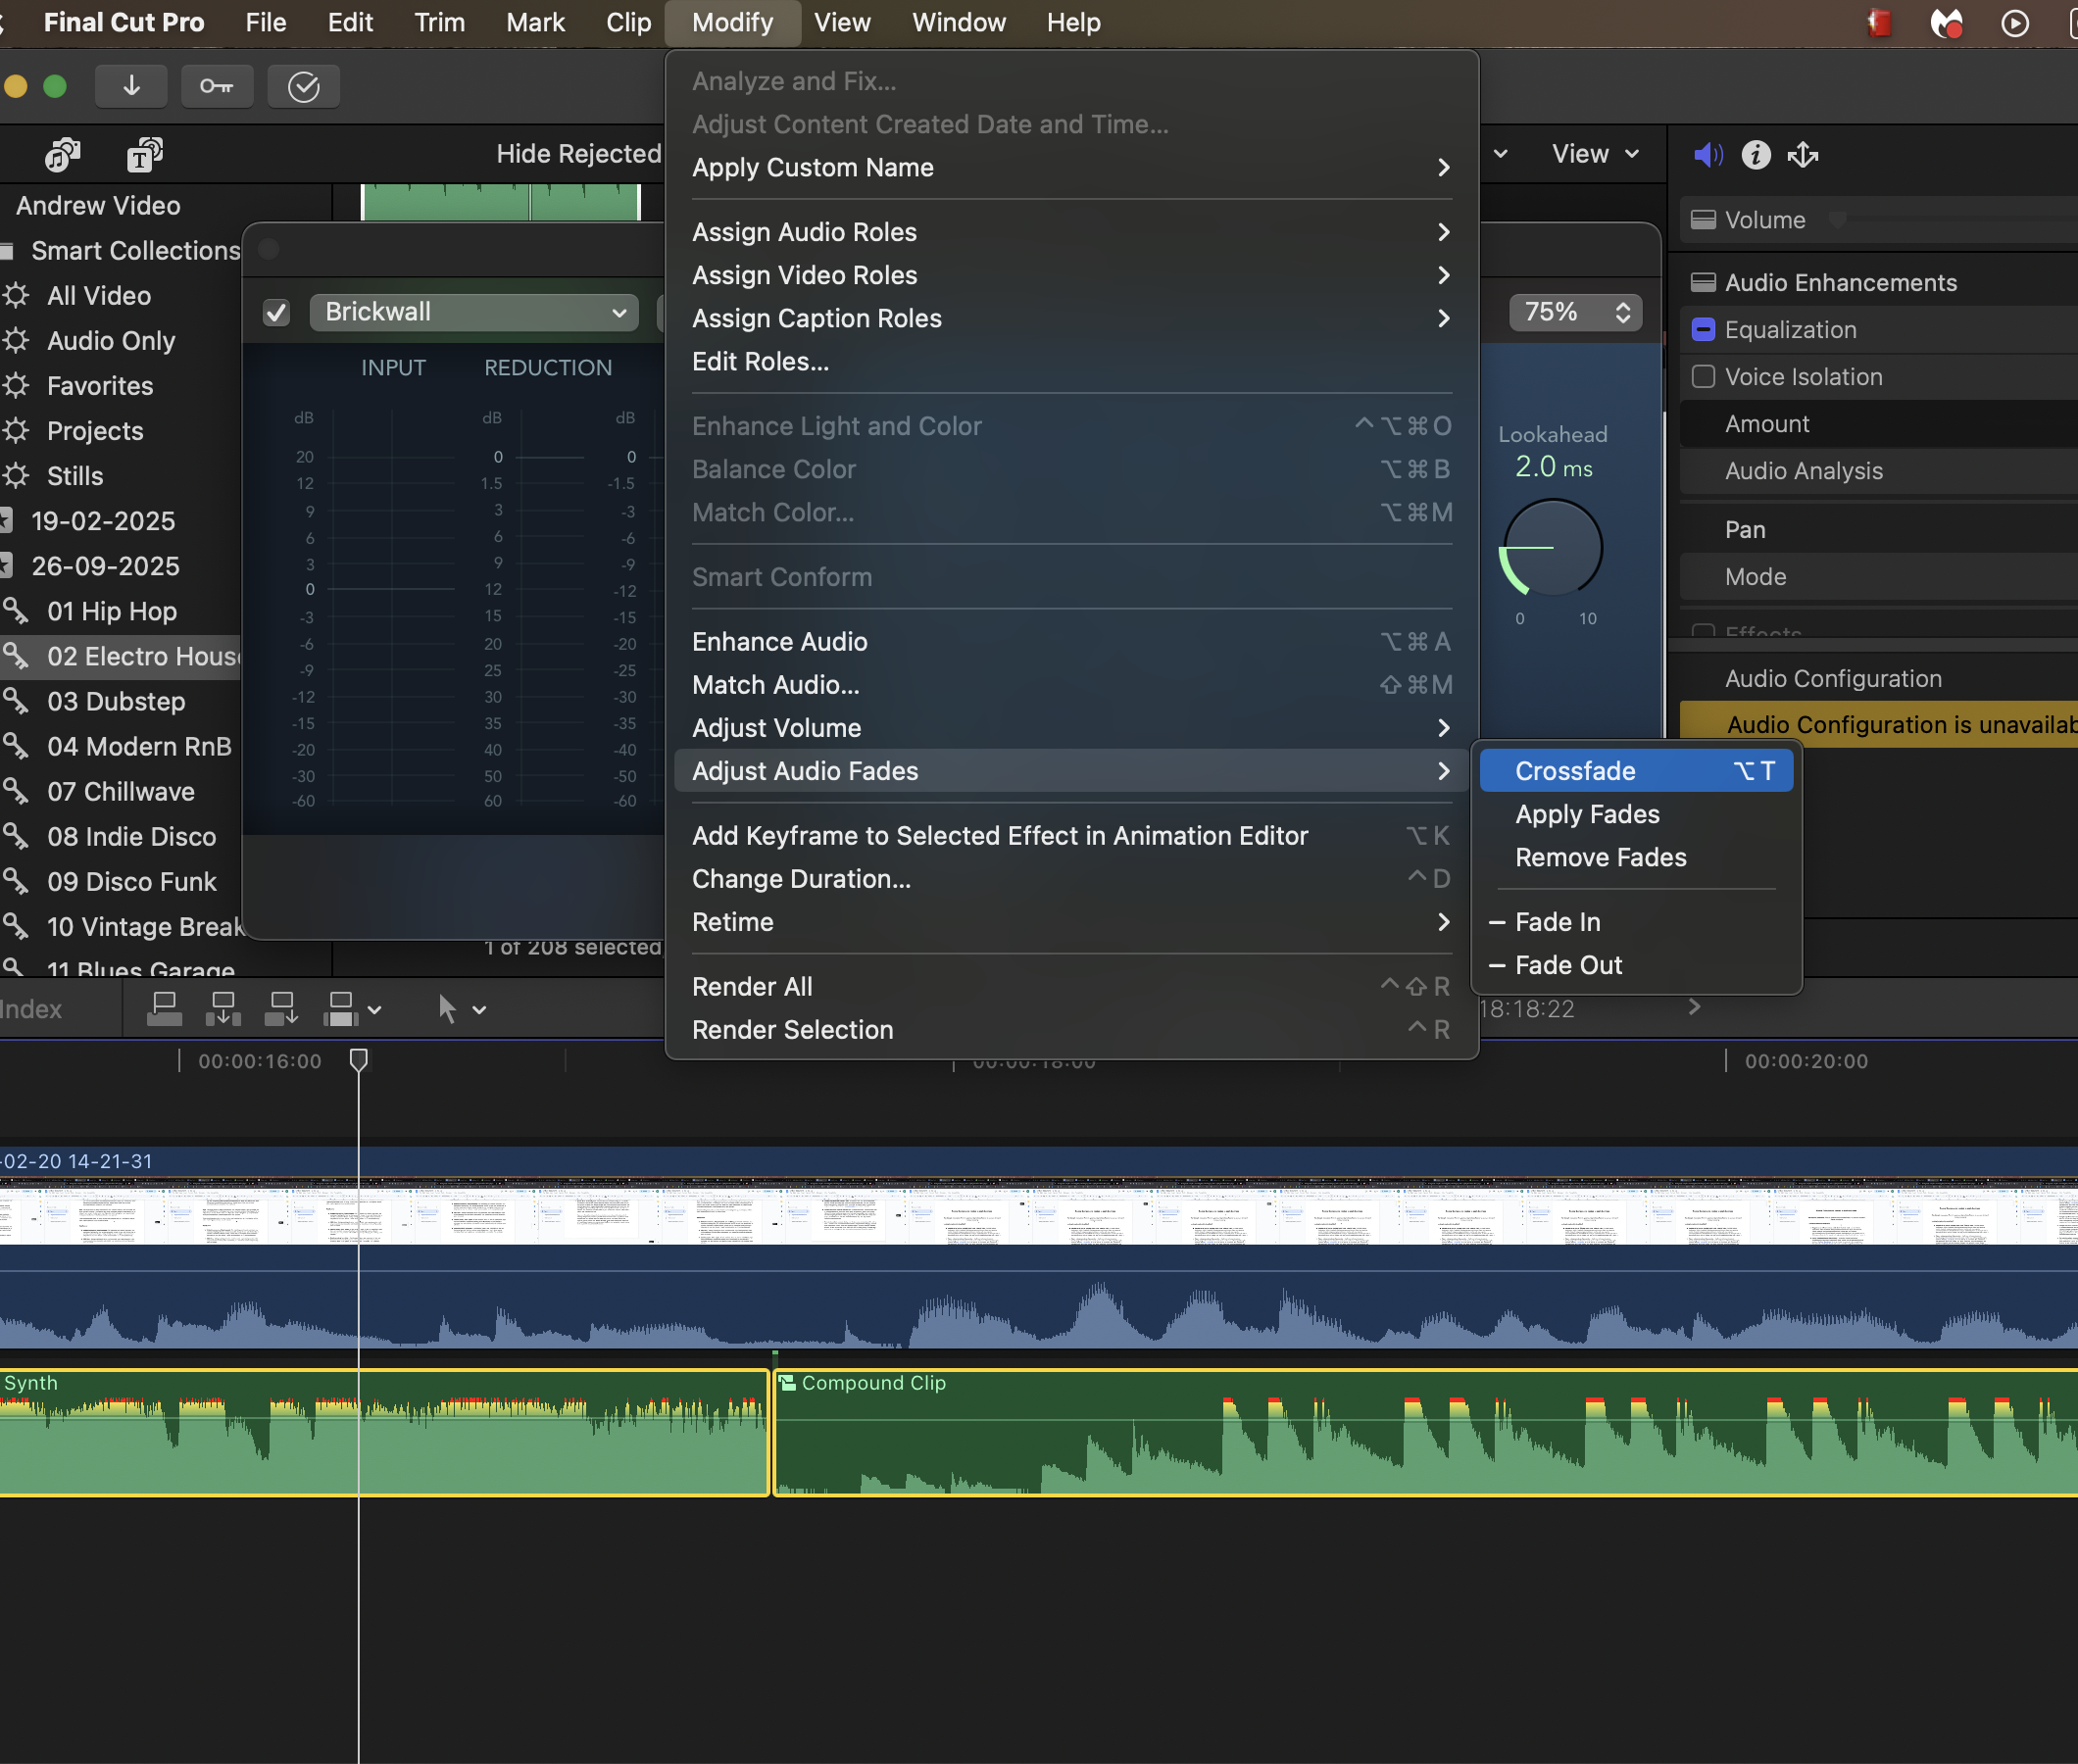
To add a crossfade between two audio clips in DaVinci Resolve, simply ensure both clips are placed exactly adjacent to one another and use the Trim Edit Mode (press T to select, or click the Trim Edit Mode toolbar icon) cursor to select the break point between both clips. Then, from the Timeline drop-down menu, select Add Audio Only Transition (or press Shift-T).

You’ll then be asked if you want to Trim Clips or Skip Clips through a pop-up Add Transitions window. You can go ahead and select Trim Clips to allow the software to automatically adjust the clips accordingly.

You can then shorten the length of your crossfade by clicking and dragging the borders inward. If you’d like to extend your default crossfade transition length, you can navigate to the DaVinci Resolve drop-down menu, and select Preferences… (or press Ctrl-,). Then open the Editing settings from the User tab and change the Standard transition duration field, to your newly desired default transition length.

EQing audio in DaVinci Resolve

To EQ an audio track in DaVinci Resolve, head over to the Fairlight editor, and double-click on the EQ graph inside of the desired track’s mixer strip. You’ll then be met with the program’s stock equaliser, which you can adjust to your liking. Just make sure the EQ’s turned on, using the top-left switch first.

If you want to add a low-cut filter to remove the bass frequencies from your audio, simply enable Band 1 by toggling the Band 1 button, and adjust the Frequency knob as you see fit.

Compressing audio in DaVinci Resolve

To explore the compression controls inside DaVinci Resolve, open up the Dynamics panel by double-clicking the Dynamics graph on the desired track’s mixer strip. You can then enable the Expander, Gate, Compressor, and/or Limiter within the window.

https://www.youtube.com/watch?v=LGqDVhww-hs

To apply some basic compression, let's enable the Compressor by toggling the switch, lowering our Threshold to around -20dB, setting the Ratio to 3.0:1, and adjusting the Make Up gain by 3.0dB. You can see how the audio is being affected using the visual matrix. If you’re not a trained audio engineer, don’t worry, these controls might be a bit alien to you. You can check out the above video for a quick explanation of how compression works.

Spatializing audio in DaVinci Resolve

Making changes to the stereo field inside DaVinci Resolves follow the same steps as the previous two sections about EQ and compression. Double-click the Pan graph on the desired mixer strip.

You can then click-drag the blue dot on the graph to pan your audio from left to right in the stereo field, or you click-drag the green dots to bring your audio closer/further away. Additionally, make changes to the Spread knob to narrow/widen your audio in the stereo field.

Adding external effects in DaVinci Resolve

Finally, DaVinci Resolve allows for the use of third-party plugins in your audio’s processing effects chain. Head back into your Preferences settings and navigate to the Audio Plugins section under the System tab. From there, you can add or remove file directories for the software to scan for any third-party plugins you’ve installed. Once scanned, you enable/disable your plugins using the Available Plugins list.

Once you’ve scanned and enabled your plugins, you’ll be able to add them to any mixer strip’s effects chain by clicking on the Effects dropdown menu and selecting them.

How-to guide
This is some text inside of a div block.

Supercharged Sound: Enhancing Your Edits With Adobe Audition

Discover how Adobe Audition can elevate your content creation workflow. Master audio editing, sound design, and multitrack mixing for professional results.

JJ Lyon
December 19, 2025
Read Story↗

As a content creator, you are going to want to make the most of all of your tools to make the highest quality edits you can and stand out from other editors in a sea of TikTok and reels content. We’re going to show you what can be achieved when you use Adobe Audition as part of your Adobe workflow.

To explore even more, try out the advanced features in Krotos Studio MAX, check out our free sound effects library.

Adobe Creative Cloud

Adobe Creative Cloud comes with many incredible tools. No doubt you are making the most of Photoshop, Premiere Pro and After Effects for your edits. As a visual creative, you’re probably familiar with Illustrator and Lightroom too!

One tool that you may have not explored though, is Adobe Audition; the Digital Audio Workstation that also is included with your Creative Cloud subscription.

All About Adobe Audition

Adobe Audition is a powerful digital audio workstation (DAW) from Adobe Systems. It is designed for audio editing, mixing, restoration, and effects. Here's a breakdown of what Adobe Audition offers and how it can be a valuable tool for a content creator like yourself

Sound Design

Adobe Audition lets you have full control over audio in your edits. Import your video, voice over recordings and music, and get to work adding in whooshes, pings, transitions, impacts, and more to add a professional and engaging touch to your edits.

Audio Editing

Adobe Audition provides comprehensive tools for high-precision audio editing. You can cut, splice, and manipulate audio clips with ease, making it ideal for fine-tuning dialogue, adjusting timing, and more. Add fades, reverse sound files, chop them up, delete parts you don’t need, and much more.

Multitrack Mixing

Once edited, you can mix your edits to perfection. Adobe Audition allows you to work with multiple audio tracks simultaneously, which is great for complex projects involving layered sound effects, background music, and dialogue. The multitrack environment is versatile for mixing and arranging audio elements precisely. Use the mixer window and make music quieter and dialogue louder. remove rumbling frequencies, place sounds in the left speaker or the right speaker individually and more.

Audio Restoration

Audition includes various tools that help clean up recordings by removing noise, hiss, hum, or other unwanted background sounds. This is particularly useful for improving the quality of location recordings or older audio files. So if you have some poort quality dialogue that was recorded on location, by a roadside or with a passing plane overhead, you can remove some of these intrusive sounds and save that all-important take.

Sound Effects

You can apply a wide range of built-in effects to your audio, such as reverb, delay, EQ, compression, and many more. Audition also supports third-party VST plugins, expanding your capability to add unique sound effects to your projects. The opportunities to add effects to your edits is down to your imagination!

ALT

Integration with Other Adobe Products

If you're already using Premiere Pro, After Effects, and Photoshop, Audition integrates seamlessly with these applications. This integration allows for smooth workflow transitions, such as sending audio from Premiere Pro to Audition for detailed editing and then back again without any hassle. This provides a super smooth workflow

Podcast and Voiceover Production

Audition is also a popular choice for podcasters and voice-over artists, thanks to its user-friendly interface and robust editing tools that make it easy to produce professional-quality audio. Control the volume of voice recordings, add in sound effects and music, and much more across numerous tracks, with ease.

Spectral Frequency Display

This feature provides a detailed visual representation of the sound, allowing you to see and edit specific frequencies more accurately. It's especially useful for forensic audio work like isolating spoken words obscured by background noise.

Adobe Audition is a versatile tool that can handle just about any audio task you throw at it, making it a valuable addition to your content creation toolkit, especially if you're looking to produce high-quality audio content alongside your visual projects.

Enhance Your Content by Pushing Your Sound To The Next Level

Now you have seen what can be achieved in Adobe Audition, why not give it a try? Explore plugins and effects and tools, and create incredible audio to push your edits to a professional level.

See how we made a sound design in Adobe Audition using our flagship sound design platform, Krotos Studio

Watch it Here

How-to guide
This is some text inside of a div block.

Working with Sound Effects in Premiere Pro

Discover how you can confidently work with audio in Adobe’s professional video editing software, and elevate your project’s sound

James Russell
October 17, 2025
Read Story↗

Adobe Premiere Pro is a powerful video editing platform with tools capable of handling everything from quick social edits to complex film and broadcast projects. This guide focuses specifically on working with sound effects and audio clips inside Premiere Pro, helping you get comfortable with everyday audio editing tasks quickly and efficiently.

By the end of this article, you should feel much more confident working with sound effects and audio clips in Premiere Pro. We’ll cover core actions like moving, muting, trimming, and replacing audio clips, as well as more advanced techniques such as automation, looping, reversing audio, and adding fades and crossfades.

If you’re still building your sound library, our free sound effects collection is a great place to start, along with our guide on downloading and using sound effects in your projects.

Basic Audio Clip Editing in Adobe Premiere Pro

How to Move Audio Clips in Adobe Premiere Pro

Moving audio clips in Adobe Premiere Pro couldn’t be simpler, and you’ll likely do it constantly during any edit. Select the audio clip in the timeline using the Selection tool (V), then drag it left or right to reposition it against your video. You can also drag it vertically to place it on a different audio track if your timeline becomes busy.

For more precise placement, you can toggle snapping on or off using the S key. With snapping disabled, clips move freely without locking to edit points or the playhead.

Top Tip:

If you’re only trying to reposition a clip slightly, turning snapping off can help avoid accidental jumps to nearby edits.

How to Mute Audio Clips in Adobe Premiere Pro

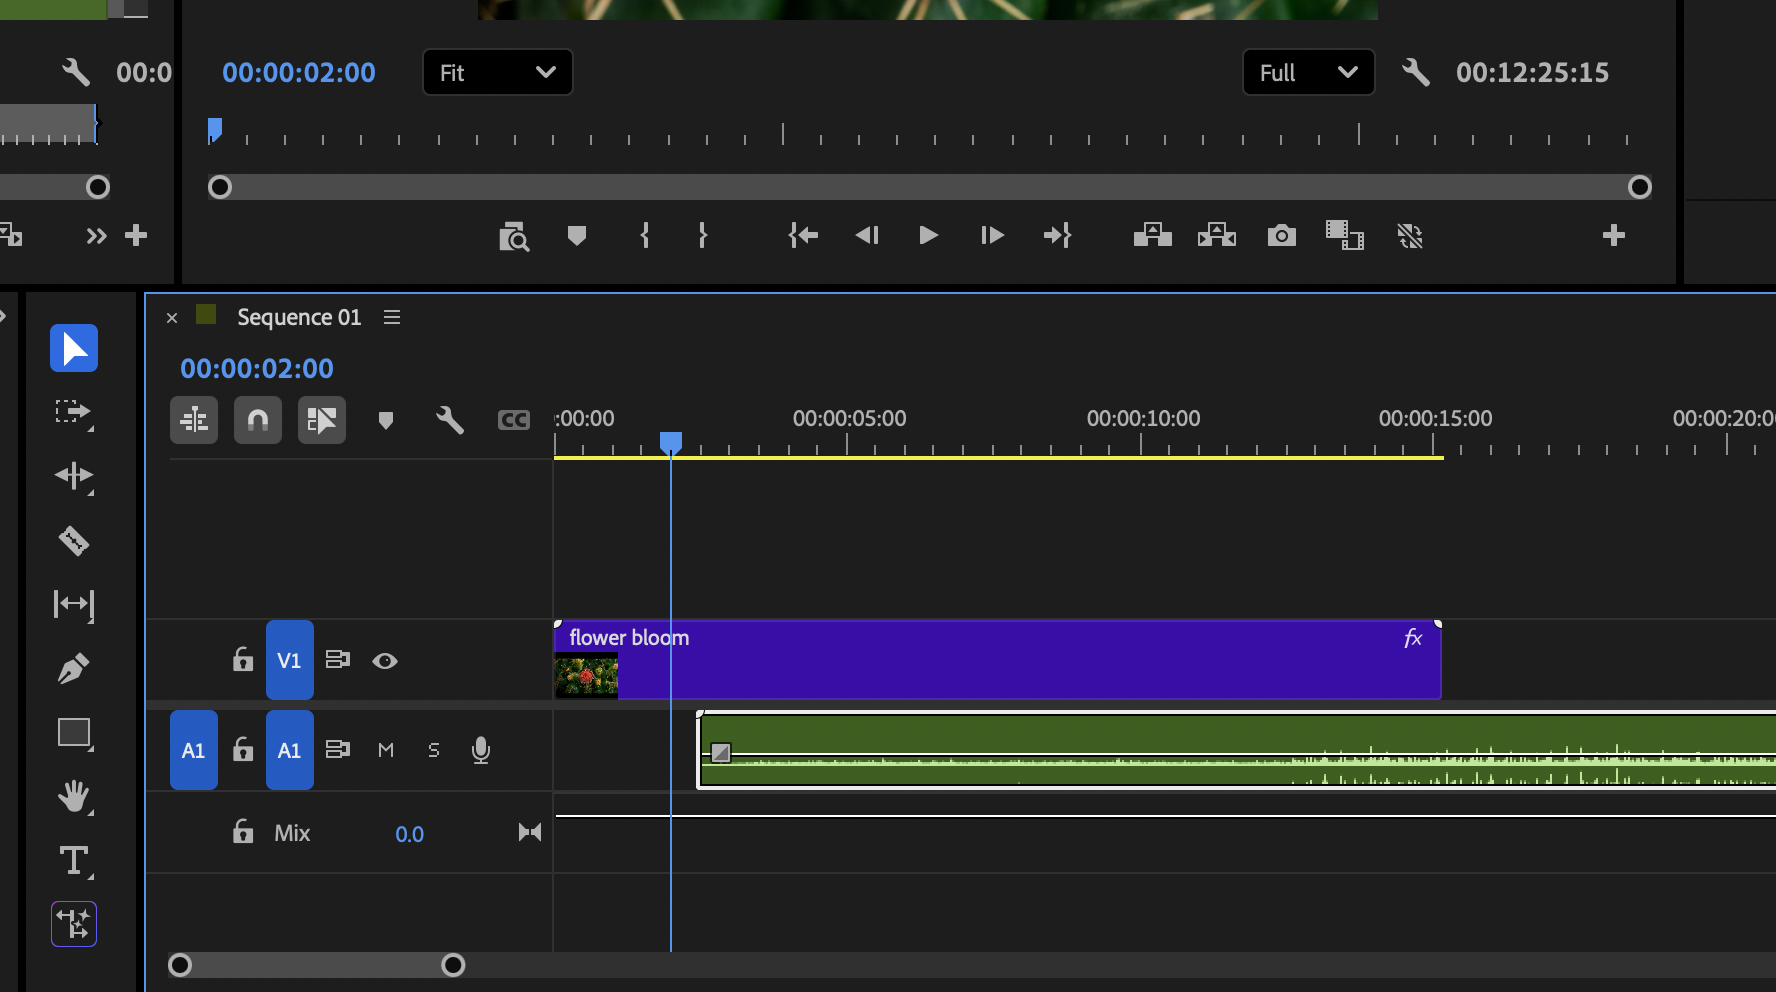
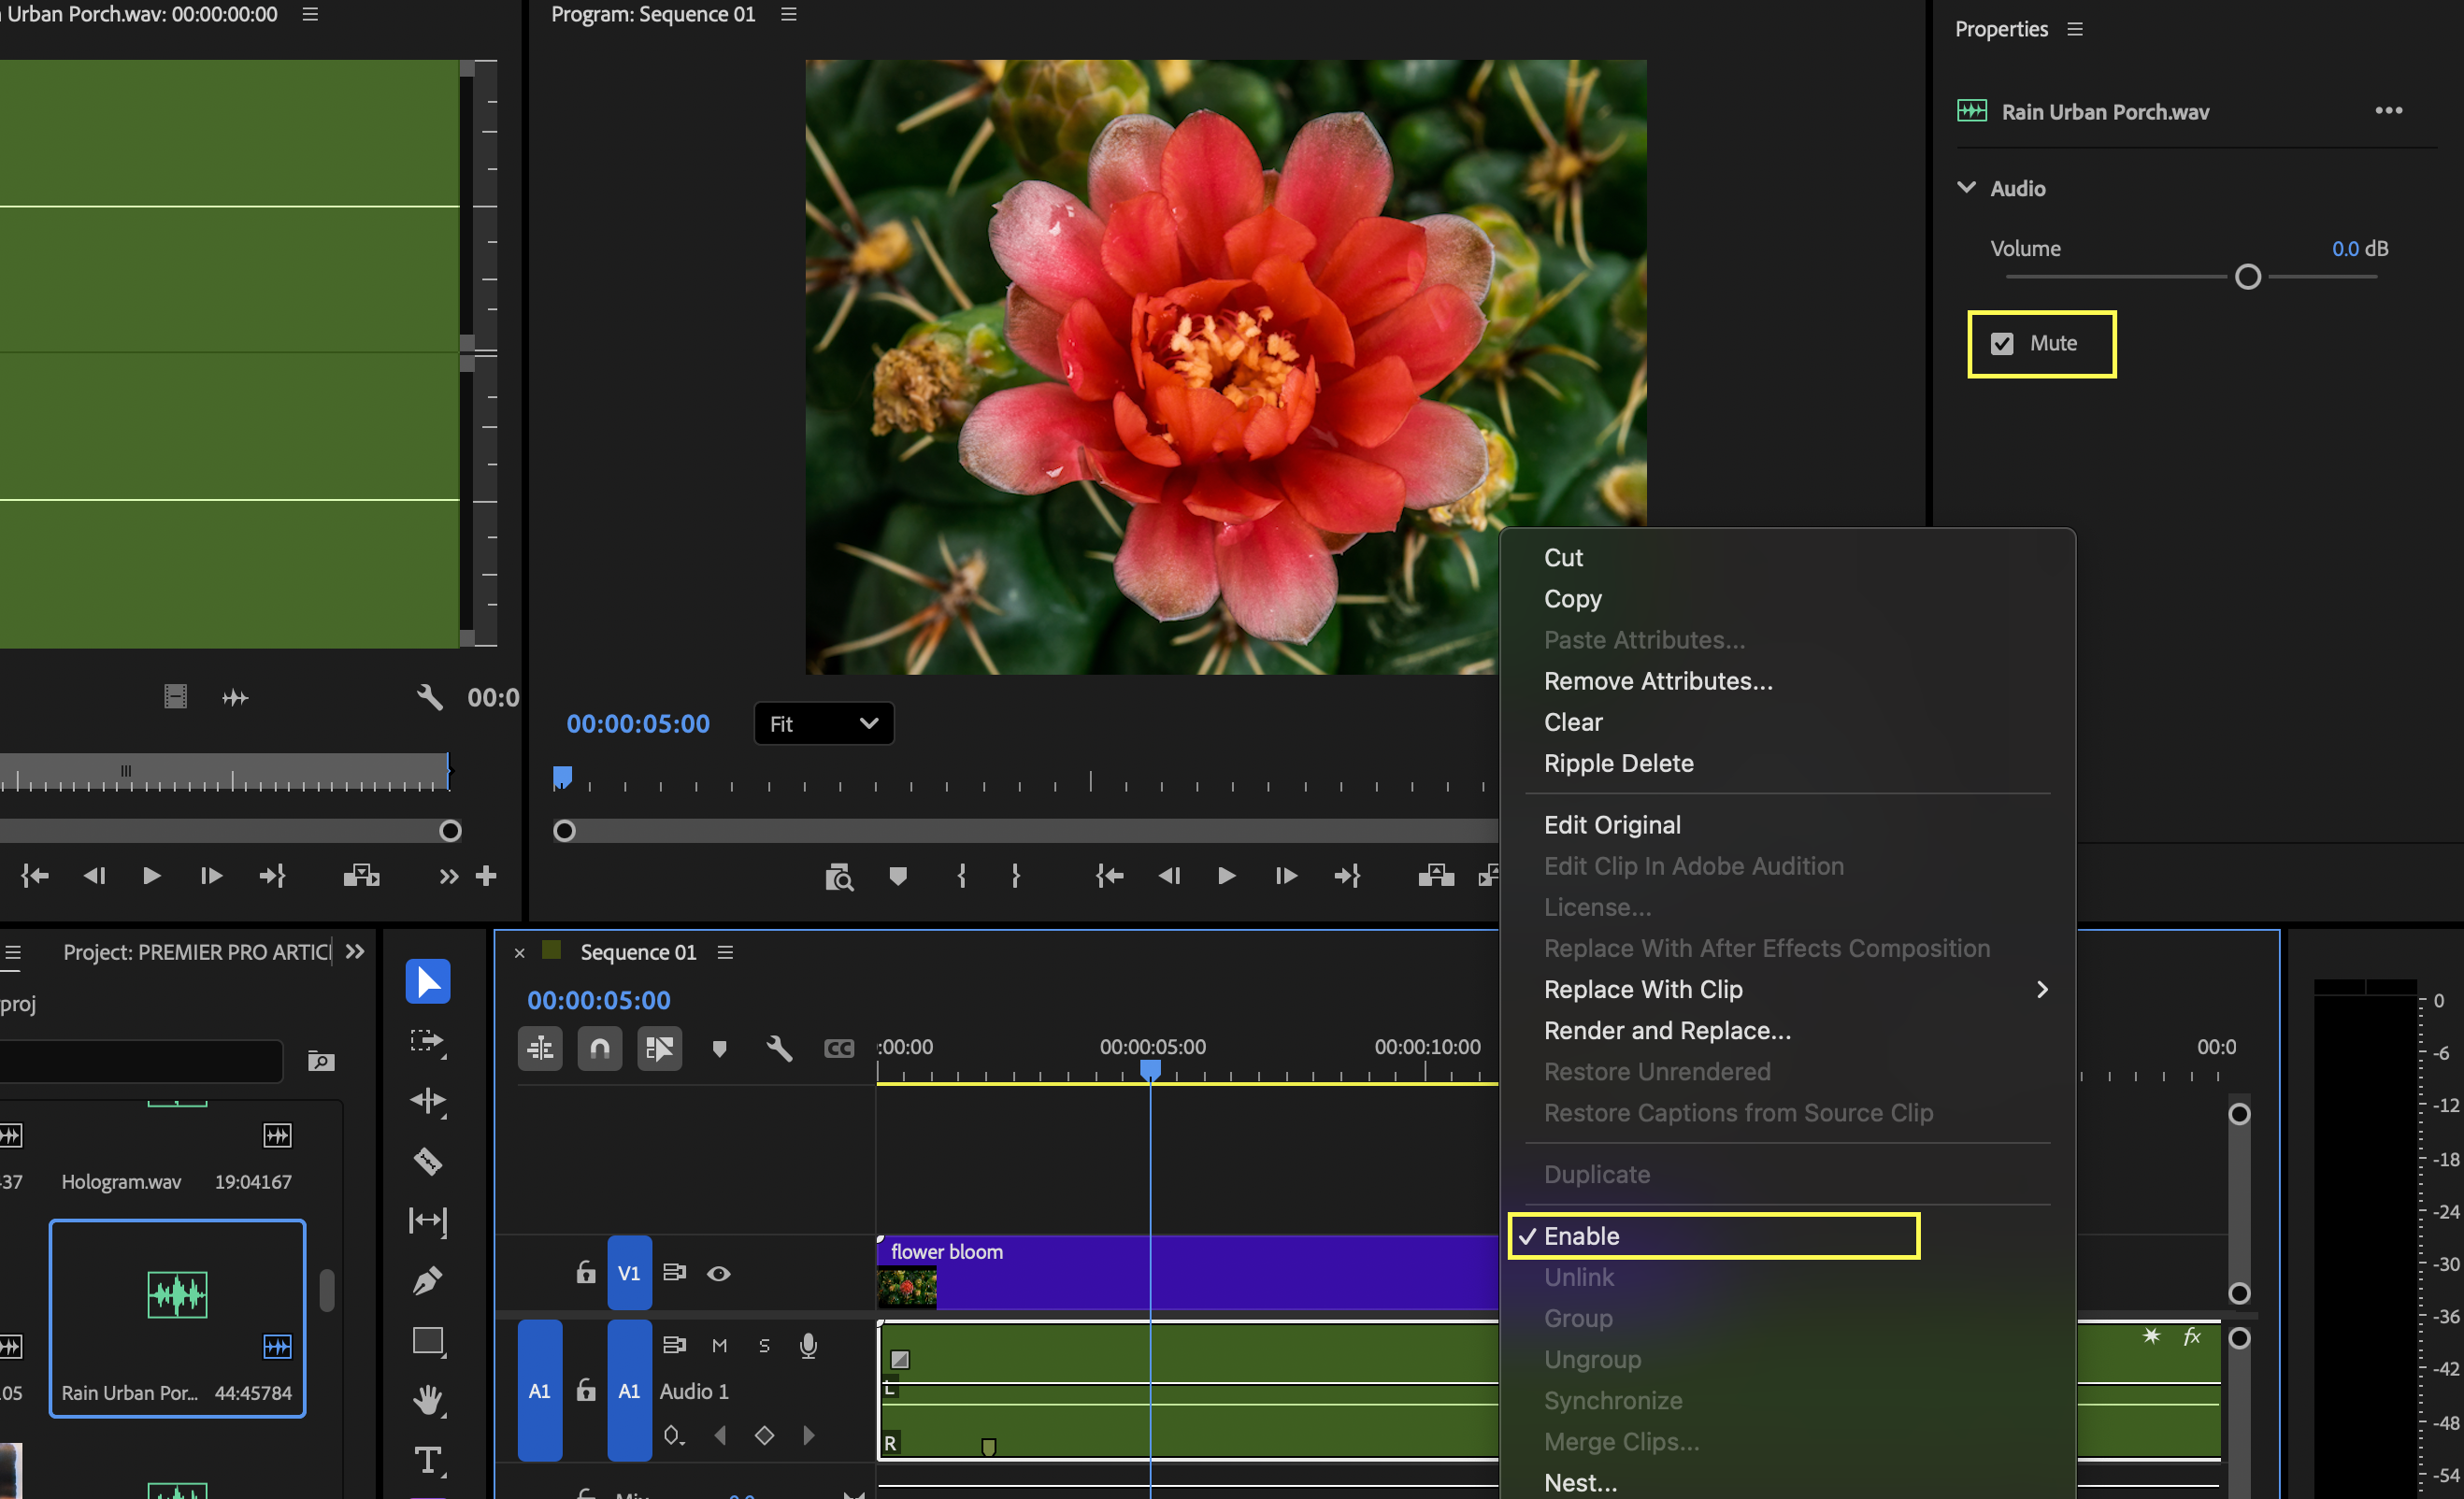
To mute audio in Premiere Pro, you can lower the clip’s volume directly in the timeline or via the Effect Controls panel. Select the clip, open Effect Controls, and adjust the Volume level to silence it.

You can also mute entire tracks using the M button in the track header, or you can disable the clip using Cmnd+Shift+E, which is useful when testing different sound design ideas or comparing variations.

How to Replace Audio Clips in Adobe Premiere Pro

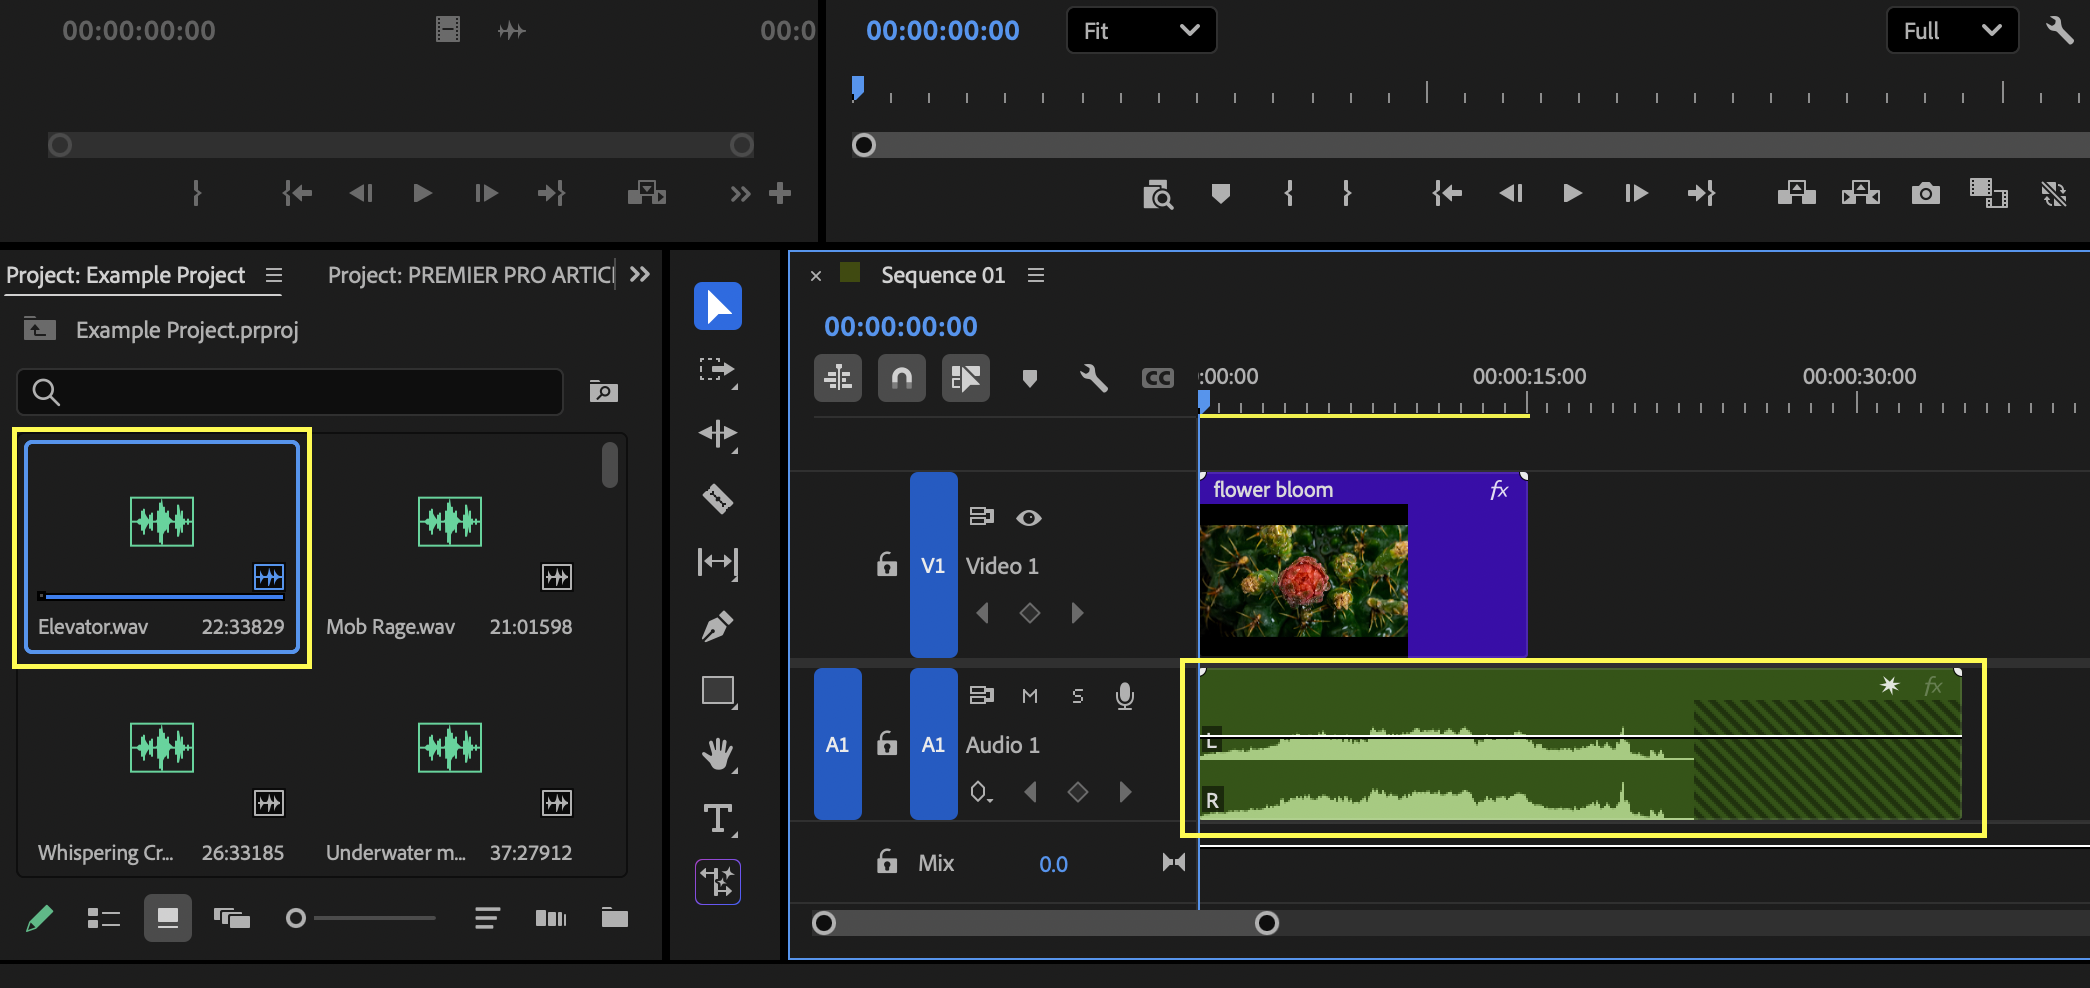
Replacing an audio clip allows you to keep its timing while swapping out the sound itself. To do this, hold Alt (Windows) or Option (Mac) and drag a new audio file from the Project panel directly onto the existing clip in the timeline. Premiere Pro replaces the clip while preserving its position and duration.

This is ideal for swapping temporary sound effects or replacing early draft recordings with final versions.

How to Trim Audio Clips in Adobe Premiere Pro

Trimming audio clips is essential for tightening edits and aligning sound effects precisely. Hover your cursor over the start or end of an audio clip until the trim handle appears, then click and drag inward to shorten the clip.

The waveform updates in real time, helping you trim accurately to transients or dialogue starts. Zoom in using the = and – keys for finer control.

Top Tip:

Zooming in close makes it much easier to avoid clicks and cut cleanly on natural zero crossings.

How to Split Audio Clips in Adobe Premiere Pro

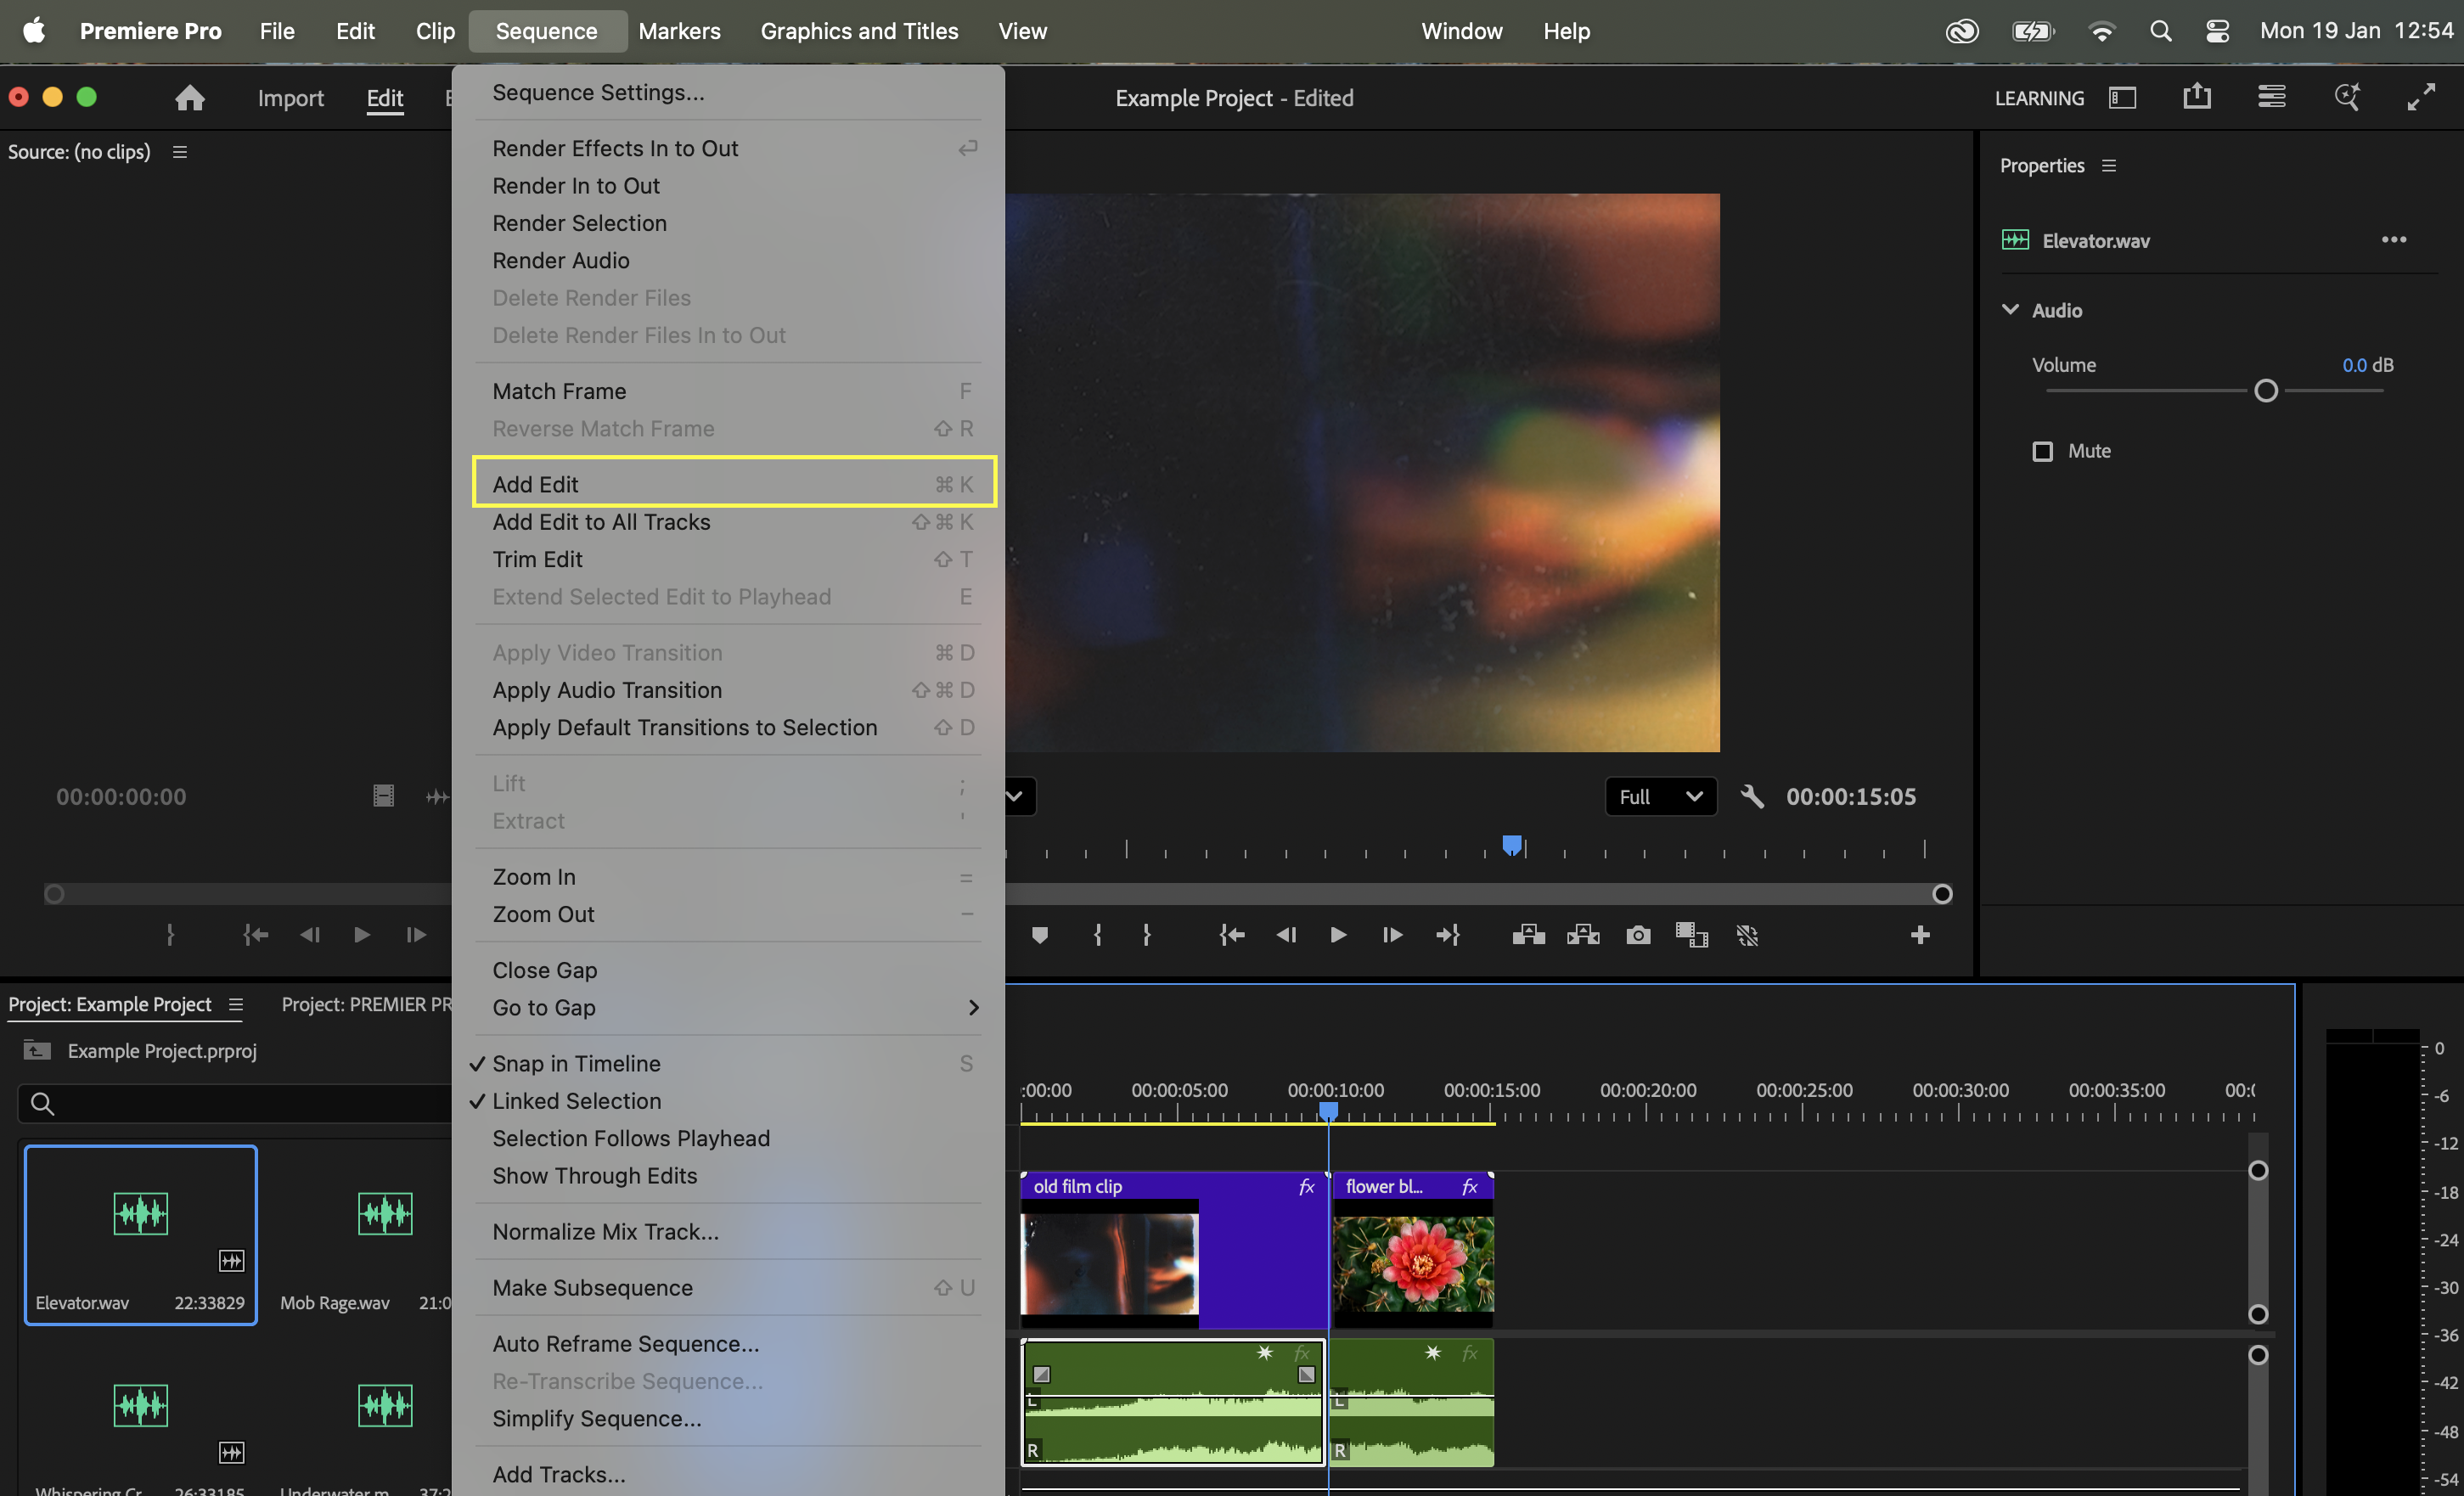
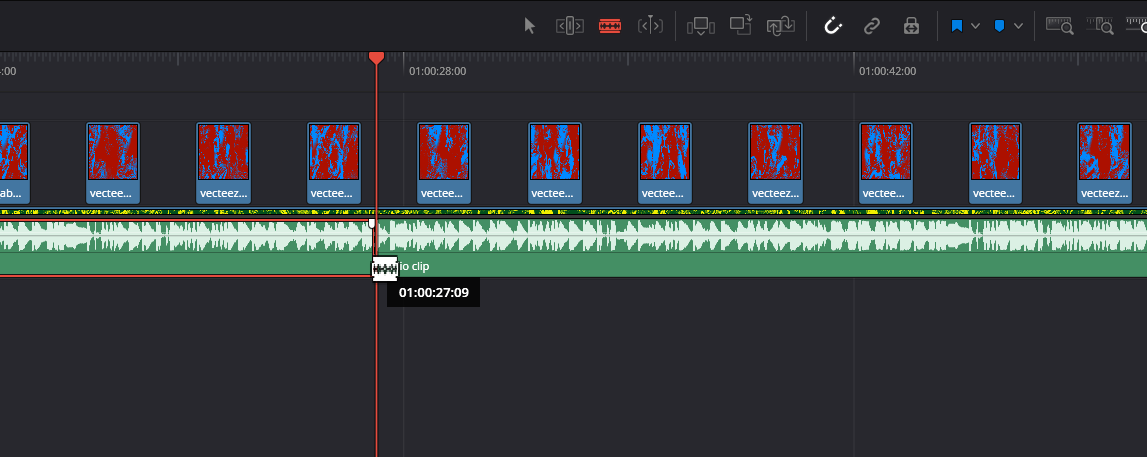
Splitting an audio clip lets you isolate sections, remove unwanted sounds, or apply different effects to specific moments. Move the playhead to where you want the cut, select the clip, and press Ctrl + K (Windows) or Cmd + K (Mac) to make an edit.

You can also use the Razor tool (C) and click directly on the clip.

Once split, each segment can be moved, trimmed, faded, or processed independently.

Top Tip:

Splitting clips before applying fades gives you more flexibility when shaping transitions.

Advanced Audio Clip Editing in Adobe Premiere Pro

How to Automate Audio Clips in Adobe Premiere Pro

Automation allows you to control volume changes over time. To automate a clip’s volume, select the audio clip and click the fx button to open the Effect Controls panel. Enable keyframing on the Volume parameter, then add keyframes at different points and drag them up or down to adjust levels.

You can also show clip keyframes directly in the timeline, making automation adjustments quicker and more visual.

Automation is ideal for ducking music under dialogue or emphasising specific sound effects.

How to Loop Audio Clips in Adobe Premiere Pro

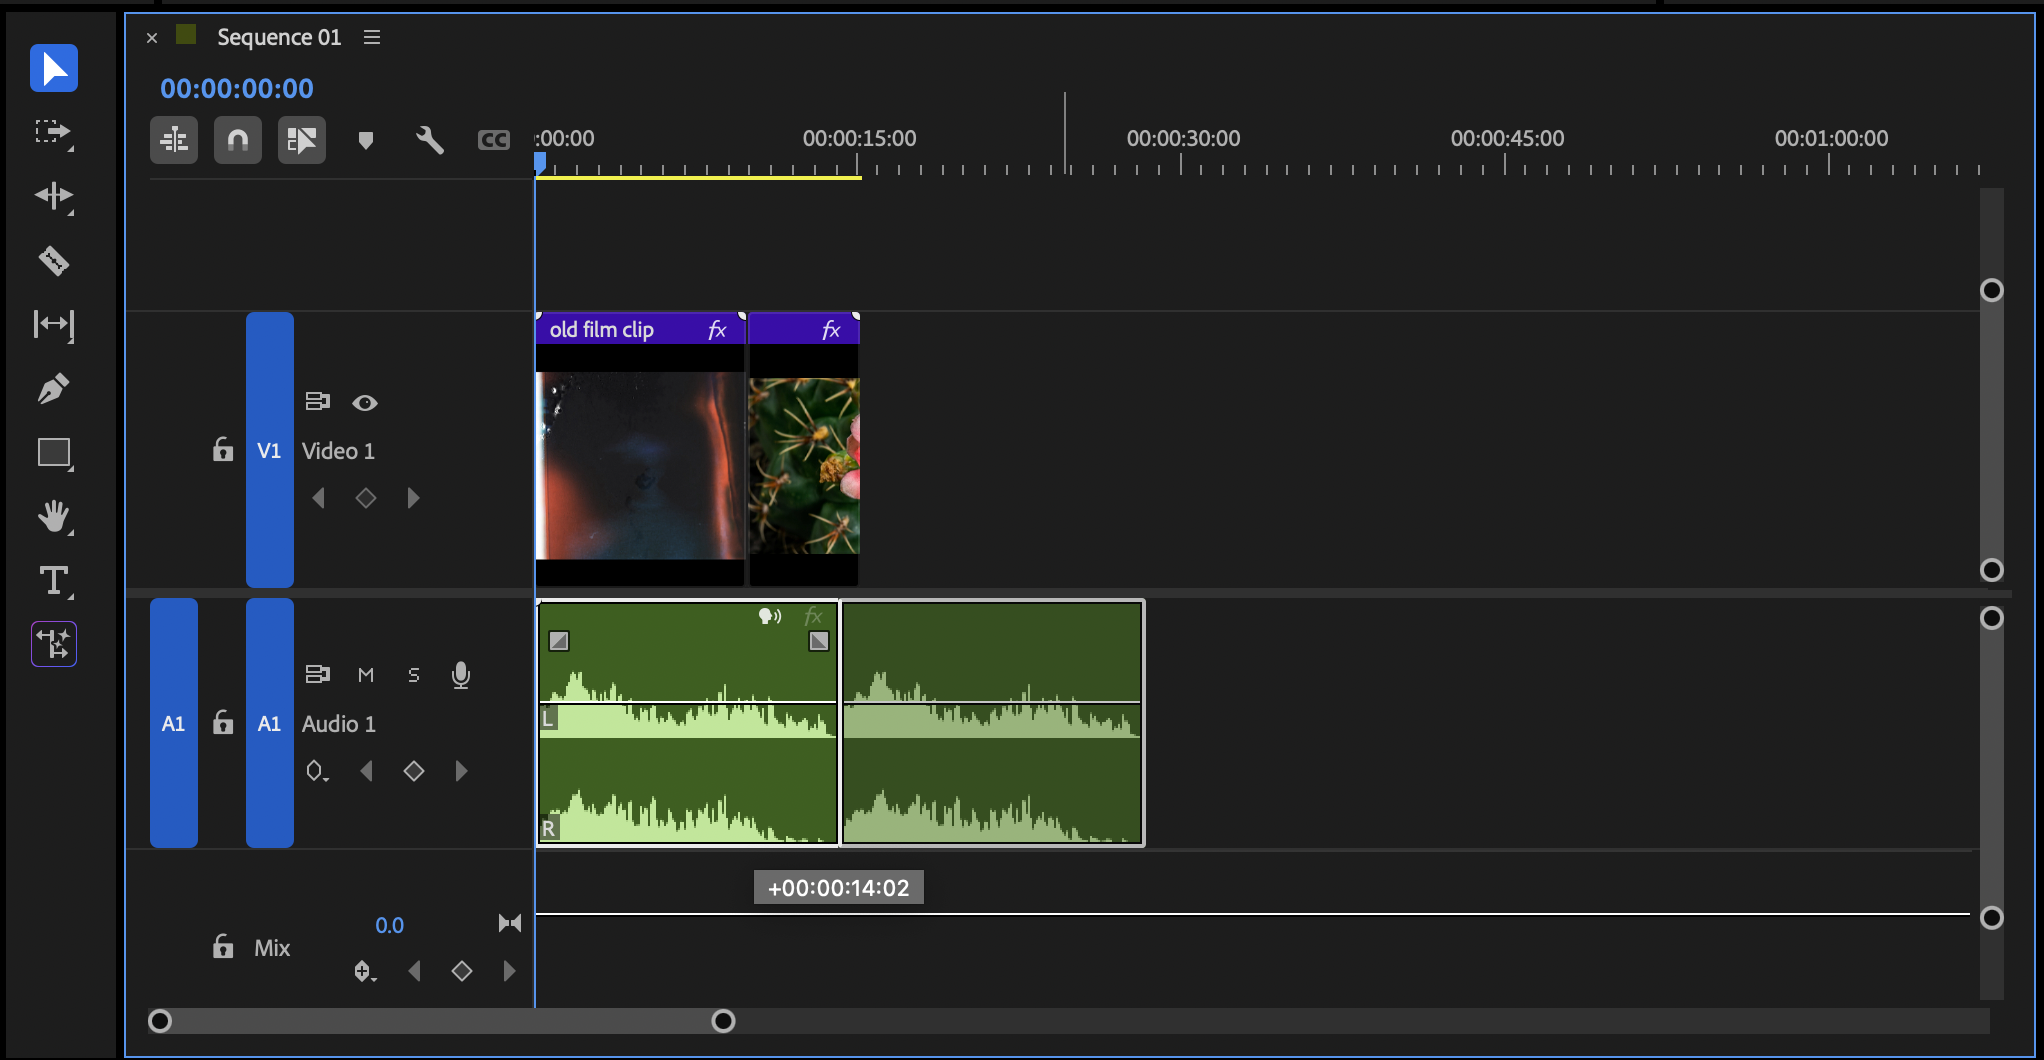
Looping audio clips is useful for extending ambience, music beds, or repeating sound effects. Premiere Pro does not automatically loop audio, so this is done manually. Hold Alt (Windows) or Option (Mac), then drag the clip to create a duplicate. Place the duplicate directly after the original and repeat as needed.

Adding a short crossfade between duplicates helps smooth the loop.

Top Tip:

Even very short crossfades can prevent audible looping artefacts, especially with ambience.

How to Reverse Audio Clips in Adobe Premiere Pro

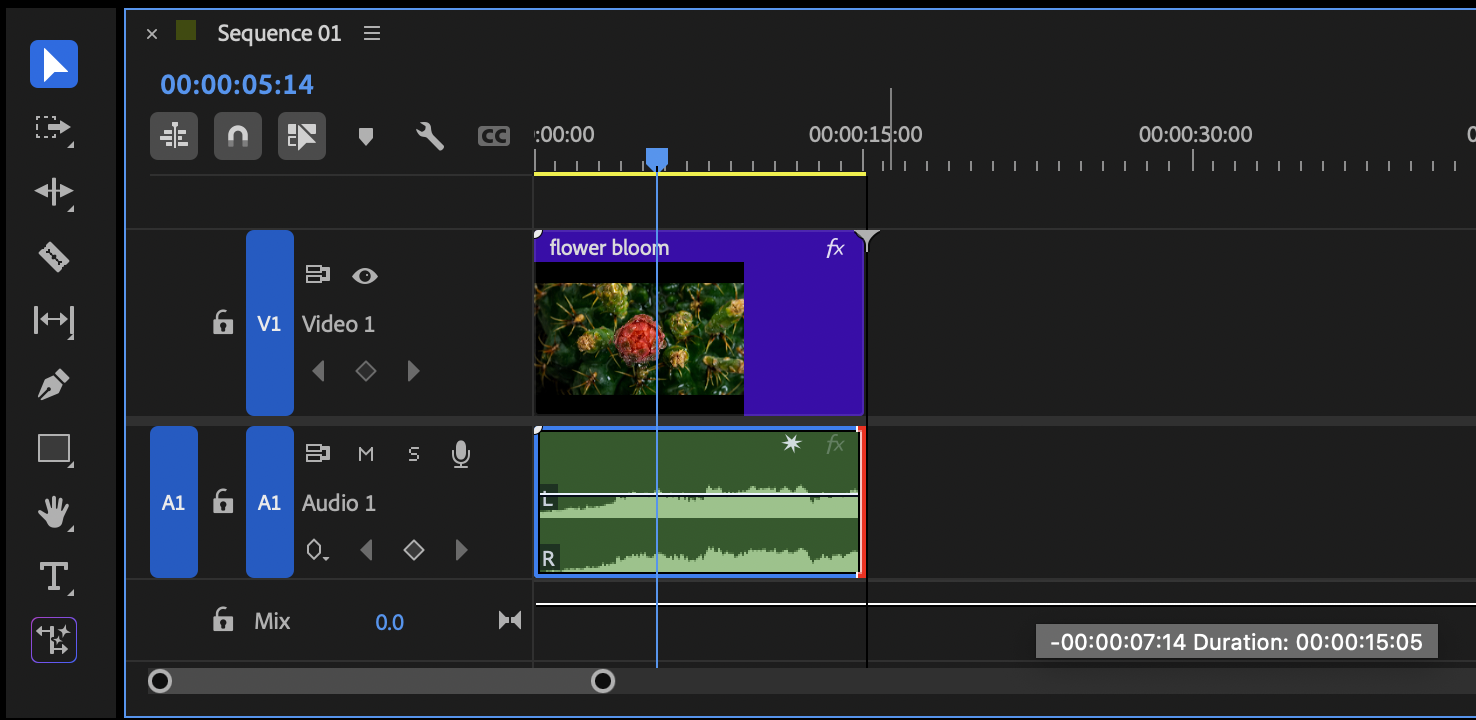
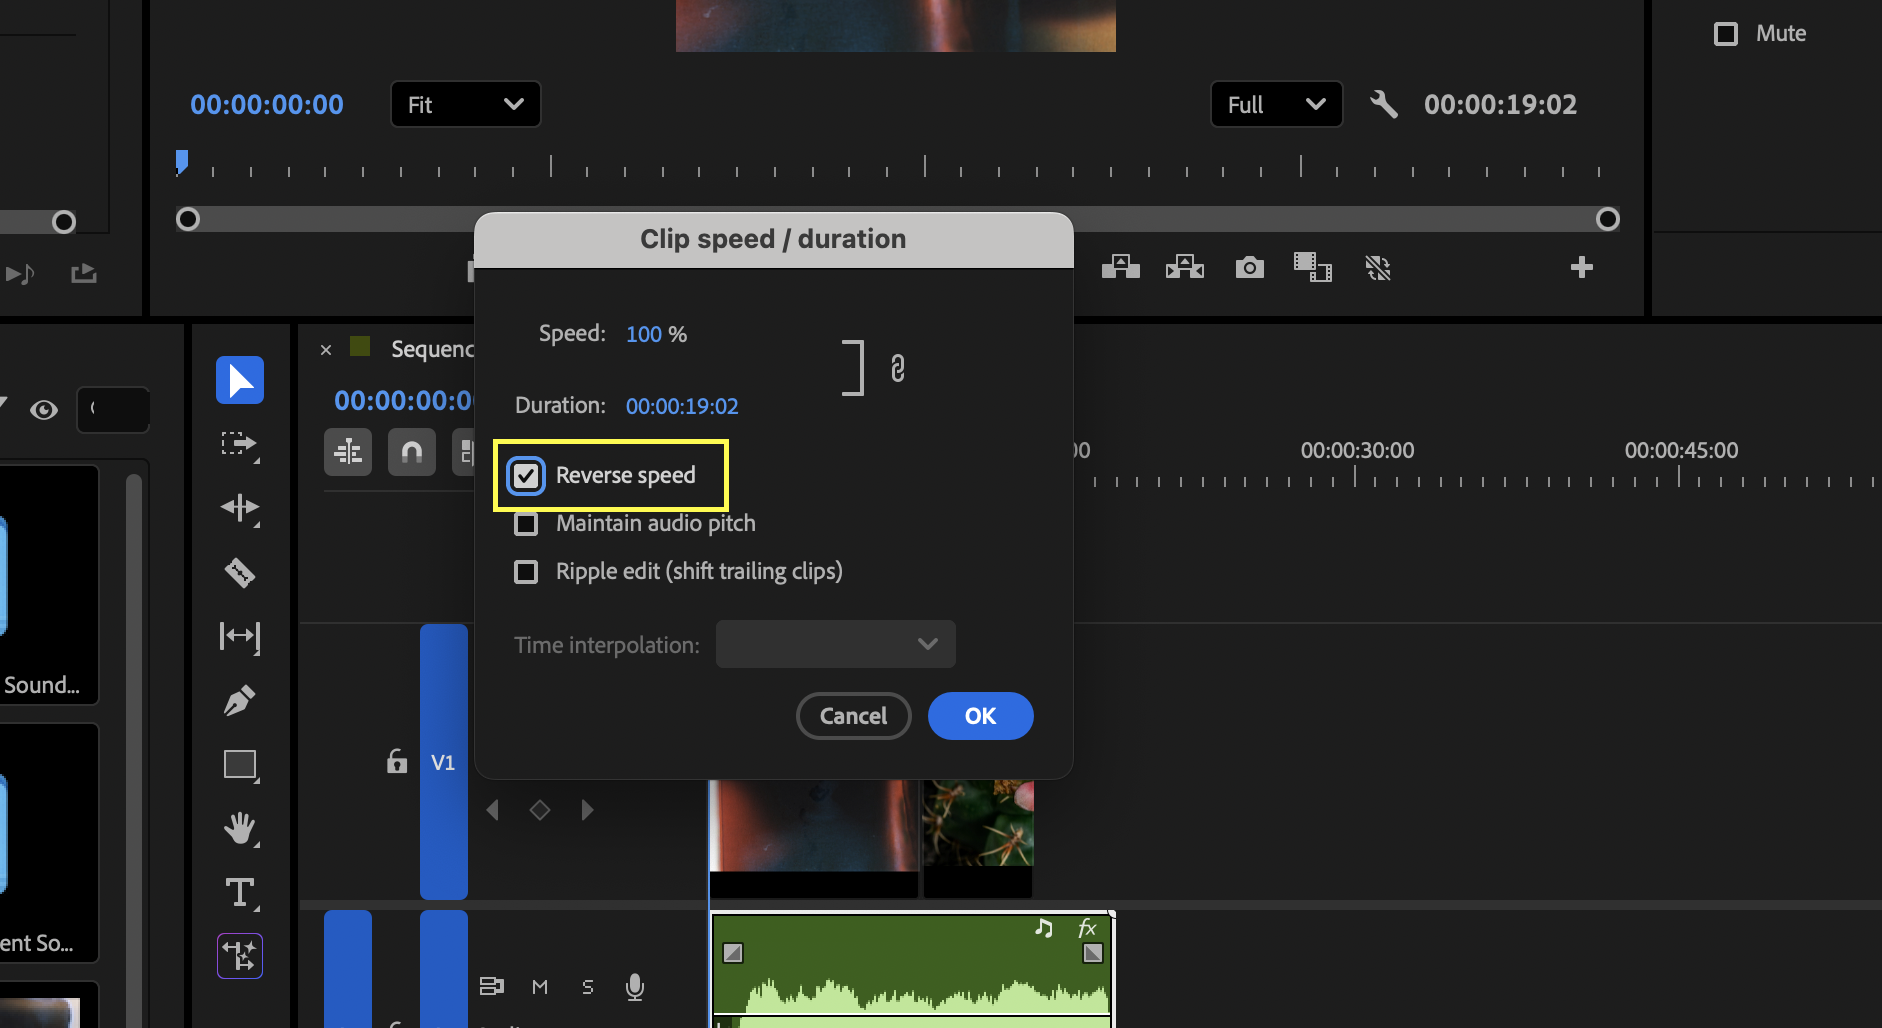
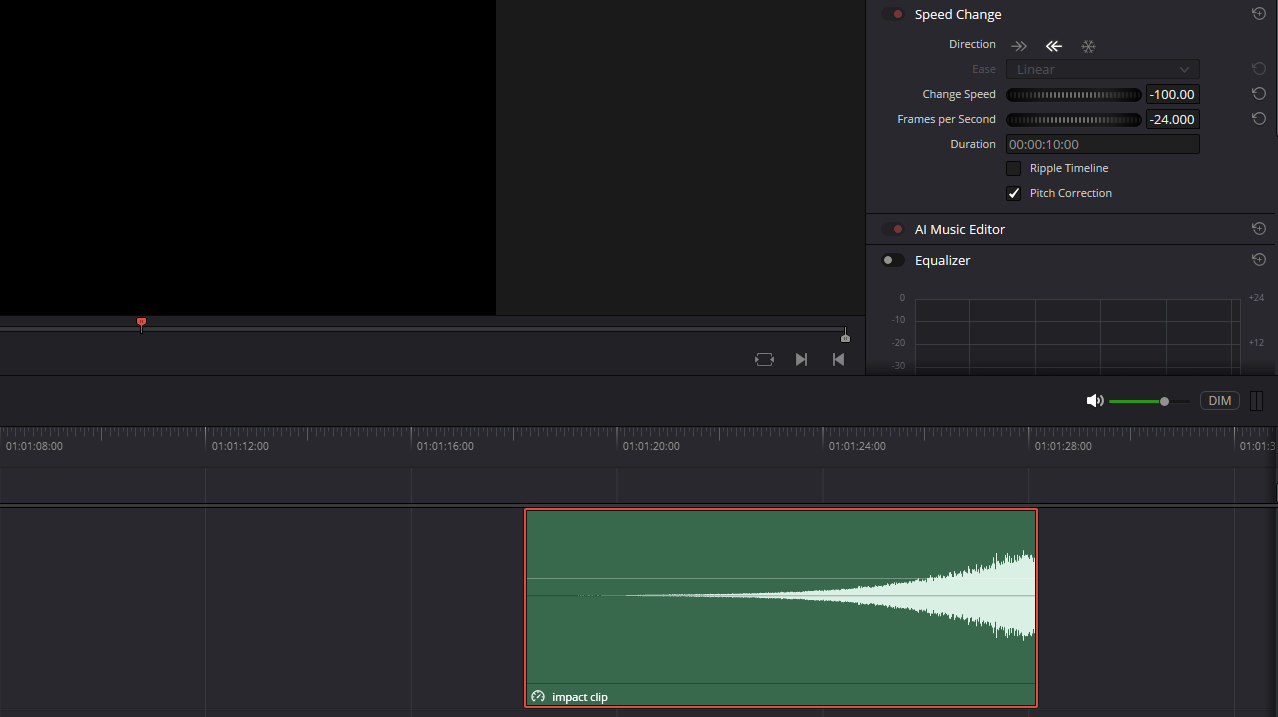
Reversing audio is great for creative sound design, transitions, and accent moments. Right-click the audio clip, select “Speed/Duration…” and tick “Reverse Speed”. Finally, press OK to apply the reverse effect.

Premiere Pro processes the change instantly, and the waveform updates to reflect the reversed playback.

This works particularly well on risers, impacts, breaths, and whooshes.

How to Normalise Audio Clips in Adobe Premiere Pro

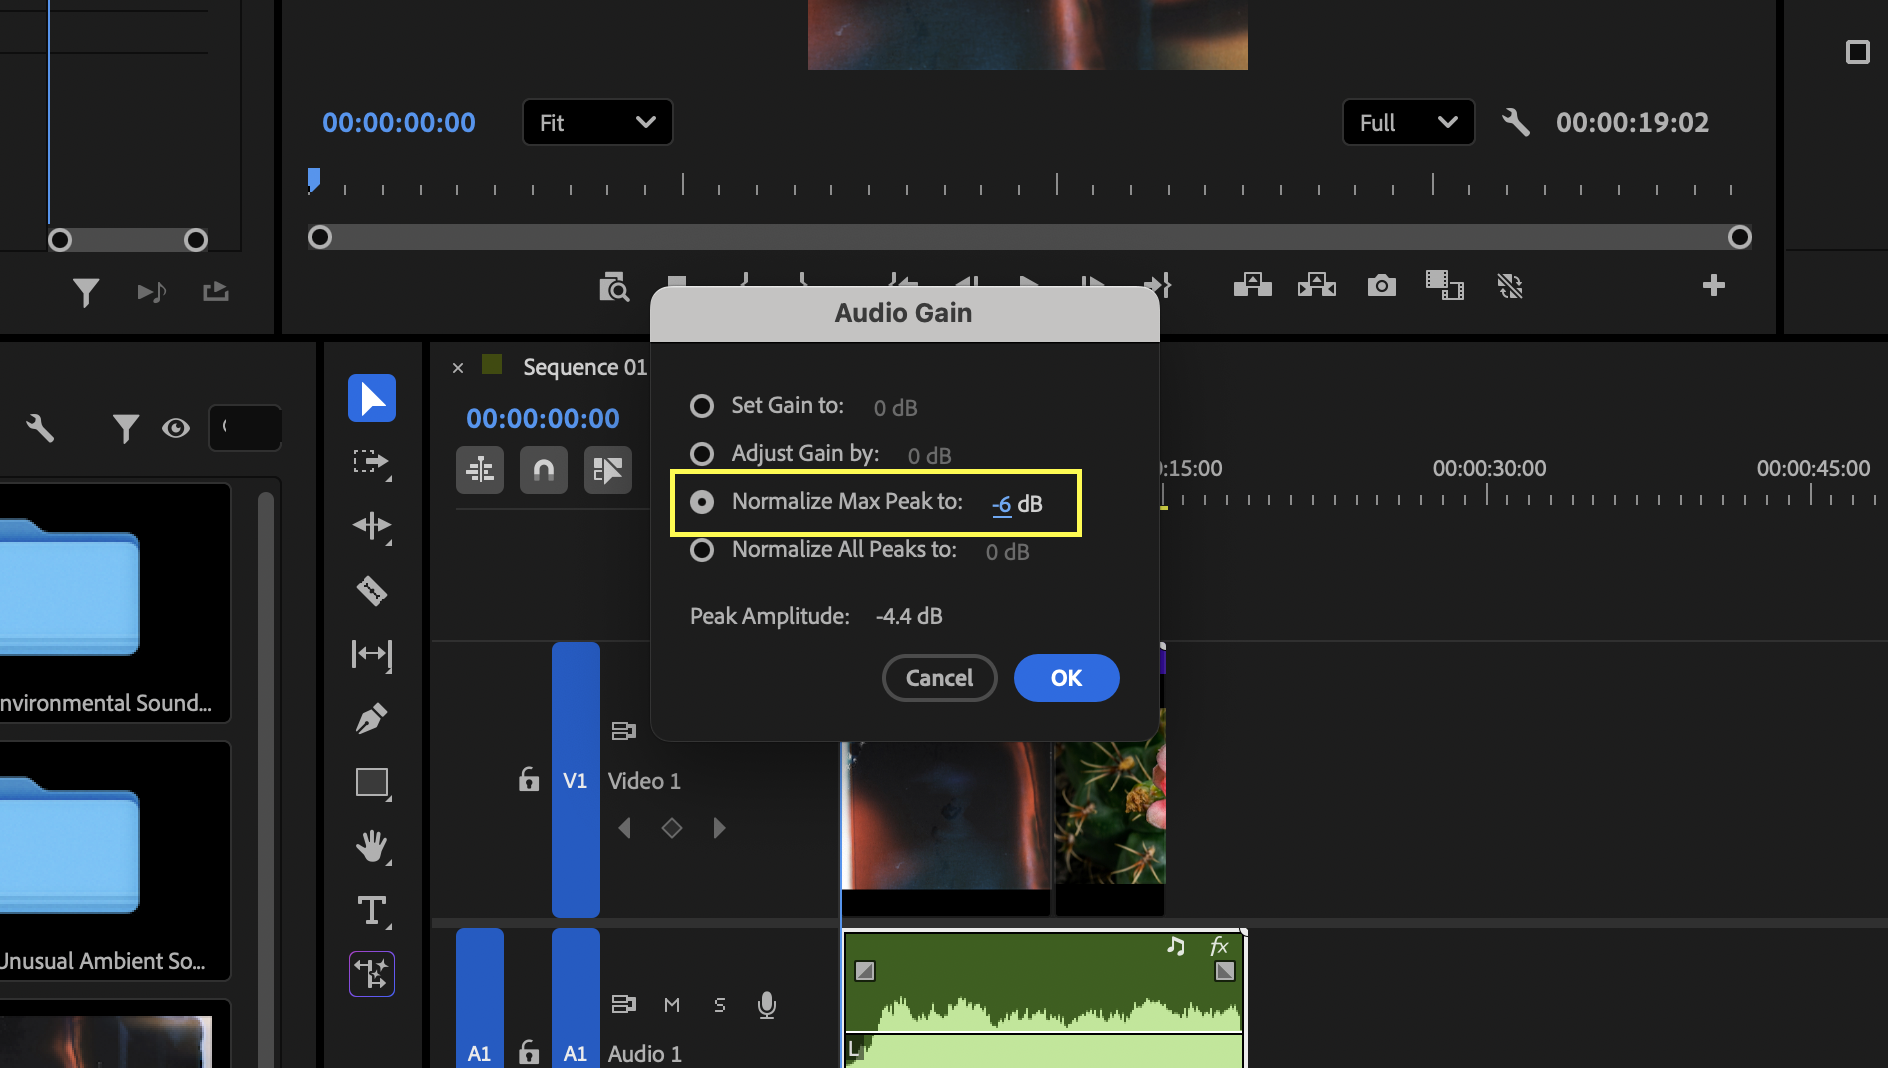
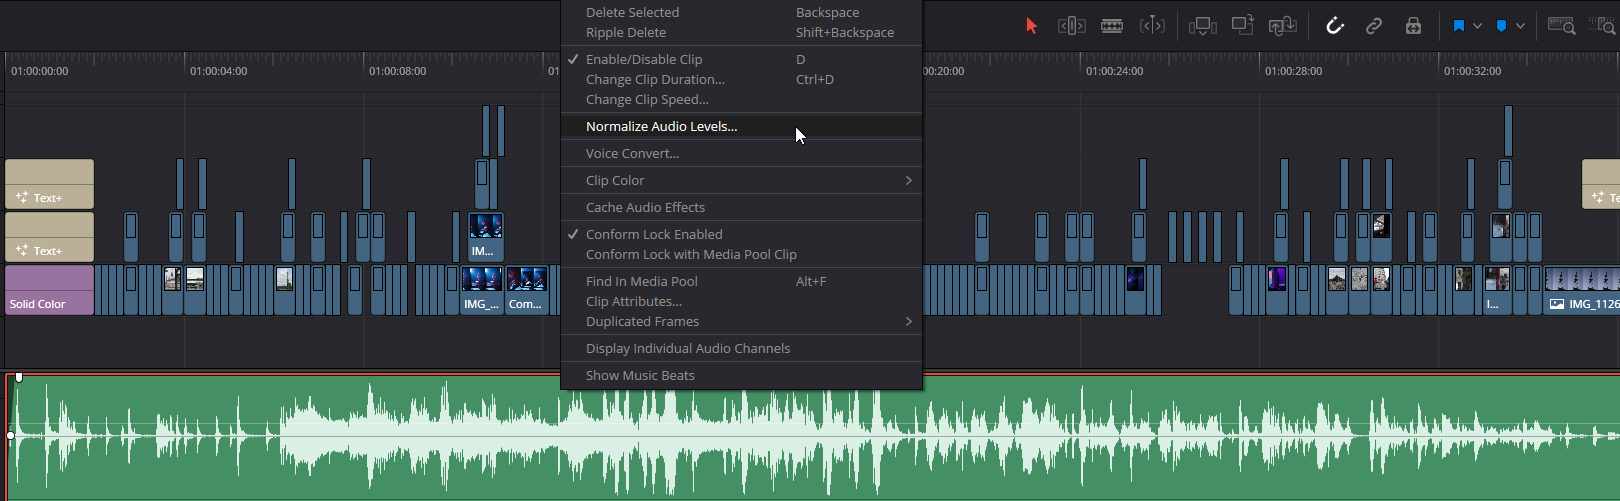
Normalising helps correct inconsistent loudness by raising audio to a consistent level. Select the clip, press G to open the Audio Gain window, then choose Normalize Max Peak and set your desired level.

Normalisation is useful for dialogue recorded at uneven levels or sound effects sourced from different libraries. You can combine this with compression for better dynamic control.

How to Pan Audio Clips in Adobe Premiere Pro

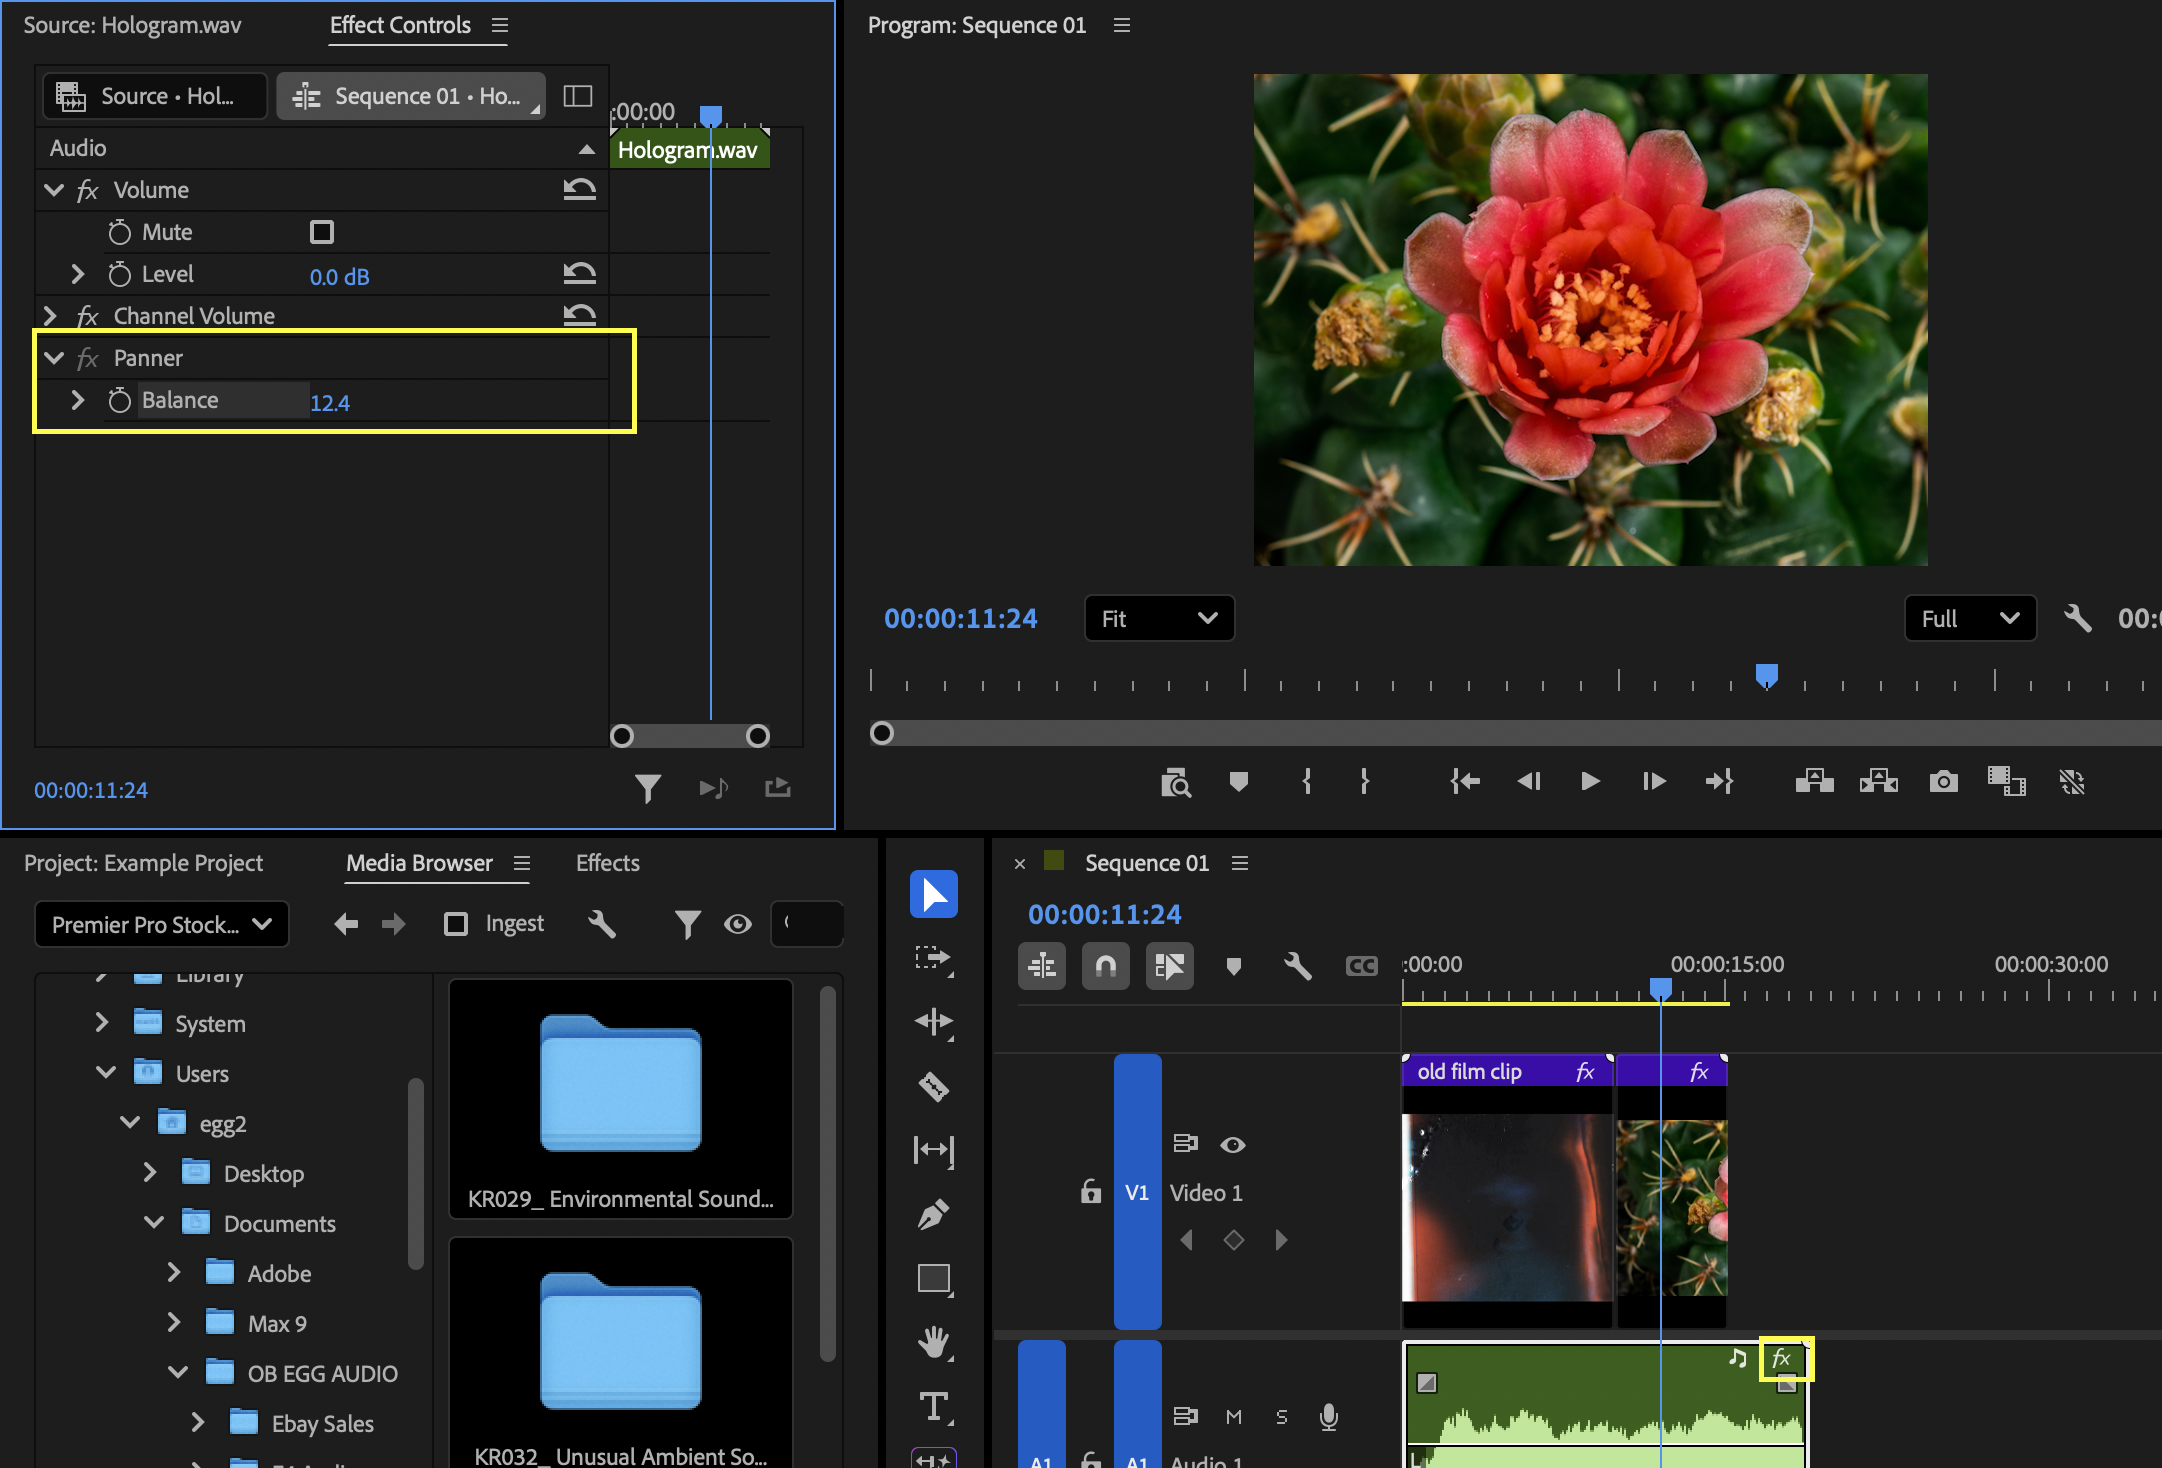
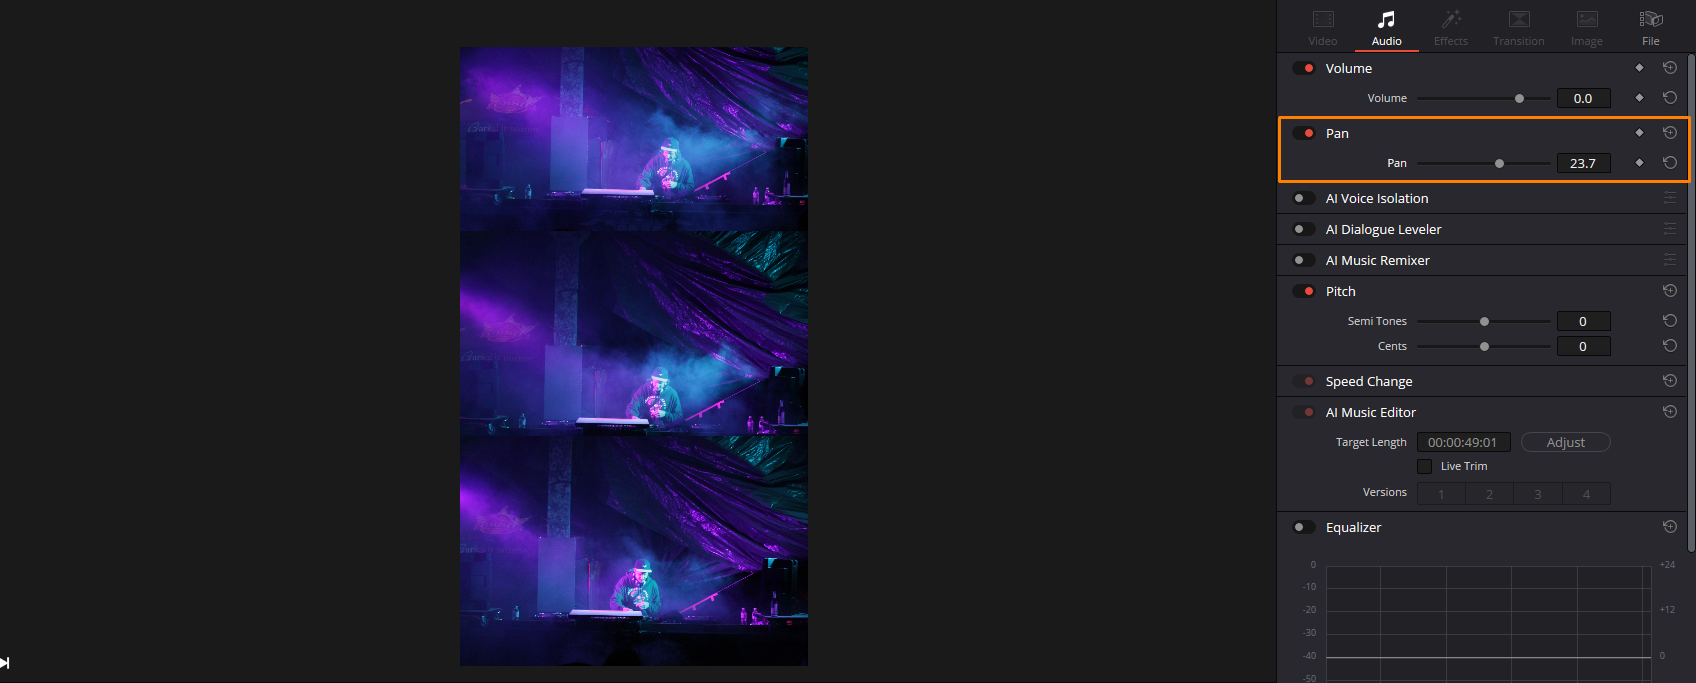
Panning lets you place audio across the stereo field. Select the clip, open Effect Controls, and adjust the Balance control to move the sound left or right.

This is ideal for matching on-screen movement or creating a wider, more immersive soundstage.

Using Audio Clip Effects in Adobe Premiere Pro

Applying Audio Effects in Adobe Premiere Pro

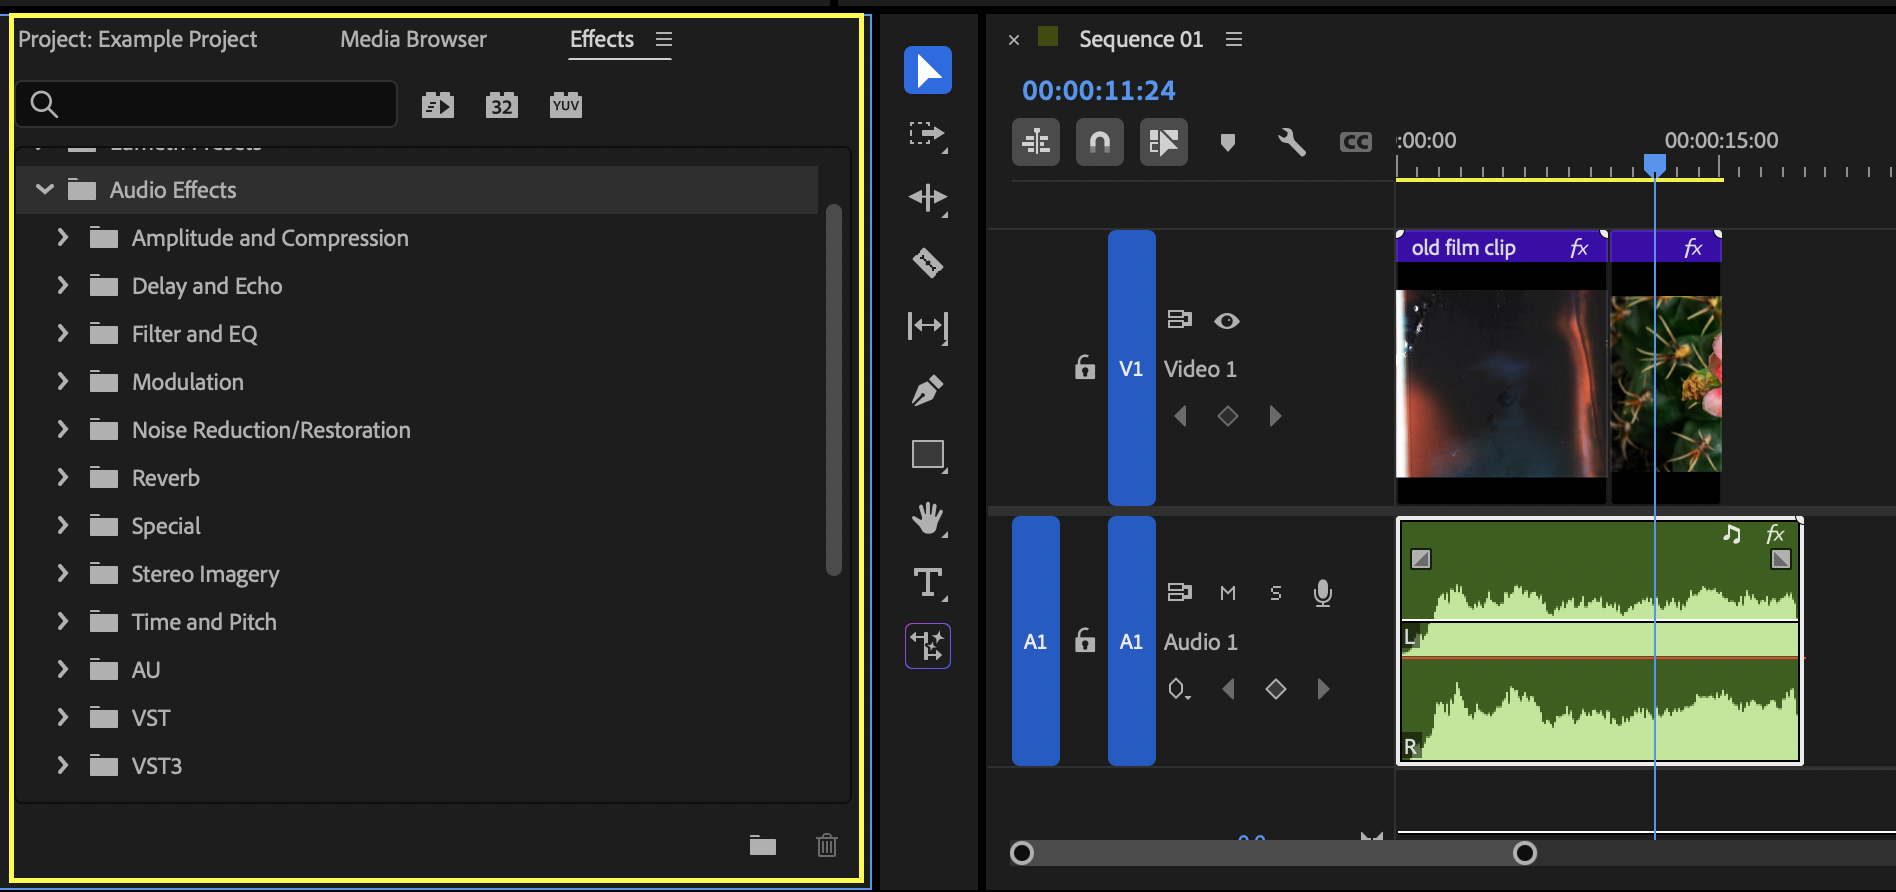
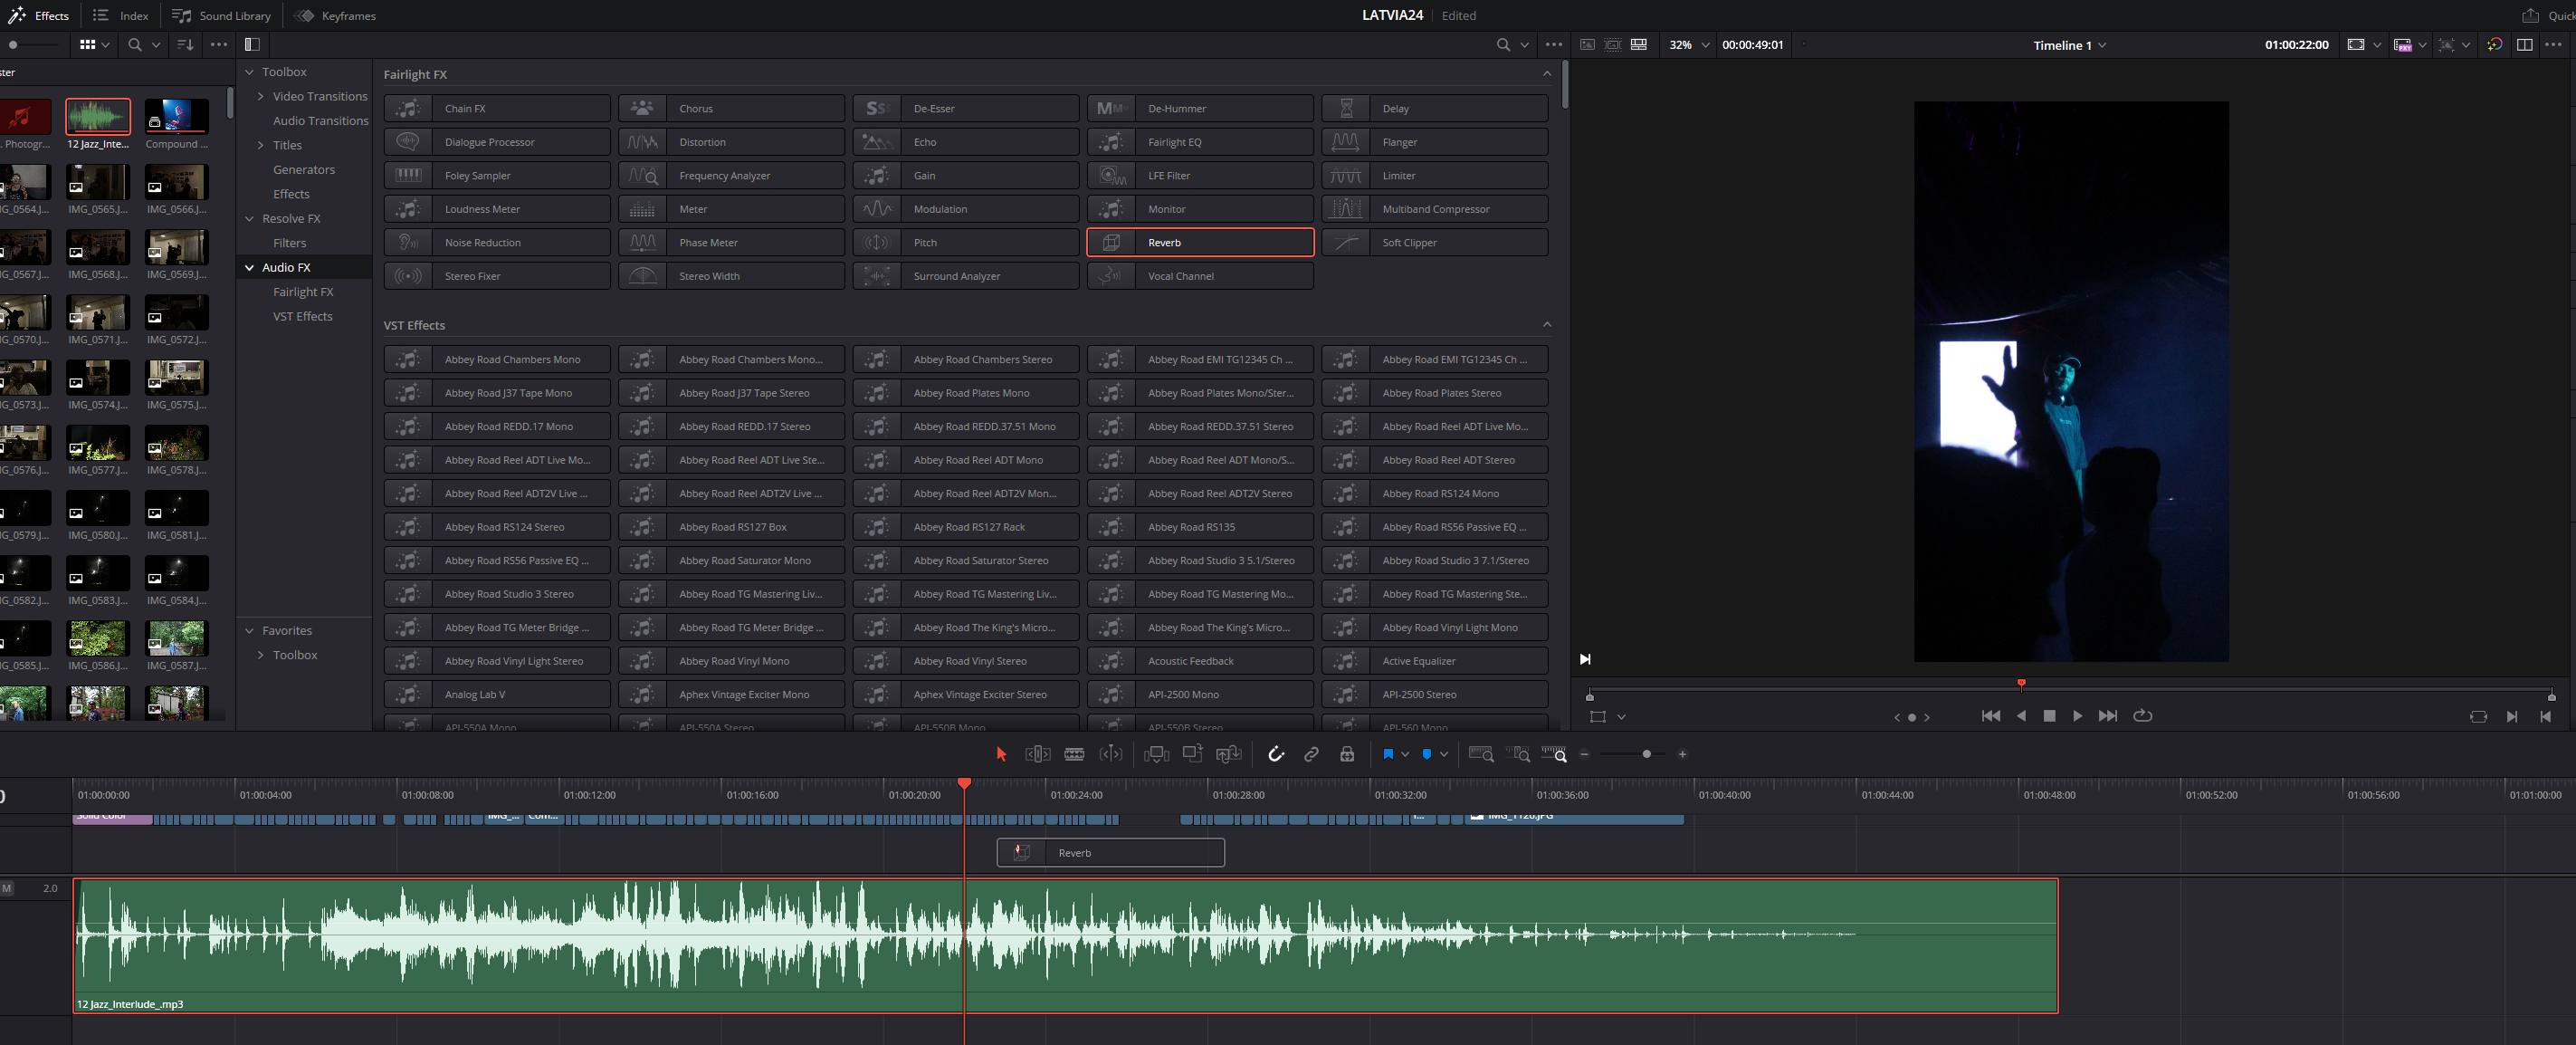
Premiere Pro includes a wide range of built-in audio effects such as EQ, Noise Reduction, Dynamics, and Reverb. To apply one, open the Effects panel, browse the Audio Effects category, and drag your chosen effect onto the clip.

You can tweak effect settings in the Effect Controls panel, where each effect opens its own adjustable parameters.

This workflow is ideal for cleaning dialogue, enhancing sound effects, or shaping ambience.

Using Audio Clip Transitions in Adobe Premiere Pro

How to Fade In Audio Clips in Adobe Premiere Pro

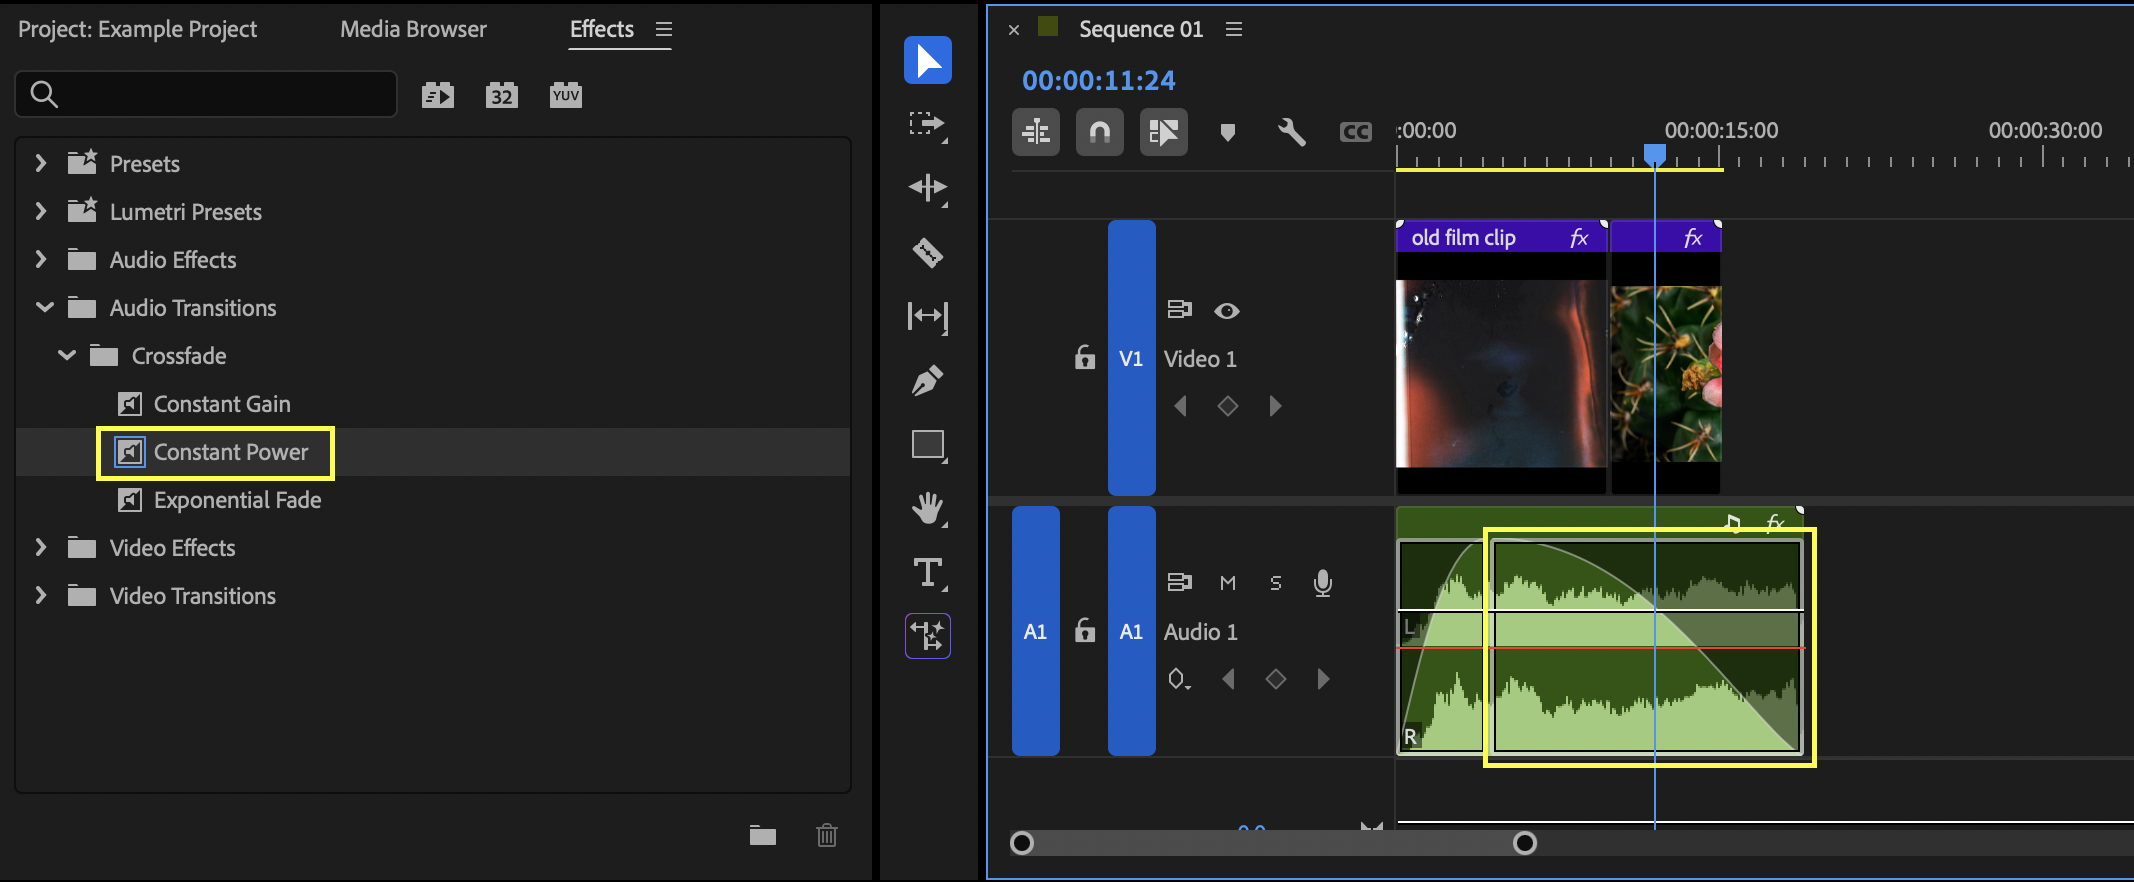
Fading in audio helps smooth the start of a clip and avoids sudden or distracting entrances. To add a fade-in, apply the Constant Power transition from the Effects panel to the start of the audio clip.

You can adjust the fade length by dragging the transition’s edges in the timeline.

How to Fade Out Audio Clips in Adobe Premiere Pro

To create a fade-out, apply the Constant Power transition to the end of the audio clip. Adjust its duration to control how gradually the sound fades away.

This is particularly useful for music beds and ambience.

Top Tip:

Longer fade-outs help scenes feel more natural and less abruptly cut.

How to Crossfade Audio Clips in Adobe Premiere Pro

Crossfades help blend two audio clips smoothly. Overlap the end of one clip with the start of another on the timeline, then apply the Constant Power transition between them. You can also use Shift + D to apply the default audio transition to selected edits.

Crossfades are ideal for smoothing dialogue cuts or transitioning between ambience layers.

Top Tip:

If a crossfade sounds uneven, try balancing clip levels before applying the transition.

How-to guide
This is some text inside of a div block.

Simplicity in Sound Effects: A Philosophy of Better Creative Flow

Simplicity strips away the unnecessary, leaving only what is essential to the task. This is what we aim for with Krotos Studio.

JJ Lyon
December 19, 2025
Read Story↗

What do Krotos Studio and a Kitchen Knife Have in Common?

Life is complicated. and in a complicated world, simplicity is regularly the solution, offering clarity & efficiency.

Simplicity strips away the unnecessary, leaving only what is essential to the task. This is what we aim for with Krotos Studio.

Here's an example...

The Beauty of the Kitchen Knife

We all have our favourite knife in our kitchen drawer. The go-to knife that keeps it's edge, feels right in our hands, and provides the most control.

Sure, there's a knife for every situation, but personally, I'm a 'one knife for everything' kind of person.

And sure, there's knives with fancy materials and designs; and while they're nice to use, the novelty eventually wears off and I just want to go back to basics.

Why? because the simple knife has been catered (pun intended) to what we need from the tool, not what we think we need.

The chef using the simple knife does not need to think about the complexities of the tool. Instead, they can focus entirely on what they were meant to do; cooking incredible cuisine.

Simplicity in Sound Design: Krotos Studio

Krotos Studio follows the same principle, emphasising the ease of click-and-drag on a timeline for sound design. It is made to simplify the content creators process. We want creators to stay locked in to their creative flow, to be able to add pro SFX to their video without getting in their way.

Our sound design platform places a streamlined interface and intuitive controls in your hands. It is designed by a team who understand that simplicity offers flexibility, freedom, and ease of use. We believe that these are the key components that empower users from all backgrounds to create professional-quality audio for their project, without the hassle of navigating a complex systems.

How Krotos Studio Implements Simplicity

Krotos Studio simplifies the sound design process by providing a collection of Quick FX, a vast audio library, and AI-powered presets that are easy to use, yet incredibly powerful

Quick FX

Quick FX allows users to place sound effects within a real space with  a simple dial. This simplicity does not compromise the depth or quality of sound but instead makes professional level features accessible to all users, including those new to audio and media editing; regardless of technical skill level.

With a simple interaction, you can control how realistic or emotional your scene is. As a video editor, picture is the most essential ingredient to your film. But this shouldn't mean that the audio can't sound the way it should.

An Extensive Library of Sounds That is Always Growing

We are adding sound effects to Krotos Studio every month. All you need to do is explore them, drag and drop them into your project, and carry on editing. From Foley to Footsteps, Ambient backgrounds to Weather and Roomtones, Cinematic, Combat, Vehicle Sounds and Beyond, any sound you could possibly want to create is available with a click, drag and drop.

AI-Powered Presets

We record all of the sounds in Krotos Studio ourselves. What we use AI for is to control and shape these recordings in the most incredible ways. Foley comes alive in a way that sounds incredibly close to the real thing. With a few gestures of the mouse, you elevate your sound effects to a level that is remarkably similar to the act of Foley performance with materials and objects in a studio.

The Benefits of Simplicity

In practice, while complex tools might seem impressive due to their 'wow' factor, they often introduce unnecessary complications that can hinder creativity and productivity.

Krotos Studio’s philosophy centers around making sound design as straightforward as possible, much like choosing a music track for a YouTube video with a simple click. This approach not only saves time but also reduces the cognitive load on users, allowing them to focus more on creativity and less on figuring out how to use the tools.

Why Simplicity Prevails

Ultimately, simplicity prevails because it enhances the user experience and promotes a deeper engagement with the task at hand. In sound design, like the kitchen knife, the tools we use should enhance our skills without overshadowing them.

Krotos Studio’s commitment to simplicity ensures that users can achieve professional results with minimal effort, proving that in the world of technology, less often truly is more. By embracing simplicity, we allow our users to not just do more, but also to achieve greater.

Check out how to quickly construct a City Scene in Sound Effects, and learn how to streamline sound design by starting with a single frame with Image to Sound in Krotos Studio.

How-to guide
This is some text inside of a div block.

Best Sound Design Software for Filmmakers on a Budget

You no longer need a Hollywood-sized budget to achieve Hollywood-level sound

JJ Lyon
December 19, 2025
Read Story↗

Best Sound Design Software for Filmmakers on a Budget

Filmmakers live and breathe their craft. Passion, late nights, and every spare penny gets poured into getting their stories on screen. Obsessing over the script, the lighting, acting, cinematography, and colour grading is already a huge workload, and that’s without even acknowledging sound.

By that time, all too often budgets are stretched to their limits, so audio becomes an afterthought. I’ve seen it happen countless times.

But the thing is, great sound keeps student projects from becoming festival contenders. It’s the invisible magic that immerses your audience and sells the reality of your world. The good news? You no longer need a Hollywood-sized budget to achieve Hollywood-level sound.

Let’s talk about how you can make it happen.

Why is Sound Design Overlooked in Indie Film?

When you're working with limited funds, every penny has to be justified. Renting the right lenses, securing locations, & hiring extras needs to take priority. At that point, sound design can feel like a luxury you can't afford.

The traditional route involves expensive plugin bundles, massive sound libraries that cost a fortune, or hiring a professional, which is often out of the question for a short film or a passion project. This financial barrier is the number one reason incredible stories end up with thin, lifeless audio that just doesn't do justice to the stunning visuals.

Budget Doesn’t Mean Low Quality

Let's bust a myth right now: low-cost sound design doesn't have to mean low quality. We're in a golden age of accessible tools that deliver immense value without draining your bank account. The key is to find tools that are powerful, efficient, and versatile.

Instead of buying dozens of specialised tools, you want a solution that can do it all. You're looking for the best budget sound tools that give you the most creative firepower for your money. These are often all-in-one environments or affordable audio plugins that punch way above their weight class, giving you access to pro-quality sounds and workflows.

Krotos Studio: Pro Sound Without the Pro Price

This is exactly why we created Krotos Studio. We wanted to build something that would empower creators at every level. It’s a tool designed to give you everything you need for incredible sound design in one place.

We hear from filmmakers and students constantly who are blown away by what they can achieve.

"As a film student, Krotos Studio was a game-changer for my final project. I performed all the foley for my main character in an afternoon. I never thought my sound could be that detailed on my budget." – Chloe R., Film Student

For an independent creator, time is just as valuable as money. Krotos Studio is built for speed. It's an intuitive workflow that lets you perform sounds in real-time, perfectly synced to your picture. You're not just saving money on expensive libraries and plugins; you're saving countless hours of tedious editing.

Stop making compromises on your sound. Your story deserves to be heard, loud and clear. Elevate your film from good to unforgettable.

Ready to see what you can create?

"I used to spend days searching for the right sounds for my short films. With Krotos, I just drag a preset in and perform it in real-time. It's saved me an incredible amount of time and the results are amazing." – Ben T., Independent Filmmaker

If you’re assembling a lean toolkit, put techniques into practice with Creating Cinematic Sound Effects In Krotos Studio and check out our advice for enchancing realism in your sound design.

How-to guide
This is some text inside of a div block.

Animal sound effects

When you need animal sound effects that feel real, cinematic, and totally under your control, Animals & Monsters for Krotos Studio is the fastest way to get there.

JJ Lyon
December 19, 2025
Read Story↗

Animal Sound Effects That Go From Natural to Supernatural

When you need animal sound effects that feel real, cinematic, and totally under your control, Animals & Monsters for Krotos Studio is the fastest way to get there. This pack is all about range — from grounded wildlife to full-on fantasy creature energy — so you can build sound worlds that feel alive, tense, and unpredictable. Whether you’re cutting a nature sequence, a thriller teaser, or a creature-driven scene, these sounds give you instant character without the usual headache.

Instead of digging through endless folders or recycling the same overused library clips, you get a focused collection of animals and monsters designed to slot straight into modern workflows. The result: better sound design, way faster.

19 Creatures, One Pack, Endless Uses

Animals & Monsters gives you 19 spine-tingling animals and monsters that cover a huge emotional spectrum. You’ve got natural wildlife recordings for realism, and stylized monster designs that push things into the supernatural when your story needs more bite.

That means one pack can handle:

  • Nature documentaries needing clean, authentic animal sound effects
  • Creature features that demand bigger-than-life roars and attacks
  • Fantasy or sci-fi edits where your animals need to feel unfamiliar
  • Game trailers and shorts that rely on quick, high-impact sound moments

If your scene needs claws, breath, growls, wings, distant calls, or something that feels like it came from “beyond,” you’re covered.

Project-Ready, Mix-Ready Animal Sound Effects in Real Time

Here’s the big win: these animal sound effects aren’t just raw recordings you have to wrestle into shape. They’re built for real-time performance inside Krotos Studio — meaning you can audition, control, and drop them into your project instantly.

You don’t need to:

  • stack a million layers
  • spend hours tuning and reshaping
  • wait for slow export-heavy workflows

Instead, you get mix-ready results on the fly, with no technical friction. It’s the difference between searching for a sound and designing the moment.

Faster Workflows, More Animalistic Results

This pack is designed for speed without sacrificing quality. The sounds respond quickly, fit naturally in a mix, and scale from subtle detail to full cinematic menace. So you stay in creative flow — not stuck in sound-library limbo.

If you’re a video editor or creator, that matters. Because when you can generate the right animal sound effects in seconds, you can:

  • cut faster
  • iterate more
  • land stronger emotional beats
  • make your visuals feel bigger

Less time building. More time storytelling.

Ready to Unleash Nature (or What Lives Beyond It)?

Animals & Monsters for Krotos Studio lets you pull from the raw power of nature or lean into something darker and more stylized — all with the same fast, intuitive workflow. If you want animal sound effects that sound premium, feel unique to your project, and take minutes instead of hours to shape, this pack is your shortcut.

Download Animals & Monsters for Krotos Studio today, and let your next scene breathe, howl, snarl, and explode to life.

How-to guide
This is some text inside of a div block.

Exploring the Sound Design In Ten of the Best Sci-Fi Films of all Time

Discover how sound design shaped iconic Sci-Fi films like Star Wars, Blade Runner, and Alien, enhancing their immersive experiences and storytelling.

JJ Lyon
December 19, 2025
Read Story↗

Celebrating all things futuristic in sound design, we explore ten of the most iconic Sci-Fi films in modern cinema history to examine how their sound effects were created.

1. Star Wars Episode V: The Empire Strikes Back (1980)

Video from INDEPTH sound design

Explore even more futuristic design approaches in Celebrating a Month of Sci-Fi with Krotos Studio and discover practical film mixing tips with our Dune Part 2 Sound ReDesign. For those looking to expand further, try out the advanced features in Krotos Studio MAX.

Sound Design and Effects Creation

The sound design of The Empire Strikes Back built on the innovative work of the original Star Wars. Legendary sound designer Ben Burtt crafted iconic sounds, such as the roar of the Wampa and the hum of a lightsaber, using a combination of animal sounds and mechanical noises. The distinct voice of Yoda was achieved by blending the voice of actor Frank Oz with other elements to impart a mystical quality.

Notable Sounds

Sabers, Vader, and blasters aside, there are some iconic sounds throughout Empire. The Tauntauns' calls were created using recordings of sea lions and walruses, modified to fit the snowy environment of Hoth. The sounds of the AT-AT walkers were crafted from the modified noises of industrial machines to emphasize their mechanical nature and formidable presence.

Impact on Sci-Fi Sound Design

The approach taken in The Empire Strikes Back set a new standard for sound in science fiction films. Burtt's work not only enhanced the narrative but also deepened the immersive experience of the galaxy far, far away. His innovative use of everyday sounds to create something entirely new has influenced countless films since then.

2. Blade Runner (1982)

Sound Design and Effects Creation

Blade Runner features a sound design that perfectly complements its neo-noir aesthetic. Sound designer Peter Pennell and his team utilized a combination of synthesized sounds and real-world recordings to create a futuristic yet gritty soundscape. For example, the sounds of the spinner vehicles were crafted from recordings of jet engines mixed with the hum of electric motors.

Notable Sounds

The eerie, ambient soundscapes that define the dystopian world of Blade Runner were achieved through innovative electronic music techniques, including the use of the Yamaha CS-80 synthesizer by composer Vangelis. The haunting sound effects add a layer of depth to the film’s rich visual design.

Impact on Sci-Fi Sound Design

The sound design in Blade Runner has been highly influential, serving as a template for how sound can enhance the futuristic settings of sci-fi films. The film's use of sound to evoke emotion and build the world has been emulated by numerous films in the decades following its release.

3. Alien (1979)

Alien Sound Design Walkthrough Video from Empire of the Mind

Sound Design and Effects Creation

In Alien, sound design plays a crucial role in building suspense and a sense of isolation. The iconic sounds of the Alien creature were developed using a variety of animal noises, which were then altered to sound more sinister and otherworldly. The spaceship’s ambient sounds were designed to be both eerie and somewhat familiar, employing recordings of airplane cabins to simulate the interior of the spacecraft.

Notable Sounds

The chilling hiss of the Alien was crafted from a combination of snake hisses, along with other animal growls and hisses, all processed to create something unsettlingly alien. The sounds of doors and other equipment on the Nostromo were recorded from various machines and military equipment to enhance the industrial feel of the ship.

Impact on Sci-Fi Sound Design

The sound design of Alien serves as a masterclass in using audio to enhance psychological horror and tension. The use of layered, textured sounds creates an atmosphere that is as immersive as it is terrifying, setting a high standard for horror and sci-fi films alike.

4. 2001: A Space Odyssey (1968)

Sound Design Examination of 2001: A Space Odyssey by Mitchell McLaughlin

Sound Design and Effects Creation

The sound design in 2001: A Space Odyssey, directed by Stanley Kubrick, is as meticulous as its visual composition. Pioneering sound designer Winston Ryder created the film's sound effects to realistically mimic the silence and vacuum of space, often using the absence of sound to powerful effect. Mechanical noises within the spacecraft were recorded from various machines and modified to emphasize the eerie quiet of space.

Notable Sounds

One of the most iconic sounds in the film is the voice of HAL 9000, the ship's AI, achieved through straightforward, calm speech that deeply contrasts with its sinister actions. The use of classical music, like Strauss’s "Also sprach Zarathustra," provides a dramatic backdrop, enhancing the epic and timeless nature of the film’s visual sequences.

Impact on Sci-Fi Sound Design

2001: A Space Odyssey significantly impacted how soundscapes in sci-fi films are perceived, emphasizing realism and psychological impact. Its innovative use of sound to enhance storytelling and atmosphere has been influential across film and audio design disciplines.

5. The Matrix (1999)

Matrix Sound Effects Montage From Art of The Film

Sound Design and Effects Creation

The sound design of The Matrix played a crucial role in constructing its cybernetic world. Supervising sound editor Dane A. Davis blended synthesized and "organic" sounds to give digital elements like the Matrix itself a unique auditory signature. For instance, the sound of the Matrix code was represented by a mix of the sound of a rainstorm and synthesized sounds, creating a distinctive auditory cue for the virtual reality environment.

Notable Sounds

The bullet-dodging scene uses slowed-down and manipulated sounds to emphasize the time-distortion effect. The sounds of gunfire and ricochets were specially crafted to match the visual flair of the slow-motion effects, enhancing the film’s signature action scenes.

Impact on Sci-Fi Sound Design

The Matrix set a new standard for integrating sound with visual effects in action sequences, influencing a generation of filmmakers on how sound can be used to augment the digital effects that are now commonplace in sci-fi and action films.

6. Terminator 2: Judgment Day (1991)

Sound Design and Effects Creation:

For Terminator 2: Judgment Day, sound designer Gary Rydstrom created iconic auditory elements that matched the film's groundbreaking visual effects. The sounds of the T-1000 were particularly notable, employing a combination of metallic echoes and digital manipulation to depict its liquid metal form. Similarly, the sound of the Terminator’s movements was carefully crafted using various mechanical noises to convey the sense of heavy, metallic machinery in motion.

Notable Sounds:

The distinctive clanking of the T-800 and the liquid morphing sound of the T-1000 were achieved through layering metal sounds with digital effects, helping to define the characters’ mechanical nature. Gunfire and explosions were also tailored to have a significant impact, combining live recordings with enhanced digital effects to make every action scene intense and realistic.

Impact on Sci-Fi Sound Design:

Terminator 2 is often credited with pioneering the use of digital sound editing techniques in Hollywood. It pushed forward the capabilities of sound design in action-packed sequences and set a high standard for future films in the sci-fi genre.

7. Back to the Future (1985)

Sound Design and Effects Creation:

Back to the Future cleverly uses sound design to support its whimsical and adventurous tone. Sound effects for the iconic DeLorean time machine, including its time travel sequences, were created using a mix of electrical discharges and engine sounds to convey its futuristic capabilities. Sound designer Charles L. Campbell and his team provided a dynamic auditory experience that matched the film’s high-energy, comedic, and dramatic moments.

Notable Sounds:

The sound when the DeLorean activates its flux capacitor and achieves the necessary 88 mph for time travel is particularly memorable. This effect was achieved by layering sounds from various high-tension electrical devices and jet engines to create a powerful and resonant sci-fi sound.

Impact on Sci-Fi Sound Design:

The innovative use of sound in Back to the Future helped to create an engaging and believable time-travel experience, setting a playful tone that is crucial to the film’s enduring appeal. It remains a reference point for achieving an effective blend of science fiction elements with comedic and dramatic undertones.

Learn how sound designer Gareth Owen adapted these iconic sound effects and created entirely new ones for the theatrical adaptation, Back to the Future: The Musical, using Krotos plugins.

8. Jurassic Park (1993)

Sound Design and Effects Creation:

The sound design in Jurassic Park, by Gary Rydstrom from Skywalker Sound, is monumental in cinema history, especially for its creature effects. The dinosaur roars were crafted from a mix of animal sounds: the T-Rex's roar combined a baby elephant’s cry, an alligator’s gurgling, and other animal noises to create something both terrifying and majestic.

Notable Sounds:

The sound of the Velociraptors was famously created from recordings of tortoises mating, which Rydstrom described as eerily human and very intense. The blending of these natural sounds provided a lifelike quality to the dinosaurs, enhancing the film’s immersive experience.

Impact on Sci-Fi Sound Design:

Jurassic Park set a new standard for audio in visual effects-driven films. The realistic and powerful sound effects used for the dinosaurs played a key role in bringing them to life, profoundly impacting audience engagement and setting benchmarks for sound in cinema.

Interested in making your own dinosaur footstep sound effects? check out our sound design tutorials on Dinosaur Footsteps and Roars.

9. Inception (2010)

Sound Design and Effects Creation

The sound design for Inception, led by Richard King, plays a crucial role in conveying the film's complex narrative layers and dream states. The manipulation of ambient sounds and crafted auditory cues guide the audience through the different levels of dreams. Notably, a slowed-down version of Édith Piaf's song signals transitions between dream layers, serving as a standout auditory marker in the film.

Notable Sounds

The thunderous blaring of the "Inception horn" has become iconic. This sound, crafted from a slowed and processed brass section, creates a sense of grandeur and urgency that punctuates the dream sequences.

Impact on Sci-Fi Sound Design

The innovative sound techniques in Inception have greatly influenced cinematic sound design, especially in how sound can be used to navigate nonlinear narratives and complex temporal structures. The film’s audio cues have become culturally iconic, demonstrating the power of sound design in modern filmmaking.

10. The Day the Earth Stood Still (1951)

Sound Design and Effects Creation

This classic film utilized sound sparingly yet effectively to enhance its theme of otherworldly presence and tension. Bernard Herrmann’s score, featuring the theremin, created one of the first electronic soundtracks, which perfectly captured the eerie and mysterious ambiance of the film.

Notable Sounds

The use of the theremin, an electronic musical instrument controlled without physical contact, was particularly effective in evoking the alien and futuristic themes of the movie. This sound became synonymous with sci-fi and alien encounters in many subsequent films.

These films not only revolutionized visual storytelling in their respective eras but also advanced the field of sound design, demonstrating how integral sound is to the fabric of cinematic storytelling, especially in the sci-fi genre.

Impact on Sci-Fi Sound Design

The Day the Earth Stood Still had a significant impact on the use of music and sound in science fiction, particularly in how electronic instruments could be employed to enhance storytelling in sci-fi films. It remains a touchstone for the genre, influencing the auditory style of many future sci-fi projects.

Chronicling A Legacy of Sci-Fi Sound Effects

Cinema has pushed the boundaries of sound effects to new heights since the humble days of the 1950s. What films did we miss out in this rundown? let us know your contenders for the best sci-fi films and their sound effects!

How-to guide
This is some text inside of a div block.

Exploring Krotos Studio Pro

Unlock the full potential of Krotos Studio Pro with our comprehensive guide on edit mode, core engine, performance area, and saving presets.

JJ Lyon
December 19, 2025
Read Story↗

Introduction

With a Krotos Studio Pro subscription, you gain access to the edit mode, enabling the creation of presets, and detailed customization of the factory presets. This guide will explore the core engine area, performance area, and assignment area. Watch the video below!

You can also explore a wide range of assets in our free sound effects library.

Exploring Edit Mode: The Core Engine Area

The core engine area is the hub for importing sound files. There are four tabs, and each tab has up to four core engines. These are different types of sampler that you add sounds to.

Add engines by clicking the ‘+ Add Engine’ button and choose between the Granular, Reformer AI, or Sampler engines. Up to 16 engines can be combined within a preset. This enables you to add up to 4,000 sound files.

Sounds can be added directly from your library through drag and drop. You can mute, solo, or remove samples at any time. You can also Control level, pan, pitch, looping, volume normalization from the sampler.

Finally, autoplay, release triggers, and selectable playback modes (Random and Round Robin) are available in the core engines, to enable to you to control your presets in a range of innovative and easy ways.

Performance Area

The performance area mirrors the perform view that is so recognisable in Krotos Studio, but with some additional features. The ‘note trigger’ checkbox allows sound generation via the XY pad. With this, you can click inside the XY pad and the sound will be created.

The performance area also contains trigger buttons and macro dials for even further control, all while keeping things simple.

Labels can be renamed by right clicking them, and a variety of performing templates are available to suit different use cases.

Assignment Area

You assign parameters to the XY pad by dragging them onto the drop zones. These turn green when hovered over. Multiple parameters can be mapped to a single component. Modulation depth can be adjusted via sliders in the modulation table. Remove assignments by clicking the X next to the slider.

Saving and Loading Presets

Save your customized presets by selecting ‘save preset as’ from the burger menu, naming, and storing them in your library. Load presets via the ‘load user preset’ option.

Krotos Studio Pro empowers you to add your sounds, create new presets, and customize existing ones. Dive into our library or start building your own presets today.

Explore the full capabilities of Krotos Studio Pro and elevate your sound design to new heights. Happy creating!

How-to guide
This is some text inside of a div block.

The 10 Best Places to Find Great Sound Effect Libraries

Discover the best online resources for high-quality, royalty-free sound effects. Save time with our curated list of 10 reliable SFX sites.

JJ Lyon
December 19, 2025
Read Story↗

There is a huge quantity of sounds available on the internet, but quality is harder to find. Here are ten highly recommended sites for getting royalty-free SFX. 

If you’re involved in sound design in any way, you’ve probably found yourself sifting through endless sources online at some point, hunting for the perfect audio file to fit your project. Once you start looking, it can feel like you’re awash in a sea of sonic debris at times, with a seemingly infinite number of SFX libraries trying to catch you in their nets and reel you into a subscription.

It’s a distinctly modern paradox; with so much choice available, how are you supposed to choose? Well, today, we’re here to provide you with some no-nonsense online sources that you can always rely on when in times of need. Hopefully, by bookmarking these specialist audio sources, you’ll save a bit of time in the future and have a filterable catalogue to narrow down your searches.

THE SITES: A soundeffect, Penguin Grenade, SoundMorph, Mattia Cellotto, SoundBits, Boom Library, Krotos, A Sound Effect, FreeSound, Artlist

Best Sound Effect Libraries for your Video Edits

1. Krotos

Without being too braggadocious, there really is no better place to start than with our very own library of easily-accessible, royalty-free sounds, plugins and effects.

You’ll also find our all-in-one sound design powerhouse Krotos Studio, featuring 350+ custom sound effects presets to allow for completely original SFX in your productions.

One feature we think you’ll appreciate is that our sample packs are available as a one-time purchase, compared to other providers who offer a price-per-sample or subscription-based credit system. With our pack deals you’ll make savings overall and can dip in and out of our sound pool when the need arises, rather than having to pay-per-sound or being tied into a plan that will gradually erode your bank balance over time.

Our libraries are carefully curated to provide specifically-themed cinematic audio elements you might find useful in niche genres and styles. For example, our Ammo and Reloads Sound Effect Library does exactly what it says on the tin and comes locked and loaded with high-calibre 24bit, 192/96kHz bullet and reloading SFX WAV audio files. With our commitment to quality, diversity and usability, you’re sure to find a Krotos sound library to fit your needs.

2. A Sound Effect

With one of the largest ranges on this list, A Sound Effect makes for a nice home to all in the audio sphere as they feature large complete FX packs, bundles and music libraries, as well as a whole host of VST plugins that might spark your interest. If you’re passionate about supporting indie developers and want to purchase from a trusted source, this is your chance.

The A Sound Effect website makes for a nice royalty-free audio internet hub, as a lot of sound designers have their creations featured here through affiliation. As an example, remember Mattias Cellotto from earlier in the list? Well, all of his sound packs are also featured here. 

Who knows, maybe one day you’ll get your own sound design assets featured on A Sound Effect and leave a lasting mark on the SFX ecosystem.

3. Boom Library

Next up, we have Boom Library, who’ve had their stellar samples featured in some legendary productions from Blizzard, Ubisoft, Nintendo, and many more. If you’re like most people and you like to retain as much of your hard-earned cash as possible, you’ll find plenty of bang for your buck with their fine-tuned sample packs.

Boom features a number of ambient packs, including their Quiet Planet range, and these entries come in standard stereo, or surround sound, making them great choices for advanced sound designers. However, one of Boom’s limitations is that they strictly specialise in sound packs. So, if you’re looking for plugins to sculpt your own sounds, you’ll need to go elsewhere.

Boom have a number of free packs available if you want to extend a tentative toe into the sonic waters. For example, their Processed Impacts pack is ready to be added to your collection now, containing 348 high-grade impact samples.

4. Penguin Grenade

Penguin Grenade, run by indie sound designer and artist Paul Stoughton, specialises in experimental sound design using a combination of field recording, sound synthesis, and digital processing. 

Their packs are cutting-edge when it comes to sci-fi, with most of the sounds having a Halo/Dead Space vibe to them – which isn’t surprising as titles from both gaming series have featured sounds from the Penguin Grenade arsenal. Paul has also released an Essential Magic and Dark Magic pack which carry more Skyrim or World of WarCraft magicka characteristics.

The packs are niche, but they excel at their intended purpose. If you’re looking for sci-fi/magic sound assets for video game production, Penguin Grenade will provide ripe fruit ready for the picking.

5. SoundMorph

Now, let’s move on to the second entry in this list that stocks plugins on their virtual sound design shelving. SoundMorph primarily focuses on providing top-notch audio for video game design across a range of genres (primarily horror and sci-fi), however, they also have some musical packs available, with a dedicated page of advanced drum libraries made by professional musicians.

SoundMorph have released six VST plugins; five of which are synths, and the final one is a processing unit. They have even gone so far as to list their retro-style Dr01d synth for free, describing it as “our homage to retro sci-fi robots”. 

Whichever niche of sound design you find yourself in, there’s a good chance that you’ll probably hear something calling out to you in SoundMorph’s extensive catalogue of SFX samples.

6. Mattia Cellotto

Another indie designer with some undeniably impressive accolades, Mattia Cellotto’s audio works have had the privilege of being featured on AAA titles such as Battlefield V, Star Wars Battlefront II, and Jedi: Fallen Order, amongst others.

Mattia’s sound libraries are all recorded using foley techniques, then edited and exported at high-quality, stereo output, ready to be utilised in your next audio adventure. If you’re looking for tip-top fidelity captured by a truly veteran audiophile, Mattias Cellotto’s sound design store could be the right place for you.

The Metamorphosis library is just one example of many that demonstrates the level of professionalism that goes into orchestrating such a pack. Take a look at the accompanying trailer below to get an insight into some of the intricacies involved in the process. Additionally, some of Mattia’s packs are now available free of charge when you purchase any of the more recent additions.

7. SoundBits

The SoundBits catalogue includes a plentiful supply of sample libraries that reach far and wide across the web. Some of their samples are listed individually on third-party associate sites, such as Pro Sound Effects, Pond5, AudioJungle, and DepositPhotos and they also have releases distributed exclusively across their partnered stores, including on our very own Krotos webpage.

The packs available on their dedicated website are diverse and plentiful, with a heap of ambient packs; whooshes and impacts; foley and field recording packs; and genre-specific asset packs. You’re never short of options with SoundBits, so it makes for a great hunting ground for the eager sound designer.

All of the packs here are reasonably priced and welcoming to new audio workers looking to build a foundational library of their own. Feel free to take a look, safe in the knowledge that you’re surrounded by quality sounds.

8. Silverplatter Audio

Last but not least, we have Silverplatter Audio. With a tidy website and concise catalogue of well-presented sound packs, they’re clearly attempting to make it as easy as possible for you when it comes to locating and downloading premium sound effects. You could almost say they’re serving it up to you on a…nevermind. 

All the packs here have affordable price points, especially when compared to some other entries on this list, so this could be a great place to start building up your library. They even have a SWAG store, featuring a small range of branded clothing–a pretty unique feature that shows their personality.

Overall, Silverplatter Audio is a good example of “less is more”, as their range might not be as galactic in scale as some of the other sources mentioned, but they sure pack a punch. Check out their sounds and try one on for size – if it doesn’t fit then you can always pick up one of their organic ribbed beanies instead!

9. Artlist

The only entry on this list that focuses more on video assets compared to audio, Artlist has an abundance of royalty-free stock footage, image templates, and video editing plugins available. They’ve even released some of their very own complete video editing programs, demonstrating an impressive commitment to providing their customers with everything they need.

However, this is a list about sound libraries, so let’s take a look at their sound selection. Artlist features a Music and Sound Effects page on their website and the samples can be accessed through one of their various subscription tiers. They have a wide range of assets at high quality, and you can choose a subscription tier that best suits your needs. For example, if you plan to only use their audio services, you can choose one of the Music and SFX-only tiers.

The choice is yours and it really depends on what your preference is when it comes to acquiring sound files. If you prefer to go for a one-by-one approach and download singular files, a provider like Artlist could be for you, however, if you’re searching for entire packs, you might want to stick to one of the other entries.

10. Freesound

Another collaborative collection of sounds from across the globe, Freesound also functions as a hub where sound designers can share their work. A neat, unique feature on the Freesound website is their random sound of the day, whereby they post a random sound from their pool of 625,000+ samples.

One of the limitations of Freesound as an SFX depot is that just about anyone and everyone can upload their audio files on the site, resulting in some samples being low resolution and sub-optimal for high-grade design. Such is life when you commit to being a community-minded outlet though, and the collective spirit on the site is encouraging. They have a dedicated forum page with conversations occurring all day, every day, which makes for a useful information archive.

And there you have it; a collection of ten of the best, specialised, niche sound asset sources available online. It’s worth noting that the Krotos Sound Effects Library store features packs from most of the mentioned providers in this list, and we love to share, so any purchases of the partnered designer’s samples will result in an affiliate compensation. 

If you want to show your support to any of the highly talented sound designers mentioned and keep the world of sonic artistry spinning then we highly recommend browsing the Krotos universe. That sound you’ve been looking for is just around the corner. 

How-to guide
This is some text inside of a div block.

How All Creatives are Benefitting from Krotos Studio

Sound Designer Carlos Bricio shares how he feels Krotos Studio provides sound effects for all creatives, from beginners to professionals.

JJ Lyon
December 19, 2025
Read Story↗

Sound Designer Carlos Bricio shares how he feels Krotos Studio provides sound effects for all creatives, from beginners to professionals.

Here is where Krotos' originality comes into play. You don’t simply browse a library of sounds… you perform them! -Carlos Bricio

Are you a filmmaker needing professional-quality sounds, but don’t know where to start? Have you found yourself browsing endlessly for free sounds just to end up with something that didn’t quite fit your vision?

Finding the right sounds for a project can be difficult. It can be even more tricky if you don’t have the right tools, budget or library.

Thankfully Krotos Studio lets you create engaging sound FX all in one platform.

Carlos Bricio In His Studio
Carlos Bricio - Producer, Composer and Sound Designer

What is Krotos Studio?

Krotos Studio is an ever-growing platform. It allows everyone from professional sound designers, to film editors, or content creators to intuitively create realistic sound effects in seconds.

Krotos Studio has all the essential categories: ambiences, Foley, footsteps, whooshes, weapons and more.

Here is where Krotos' originality comes into play... you don’t simply browse a library of sounds… you perform them!

Krotos Studio User Interfaces

Performing Sound Effects

The magic behind Krotos Studio is that you perform sound. You set the preset for your scene, character or mood and then play around with the parameters until you get the sound that you are after.

The result? Sound effects tailored to your project, in seconds. But it doesn’t stop there...

Krotos Studio is interactive and ever-evolving. You can perform sounds just like a Foley artist would do, or capture ambience as if you were on location. This is all done in the box by simply clicking and dragging your mouse around - Carlos Bricio

Krotos Studio is all about staying creative while speeding up your workflow. No more auditioning sounds one after the other. Just perform the sounds while watching your footage and you are done!

Furthermore, Krotos Studio provides never-repeating variations to your sounds, making them more realistic. Every footstep, gunshot, rise or explosion will sound different.

Sound Designer Carlos Bricio Making Sound Effects

Krotos Studio for Beginners

Whether you have no idea about sound design, or you have just started in the world of SFX, Krotos Studio is a must-have tool.

The best part? You can get started for free.

The free version provides essential presets from city and forest ambiences to footsteps and Foley. Furthermore, there are fun and exciting sound effects like whooshes and lazer guns.

There is a wide range of useful presets to explore, letting you create original and royalty-free soundscapes.

Krotos Studio for Professionals

For professional sound designers and editors, Krotos Studio provides powerful features such as multi-channel output, MIDI control and automation. Additionally, an edit mode will also be launched in future updates, letting you add your own sound effects.

The Krotos Studio Sound Effects Presets

Krotos Studio is always evolving. As well as the sounds included in the free version, there are over one hundred sound effects presets available in an affordable subscription, with new sound effects added every month.

Overall, Krotos Studio is a fun and inspiring tool to add realism to your sound designs. Now anyone can get started creating awesome sound effects!

Carlos Bricio is a producer, composer and sound designer based in Madrid, Spain.

How-to guide
This is some text inside of a div block.

What's the YouTube Sound Effects Library and How Does it Work?

Discover how to get sound effects and music from this free resource for creators, and see when the YouTube Audio Library is best to use and best to avoid

James Russell
October 17, 2025
Read Story↗

With over 500 hours of content uploaded to YouTube every minute, it can be hard to stand out from the crowd. Sound is a big part of making your video unique and different, and a lot of new creators will face familiar questions in this field when they’re just getting started: how can I source sund effects for free? What music tracks am I allowed to use?

Using high-quality sound effects is important. Thankfully, there’s no shortage of royalty-free sound effects libraries online. But did you know that YouTube has its own stock SFX and music library, built into the platform itself? Read on for a comprehensive guide to the pros and cons of using the YouTube Audio Library compared to other offerings in Free Sound Effects Solutions.

The YouTube Audio Library

It’s crucial to understand that you can’ t just throw a bunch of your favourite copyrighted music tracks and SFX into your videos – this is a fast track way to getting your tracks demonetized or worse, taken down entirely. The YouTube Audio Library is a quick solution to this. It doesn’t cost anything to use, provided you only use the assets on YouTube itself, making it a solid bedrock from which to jump straight with crafting content on a budget.

Everything in the library is totally free to download, and it’s integrated into YouTube Studio, offering both music and sound effects that are pre-cleared for usage on YouTube. This means there is no need to worry about any royalties, copyright strikes or losing ad revenue to a rights holder as a result of these audio clips, as long as you keep your creation to YouTube itself.

The YouTube Video Library is also pretty big: there are thousands of music tracks available and more are added every month. You can filter by genre (say, rock, ambient, cinematic or lo-fi) or by mood (calm, happy, dramatic and so on). There are also hundreds of sound effects, covering everything from alarms and swooshes, to footsteps and impact noises. Everything here is perfectly usable and makes for a solid jumping-off point; it provides quick inspiration without having to worry about paying upfront.

But it's important to note that because it's the default free option, the most popular tracks and effects will already be in use, potentially by millions of other new YouTubers (NewTubers?) like yourself –  so there’s a good chance people will recognise them already.

What’s Wrong with the YouTube Audio Library?

It’s a free resource for sound effects that provides royalty-free audio clips… so what could possibly be wrong about the YouTube Audio Library? In other articles, we've claimed the YouTube audio library is dead, and how to move beyond it. Let's have a look at a few of the negatives behind using the YouTube Audio Library.

You’ll Probably Recognize Most of the Sounds

The ease of use and cost-effectiveness of YouTube’s Audio Library make it a great asset, but they also provide its biggest disadvantage. With so many people using them, many of these sounds have become ubiquitous across the web and anyone using them will struggle to stand out from the crowd. You only have to read the comments on some of its most popular stock tracks to see they’ve become oversaturated to the point of being meme worthy.

The Quality Isn’t Top Notch

YouTube provides these files as 320kbps MP3 downloads, which is good, but not great quality. If you’re looking for the highest quality, uncompressed audio, you’re better off looking elsewhere.

You May Have to Edit the Sounds

Furthermore, YouTube’s stock sounds are very much ‘one size fits all’, meaning they’re not tweakable in any way outside of audio editing software. If your audio track is too short for a clip you’re using, you’ll have to spend time looping and crossfading to get it long enough. If you’re looking to have the most flexibility and control over your sound effects, then there are better options available.

The License is Only for Uploading to YouTube

Bear in mind also that the free use license only applies to YouTube; the minute you take your video content to another platform such as, say, Tiktok, you’ll find yourself in a legal grey area. You’ll need to be careful with how you share such content to avoid getting yourself in trouble, or instead use a solution that’s royalty-free across all platforms.

How to Improve on the YouTube Audio Library?

If you’re looking to stand out from the crowd, YouTube’s static sound database may not cut the mustard. When there are millions of other small channels using the same "Whoosh_01.mp3" clip as you, you’ve certainly got your work cut out for you.

Krotos Studio lets you perform your own unique sound effects, like a Foley studio inside your computer. Even if two creators use the same "Cinematic Whoosh" preset, the sound will be different because it depends on how you move your mouse. You are generating a unique performance, not just playing a file.

There’s also a solution to the aforementioned timing issue, as Krotos also includes a nifty Instant Render tool that’s a cinch to use. Once you’ve picked a sound, (say, a rainy city soundscape) simply specify how long you’d like the audio file to be and it will generate a non-repeating, seamless track of that exact length instantly. No manual looping required. Or say you need footsteps on gravel that start slow and speed up? Rather than faffing around auditioning 50 different "footstep" files, you can simply “play” them yourself with a mouse or MIDI controller. This way, you can match the audio to what’s being shown on screen, saving hours of tedious syncing and splicing.

Another common complaint is that sound effects from YouTube’s stock library can sound thin and uninspiring by themselves. The solution is to layer sounds convincingly in a way that avoids overpowering the rest of the mix. This can be complicated, time consuming work that slows you down and takes you out of the creative flow. Krotos Studio’s Ambience Generator removes this pain point, making it quick and painless to create sounds based on simple text prompts, or even just screenshots of a video.

Questions About the YouTube Audio Library

Can you access the YouTube Audio Library without being logged in?

No. You’ll need a Google account to access YouTube Studio and its included Audio Effects Library.

Are the tracks on YouTube’s Audio Library royalty free?

It depends. Are you sticking to YouTube only? Then yes, you’ve got nothing to worry about in terms of monetization, copyright, and so on. But problems may emerge when you use copyrighted music and sound effects on other platforms such as TikTok, as doing so could technically result in a copyright claim.

Why do my sound effects seem generic?

In all likelihood, because they probably are. With millions of people dipping into the same limited pool of sounds on YouTube’s Audio Library, people begin to subconsciously register them as “cheap” or “generic” in their minds.

My audio clip isn’t long enough for the scene I’ve produced. What should I do?

If you’re working with a simple soundscape without any sharp audio transients, you can manually trim, fade, and splice static audio files to extend them. Be careful not to stretch the audio too much, which can make it sound distorted or unnatural.

I’ve found some nice background ambience, but certain elements are too distracting. Can I remove them?

Any sound effects downloaded from YouTube’s Audio Library will be “baked” into a single MP3 file, without any easy way to separate individual elements.

How-to guide
This is some text inside of a div block.

Working with Sound Effects in Davinci Resolve

Learn how to command audio clips and functions in the Blackmagic NLE software, and come out with better, more polished audio channels and tracks

James Russell
October 17, 2025
Read Story↗

DaVinci Resolve is known for its professional editing tools and powerful colour grading, but it also includes a strong set of features for working with sound effects and audio clips. Whether you’re placing simple SFX, shaping ambience, or refining transitions, Resolve gives you precise control over these elements. 

By the end of this guide, you should feel confident handling sound effect tasks within DaVinci Resolve. We’ll cover core techniques like moving, muting, trimming and splitting audio clips, before moving on to more advanced workflows such as automation, reversing, panning and applying audio effects. You’ll also learn how to use fades and crossfades to create smoother, more natural sounding transitions.

For further information on working with audio in Resolve, check out our article on How to Do Anything with Audio in DaVinci Resolve. It the software’s extensive audio features and how you may potentially use them in your own projects. In addition, if you are stuck on where to start building a sound library, our Free Sound Effects collection is a great place to begin, and you can check out How to Download Free Sound Effects and Use them in Your Projects.

Basic Audio Clip Editing in DaVinci Resolve

How to Move Audio Clips in DaVinci Resolve

Moving audio clips in DaVinci Resolve is very straightforward, and you’ll find yourself doing it constantly throughout any edit. Simply select the audio clip in the Edit page timeline and drag it left or right to reposition it against your video. You can also drag it up or down to move it to a different audio track if your project becomes crowded.

For more precision, turn off Snapping (N). This allows you to move clips freely without them attaching to edit points or the playhead.

How to Mute Audio Clips in DaVinci Resolve

To mute audio in DaVinci Resolve, select the clip and press D to disable it (or right click>enable/disable clip). This keeps the clip visible in your timeline but silences it during playback and export.

Alternatively, open the Inspector and lower the clip gain to negative infinity. This is useful if you want to maintain the clip’s presence but still experiment with different sound combinations.

If you need temporary silence without disabling the clip, use the Mute button in the track header to mute an entire track at once.

Top Tip: Clip disabling is a cleaner method than lowering gain because it keeps your mix visually organised, especially when testing variations.

How to Replace Audio Clips in DaVinci Resolve

Replacing an audio clip allows you to keep its timing and position while swapping the sound itself. To do this, load your new audio file in the Source Viewer, align the playhead where you want the replacement to begin, then use Replace Edit (F11) (or Edit>Replace). Resolve will update the clip while leaving the timing and edit structure untouched.

This is ideal for swapping temporary sound effects, scratch recordings, or updating audio you’ve refined outside of Resolve.

How to Trim Audio Clips in DaVinci Resolve

Trimming audio clips is essential for getting your timing right. Hover your cursor over the start or end of a clip until you see the trim brackets, then drag inward to shorten it. Resolve updates the waveform in real time, helping you trim to the exact transient or moment you need.

Zoom in using Alt + scroll for more precise adjustments. Trimming does not ripple other clips by default, making it ideal for localised timing fixes.

How to Split Audio Clips in DaVinci Resolve

Splitting audio in Resolve helps isolate sections for processing, remove unwanted noises, or apply specific transitions. Move the playhead to the exact frame where you want to cut, select the clip, and press Ctrl + B. You can also use the Blade tool (B) for more manual slicing.

You’ll now have two independent clips you can move, trim, fade, or process separately.

Top Tip: Use splits before adding fades so each section can receive its own fade shape without affecting the whole clip.

Advanced Audio Clip Editing in DaVinci Resolve

How to Automate Audio Clips in DaVinci Resolve

Automation in Resolve lets you create volume or panning changes over time. Select your audio clip, open the Inspector, and activate the keyframe icon next to Volume/Pan. You can then add keyframes where needed and drag them up or down to adjust levels.

You can also automate directly in the timeline using the clip keyframe lane, which makes visual adjustments much easier.

Automation is perfect for ducking music under dialogue, emphasising specific moments, or creating more dynamic scenes.

How to Loop Audio Clips in DaVinci Resolve

Looping audio clips helps you extend ambience, music beds, or rhythmic effects. Resolve does not automatically loop audio, so you’ll need to duplicate your clip manually. Hold Alt, click the clip, and drag to create a duplicate. Place it directly after the original to build a seamless loop.

If you need to tidy things up, you can group the duplicates or combine them using a Compound Clip, keeping your timeline cleaner.

Top Tip: When looping ambiences, offset each duplicate by a few milliseconds and add a crossfade to avoid a noticeable looping pattern.

How to Reverse Audio Clips in DaVinci Resolve

Reversing audio is great for transitions, build-ups, or creative sound design. Select the clip, open the Inspector, and under the Speed Change tab select the reverse button. The waveform flips to show its reversed direction.

Reversed breaths, risers, or hits can add strong emphasis to scene transitions or stylised moments.

Top Tip: Add reverb before reversing for a “sucked-in” effect that works beautifully for cinematic transitions.

How to Normalise Audio Clips in DaVinci Resolve

Normalising helps control inconsistent loudness by raising levels to a target value. Right-click the audio clip and choose Normalize Audio Levels. Here you can choose peak or loudness targets depending on the material.

This is especially useful for dialogue or unevenly recorded SFX. You can use compression afterwards to further smooth dynamics.

How to Pan Audio Clips in DaVinci Resolve

Panning places audio across the stereo field. Select your clip, open the Inspector, and adjust the Pan control to move the sound left or right. Fairlight’s audio settings offer several pan laws and stereo modes, allowing you to create more immersive mixes.

This is especially effective for matching on-screen movement or widening your soundscape.

Top Tip: Subtle movement is usually best. Extreme panning works well for creative effects but can feel unnatural in grounded scenes.

Using Audio Clip Effects in DaVinci Resolve

Applying Audio Effects in DaVinci Resolve

DaVinci Resolve includes a wide range of built-in audio effects such as EQ, Noise Reduction, Reverb, and Dynamics. Open the Effects Library, scroll to the Audio FX section, and drag an effect onto any clip.

Once applied, open the Inspector to adjust each effect’s parameters. This is useful for improving dialogue clarity, shaping sound effects, or enhancing ambience.

Top Tip: For deeper audio editing, switch to the Fairlight page. It offers far more control, including buses, meters, routing, and advanced plugins.

Using Audio Clip Transitions in DaVinci Resolve

How to Fade In Audio Clips in DaVinci Resolve

Fading in audio helps avoid sudden or harsh entrances. Hover near the start of the clip until the fade handle appears, then drag it to the right. You can adjust the fade shape by right-clicking the fade curve and choosing from several options.

Fade shapes control how gradually the sound enters, helping you match energy and pacing.

Top Tip: Short fades help avoid clicks on sound effects, even when they’re only a few frames long.

How to Fade Out Audio Clips in DaVinci Resolve

To create a fade-out, hover near the end of the clip until the fade handle appears and drag it to the left. Right-click the fade curve to choose different shapes, giving you finer control over how quickly the audio decays.

This works particularly well on music, ambience, or stems that need to finish smoothly.

How to Crossfade Audio Clips in DaVinci Resolve

Crossfades blend two audio clips together for smoother transitions. Overlap the end of one clip with the start of another on the same track, and Resolve will automatically create a crossfade. You can lengthen or shorten the crossfade using the fade handles between the clips.

Crossfades are great for smoothing dialogue cuts, connecting ambience, or making SFX feel consistent.

Top Tip: If a crossfade sounds uneven, try matching levels or applying light EQ to both clips before blending them.

Further Reading

We hope this guide has helped you feel more confident working with audio clips and sound effects in DaVinci Resolve. You’re now ready to put these techniques into practice, and start shaping audio in your own projects. For more advanced tips and a more polished mix, take a look at our guide on How to Balance Music and Sound Effects.

How-to guide
This is some text inside of a div block.

How to add Footsteps to a video in DaVinci Resolve.

Discover how Krotos Studio transforms the creation of footstep sound effects in your sound design and video editing projects.

JJ Lyon
December 19, 2025
Read Story↗

Crafting the perfect footsteps in a scene can often be a tedious and time-consuming task, especially when striving for that ideal sync and realism. However, with the seamless integration of Krotos Studio into DaVinci Resolve's Fairlight tab, this once painstaking process becomes effortlessly simple. In our latest video, discover how this powerful combination transforms the art of adding footsteps to your projects, making it a smooth and painless experience. Watch as we demonstrate the ease and efficiency of using Krotos Studio to bring authentic footstep sounds to life in your scenes.

For authentic sync and texture techniques, study the art of footsteps further in Every Step Counts: Mastering Footstep Sound Effects. You can also explore a wide range of assets in our free sound effects library.

What Sound Effects Do We Need?

It's a pretty simple scene. We have two people walking down a concrete city street. One person is wearing sneakers, the other is wearing boots. Their footsteps are out of synchronisation with one another, so we'll need two different paces with two different footwear types.

Adding Footsteps in Sneakers Sound Effects

In the Fairlight tab, we have Krotos Studio already added to an audio track. We have loaded the 'Sneakers Urban' preset.

We click the 'R' or record arm button on the audio track, then hit the little red circle 'record' button below the viewer and simply click in the top left 'concrete' corner to match the surface our character is walking on.

Once recorded, move the recorded clip down to another audio track. That's one walker finished, now on to the next!

Adding Footsteps in Boots Sound Effects

So now we'll repeat the same process, only this time for the character wearing boots. We have now selected the 'Boots Urban' preset, and we're going to click in time with our character at the back. Once recorded, we'll add this recording to another audio track like we did with our sneakers.

Adding City Ambience Sound Effects to our Scene

With our footsteps in place, we then add some real-worldness to this scene with the 'City' preset. We didn't want to hear any sirens or horns in this particular scene, so we moved the second XY pad to the bottom left corner to mute it. Then we simply hit record and capture our ambience!

The Finished Result

When we hear what it all sounds like together, you have high-quality and unique-sounding footstep recordings, at different paces, in different footwear, complete with a rich and dense metropolitan soundscape.

This is just ONE example of what can be done with Krotos Studio. With over 200 presets, AI technology, and a fast and effective workflow, imagine what else you can achieve in your projects.

Buy Now

How-to guide
This is some text inside of a div block.

Creating Cinematic Sound Effects In Krotos Studio

In this quick guide, we show you how to use the cinematic category, to start sending tingles up the spines of your audience.

JJ Lyon
December 19, 2025
Read Story↗

Ever watched a movie and felt chills from its sound effects? With Krotos Studio, you can achieve this phenomenon for your own videos! Krotos Studio is perfect for powerful cinematic sound effects. In this quick guide, we show you how to use the cinematic category, to start sending tingles up the spines of your audience.

Watch how Krotos Studio creates cinematic sound effects quickly and easily!

To take your cinematic designs further, explore the dramatic cues in our 'Cinematic Tension' Free Sound Effects Library and learn how to adapt these methods for interactive media in Creating Video Game Trailer SFX with Krotos Studio.

Cinematic Sound Effects Presets in Krotos Studio

The cinematic category provides a huge collection of cinematic sound effects from whooshes to magic spells. With just a few clicks, you can create powerful cinematic sound FX, simply by clicking and dragging in Krotos Studio's performance area.

The cinematic category covers all essential sounds for drama, momentum, action, tension and more, across a range of presets. There is a vast collection of presets, and each is filled with unique assets, meaning you generate new variations every time you click. And you don't need to worry about losing your sounds, as Krotos Studio is always recording! simply click-drag recording to save the sounds you like the most.

Explore all Cinematic presets, and watch what they include and sound like.

Now that you're familiar with the vast array of presets, let's delve into how you can create with them

Why Krotos Studio for Cinematic Sound Effects?

Krotos Studio eliminates the time-consuming traditional process of collecting individual sounds, and then layering them to build sound effects for your projects. Instead, it generates unique cinematic sound effects with a few click-and-drag gestures.

Creating Cinematic Sound Effects in Krotos Studio

The Cinematic category presets are performed with either X-Y pad in the performance area.

Creating Sounds with the Presets

In each preset, you will see at least one 1 X-Y pad. To trigger sound effects, simply click inside the left X-Y pad.

There is a unique sound type in each quadrant. The closer you are to a particular corner, the more of that sound you will hear. You can click along the sides or centre to combine materials for more complex sound effects.

Tip: try short clicks for shorter sound effects, or click and hold for longer sounds. Move across the X-Y pad in different directions as you click and drag to combine the sounds in interesting ways.

Additional Controls

Cinematic sound effects are highly varied and require different parameters for every use case. As a result, the control layout changes depending on the preset selected. Some have 2 X-Y pads, for example, while other presets have controls for reverb amount, pitch, punchiness and more.

Dive into the cinematic presets and see what you can achieve with each selection.

Tip: You get a new sound every time you click, meaning your sound effects don’t become repetitive! Use the pitch controls to tailor these sounds even further; pitch upwards for smaller, lighter doors, and pitch downwards for big, heavy doors.

Exporting Cinematic Sound Effects From Krotos Studio

Krotos Studio records in the background as you perform, no need to hit a record button. Simply create your sound effects by clicking and dragging in the left X-Y pad and you will see the recording alert on the application.

Krotos Studio Recording Notification

Once you are happy with your sounds, click and hold the drag recording button, and drag out of Krotos Studio into your video editor, sound editor or DAW.

Krotos Studio Drag Recording Notification

Release the click when hovering over the timeline in your editor and your sound effects will be immediately added to your project!

Tip: You can set a location to store all of your sound effects using the burger menu in the top left corner. Set the location to where your other footage is stored to keep all of your assets together automatically.

Summary

With a huge collection of cinematic sound effects at your fingertips, you're not just getting a tool – you're unlocking a universe of sound possibilities. Whether you're crafting an action-packed trailer, a suspense-filled drama, or a fantasy epic, the power to astonish your audience is now within reach. Dive into your cinematic presets and redefine your sound design journey. Your next masterpiece awaits!

Explore all cinematic presets

Dive into Krotos Studio to embark on a sonic adventure like never before.

How-to guide
This is some text inside of a div block.

Every Step Counts: Mastering Footstep Sound Effects with Krotos Studio

Krotos Studio is the perfect solution for dynamic, realistic footstep sound effects. Discover what you can achieve with our quick guide!

JJ Lyon
December 19, 2025
Read Story↗

Krotos Studio is the perfect solution for dynamic, realistic footstep sound effects. Discover what you can achieve with our quick guide!

In this video we show you how you can create realistic, high-quality footsteps with minimal effort, letting you focus on the more important parts of your production.

For natural‑sounding movement, blend footstep layers with spatial beds of sound by Creating Ambience Sound Effects With Krotos Studio.

Footstep Sound Effects Presets in Krotos Studio

The footsteps category provides ready-to-go footstep sound effects from a wide range of footwear across numerous surface types, with four detailed terrains on each surface. Furthermore, you can set the pace of your footsteps by clicking in the performance area in synchronisation with your footage. If you need a running pace, you simply click faster!

Footwear covers all essentials including boots, heels, shoes and sneakers, and even includes flip flops, socks and barefoot footsteps. These are recorded across many surfaces including tile, carpet, wood floor, grass, mud, sand, metal, grass, broken glass, gravel and many more. Explore all footsteps presets, and watch what they include and sound like.

Why Krotos Studio for Footsteps?

Krotos Studio eliminates the time-consuming traditional process of collecting individual sounds, then layering, editing, and looping them to build sound effects for your projects. Instead, it generates unique footsteps. These workflows sacrifice ease of creation in order to provide more control, but with Krotos Studio, you get both. You set the pace. You decide the footwear. You choose the environment. All it takes is a few clicks.

Follow our guide below to create footsteps in Krotos Studio, one step at a time!

How to Create Footsteps in Krotos Studio

In each preset, you will see X-Y pads with multiple surface types in the corners. To trigger footstep sound effects, simply click inside the X-Y pad. the closer you are to a particular corner, the more of that surface you will hear. You can click along the sides or centre to combine surfaces for more complex textures!

Tip: You can transition across surface types by beginning your clicks in one corner, and then gradually clicking across the X-Y Pad to other corners.

Controlling the Pace of Your Footsteps

Controlling the pace of your footsteps is as simple as clicking at the pace you require. Click quickly for running, or slowly for walking.

Adding Realism With Scuffs and Stops

You can trigger foot scuffs and stops separately from your steps, for more realistic walking sound effects.

Tip: Try clicking the scuff button when your walker changes direction, or using the stop button for the last footstep in a walking sequence.

Pitch and Pan Controls

You can adjust the sound of the footsteps with the pitch control, and you can change the position of the footsteps in the stereo field with the pan control. Move this parameter downwards to position your footsteps to the left, and inversely move it upwards to position your footsteps to the right.

Tip: Pitching footsteps upwards for lighter footsteps, and downwards for heavier footsteps.

Performing your Footstep Sound Effects

You can perform the footsteps for your footage by counting the steps the person walking takes, then clicking in the performance pad for the same amount of steps.

You can also perform your footsteps in synchronisation with your footage. Play your footage back and trigger the footsteps in Krotos Studio in time with the footsteps of the person walking.

Exporting your Footstep Sound Effects From Krotos Studio

Krotos Studio records in the background as you perform, no need to hit a record button. Simply create your footsteps by clicking in the performance area and you will see the recording alert on the application.

Then once you are happy with your footsteps, click and hold the drag recording button, and drag out of Krotos Studio into your video editor, sound editor or DAW. Release the click when hovering over the timeline in your editor, and your footsteps will be immediately added to your project.

Tip: You can set a location to store all of your sound effects using the burger menu in the top left corner. Set the location to where your other footage is stored to keep all of your assets together automatically.

Summary

Krotos Studio's Footsteps category offers an incredibly versatile and powerful collection of sounds for creating dynamic and realistic footsteps. From the simplicity of using a single surface to the complexity of combining multiple surfaces, Krotos Studio provides a vast array of possibilities for creating footsteps, quickly and easily.

How-to guide
This is some text inside of a div block.

How to do sound design in Premiere: fast, practical steps

This guide starts by showing what typically goes wrong, then gives a fast, practical Premiere centred workflow to get pro sounding results without the guesswork.

JJ Lyon
December 19, 2025
Read Story↗

If your Premiere timeline sounds messy, you will waste hours fixing small problems later. This guide starts by showing what typically goes wrong, then gives a fast, practical Premiere centred workflow to get pro sounding results without the guesswork. Read it with your project open and a cued timeline, and you will be able to clean things up, design quick SFX and export delivery ready stems in a single session.

Common mistakes that ruin sound design in Premiere

A lot of projects start to fall apart because audio organisation was treated as optional. Here are the usual suspects that turn a tidy edit into a nightmare when deadlines press.

• Mixing dialogue, music and SFX on the same tracks without buses. When every element lives on the same track you cannot apply group processing, automate stems, or export clean dialogue masters for reversion. That means more manual moves and late night bounce tweaks.

• Poor file and timeline organisation that makes iteration slow. Bad naming, scattered bins and no markers turn a five minute tweak into a thirty minute hunt for the right hit.

• Relying on single source stock hits instead of layered textures. One-shot sounds can feel thin and obvious, especially on big screens or headphones. Layers sell depth and hide the origin of a stock hit.

• Skipping quick checks, like phase, pops and sync, until the last minute. Small phase issues, alignment pops or a mis-synced clap are cheap to fix early and expensive to salvage later.

• Over processing early and creating a brittle, unfixable mix. Slapping heavy EQ, gating and limiting on raw tracks before structure is locked makes later edits fight the processing chain.

Why messy timelines cost more time than you think

A messy timeline looks small on the surface, but it multiplies work. When tracks are unnamed or everything lives on the same channels you will be repeatedly hunting for clips, duplicating edits or accidentally trimming the wrong take. That creates rework loops that amplify under a deadline, because every change requires checking dozens of affected clips, re-rendering previews and re-exporting multiple versions. Proper track structure and naming reduce cognitive load, minimise accidental edits and let you export stems or stems-only versions for clients or re-recording in a single pass.

Common creative traps that sound fake

Creativity gets undermined by obvious shortcuts. One obvious one shot whoosh, a reverb that does not match room size, or ambience lifted from a different scene will break immersion. When SFX sit too cleanly on the mix or are the same sound repeated, the ear flags them as artificial. The cure is small: subtle variation, layered textures, correct reverb type and decay, and matching ambience level to the camera lens and framing. Those small creative choices stop you from redoing scenes because the sound just does not feel like it belongs.

The better principle: separate, simplify, iterate

If you want fast, reliable results, split your workflow into clear phases and keep each phase lightweight. Separate, simplify and iterate is the principle: edit first, then design, then mix, then finalise.

• Work in clear stages: edit, sound design, mix, finalise. Each stage has a single goal and a short checklist. Treat sound design as a distinct pass, not an afterthought squeezed into picture edits.

• Create a minimal track template and use buses and submixes. With a template you only make the routing and group processing decisions once, which speeds every project.

• Prioritise story clarity, dialogue first, then atmosphere and hits. If the dialogue is clear, you can push music and SFX harder without losing the message.

• Use placeholders and quick proof versions so you can iterate. Drop simple whooshes and ambiences early to sell mood, then replace with layered, fully designed elements before final mix.

Set up a ‘sound-first’ Premiere template

A lean sequence template is your best speed hack. Create tracks in this order, from top to bottom: dialogue, ambience, foley, SFX, music, master bus. Route dialogue, ambience and SFX to submix buses so you can apply single instance processing like a bus compressor or noise reduction. Label each track by role and scene, for example Dialogue A, Dialogue B, Ambience BG, SFX Fore. Save the sequence as a template project or export a project template so every new edit starts with the same routing and fewer decisions.

Decide SFX hierarchy before you design

Before you hit the fancy tools, choose which sounds matter most to the story. Rank elements by importance: dialogue clarity, then foreground foley that sells action, then background ambience, finally decorative hits and musical stings. Put a small time budget against each category and design to that budget. Knowing your hierarchy lets you spend seconds or minutes on low priority sounds and reserve creative time for hits that need to sell the scene.

Step-by-step Premiere workflow for fast sound design

Here is a practical, trackable workflow you can follow every time. It keeps the edit moving and leaves room for creative experimentation without chaos.

• Project prep: import, build bins, name files and add markers. Treat organisation as part of the edit.

• Track setup: create buses, submixes and routing for dialogue, SFX and music. Make export-ready stems possible from the start.

• Design: layer quick elements to sell hits and movement, keep timing tight to picture.

• Mix basics: use gentle EQ and compression, send/return reverb for depth, check loudness early.

• Export: render stems and full mix with safe file names that clients and post houses can understand.

Prep: organise assets and set markers

Start with a disciplined import routine. Create bins for dialogue, SFX, foley, ambience and music. Rename takes so they include scene and take numbers, and immediately add markers on the timeline for key frames, sound hits and edit points. Use coloured labels to mark priority assets. If you are working with reference tracks or temp music, add a labelled reference marker so you can always jump back. Good markers and bins make finding that one weird breath or an essential footstep instant, saving minutes every time you make a tweak.

Design: fast layering and match-to-picture

Design quickly by building a three layer recipe for hits. Layer 1, the impact or transient, gives attack and punch. Layer 2, the body, provides tonal weight and character. Layer 3, texture or ambience, adds grit and spatial context. Shift timing by a few frames to sell impact without losing sync, pitch shift subtly for variation, and use slight randomiser or stretch for naturalism. For movement, automate pan and level on a submix to create motion that matches the camera. Keep iterations short, auditioning in context and replacing placeholders only when you are happy with the movement.

Mix: routing, simple processing and quick LUFS checks

Route like a pro. Send dialogue tracks to a dialogue bus with mild EQ and de-essing, SFX and foley to their own buses with group compression where needed, and music to a music bus with a simple high pass if it crowds the voice. Use send/return reverb to glue ambience, rather than putting reverb on every clip. Do a quick LUFS check for the target platform, apply gentle limiting on the master to control peaks and export stems: Dialogue stem, Music stem, SFX stem, Full mix. Keep file names descriptive and include sample rate and bit depth so downstream engineers do not need to guess.

How this workflow looks in real projects

Different projects demand different priorities. Below are three realistic scenarios and how you can apply the same principles with speed.

• Short form social clip where clarity and punch matter most.

• Interview or documentary where ambience and dialogue are the focus.

• Cinematic action scene requiring layered impacts and whooshes.

Short social clip, fast impact with minimal tracks

For social clips you are usually fighting both time and platform loudness. Prioritise dialogue or a key line, keep music lower so the line reads on mobile, and use one punchy whoosh layered with a small texture to sell transitions. Use a single SFX bus with simple compression to glue all hits and a master preset for LUFS appropriate to the platform. Export a quick proof for review and a separate loudness optimised version for upload, both named clearly with the platform target in the filename.

Interview/documentary, keep dialogue front and centre

Here the story is everything. First, clean room tone and equalise for intelligibility. Replace awkward silences with a consistent room tone track rather than filling with noticeably different ambience. Place unobtrusive foley under edits to avoid distracting from the speaker. If you do add music, duck it with a sidechain or automation so dialogue never fights the score. Export a dialogue stem for archiving or subtitling workflows, and a full mix for client approval.

Cinematic action, build believable impact with layers

For action scenes take the layered hit recipe and expand it. Use a low sub impact for weight, a mid range body for character, and a higher transient or metallic layer for snap. Add whooshes timed to camera movement, but introduce slight timing variations for realism. Keep reverb conservative on hits, and instead place ambient reverb on a return to maintain a consistent space. Check your mix in headphones and on monitors, then export stems for foley, ambience and SFX so the sound editor or mixer can further refine without redoing your design.

Final checks before export to avoid last-minute disasters

Before you hit export walk through a short but thorough checklist, written here as prose so you can keep it in your head while you put the kettle on. Confirm audio and video are perfectly in sync and look for any clip slips or misaligned edits. Remove clicks and pops with small fades or the audio stretch tool, and check that all fades are consistent so nothing cuts abruptly. Verify dialogue intelligibility by listening on both studio monitors and headphones, then adjust music and SFX balance so the voice always reads. Run a quick loudness and peak check to make sure you are within delivery guidelines, and export stems with clear names including scene and version numbers, for example Scene05_Dialogue_v02_48kHz24bit.wav. That saves time if someone asks for just the dialogue later.

Where Krotos fits: speed and creative exploration for SFX

Krotos tools and libraries are a practical companion to the Premiere workflow, not a replacement. Use them to generate quick, editable SFX and ambiences when you need to iterate fast, or when library hunting is costing you minutes or hours. Krotos can help you sketch layered textures, audition variations quickly and export stems that slot straight into your Premiere bins. That gets you from idea to usable sound fast, and leaves time for creative refinement.

• Replace time consuming library hunting with fast ideation and exportable assets. Instead of trawling through folders, audition and generate several options in the time it takes to open a folder.

• Use Krotos as a creative partner to produce variations you can audition instantly, then drop the chosen layers into your Premiere timeline.

• Generate ambiences and movement that match picture without long search times, then refine in Premiere with your usual buses and submixes.

Practical wins you can expect using Krotos alongside your Premiere workflow

In real terms you will see faster idea to sound cycles, fewer placeholder lifts, and a larger pool of tailored textures ready to layer under hits. That means less time swapping single stock hits and more time refining the three layer recipe that sells scenes. Exportable SFX from Krotos slot into your SFX bin ready to route to your SFX bus, and quick preset options let you maintain speed when you need to replace or vary elements for client notes. Use Krotos for ideation and Premiere for final placement and stems, and you will shave hours off a typical sound design pass.

If you want to try the workflow, jump into a free trial of Krotos to explore presets and quick start templates, or visit the user forum and tutorial library to see project based examples. The community shares session presets and export recipes that map directly to Premiere templates, which is a fast way to get those first wins.

Frequently asked questions

Can you do sound design in Premiere Pro?

Yes, you can do effective sound design in Premiere Pro. Premiere includes the routing, automation and basic processing tools needed for layering SFX, foley and ambience and producing delivery stems. Many solo editors and filmmakers create fully usable soundscapes within Premiere, especially when they work with a clear stage based workflow and a template that includes buses and submixes.

That said, some sound designers prefer to move complex sound design or advanced editing into specialised audio tools for deep manipulation. For the majority of fast turnaround projects, Premiere combined with good organising, layering techniques and quick external SFX sources will get you professional results.

Which is better, AE or PR?

After Effects and Premiere Pro serve different roles, so neither is strictly better for sound design. Premiere Pro is the natural choice for sound design linked to an edit, because it has robust timeline audio tools, submix routing and direct video reference. After Effects is focused on motion graphics and visual effects and has limited, clip based audio editing features.

If your priority is cutting, syncing and mixing audio to picture, choose Premiere. If you need to align sound changes to complex animated motion within After Effects, you may need to bounce audio or work with smaller chunks. For most editors and filmmakers who need fast, usable audio, Premiere is the practical mainline tool.

What is the Adobe program for sound design?

Adobe Audition is Adobe’s dedicated audio application for more detailed sound work. It provides advanced clip editing, spectral repair tools, multitrack mixing and robust restoration features that are useful for cleaning dialog, removing noise and doing detailed sound design that requires sample level editing.

Use Audition when you need restorative work, detailed processing or when you want to perform more intricate manipulations before returning stems to Premiere. For many quick projects, however, Premiere’s built in tools are perfectly adequate.

What is sound design?

Sound design is the craft of creating and organising audio elements to support a story, emotion or action. It includes recording and editing foley, creating or finding SFX, building ambience, designing transitions and shaping the balance between dialogue, music and effects so the audience receives the intended information and feeling.

Good sound design is both technical and creative. It requires attention to timing, texture, dynamic balance and context, plus practical workflows that let you iterate and deliver on time. The techniques in this guide are focused on achieving those outcomes quickly and reliably.

How-to guide
This is some text inside of a div block.

Creating Sound Effects for an Immersive Audio Drama

Working in a non-visual medium presents an interesting challenge: How do you make an entire world come alive, when there's nothing to see?

JJ Lyon
December 19, 2025
Read Story↗

Working in a non-visual medium presents an interesting challenge: How do you make an entire world come alive, when there's nothing to see?

Audio dramas and podcasts provide an exciting opportunity to explore sound on a deeper level. However, it also carries it's own set of unique problems:

1 - With no visuals, the audience relies on their ears only.

As a result, every sound effect needs to be interesting, feel realistic and sound natural.

2 - A lot more audio work is needed to build the story world

Therefore, sound designers have to create a significant amount of sound effects quickly, to fill in the blanks that image fills for film and television.

Overcoming challenges likes these takes time...a lot of it.

A Use Case: Making Realistic Sound Effects for a Robot Audio Drama

When working on Vaporware, a sci-fi audio drama with robot characters, Composer and Sound Designer David McKee faced these very problems:

"[Vaporware Main Characters] Eden or Poly aren't human, or even humanoid. As such, making them sound natural in a medium that has no visuals is tricky. I have to place each movement sound piece by piece manually to create movement that was natural and believable."

Instead, McKee set out to find ways to “animate” his characters more efficiently. As a result, he stumbled a tool which seemed to solve many of these issues:

"Krotos Studio Pro allows for intuitive manipulation of sounds. Not only that, but with the “Pro” version, you can create your own custom presets."

With Krotos Studio Pro, McKee was able to import his own sound effects and perform them in real time. The result? an easier workflow that empowered him to create the Dynamic, realistic robot sound effects he was looking for.

"With Krotos Studio Pro, I can map & trigger sounds...so I can fine tune things...WOW! This just made things a HECK of a lot easier!"

Enhance your own projects with Krotos Studio

Audio Drama's films, TV and games all benefit from a faster, easier, more dynamic sound effects workflow. Give Krotos Studio Pro a try and see if, like david, some of your day to day sound effects problems disappear, enabling you to carry on creating, without the hassle

David McKee is a music composer and sound designer from Cleveland Ohio. As well as working on Vaporware, he is an active streamer, content creator and composer.

Explore how cinematic sounds and ambience creation was done in Call of Duty Black Ops 6 and check out How to Generate your own Ambiences using Krotos Studio.

How-to guide
This is some text inside of a div block.

How to use Krotos Studio with Premiere Pro

If you are a premiere pro user, Krotos Studio can run alongside your project effortlessly. See how here

JJ Lyon
December 19, 2025
Read Story↗

If you are a premiere pro user, Krotos Studio can run alongside your project effortlessly. You can create sounds for your projects on the fly, dragging and dropping them onto the timeline with ease. 

Find out more about using audio in Premiere Pro in How to Do Anything with Audio in Premiere Pro, and learn how to craft energetic mixes in Creating Video Game Trailer SFX with Krotos Studio.

Watch our video of Krotos Studio being used with Adobe Premiere Pro below!

Watch The Video

How-to guide
This is some text inside of a div block.

How to create audio for games: fast workflows and exports

A practical, creator-first roadmap for producing game-ready audio quickly, from a tight workflow overview to real, exportable examples and hand-off checks. Designed for editors, sound designers and game builders who need reliable, implementable results fast.

JJ Lyon
December 19, 2025
Read Story↗

A practical, creator-first roadmap for producing game-ready audio quickly, from a tight workflow overview to real, exportable examples and hand-off checks. Designed for editors, sound designers and game builders who need reliable, implementable results fast.

Fast game-audio workflow: brief → design → implement

Start with a clear, linear map you can run in a day or a week depending on scope. The aim is not perfect sound design on day one, it is repeatable, predictable assets that the developer can integrate and test. Below is a compact blueprint you can follow from placeholder gameplay to final bank, with decision points called out and rough time budgets you can adapt.

• Step 0, receive brief and placeholder gameplay, 30 to 60 minutes. Confirm platform, target engine or middleware, and any strict technical constraints from the dev. Get a list of key interactions and the visual reference video.

• Step 1, reference and scope, 1 to 3 hours. Gather sound references, label which SFX must be bespoke and which can be library-sourced. Decide asset type, one-shot, stem, or loop, and whether assets need variants for randomness or velocity layers.

• Step 2, prototype and design, 1 to 2 days for a small feature. Build quick mockups for core systems, like footsteps, ambience beds, UI hits. Use templates and procedural tools to speed iteration.

• Step 3, edit and prepare, 1 to 2 days. Clean edits, normalise, set loop points and export canonical files for testing. Create preview mixes and implementation notes.

• Step 4, implement and test, several hours to several days. Import into Unity or Unreal, set up simple events or snapshots, test in-engine with gameplay. Iterate where timing or balance is off.

• Step 5, finalise and deliver, 1 day. Build middleware banks if required, produce cue lists, versioned exports and a readme with accept criteria.

Where decisions happen

• Asset type: choose one-shot for discrete impacts, stems for layered control, loops for beds. One-shot files are simple to implement but less flexible. Stems allow adaptive mixing at runtime.

• Interactivity design: decide whether you need parameterised audio (RTPCs, distance LODs) or simple event-triggered SFX. Parameterised designs need more exported variants and naming conventions.

• Implementation target: decide early if everything will go into Unity, Unreal, FMOD or Wwise. Middleware enables more runtime control and fewer exported variants, but requires correct bank packaging.

Typical time budget per step

• Quick prototype features for a small game: 3 to 5 days total from brief to playable bank.

• Medium scope features with bespoke SFX and middleware integration: 1 to 2 weeks.

• Use shortcuts: library sourcing for non-character sounds, procedural tools for whooshes and risers, templates for UI sets, and Krotos-style procedural workflows for fast iterations.

Core workflow stages

• Brief. Clarify scope and acceptance criteria. Success is a prioritised list of interactions and a clear export target for each.

• Reference. Collect 3 to 5 references per interaction. Success is an annotated reference doc tied to timecodes.

• Design. Build prototypes, choose layering strategies, make quick render passes. Success is playable roughs in-engine.

• Edit. Clean, remove artefacts, set loop points, create velocity ranges. Success is export-ready files with consistent loudness.

• Test. Put assets into the game context, check transitions, spawns and priority behaviour. Success is confirmation that assets trigger at correct times and levels.

• Export. Package banks, write cue lists, provide implementation notes. Success is a developer sign-off.

When to design vs source

• Source first when you are under time pressure, when the sound is generic, or when you need a baseline for iteration. Good libraries save hours. Pick assets that match the reference or can be easily layered.

• Design when sounds are a key identity element, linked to character, weapon or world feel. Bespoke sounds give control over unique timbres and interactive behaviour.

• Hybrid approach, often the fastest: pull a clean library hit as a core, then design a bespoke top layer for character. Or create stems where the base is from a library and the highs, cloth and bite are designed.

• Shortcut options: use library hits for non-critical background sounds, procedural tools to generate transitions and whooshes, and templates to ensure consistent naming and metadata.

Decide quickly, then prototype. The faster you can get an asset into the engine, the sooner you will find whether design or sourcing was the right call.

What to prepare first: files, formats and project templates

Good preparation turns chaos into predictability. A small amount of discipline with sample rates, folder structure and naming conventions prevents hours of confusion during integration. Below are the essentials you should confirm and create before any serious production.

Technical settings to lock in early

• Sample rate and bit depth, recommended default 48 kHz and 24-bit. Use 48 kHz for most game targets and any application tied to video. 44.1 kHz is acceptable for non-video projects or when your engine or platform requires it, but be consistent across your pipeline.

• Channel formats, mono for single-source SFX like footsteps and hits, stereo for ambiences and music, and ambisonic where positional 360 audio is required.

• Loudness and headroom. Do not brick peak levels. Leave reasonable headroom for engine runtime processing and ducking. Use LUFS for voice/music reference tracks in previews.

• File formats for delivery: WAV or Broadcast WAV for banks and middleware. Avoid lossy formats for final exports.

• Metadata. Include cue names, event names, and variant indexes using a consistent naming convention so middleware can map assets automatically.

Folder structure and naming

• Top level: ProjectName_audio

• SFX

• UI

• Footsteps

• Weapons

• Ambience

• Music

• VO

• Mixes

• Middleware_banks

• Use versioned filenames: GameName_UI_ButtonConfirm_v01.wav

• Keep stems and variants grouped in numbered folders and include a cue list CSV with event names and descriptions.

References and documents to gather

• Gameplay video, ideally time-coded to where SFX should play. Keep multiple frame-rate exports to match engine playback.

• Design doc or audio brief that lists priority interactions and any forbidden sounds or brand restrictions.

• Reference sounds and temp cues tied to timecodes so you or the developer know which moments require attention.

• Engine and middleware details: Unity version, Unreal version, FMOD or Wwise project structure, target platform constraints and build pipeline notes.

• Licensing and ethics checklist: permission for voice work, third-party samples, and any AI-assisted sourcing documentation.

Technical settings checklist

• Sample rate: prefer 48 kHz, use 44.1 kHz only if required by platform or to match legacy content.

• Bit depth: 24-bit recommended for recording and delivery.

• Mono/stereo: mono for discrete SFX, stereo for ambiences, ambisonic for 360 positional audio.

• Loudness targets: use LUFS for VO and music references. Keep SFX peaks under a safe ceiling, provide preview mixes for context.

• File formats: WAV or BWF for deliverables. Provide small MP3 or OGG previews if requested for review.

• Loop points: embed loop metadata for seamless playback or provide explicit loop markers in a separate document.

Creative inputs and references

• Pull 3 to 5 references for each high-priority interaction. Label which element you like, e.g., transient, texture or pitch.

• Provide a short annotated gameplay clip with temp cues and notes, such as "jump sound at 00:02:15, low bite preferred, should not mask music".

• Annotate priority and interactivity: mark sounds that require parameterisation, variants or RTPC control.

• Include a short style guide: tone descriptors like "gritty", "organic", "sci-fi clean", and any forbidden elements such as recognisable real-world trademarks or celebrity voices.

Getting these items prepared first saves back-and-forth and gives you a clean folder to return to when building banks or creating iterations.

Worked examples: footsteps, ambience, UI and adaptive cues

Concrete recipes work best. Below are hands-on step-by-step techniques you can replicate immediately for common SFX categories, and notes on how to prepare those assets so they behave predictably in your engine or middleware.

Footsteps: start with surfaces, not one sound

• Record or source a set of one-shots for each surface: hard wood, concrete, gravel, wet mud, metal. Aim for three dynamics: light, normal, heavy, or several velocity layers.

• Layering approach: create separate stems for impact, cloth, and gravel. Impact carries transient and weight, cloth adds body for fabric movement, gravel adds texture.

• Variation and randomness: export 6 to 12 variants per surface and velocity level to avoid repetition. Use slight pitch shifts and timing offsets in middleware if appropriate.

• Metadata: name files with surface, velocity and variant number, e.g., foot_wood_norm_v03.wav. Include cushion info such as suggested distance attenuation or LOD hints.

• Exporting for middleware: provide mono files for each variant and a CSV mapping that middleware or the engine can read to assign random selection or layering rules.

Ambience: build beds and positionable loops

• Start with a base bed loop of about 10 to 30 seconds. Make it seamless by aligning transient-free sections and crossfading or using loop markers.

• Add positionable loops: short, distinct loops that can be triggered around a player, such as distant traffic, bird calls or machinery. Keep these shorter, 5 to 15 seconds.

• Create stems for dynamic mixing: low-frequency bed, mid texture, high-detail elements. This allows runtime mixing for time of day or weather changes.

• Loop point creation: set precise sample-accurate loop points or provide trimmed WAVs that are already seamless. Include an alternate pre-roll for smoothing transitions if needed.

• Export stems in stereo, provide an ambience map document describing which stem controls which environmental parameter.

UI and adaptive cues: tight and performant

• UI hits should be short, clear and mix-safe. Aim for 100 to 500 milliseconds for most confirms and errors. Keep frequency content distinct from main action sounds.

• Design a small palette of tones: confirm, deny, hover and notify. Use variations for intensity but keep them cohesive.

• Adaptive stingers: produce very short stingers or risers that can be layered on top of music or used as transitions. Provide both full and low-band stems for runtime ducking.

• Performance considerations: export low-bitrate preview OGGs for rapid tests, but use uncompressed WAVs for final banks.

• RTPC-ready stems: split elements into impact, body and tonal tail so the game can blend or filter them at runtime for responsiveness.

Implementation notes for Unity, Unreal and middleware

• Naming matters. File names should map to event names in FMOD/Wwise or Unity events. Use consistent prefixes like sfx_ui_button_confirm_v01.

• Event versus snapshot choices: use events for discrete actions, snapshots for global changes like weather or stealth mode.

• Simple parameter mapping: for footsteps, map speed to velocity RTPC for subtle pitch and volume scaling. For ambience, use distance attenuation curves and LOD groups.

• Bank organisation: group assets by function and scene to make banks manageable and minimise memory footprint.

Footsteps: layers, variations and randomness

• Record or source separate layers: impact (hard transient), cloth (soft body), abrasive (gravel dust).

• Build multi-variant sets: 8 variants per surface and velocity. Test by randomising playback in-engine to ensure the ear does not hear looping.

• Export metadata-friendly sets: include a JSON or CSV manifest detailing surface, velocity mappings and suggested RTPC ranges.

• For middleware, import mono files and set the selection rule to random with pitch variance of +/-2.5 percent to taste.

Ambience: loops, beds and dynamic ducks

• Create a base bed that loops seamlessly. Ensure the end and start share similar spectral content and no abrupt transients.

• Make modular stems for low, mid and high. Use automation to show how these stems should balance when, for example, day turns to night.

• Prepare ducking stems: a version of the bed with lowered levels to allow important SFX to cut through, or provide stems that the engine can fade under certain game states.

UI & adaptive cues: tight, performant hits and transitions

• Keep natively short hits, and provide slightly longer versions for accessibility or slower UI contexts.

• Provide a small library of modular parts that can be combined in middleware to create more complex feedback while keeping memory low.

• For adaptive cues such as victory stingers, provide a few lengths and three intensity levels so the audio can scale with gameplay state.

These worked examples get you from a concept to export-ready assets quickly, and the implementation notes make sure your files are friendly to engine and middleware workflows.

Troubleshooting: common issues and practical fixes

Even well-made assets can misbehave. This section covers the usual suspects and straightforward ways to fix them so you can get back to building, not debugging.

Audio quality problems and quick fixes

• Clicks and pops: these often come from hard edits or missing fades. Solution: apply a 5 to 20 ms fade in or out at waveform boundaries. For abrupt transients, use a short crossfade across loop points.

• DC offset: this shows as a baseline shift and can cause clicks when looping or normalising. Run a DC removal or a high-pass filter at 5 to 20 Hz to remove the offset.

• Loop seams: identify the phase or transient mismatch. Use a crossfade or spectral repair to blend, or rebuild loop points at a zero crossing and rebuild a short crossfade of 10 to 50 ms.

• Phase problems: when layering similar sources, collapse to mono to check phase. If cancelling occurs, nudge timing slightly, invert phase on one layer, or apply slight EQ differences to remove destructive interference.

• Over-compression and pumping: check dynamics and restore natural dynamics where necessary. Use parallel compression rather than brickwall limiting when you need weight without pumping.

Integration and engine issues

• Missing assets in engine: confirm file paths and that the asset was added to the project. Reimport the folder and check consoles for missing reference errors.

• Sample-rate mismatches: if audio sounds slow, the engine or middleware is likely resampling incorrectly. Ensure all assets use the agreed sample rate, typically 48 kHz, and re-export if necessary.

• Swapped channels: if stereo elements are reversed, confirm channel orientation in the DAW and export settings. Sometimes stereo flip occurs during import due to metadata.

• Loudness mismatch: compare in-game loudness to a reference mix. If SFX are too loud or quiet, adjust preview mixes and provide per-cue gain offsets or middleware volume controls.

• Bank-loading errors: confirm bank dependencies and GUIDs in middleware. Rebuild banks after renaming or reassigning events to ensure banks contain all required audio.

Ethics, licences and AI reassurance

When working with third-party samples, voiceover, or AI-assisted elements, follow clear, simple rules. This guidance aims to help you stay compliant, transparent and respectful of creative rights.

• Verify licences: confirm commercial use rights for every third-party sound or library element you include. Maintain a licence document or spreadsheet linking each file to its licence terms and expiry if applicable.

• Voice likeness and performances: obtain written consent for any voice work that resembles a public figure or a living person’s identifiable vocal characteristics. Clarify usage rights for

Frequently asked questions

Is 44.1 or 48 Khz better for gaming?

How to set up audio for gaming?

What is audio in games?

Where can I get free sounds for games?

How-to guide
This is some text inside of a div block.

What Does ‘Royalty Free’ Mean for Sound Effects and Sound Design?

Learn about copyrights, licenses, royalties and other legal points in the context of sound effects and sound design for film and games

James Russell
October 17, 2025
Read Story↗

Everyone knows something about copyright, but not many people know enough about copyright. Royalties, copyrights and licenses are terms that some of us use interchangeably. We know that it’s simplest to search for royalty-free sound effects, but why? And what are the consequences if we don’t use those in our projects?

In this article, we’ll demystify copyright as it applies to sound design, explaining things like licenses, royalties and their use in modern day industries. We’ll do it all with the help of legal experts, and we’ll go on to tell you the exact legal situation when you deal with us here at Krotos Audio.

We Asked a Lawyer

This article has been reviewed for general legal accuracy by members of the team at RafterMarsh Law, a law firm specialising in both audio and music technology and in entertainment, TV and film. If you have any additional questions, you are welcome to reach out to philipp@raftermarsh.com for our international and US practice, and terry@raftermarsh.com for the UK.   

Key Take-Aways and TLDRs

In this article, we’ll cover the following points in more detail, and we suggest you read it all in full in order to fully understand the situation. Here’s an overview, though.

  • Copyright is an intellectual property right that is automatically “vested in” you when you create something new and original. Owning a copyright means that no one can exploit (IE “commercialise”) your creation without your permission.
  • When you give someone permission to use your work, this is called licensing. You grant them a license to use your copyrighted work while you still retain ownership.
  • The license can be granted under conditions. These could be conditions about…
    • How the work is used (is the use commercial, can it be edited, in which territory, duration, field of use etc.)
    • How much money you should be paid every time it’s used – this is called a royalty payment
    • How much money you get paid as a one-time payment for its use – this would be used in a royalty-free license arrangement
  • If you use material whose copyright belongs to someone else, and you don’t arrange a license, then the copyright owner can claim damages or seek injunctive relief requiring you to stop using or distributing infringing material. The owner would have to discover your use of their material in order to know, but this is getting easier.

How Copyright works

Copyright is a type of intellectual property right. When you create something that’s new and original, the copyright for that work automatically lies with you, however, the rules may be different if you are an employee creating a work for an employer. 

Photo by Krismas on Unsplash

Let’s say you write a page of original words to create a story – you now own the copyright to that story, assuming that it wasn’t copied from someone else or didn’t use elements of something else that was copyrighted (for example, fan fiction using existing characters from a copyrighted work).

What Holding the Copyright for Something Means

If you own the copyright for a work, no one is allowed to use it without your permission, except in limited cases permitted by laws (such as fair use in the U.S., or fair dealing in the UK/EU, which may allow for purposes such as commentary or education). In our digital era, where copying something is usually as simple as a copy and paste, it’s certainly possible for people to use copyrighted work, but that doesn’t mean they were allowed to. This is where people can get into trouble if caught.

Can You Prove You Did it First?

If you ever have to defend your copyright, you’ll need to prove that you own it in the first place. The copyright may have vested in you automatically when you created a work, but there would need to be evidence of this creation having happened. 

This is usually a little simpler with digital works, where you can prove an old upload or appearance on a website. But if you drew a picture 20 years ago and now can’t prove when it was drawn, you may have issues claiming the copyright for that image. In this case, registering your copyright officially with your local authorities (if available) or otherwise using a deposit service (for example, copyright.eu in the EU), that keep a copy for timestamping, can help providing proof of the date of a work’s creation.

In some places, you can register your copyright. This is often cheap and simple, making it worth it for any copyright you hold and consider to be valuable. For example, in the U.S., while the copyright exists without registration, you must register with the U.S. Copyright Office to sue in court and claim statutory damages. 

Not discussed, further reading: Copyright Marks [UK source]

Licensing: a Result of Copyright

Copyright holders don’t necessarily want to use their work only themselves. In many many cases, they want to allow others to use their work, but for a fee, without transferring the actual copyright ownership. 

Photo by Techivation on Unsplash

One obvious case is ours: sound design in the film, TV or games industries. Licensing sound effects for use in film or TV means that the work of recording can be done by one person or entity (the copyright owner), and the use of that recording can be shared across many people and projects. Each of these would, theoretically, be willing to pay for a license if it means they don’t have to go out and record the sound themselves. When it comes to Footstep Sounds or Traffic Noise, creating a new recording for every use case could cost too much money.

Licensing Conditions and License Agreements

And so, whenever you buy or download a copyrighted work for your own use case – a sound file, for example – you may often find a license agreement attached to it, which tells you more about the agreement for the use of the file. Are you allowed to use it in commercial work? Are you allowed to edit it? For how long are you allowed to use it? Whatever the license entails, you should be aware of its terms before you agree to them, and downloading files usually means acceptance of applicable terms. There’s a lot to keep in mind when Choosing Sound Effects to Download for Film and TV.

For example, the License agreement for the free BBC Sound Effects collection has restrictions on the purposes you can use the works/recordings for, whether you can charge to show something you made with them, and how you can use them.

And for another example, licenses for Krotos Studio allow you to use our software for personal projects, freelance and client content, and digital and social media advertising, but not for projects intended for television, cinema, game distribution, or broadcast. The license for Krotos Studio Pro additionally covers TV, film, video game audio, and broadcast and commercial use.

In exchange for the license, the deal may often be that you have to pay a fee for usage of the material. There are two main ways this can be done: through royalty payments or through a one-time payment.

What are Royalties?

Royalties are payments for the use of property (typically intellectual property), with a structure as laid out in a licensing agreement (see above).

Most people know the concept of royalties from musicians, actors or authors. These people are paid royalties for the use of their copyright work: 

  • Musicians and songwriters may be paid royalties when their songs are sold on an album, played on the radio or synced to TV or film.
  • Actors may be paid royalties when a film or TV show is shown, or sold or downloaded.
  • Authors might be due royalties every time a book is sold or when the story is adapted for another medium (film, stage, etc)
Photo by Amina Atar on Unsplash

In every case, the exact setup depends on the individual license deal, although there are more common and less common structures of royalties.

Sometimes clearances may be simpler, such as adapting a book for the stage, if one author has retained all rights. Though it’s important to confirm no rights have been assigned to a third party that could conflict with your anticipated project. When a project gets bigger and bigger, and uses hundreds or multiple thousands of pieces of intellectual property, there’s a lot of paperwork to be done, and a lot of receipts to chase for years to come. The paperwork can’t be avoided, but what if the payments could?

What is a Royalty-Free License?

Dispensing with the need to collect information about royalty payments and to arrange these payments later, a royalty-free license cuts out the after-the-fact work. The cost? A royalty-free license usually comes with something that has been paid for once upfront, whether it’s a sound distributed as part of our Sound Effects Libraries, or something you create with Weaponiser or Krotos Studio.

Royalty-Free Doesn’t Mean License-Free

To use something copyrighted, you need to have a license – there’s no escaping that. A royalty-free license still has to be acquired; you just may not have noticed it as part of a paid-for software download or a software subscription. If you’re downloading free sounds on the web, you should be sure that the content comes with a license and what conditions apply – especially if you’re intending to use the work commercially.

What Will Happen If I Don’t Use Sound Effects with a proper license?

This depends. You shouldn’t use copyright material without the permission of the copyright holder. But what will happen if you use it without permission anyway?

Famous and successful acts in highly publicised copyright infringement cases are reported to have been paid out millions of dollars. For less successful or well known cases, these damages will be a matter for the court or legal settlement in question to award (usually the amount of the lost license fee and potential additional statutory damages and legal costs) . In extreme cases, there could even be criminal penalties for wilful infringement on a commercial scale.

The consequences of using unlicensed copyright material may not even be felt by you: Usually, the clients or publishers are held responsible for the end product not being properly licensed, however, any user or contributor can be held liable, even if they only played a small part in its creation.

That’s if you get caught. In the past, your likelihood to get caught using copyrighted material was lower. Today, AI-based content recognition systems are very sophisticated at detecting audio even when it’s masked alongside other clips, although these systems do have their limits. Systems like these will inevitably improve in future.

This article is provided for general information and educational purposes only and does not constitute legal advice. While the general principles discussed apply in many countries, precise positions may differ in each jurisdiction and you should seek professional advice from a lawyer licensed in the relevant jurisdiction relating to copyright, licensing, or intellectual property rights.

How-to guide
This is some text inside of a div block.

Film Sound Effects: A Practical, Creator-First Guide to Designing, Sourcing and Mixing SFX Fast

Film Sound Effects: A Practical, Creator-First Guide to Designing, Sourcing and Mixing SFX Fast

JJ Lyon
December 19, 2025
Read Story↗

Film Sound Effects: A Practical, Creator-First Guide to Designing, Sourcing and Mixing SFX Fast

Search for film sound effects and you’ll find two types of results.

Gigantic download libraries promising 10,000 “epic” sounds.
And vague advice about “the power of audio in storytelling.”

Neither helps when you’ve got a locked cut, a delivery deadline, and a fight scene that sounds like someone tapping cutlery together.

This guide is a practical playbook. It covers what film sound effects actually are, how to create and source them quickly, how to layer and mix them properly, and how not to accidentally violate a licence agreement in the process.

The goal isn’t to turn you into a re-recording mixer overnight. It’s to get professional, believable audio into your film workflow fast.

What Are Film Sound Effects (And Why They Matter More Than You Think)

Film sound effects are any non-dialogue sounds that support picture. That includes:

  • Foley (footsteps, cloth, props)
  • Designed impacts and transitions
  • Environmental ambience
  • UI and mechanical sounds
  • Cinematic sound effects that heighten drama

They sit alongside dialogue and music, but they’re often the difference between something feeling finished and something feeling… student project.

Diegetic vs Non-Diegetic Sound

A quick distinction that matters in film audio effects:

  • Diegetic sound exists in the world of the film. Footsteps. Doors. Engines.
  • Non-diegetic sound exists for the audience. Score. Stylised impacts. Emotional design elements.

Understanding this changes how you design and mix. Diegetic sounds need to feel believable and spatially grounded. Non-diegetic sounds can be larger, more stylised, sometimes even slightly exaggerated.

Neither is “better.” They just serve different storytelling purposes.

The Film SFX Workflow: From Production to Final Mix

Professional sound design for film isn’t one task. It’s a chain of decisions.

If you’re working quickly, thinking in stages keeps things manageable.

On-Set Capture and Props

The cleanest workflow starts before you open Premiere or Resolve.

Capture usable production sound wherever possible. Even rough wild tracks of room tone, cloth movement or prop handling will help later. A five-minute recording of ambience on location can save you hours of hunting through sound effects libraries.

You don’t need a truck full of kit. A decent field recorder, a shotgun mic, and basic wind protection go a long way.

Field Recording Essentials

Field recording for film gives you unique texture. It doesn’t need to be elaborate.

A small recorder, closed-back headphones and attention to noise floor are enough. Record longer than you think you need. Capture variations. Change distance and angle. If you’re recording footsteps, record multiple surfaces and intensities.

Future-you will be grateful.

ADR and Dialogue Editing

ADR (Automated Dialogue Replacement) exists because production audio is rarely perfect.

Use ADR when dialogue is unusable, unclear, or emotionally off. When editing, match room tone, reverb and mic perspective so it doesn’t sound like someone stepped into a cupboard mid-scene.

Even light processing, subtle EQ and convolution reverb, can glue ADR into a scene convincingly.

Foley, Designed Sound and Libraries: Who Does What?

Not all movie sound effects are created equal.

Foley: Fast, Repeatable Techniques

Foley is performance. It’s not just “record footsteps.” It’s perform footsteps in sync to picture.

For editors under time pressure, simple foley recipes work:

  • Cornflour in a cloth bag for snow
  • Leather gloves for cloth movement
  • Gravel in a tray for exterior footsteps
  • Celery snapped close-mic’d for bone cracks

The trick isn’t realism in isolation. It’s realism in context.

Designed Sound: Layering and Synthesis

Designed cinematic sound effects go beyond realism. Think stylised impacts, transitions, tension risers.

Layering is the key skill here. A single impact might include:

  • A transient layer (sharp attack)
  • A body layer (weight)
  • A low-frequency thump
  • A tail or reverb layer

You don’t need dozens of plugins. You need intentional layering and timing.

Library Effects: Choosing the Right Pack

Sound effects libraries can be a blessing or a black hole.

When choosing:

  • Check recording quality and noise floor
  • Check loop points for ambience
  • Read the licence clearly
  • Look at metadata and organisation

Free platforms like Pixabay, Freesound or Mixkit can help for quick placeholders, but quality and licensing vary. Paid libraries and structured tools tend to offer cleaner assets and clearer rights.

If you’re working commercially, clarity beats quantity every time.

Editing, Layering and Mixing SFX into Picture

Having great film sound effects means very little if they’re poorly placed.

Syncing to Picture: Timing Is Everything

Sound feels powerful when it peaks at the pivotal frame.

Zoom into your timeline. Align transients with visual impact. If a door slams, the transient should land exactly on the frame it closes.

If something feels “off,” it usually is. Adjust by frames, not seconds.

EQ, Compression and Spatial Placement

Mixing film audio is less about making things loud and more about making them clear.

  • Use EQ to carve space around dialogue
  • Apply light compression to control dynamics
  • Use panning and reverb to place sounds in the scene

Clarity always wins over sheer volume.

Stereo vs Immersive

For most creators, stereo is the deliverable. Keep centre clarity for dialogue and avoid excessive low-frequency build-up.

If you’re mixing for surround or immersive formats, think in layers of depth. Ambience and environmental sounds benefit most from spatial treatment.

Licensing and Legal Considerations

It’s not glamorous, but it matters.

Free vs Commercial Libraries

Royalty-free typically allows commercial use without per-sale fees, but may restrict redistribution of raw files.

Creative Commons licences vary. Some require attribution. Some prohibit commercial use. Some require derivative works to carry the same licence.

Always check the specific terms on the provider’s official licence page rather than assuming.

Project Scope and Compatibility

If you’re delivering to a client, confirm that your licence covers commercial distribution, broadcast and streaming.

When in doubt, clarify before release, not after.

Fast Techniques for Low-Budget and Indie Filmmakers

Budget constraints don’t mean thin sound.

DIY Foley on a Budget

A small treated corner of a room, soft furnishings for absorption, and a basic recorder can produce surprisingly clean results.

Record multiple takes. Change perspective. Add subtle room tone underneath to glue edits together.

Repurposing Library Sounds

A whoosh can become a subtle cloth movement with EQ and reverb. An impact tail can become ambience when stretched and filtered.

Editing creatively often beats downloading something “perfect.”

Tools, Plugins and Integrations to Speed Your Workflow

Efficiency matters.

DAW Tips for Premiere and Resolve Editors

Use submixes and buses to group SFX. Create a dedicated SFX track layout. Colour-code aggressively. Label clearly.

Set markers on key visual moments so you can align sound precisely.

Useful Plugin Types

  • Convolution reverb for realistic space
  • Transient shapers for sharper attacks
  • EQ for clarity
  • Subtle saturation for warmth

Tools that allow you to perform and shape sounds quickly rather than endlessly browse static files can dramatically shorten turnaround times, especially when layering and variation are needed.

Quick Checklist for Your Next Edit

Before you export:

  • Are key impacts aligned to exact frames?
  • Is dialogue clear and supported, not masked?
  • Do ambience layers feel continuous?
  • Have you checked licence terms?
  • Have you tested on different speakers or headphones?

If the answer to most of those is yes, you’re ahead of many.

Final Thoughts

Film sound effects are not an afterthought. They’re structure. They’re rhythm. They’re credibility.

You don’t need a Hollywood stage to make your work sound professional. You need:

  • Clean source material
  • Intentional layering
  • Precise timing
  • Sensible licensing decisions
  • A workflow that values speed and clarity

If you want to accelerate that process, try tools and starter packs designed to get usable SFX into your project in minutes, not hours. Or join a community of creators who share techniques, presets and workflows.

Great sound doesn’t have to be complicated. It just has to be intentional.

And ideally, on time.

How-to guide
This is some text inside of a div block.

Film sound design: a how-to guide for editors and filmmakers

Film sound design is the craft of choosing, creating and arranging the sounds a viewer hears so the picture reads as real and emotionally engaging.

JJ Lyon
December 19, 2025
Read Story↗

Film sound design is the craft of choosing, creating and arranging the sounds a viewer hears so the picture reads clearer, the emotion lands and the cut feels seamless. This practical guide explains what film sound design is for editors and filmmakers, why it speeds up your edit, a typical workflow you can follow, a step‑by‑step example for a 60 second scene, quality checks to avoid common traps, and where Krotos tools can help you work faster without cutting corners.

What film sound design actually is (for editors and filmmakers)

At its simplest, film sound design is everything you add or shape that is not dialogue or music to support the picture and the story. It covers footsteps, doors, impacts, whooshes, crowds, environmental ambience and designed textures that make an action feel physical and a space feel lived in. Good sound design helps the audience understand where they are, what is happening, and how they should feel, all without calling attention to itself.

Sound design differs from recording and dialogue editing in that it is primarily a creative layer rather than a capture task. Recording captures source material, dialogue editing cleans and times speech for clarity, and music composes emotional scaffolding. Sound design sits between editing and mixing, making creative decisions about what to emphasise, what to conceal and what to invent. Where dialogue editing prioritises intelligibility, sound design prioritises narrative and impact, and the mix integrates both so the final soundtrack serves the film.

Sound design vs. audio tasks you already do

Dialogue editing is about sync, breath control, noise reduction and ensuring lines are audible and consistent. Foley recreates contact sounds tied to actions on screen, often recorded specifically for the performance. Ambience establishes the acoustic space and continuity between shots, while production effects are sounds captured on set that you might clean and reuse. Designed effects are created or heavily processed sounds for elements that do not exist or need to feel more cinematic, such as sci‑fi impacts and stylised whooshes. Music is a parallel storytelling layer that works with sound effects to shape pacing and emotion.

The creative decisions that define sound design include choosing which Foley hits to keep, when to exaggerate an impact for dramatic effect, where to let ambience sit in the background and when to pull it up to mask a cut. These choices are editorial as much as technical, and they are the bits that make an edit feel professional, not just correct.

Why great film sound design speeds up your edit and sells the story

Good sound design is not an optional flourish, it is an efficiency tool. When sound supports the picture, editors make clearer pacing decisions, directors sign off faster, and the number of review rounds drops. A believable ambience track prevents viewers asking where the sound went when a cut changes location. Clean, intentioned Foley removes the need for awkward ADR or complex fixes later. That means less time hunting libraries and fewer late nights in post.

Practically, a rapid, usable sound design approach saves money. Instead of sending a sequence back with a vague note to "do better SFX", deliver a temp mix that sells the idea. Reviewers can concentrate on picture and performance rather than catching up on missing sound. Fast, good sound also helps in pitching and test screenings, where a completed-sounding sequence communicates tone and pace far more effectively than a dry picture.

When good sound design fixes obvious picture problems

Cut masking is one of the most time saving wins. A well‑placed ambience swell or whoosh can hide a jump cut and make two disparate shots read as one continuous action. Location noise smoothing fixes sections where the on‑set audio is distracting, letting you keep the performance but remove unwanted sounds. For action scenes, layered impacts and movement sounds make stunts and hits feel physical, even when the choreography or cinematography is imperfect. In every case, the right sound choice turns attention back to story and performance, reducing rework.

Core components and a practical workflow for film sound design

The core building blocks are straightforward. Dialogue is the narrative spine, Foley is the tactile layer that connects bodies to surfaces, production FX are usable on set sounds, designed FX are creative textures and hits, ambience is the scene glue, music is the emotional map, and the mix bus is where balance, tone and loudness are finalised. Think of each as a lane in a race, with the mix bus as the finish line.

A typical workflow moves from spotting through sourcing or creation, layering, a temp mix and then a final pass. Spotting identifies priorities and reference moments. Sourcing uses libraries, field recordings or quick Foley takes. Layering puts primary sounds front and centre and adds supporting textures. The temp mix communicates intention to the director and other reviewers, and the final pass polishes levels, EQ and automation for delivery.

Spotting and sound decision-making

Do a quick spotting pass with clear priorities: keep dialogue intelligible at all times, identify moments that need impact or emotional lift, and flag problem areas for repair. Use references to lock tone and pacing, and create a simple sound map in your session or as notes in the edit: mark where ambience should change, where key hits occur, and any moments that require designed elements. This map should be short, actionable, and shared with collaborators so everyone knows the audio goals before sourcing begins.

Layering and hierarchy

Place elements in a hierarchy to avoid masking and muddiness. Lead sounds, usually dialogue or a key impact, sit in the foreground and get priority for clarity and dynamics. Supporting textures such as footsteps, rustles and room tone sit at lower levels and help the lead sound feel grounded. Designed effects and music sit on top to push drama or speed. Use EQ to carve space, automation to manage attention, and panning to position sounds so they do not clash. Less is often more; avoid treating every action with an equal-weight sound layer.

Step‑by‑step: sound design a 60‑second scene (fast, editor‑friendly)

This sequence assumes you are the editor working in Premiere Pro or DaVinci Resolve and need a deliverable temp mix quickly.

1. Prepare the session. Duplicate the picture sequence, label it clearly, and create a new audio timeline or session. Set up tracks: Dialogue, Production FX, Foley, Ambience, Designed FX, Music, Master. Lock the picture track to prevent accidental edits.

2. Spot the scene in a single pass. Mark sync points, problem lines and hits. Note where ambience should change and any reference moments for tone.

3. Source quickly. Pull clean dialogue takes, grab production FX where usable, search your libraries for relevant ambiences and whooshes, and record one or two targeted Foley hits if needed.

4. Assemble layers. Lay in dialogue, then fill in ambience to create continuity. Add Foley for on‑screen actions, then place designed FX and impacts. Keep relative levels sensible; dialogue remains dominant unless intention dictates otherwise.

5. Quick mix and render stems. Apply gentle EQ to clear dialogue, cut conflicting lows from other layers, automate levels to keep clarity, and render stems or a stereo temp mix for review.

Hints for Premiere Pro and DaVinci Resolve

• Track layout: keep the same order across projects so you can move between timelines quickly. Dialogue at the top, then action sounds, then ambience and music.

• Temp stems: export quick stems from the timeline as WAV files labelled by scene and stem type. These are handy for review sessions and for handing off to an audio specialist.

• Round‑tripping: if you need deeper editing, export an OMF or AAF and open it in an audio workstation. Otherwise, apply essential processing in the edit and only move to a DAW for complex repair.

Practical checklist for each pass

Pass 1: Sync and dialogue

• Check picture sync and lip alignment.

• Clean breaths and clicks, reduce obvious noise.

• Match dialogue levels across shots.

Pass 2: Foley and ambience

• Place essential footsteps and contact sounds.

• Lay continuous ambience and automate room changes.

• Ensure ambience bridges cuts smoothly.

Pass 3: Designed SFX and sweetening

• Add impacts, whooshes and stylised effects.

• Layer subtle textures to enhance motion and weight.

• Use EQ and transient shaping to place impacts.

Pass 4: Quick mix and export

• Balance stems so dialogue is clear and impacts read.

• Apply gentle compression and final EQ on the mix bus.

• Export stems and a stereo temp mix for review.

Fast tricks to speed sourcing

Keyword searches win time. Use broad then narrow terms: start with "urban ambience" then filter to "car pass, distant". Tagging strategy helps; create your own tags for textures you use often, such as "metal hit light" or "footstep gravel". Library tweaks like pitch shifting or adding a little reverb can make a sound feel unique without long design sessions. Record single-purpose Foley takes when you need a particular texture; a two‑minute take of one actor walking on wood will often beat hunting for the perfect hit in multiple libraries.

Checks to run and mistakes to avoid before you deliver

Before handing off or delivering, run a set of technical and editorial checks. Verify sync across edits and ensure mono compatibility and phase coherence, particularly for centred dialogue. Check loudness against your delivery spec and make sure noise floors are under control so quiet passages remain quiet but intelligible. Test dialogue intelligibility on a couple of consumer speakers or headphones and adjust EQ if consonants or sibilance are lost.

Creative mistakes are just as damaging. Over‑layering whooshes will make motion read as busy and can distract from performance. Inconsistent ambience across cuts breaks realism; if a room shifts, automate a gradual ambience crossfade rather than flipping abruptly. Using the exact same impact sample for multiple cuts is a giveaway; vary hits and processing to maintain believability. Finally, always export stems; forgetting stems makes future revisions much slower.

Quick QA checklist

• Sync checked across all dialogue and action hits.

• Levels balanced, dialogue top of hierarchy where needed.

• EQ applied to clear competing frequency bands.

• Mono/phase check passed on key sections.

• Loudness measured and within delivery spec.

• Noise floor acceptable and cleaned where necessary.

• File naming follows project convention and includes stem details.

• Stems exported for dialogue, Foley, ambience, FX and music.

Where Krotos fits into your sound design workflow (practical, no hype)

Krotos tools are built to speed the tasks editors and small post teams do most often. If you are repeatedly hunting for a particular whoosh or need a crowd that can be quickly tweaked, tools that let you design and iterate sounds in a few minutes save hours. Krotos excels at rapid SFX creation, editable whooshes that adapt to the cut, and generating ambiences or crowd beds that you can customise. For sound designers who already make detailed passes, Krotos is a creative extension that reduces the initial search and sketch phase, letting you focus on refinement.

Integration is simple and editor friendly. Export formats are standard WAV stems that drop straight into Premiere Pro or DaVinci Resolve. You can sample sounds into your timeline to test timing and then refine the design if needed. Use stems from Krotos as final elements or as starting points for deeper processing in your DAW. The point is speed and iteration: deliver a convincing temp quickly, then refine if the picture requires it.

Ethical and practical boundaries

Tools that generate or heavily process sounds are assistants, not replacements for judgement. Be transparent about your workflow where necessary, and respect licensing and crediting requirements for any generated assets. When using generated or processed audio in a commercial project, check the licence terms and follow any contractual rules around crediting. Keep design choices documented so if a sound needs to be swapped or cleared later, you know the source and the processing steps applied. This protects you and maintains trust with clients and collaborators.

Before you go, if you want to test how Krotos could speed your next edit, try a free trial or book a demo. Join the Krotos creator community for presets, tips and short tutorial playlists that show how to get a usable mix fast. The quickest wins usually come from integrating a few targeted Krotos sounds into your usual stem workflow, not from replacing the craft you already have.

Frequently asked questions

What is sound design for a film?

Sound design for a film is the creative process of choosing, creating and arranging the non‑musical audio elements that support the picture. It makes environments believable, actions feel physical, and emotions clear. Practically it includes footsteps, impacts, environmental ambience, and designed effects that are layered and mixed so the audience experiences the intended narrative and emotional cues.

What are the 5 main elements of sound design in film?

The five main elements are dialogue, Foley, production or on‑set effects, ambience and music. Dialogue carries the words and often the storyline, Foley recre

How-to guide
This is some text inside of a div block.

How to Balance Music and Sound Effects

See how to get the right balance between background music and SFX for your videos

James Russell
October 17, 2025
Read Story↗

Mixing can sometimes feel like a daunting task. What is the loudest point? How do I ensure all the dialogue is audible amongst the FX and Music? How do I keep intensity without your ears getting tired? How do I ensure a quiet moment is actually audible? And all at the same time!

While there are industry standards for overall loudness, the modern trend of pushing the loudness of film has highlighted how, within these standards, the guiding hand of direction and personal taste can result in drastically different outcomes for the viewer. Especially when taking into account different media, genres, and stylistic choices. What is the right balance, and how can you strike it?

In this article, we’ll answer all those questions, and get you balancing your SFX with more confidence – whether you make them fresh and unique yourself in Krotos Studio, or get them elsewhere.

TLDR – The Answer in Summary

To an extent, the exact answer does depend on your format (video, film, TV, games…), the context (tense scenes vs action scenes…), and on the genre you’re in (horror, sports, period…). But as a rule of thumb, your music should be approximately -20dB, while sound effects should be louder, sitting between the same -20dB level (footsteps, environmental sounds) and -10dB (hits, cracks and louder sounds), with real peaks getting even louder. Remember, there is scope for varying these levels when appropriate to your context, so use your judgment in addition to this general guidance.

How Loud Should Music and Sound Effects Be Set?

There’s no easy or strict answer to this question, as the relative levels of music and sound effects can vary, and are dictated by a number of factors. Mixing is as much an art as it is a science, so knowing what style you are trying to achieve (and doing so with confidence) is as important as knowing the numerical values you are aiming for. 

That being said, there are industry standards for a reason, and you must understand them first before you bring forth your vision. You wouldn’t want to accidentally blow up a speaker or leave your audience cupping their ears to better hear what’s being said. 

A common loudness measurement you may run into is called LUFS (Loudness Units Full Scale). While we won’t go too deep into LUFS (which measures perceived loudness, unlike dBs), we’ll tell you that there are standards for LUFS volume levels for TV, Film, and other formats. For example, music generally is mixed and mastered to around -14 LUFS, while TV audio sits at -23 LUFS, and film at -27 LUFS. However, these ‘standards’ aren’t universal, and each project will have its own required overall integrated LUFS and guidelines for music/SFX levels (so make sure to ask for a written outline for deliverables).

Photo by Houses Cheung on Unsplash

How Loud Should Music be in Film or TV?

As a general rule, music is more of a support to the narrative and therefore is generally quieter than the dialogue and SFX, particularly when alongside dialogue and sound. Going by general industry practices, as seen in the Sundance Film Festival's 2023 Specifications, a film should be mixed to -24 dB LUFS overall (sometimes referred to as integrated LUFS). 

Since dialogue takes up the majority of the mix, this would mean that in moments where there is no talking, the music has space to be louder (if applicable for the scene), with the volume decreasing in moments with dialogue or louder sound elements. Finding the level depends on the style of music and taste, alongside the usual mixing rigmarole of not having too much of a certain frequency taking up the mix to avoid mud.

How Loud Should Sound Effects be for Film or TV?

SFX tends to be secondary to dialogue within the sound mix, as it enhances the realism of a scene and creates an atmospheric foundation for the dialogue. Key story elements are often conveyed through sound, sometimes telling as much of the narrative as dialogue. Therefore, the balance between dialogue and sound design is very important and often depends on the style. 

If you are shooting for naturalistic realism, then sound FX will often be more reserved; if you are working on an action movie, then it can be important for sounds to have an exaggerated impact and weight in the mix. Balancing sound and music can be a tightrope walk, especially if you’re dealing with a sequence that’s more music-driven anyway. The music overtaking the sound can give a sense of weightlessness, which is great for gentle moments or at the peak of a scene's crescendo. 

Photo by Glenn Carstens-Peters on Unsplash

Things that Change the Balance Between Music and Sound Effects Audio Channels

As previously mentioned, the balance between your SFX, Music, and Dialogue changes depending on what role they are fulfilling. In this section, we will briefly outline some of the reasons why. 

Balancing Based on Format

Sound and music will intrinsically play a different role in different formats. In video games, dialogue is usually kept to cutscenes or NPC interactions, so the music and the SFX are doing more within the sound mix. Sound design, in particular, plays a massive part in giving the players' actions weight and is therefore quite loud in the mix. 

TV, unlike film, is mixed primarily for home viewing and is very dialogue-heavy with less sound design (although with TV becoming increasingly more cinematic the difference in mixing is getting less and less). Audiobooks and radio plays will keep sound design and music at a quieter level throughout, as the dialogue/overall levels need to remain very consistent. 

Balancing Based on Genre / Mood

Consider an action-packed sports scene, with panicked footsteps, heavy kicks and net sounds, compared to a tense horror scene, with creeping sounds and sudden snaps. Both are using sound for a different effect. This is more obvious in genre films where sound and music are integral parts to the film's character (think John Carpenter synth scores and exaggerated gore sounds). 

This is the same across different formats; realistic action games sound very different from cartoonish adventure games. Even movies that are shooting for out-and-out realism are a result of mixing and balancing the SFX in such a way as not to bring attention to their artifice, and in doing so are equally as stylized as an ’80s horror.

Balancing Sound Effects and Music Based on Context

Sometimes, even though a film is aiming for realism, there will be moments where sound and music take the lead storytelling role, becoming more impressionistic and non-diegetic. It could be a dream sequence, a drug trip, a moment of horror, or a memory replaying in a character's head. What sets these scenes apart is that they break away from the established reality of the film, with dialogue perhaps becoming muddled amongst a wash of sound and music. 

Of course, there are many narrative reasons to play with sound like this. Sometimes it may not be during an obvious sequence, but making the sound unusually quiet, focusing on an odd sonic detail, or introducing music where there usually wouldn’t be can create a unique effect. 

Photo by Steve Pancrate on Unsplash

Beware of Your Listening Environment when Mixing Sound Effects

Even with access to a top-of-the-line studio, certain pitfalls of mixing can drastically affect the experience for the viewer when playback isn’t taken into account. The balance between music, dialogue, and SFX is even subject to change when experienced on different playback systems, and focusing too much on one type can lessen the impact when experienced on others. 

Some blockbuster movies have been known to ignore the range of home listening systems commonly used, leading to complaints of the sound effects and music being too loud and the dialogue being too quiet (such as Christopher Nolan’s TENET). In the age of the iPhone and social media, it is also imperative that phone speakers and common headphones/earbuds also be tested, as it’s likely that this is the medium your project will be most experienced. 

It’s common for higher-budgeted projects to have multiple mixdowns for different contexts (IE, a multichannel mixdown for theatre showings, and a stereo for home viewing/streaming); however, there isn’t always time or budget for two dedicated separate mixes – let alone the multiple iterations needed to test the plethora of other possible playback systems. 

Therefore, we recommend that you have reference speakers of various varieties that you can bounce between to check where possible (for example, a lot of post studios nowadays have sound bars and TVs to check mixes through). Doing this in tandem with a multichannel-to-stereo downmixer, such as the Nugen Audio Halo Downmixer, can allow you to test on the fly and maximize compatibility.

How-to guide
This is some text inside of a div block.

Post production sound design: a practical guide for editors

This outline maps what to prepare, step-by-step examples, fixes for common snags and how to hand off final stems cleanly.

JJ Lyon
December 19, 2025
Read Story↗

A compact, practical workflow for post production sound design that speeds editing and delivers professional, usable audio for Premiere Pro, DaVinci Resolve and game pipelines. This outline maps what to prepare, step-by-step examples, fixes for common snags and how to hand off final stems cleanly.

A fast, editor-friendly post production sound design workflow

Tackle sound after picture lock with a clear sequence and minimal fuss. Work from spotting to export in a repeatable order: spot, choose sources, build layers, mix, and export stems. The trick for editors is not to overcomplicate the rough pass. Get usable SFX and ambience in place fast, then invest time on the scenes that deserve the extra polish.

Organise for speed. Use template sessions with a fixed track layout and colour coding, name tracks and clips consistently, drop markers at edit points, and keep a minimal signal chain for rough work. Creative design sits between the rough editorial and the final mix. Save heavy processing and micro edits for your mix pass, and use the creative pass for signature moments where sound earns screen time.

Match effort to impact. Dialogue and editorial timing are locked early. Treat most cut reaction SFX and ambience as editorial duties you can rough in quickly, then hand over alternatives and wilds to the mixer or finish later. This way you meet tight deadlines without sacrificing scenes that demand detailed design.

Quick step-by-step checklist

• Import picture locked timeline and reference mix into your DAW or timeline.

• Sync and label dialogue stems and temp music.

• Do a rough pass of foreground SFX and key Foley to picture.

• Add ambience beds and loopable room tone.

• Create creative whooshes and impacts for transitions.

• Perform a mix pass for balance and clarity, prioritising dialogue.

• Export stems and a reference mix, include notes and markers for edits.

Speed-first rules for editors

• Use templates: track layout, routing and basic plugins preloaded.

• Limit processing during rough passes, use clip gain and basic EQ rather than deep restoration.

• Prefer destructive edits for editorial fixes that are easily reversible, like consolidating a stitched take.

• Save named snapshots or versions at each milestone so you can return without rebuilding.

• Keep a minimal bus setup for quick stem exports: dialogue, SFX, ambience, music.

What to prepare before you start: files, session and template setup

Gather the essentials before touching the timeline. You need the picture-locked sequence, a reference mix or temp track, dialogue stems (clean if available), and any editorial notes or shot lists that highlight tricky audio moments. If the picture comes as an OMF/AAF, verify handles and track assignments before importing into your DAW or editorial session.

A tidy session template reduces repetitive work. Use a clear track order and naming convention, route groups to buses labelled Dialogue, SFX Foreground, Foley, Ambience, and Music, and set up a Master bus with your loudness metering. Decide on loudness targets early, for example EBU R128 targets for broadcast or platform specific online targets, and stick to a consistent sample rate and bit depth across assets.

Avoid common format headaches by standardising on 48 kHz, 24 bit for video projects unless the delivery spec requires otherwise. Check frame rates and timecode on imported audio and picture to prevent drift. If you work in Premiere Pro or Resolve, export a locked XML/AAF and ensure handles are included when sending to a DAW.

Minimum asset checklist

• Picture locked timeline or an exported reference video.

• Dialogue stems or production tracks.

• Temp music and any licensing notes.

• Editorial notes or spot list with timings.

• At least one room tone or quiet ambience pass for each location.

Quick session template essentials

• Track order: Dialogue, SFX, Foley, Ambience, Music.

• Buses: Dialogue bus, SFX bus, Ambience bus, Music bus, and a Master bus.

• Basic processing on template: gentle high-pass on dialogue, a glue compressor on music bus, and a master limiter for reference only.

• Marker lanes for spotting and version notes.

• Preset routing for exporting stems to a standard folder structure.

Worked examples: practical SFX and ambience builds you can copy

These recipes focus on layers you can assemble quickly in an editorial timeline, then refine later. Think modular: make keeps, variations and wilds so editors can swap or trim without reopening the session.

Start small with footsteps and Foley, then create a short whoosh library for cuts, and build modular ambience beds you can drop under scenes. Use EQ to carve space, light transient shaping for punch, and subtle pitch variation for realism. Keep stems editable with clear file names and exported handles.

Footsteps and Foley (4 quick layers)

1. Contact layer for weight, recorded close and low frequency enhanced slightly.

2. Primary surface hits synced to footfalls, trimmed tightly to the edit.

3. Subtle room ambience to glue steps into a space, low pass above 6 kHz for distance.

4. Shoe squeaks or fabric rustle as a texture layer, low level only. Name exported files like scene_12_footstep_contact_v01.wav to make swaps painless.

Whooshes and impacts for cuts

Design a short whoosh recipe: a designed sweep, a reversed build for anticipation, a texture layer for grit, and a transient-clean impact. Use gentle pitch automation on the sweep, trim the build to the edit using fades, and apply transient control to the impact for tight alignment. Export multiple lengths so editors can match different cut speeds.

Crowd and ambience beds

Create three modular beds: foreground (distinct voices), mid (movement and chatter), and background (low rumble and distant ambience). EQ each bed to sit at different frequency bands and remove collision with dialogue. Provide loopable edit points and crossfades every 10 to 20 seconds so editors can extend beds without audible repeats.

Common problems and fast fixes during post production sound work

Editors and small teams run into the same issues repeatedly. Tackle the visible problems quickly and decide if something needs a deeper restoration pass. That triage keeps projects moving and prevents audio tasks from ballooning.

Noisy production tracks or a clash between dialogue and SFX often only need quick editorial moves rather than full restoration. Use short-term fixes to meet deadlines, then log problem areas for a later dedicated pass. When tools use AI, prioritise transparency and source attribution to avoid surprises.

Sync and drift fixes

For small drift, align a clear transient or slate and use minimal time-stretching, preserving pitch where possible. If you see consistent drift across a file, re-import with correct frame rate and sample rate settings. For long form projects, reconciling the locked picture export (XML/AAF) with original media usually resolves timing issues.

Masking and clarity problems

When SFX or music masks dialogue, try frequency-based fixes first. Use selective EQ to notch competing frequencies or sidechain a subtle duck on the SFX bus keyed to dialogue. If masking is scene-specific, automate SFX levels across the cue instead of raising dialogue. Reserve denoise and deep restoration for files that remain unintelligible after these steps.

A calm note on ethical and non-generative AI tooling. Use tools that clearly document sources and limitations. Treat AI as an assistant that suggests elements or automates mundane tasks, not as a black box that replaces attribution. Keep a changelog when you use AI processing so editors and mixers understand what was generated or modified.

Exporting and handing off: stems, metadata and organisation for editors and engines

Deliver stems that are predictable and easy to drop back into Premiere Pro, DaVinci Resolve or game engines. Group stems by function and keep naming unambiguous. Provide a reference mix and a readme that explains loudness targets, what is locked, and where editors can safely alter elements.

For games and middleware, supply multiple variations and clear loop points. For editorial handoffs, include a versioned set of stems and a short changelog describing edits and known issues. Archive the session with assets and export settings so anyone revisiting the project can reconstruct the workflow.

Stem export checklist

• Export dialogue-clean (no SFX), SFX-foreground, Foley, Ambience, Music, and a full reference mix.

• Use descriptive names: project_scene_Dialogue_clean_v01_48k_24bit.wav.

• Confirm sample rate and bit depth are consistent with the project, typically 48 kHz / 24 bit.

• Include markers, a simple changelog and a short README.txt explaining locked elements and alternates.

Packaging for games and middleware

Organise folders by type and purpose, for example: /SFX/Footsteps/Leather/ and include variations and metadata files with descriptions, tempo, and loop points. Provide loop-ready files with clean edit points and a dry version when possible. Keep filenames human readable and include a small CSV or JSON manifest so integration into Wwise or FMOD is quicker.

Next steps with Krotos: where to try this workflow and learn more

Krotos provides tools, libraries and project templates that fit an editor-first workflow, helping you generate quick SFX and ambience without hunting dozens of libraries. Look for sample projects and short tutorials that mirror the recipes above, so you can drop designed elements straight into Premiere Pro or DaVinci Resolve and iterate fast.

Adopt Krotos into your process by starting small. Try a trial or demo project, replace a handful of editorial SFX with newly designed assets, and measure the time saved. Use community resources to see how other editors structure templates and exports. And stay mindful: always record provenance of any sourced sounds and treat automated tools as collaborators not replacements, keeping control of creative decisions.

How to get started quickly

Visit the Krotos resources page for quick-start tutorial videos and a downloadable starter session or checklist. Load a simple template, follow a worked example from this article and export a couple of stems to test in your editorial timeline. Iterate on one scene to see immediate time savings.

Community and learning

Join the Krotos community to ask questions, download demo projects and share quick wins. Forums and tutorial channels are good places to find presets and session templates tailored to Premiere Pro, Resolve and game pipelines. Swap tips on naming conventions, routing and stem exports so everyone moves faster.

Try the workflow, grab a starter session, and see how much faster you can get to a deliverable. If you want a trial or sample pack, head over to the Krotos website to download resources and join the community for support and ideas.

Frequently asked questions

What is post-production sound design?

Post-production sound design is the process of creating, editing and assembling all non-musical sound elements after picture lock. It includes dialogue editing, Foley, SFX creation, ambience beds and the creative design work that enhances storytelling. The goal is to make sound match and amplify the picture, while preserving clarity for dialogue and pacing for edits.

Practically, it involves spotting the film, choosing or recording sources, layering elements to match the action and mood, and preparing stems for final mixing and delivery. For editors, it often means building usable, editable assets that sit comfortably in Premiere Pro or DaVinci Resolve timelines.

What does BGM and SFX mean?

BGM stands for Background Music, the music bed used to support scenes without drawing attention away from dialogue. SFX means Sound Effects, the individual sounds created or recorded to match on-screen actions, transitions and environmental detail. Both are essential layers in sound design, but they serve different narrative roles: BGM sets emotional tone, while SFX provides physical realism and editorial punctuation.

When exporting stems, keep BGM and SFX separate so picture editors or mixers can balance them against dialogue and ambience without destructive edits.

Is sound design considered post-production?

Yes, sound design is a core part of post-production. It happens after principal photography is complete and typically after picture lock. The post-production phase includes editing, sound design, Foley, ADR, mixing and mastering. Sound design specifically handles the creative and technical assembly of non-dialogue sounds to support the film’s storytelling and emotional beats.

That said, good projects integrate sound considerations earlier. Spotting sessions and temp sound choices during editing can save time later by flagging where detailed design is needed.

What are the 5 elements of sound in audio post-production?

A common way to break down sound elements is into five practical categories: dialogue, Foley, SFX, ambience, and music. Dialogue covers recorded speech, Foley refers to bespoke close-up sounds like footsteps, SFX includes designed impacts and transitions, ambience provides environmental texture, and music supplies emotional scoring.

Organising stems around these five elements helps with clarity during mixing and keeps editorial passes efficient, because each element has a different priority and processing approach during the mix.

Want to try the workflow? Download a starter session, explore Krotos tutorial projects and join the community for quick tips and presets that make post production sound design faster and less painful.

How-to guide
This is some text inside of a div block.

Making Game Audio with Krotos Studio

Sound Designer Paul Renard shares an awesome demo where he creates the sounds for a video game from scratch using Krotos Studio and Unreal Engine 5.

JJ Lyon
December 19, 2025
Read Story↗

Sound Designer Paul Renard shares an awesome demo where he creates the sounds for a video game from scratch using Krotos Studio and Unreal Engine 5.

Paul uses ambiences, cloth Foley and footsteps for the character and level, and gets creative with the vehicle interior preset to create the obstacle sound effects in the game. Furthermore, all of the doors, interface sounds and notifications were used with Krotos Studio!

"The sounds were made with Krotos Studio. It's a fun and fast way to get the sounds you want!" Paul Renar

For more game industry action, check our how to Make Game Audio with Krotos Studio and Unreal Engine, and on a sound design tip, learn how to Create Video Game Trailer SFX with Krotos Studio.

How-to guide
This is some text inside of a div block.

These Sound Designers Are About to Work Faster Than Ever Before

First come, first served. All the sound design power you could ask for in one package, for a very limited time

JJ Lyon
December 19, 2025
Read Story↗

100 Sound Designers Are About to Work Faster, Smarter, and More Creatively Than Ever

Every Krotos plugin. Every Krotos sound library. One definitive bundle. 

📣Exclusive to 100 people only.📣

First come, first served. All the sound design power you could ask for in one package, for a very limited time.

How Krotos Studio Max will power up your sound effect creation

This isn’t one of those “cool but niche” toolkits you’ll open once or twice a year. This is your new go-to for every sound design task.

Creature vocals, cinematic hits, Foley and beyond, with every Krotos plugin and every sound library in one bundle, you have the power to design any sound, in any category, all from one place.

Krotos Studio Max is something you’ll reach for on every project (...and wonder how you ever worked without it)

  • Fast-track your creativity: From a rough sound concept to a sonic reality…in a matter of minutes.
  • Access iconic plugins, used in iconic projects: The same powerhouse plugins behind the sound of Stranger Things, Avengers, The Lion King & countless others will be yours to explore and shape your sound effects.
  • Perform, interact and shape sound: build SFX textures in real time with a range of interactive, dynamic sound design tools
  • Reuse. Repurpose. Reinvent: Reinvigorate your sound effects library and transform it into an arsenal of incredible new sounds
  • Stay ahead of the curve: Combine Krotos Studio Pro with our iconic, powerful plugins. Less guesswork, more creating
  • Design what’s in your head, fast. Save countless hours on every project

Design sound effects the way you actually want to—fast, fluid, and fully in control. That’s exactly what 100 sound designers will experience with this limited opportunity.

Access all Krotos Plugins, inside the Krotos Studio Max subscription. That means every Krotos plugin—Dehumaniser, Reformer Pro, Weaponiser, Igniter And Krotos Studio Pro—and every sound library.

No more compromises. This is a complete sound design solution— incredible sound sculpting tools trusted by pros across the media industry.

  • Dehumaniser – Real-time creature vocal shaping
  • Reformer Pro – Turn mic input into dynamic textures
  • Weaponiser – Stack, blend, and fire layered SFX with precision
  • Igniter – Build realistic or sci-fi vehicle engines from scratch
  • Krotos Studio Pro – Your performance-based sound design command center
  • Concept
  • Simple Concept
  • Dehimaniser Simple Monsters
  • All Krotos Libraries – Thousands of ready-to-use assets

And you’ll have them all. Instantly.

Don’t Miss Out

When they're gone, they’re gone. Will you be one of the 100?

Get Krotos Studio Max

How-to guide
This is some text inside of a div block.

How to Create Footstep Sound Effects: Krotos Studio Pro 101

Follow along in this tutorial to understand how footsteps presets can be designed and operated in Krotos Studio Pro.

JJ Lyon
December 19, 2025
Read Story↗

Follow along in this tutorial to understand how footsteps presets can be designed and operated in Krotos Studio Pro.

Building a basic footsteps preset

  1. In the hamburger menu, click load factory presets
  2. Open the preset templates folder and select footsteps template.

The XY pad on this template is designed to hold a different surface type in each corner. There are pitch and pan macros, plus trigger buttons for scuff and stop sounds.

The sampler core engine is recommended for footsteps, as we can trigger the sounds in either a random order, or sequentially. Use one sampler per surface, as these will be mapped to their own corner later on.

The note trigger button is enabled on the XY pad. With this enabled, sounds are triggered when you click on the XY pad itself. Lets load the first engine with some footsteps. Once the sounds are inside the engine, you can trigger them and they will play back accordingly.

Now lets load another surface into engine two.

Now, when we gradually click from surface one to surface two, you can hear the surface change.

Now let’s load more surfaces into engines three and four.

Now we can click in various directions across the XY pad and mix our four surfaces together.

We can customise the sounds further. The pitch macro enables you to control the pitch of all of the footstep sounds you have loaded in. You can also pan the footsteps around with the Pan dial, and all of these parameters are fully automatable in your DAW.

Adding scuffs and stops

There is more involved in footsteps than just placing one foot in front of the other. Scuffing shoes and stopping sounds are also needed to make your footsteps sound as authentic as possible, and you can do this with the trigger buttons. With this workflow, you can have full control over the surface and footsteps, as well as additional buttons for triggering these less-often-needed sounds.

Creating a footsteps preset from a template

This template is set up to allow you to create your own version of the Krotos Studio footsteps workflow. This is not the only way to trigger footsteps of course, but we believe this is a quick way to start.

Using this template, the core engines are already setup to trigger from the XYPad4Zone and for the 4 surfaces to mix between one another, as in the footsteps presets that ship with Krotos Studio.

Tip: Steps can also be triggered with MIDI Note C3, scuffs with C#3 and stops wth D3.

To add your own steps, we will start with tab0 (labelled ’Steps’ in this template (you can right-click on any tab in Krotos Studio to rename it). This template is setup to mix between up to 4 different surfaces.

If you only have one surface, this is also fine, just use the first core engine in each tab throughout this tutorial. Each tab has already been setup and assigned to the perform area to match the 4 surfaces you can see labelled in the XYPad4zone on the right hand side.

Drop your own step samples into each of the 4 core engines of the ‘Steps’ tab, with steps for surface 1 into the first engine, for surface 2 into the first second engine etc until you have filled all 4 engines.

Remember you can use the scroll wheel on you mouse to scroll the core engine area to reach core engines that are out of sight.

You can add any many samples as you like into each core engine (up to 250 samples) to help avoid repetition.

These steps will now be setup to be triggered from the Xypad in the performance area. You should also be able to mix between these surfaces by clicking in different corners.

You can right-click on the names of any of the 4 corners of the XYPad4Zone to rename them.

You’ll see that the ’note trigger’ button has been activated underneath the XYPad4Zone. When activated any click in this XYPad will trigger any core engine set to ‘All Notes’ or ‘C3’. This is a handy way to build presets that can be triggered with your mouse.

You can also use the XYPad4Zone as a mixer, without triggering with the mouse, by deselecting this note trigger toggle. Now you can trigger using midi, and use the XYpad to mix between surfaces using your mouse.

Scuffs

The ‘Scuff’ button is setup to trigger core engines in the ‘Scuffs’ tab. You’ll see this is set to MIDI note C#3 in the core engines, on the left hand side. In the Trigger button menu directly underneath the button in the Perform Area you can also see this is set to C#3. This is how we connect the triggering to the core engines. If you want to change the trigger note, make sure you do it in both places if you want to use this button in the UI.

To add your own scuff sounds, simply drag and drop them into the core engines in tab 1. If you have multiple surfaces you want to use, add them in the same order as you did for the ’Steps’ tab, so that you can mix between the scuffs using the XYPad4Zone.

Stops

The ‘Stop' button is setup to trigger core engines in the ‘Stops’ tab. You’ll see this is set to MIDI note D3 in the core engines, on the left hand side. In the Trigger button menu directly underneath the button in the Perform Area you can also see this is set to D3. This is how we connect the triggering to the core engines. If you want to change the trigger note, make sure you do it in both places if you want to use this button in the UI.

Pitch and Pan are already assigned to the appropriate core engines as well, so once samples are added, you can use these macros straight away!

Remember you can use this template for many types of sound design use case, not just footsteps. You might find it useful for any scenario where you want to mix between multiple layers of material as you move, or have 3 different types of interactions under different circumstances.

HOT TIP - when mixing between multiple layers of footsteps, make sure you have edited the start points of your samples to be at the same point. This will ensure smooth mixing of layers. You can also adjust the start/end points of each sample you import into a core engine, but careful editing ahead of time will save you a lot of time.
How-to guide
This is some text inside of a div block.

Discover the Best Royalty-Free Sound Effects Libraries For 2025

We list the sound effects libraries that don’t require royalty payments for commercial use

James Russell
October 17, 2025
Read Story↗

A professional sound designer’s projects can see hundreds of tracks spanning a timeline of many minutes or even hours. Given how many sounds can be used over that span – whether they’re gunshot sounds, traffic SFX, footstep sounds or anything else – wouldn’t having to pay royalties on every single one seem wholly impractical? As far as big projects go, the less paperwork, the better!

Which is why most sound effects libraries and apps make the deal simple: pay an upfront fee or subscription, and anything you use won’t need another payment.

In the following list, we’ll take you through the ten best sound effects libraries that operate under a royalty-free licensing agreement model.

Complement your library with our curated free sound effects and cinematic assets from our 'Cinematic Tension' Free Sound Effects Library. You can also explore a wide range of assets in our free sound effects library

Why should you use royalty-free sound effects?

It can be tempting to use sounds plundered from your internet explorations without any second thought; they can happen to fit the project with no extra work, and better yet, no extra cost. The danger comes from the amount of non-royalty-free sound banks floating around, being reuploaded on blogs, websites, or legally questionable file-sharing sites. 

These sounds can originate from industry giants such as the BBC or Skywalker Sound, whose well-funded legal department will bring the hammer down hard if they catch you using their intellectual property without permission. Turning a cost-free shortcut into a costly legal headache for you and your employer.

By choosing to purchase/use royalty-free sounds from reputable sources, you are not only ensuring you have the legal right to use the sounds, but are also likely to be using sounds that are less recognisable, and therefore more unique to your project. Doing things by the book is one thing, but it's even more important not to be boring! 

1. Krotos Studio

How about going beyond royalty-free? Why use somebody else’s sound effect in the first place when it’s just as quick to make a custom one, tailored to your scene? That’s exactly what you get with Krotos Studio: a playable, performable sound effects generator so you can ‘play along’ with the scene at hand, and drag the resulting file into your timeline when you’re done.

All sounds from Krotos Studio come royalty-free, right out of the software.

2. A Sound Effect

A Sound Effect has been a mainstay in the sound world for years now as an ever-growing hub of independent sound designers contributing towards a true behemoth of an archive. Unlike a lot of sound libraries that allow for independent creatives to upload their work, A Sound Effect selects its roster to ensure that not only are the sounds of high quality and usability, but also are unique, not taking on too many generic sound packs of similar styles.

This has led to renowned artists such as Mattia Celloto and George Vlad calling A Sound Effect home, and fostering an array of not only sound packs but also VSTs that are well worth exploring. Who knows, maybe your own sounds will be part of the A Sound Effect ecosystem one day. 

3. Boom Library

Boom Library is an industry standard for a lot of modern high-end productions. Trusted by Netflix, Blizzard, Nintendo, and Marvel Studios, you can more than likely trust that their range of FX and atmosphere will be up to scratch. They offer a wide selection of sounds, ranging from nature recordings to targeted anime essentials, alongside many bundles and more all-around packs, such as Boom One, that include a wide range of sounds that have a place in most productions.  

They also offer some bespoke software and plug-ins that range from effects, sound generators, and processors. With a lot of their sound packs also boasting surround and 3D audio, it’s no surprise that Dolby has also given Boom Libraries their seal of approval. 

4. Soundly

Offering not only a highly usable sound FX library, but also sound-file management software to better organise your already existing sounds, Soundly has become a trusted name in the sound design community. While not having the most exhaustive library on this list, it is always being added to, with sounds being easily searched for using keywords and metadata, as well as being able to export files directly from Soundly into your DAW of choice. A perfect choice for smaller projects with tight turnarounds, or as a way of supplementing and utilising your existing sound library.

They also offer a free version of the Soundly software, which comes with limited access to their sounds and previews of their premium content (available through a single-day/month payment, or a rolling subscription). 

5. Penguin Grenade

Like the name implies, Penguin Grenade has its own way of going about things. Specialising in experimental sound design and spearheaded by Paul Stoughton, Penguin Grenades' work uses electronics, field recordings, and electroacoustic experiments to create otherworldly sounds perfect for Sci-fi/Fantasy settings, such as their Pulse Energy Weapons pack. With the fruits of their labour leading to features on projects such as Halo 2, God of War: Ragnarok, and Dead Space.

Fulfilling a specific niche, you may not be able to find sounds for all use-cases, but you will know when you are in need of their particular brand of sonics. 

6. Sound Morph

Kindred spirits in sonic aesthetics, Sound Morph is another key player in video game audio; specialising in Sci-fi sounds, but also stocking more general cinematic worlds and off-world atmospheres, alongside more horror-oriented and non-diegetic soundscapes. Sound Morph also offers musical sound elements including drums made by professional musicians and ambiences that blur the line between score and sound design. 

Sound Morph also releases software that specializes in morphing and twisting sounds, as well as sound design-specific synthesizers made for sci-fi interfaces and gadgetry

7. Rock the Speaker Box

Another specialist in fantasy/sci-fi and action sound effects, Rock the Speaker Box has become a go-to for video game sound design and genre-media projects looking for hard-hitting FX. Working with companies such as PlayStation, Activision, and Rockstar Games, they offer specific sonic solutions to explosions, gore, magic systems, futuristic technologies, and more. Like a few of the other inclusions on this list, their scope is more limited, which allows them to excel at what they do but may leave their library more limited than more all-encompassing collections.

They offer discounts on bundles, such as their action bundle, as well as some always-welcome freebies of hits and impacts.

8. Soundbits

Over a decade-plus, Saro Sahihi of SoundBits has been capturing and releasing high-quality soundpacks, with their work featured on other heavy-hitting catalogues such as Pro Sound Effects, Pond5, AudioJungle, and DepositPhotos, as well as distributing exclusively through partnered stores, including our very own Krotos webpage. Ranging from whooshes and klangs to vehicle sounds and engines, as well as an ever-expanding range of atmosphere recordings made all around the world, you will probably find that one sound you have been pulling your hair out looking for. 

With a selection as gargantuan as it is, Soundbits' highly reasonably priced soundpacks are a testament to finding interesting sounds anywhere and everywhere. 

9. Silverplatter Audio

Offering highly specific sound packs for VERY reasonable prices, Silverplatter Audio’s game is zooming in on specific sounds and packaging them for ease of discovery and use. With categories such as coins, crowbars, vintage machinery, billiard balls, and everything in between, Silverplatter has made it as easy as possible to find what you are looking for. Also offering an everything bundle that is, quite frankly, a steal. So if you have something very specific you don’t have time to record yourself, check out their wares - it may be there, and for a price you can’t sniff at. 

Let's also not forget their merch page, just in case you want some Silverplatter Audio swag after they have saved you from debilitating sonic limbo. 

10. FreeSound

A more open community to the previously mentioned A Sound Effect, Freesound is a treasure trove of both the best and worst sounds the internet has to offer. Boasting a pool of over 625,000+ samples, the quality of the sounds featured fluctuates on a user-to-user basis, but it is full of gold if you know where to look and are clever with your search terms. Just be sure to double-check the attributions of what you want to use to make sure the uploader is happy with their work being used without credit or a license. 

Freesound is, at the end of the day, a community, with all the imperfections and uniqueness that entails, reminding us of the internet's more collaborative beginnings and what can be found by people doing something purely for the love of it. 

How-to guide
This is some text inside of a div block.

How to use Krotos Studio inside Pro Tools AudioSuite

We've taken full advantage of AudioSuite in Pro Tools, making it incredibly fast to render ambiences with Krotos Studio.

JJ Lyon
December 19, 2025
Read Story↗

Creating ambiences doesn't get much quicker than the AudioSuite workflow in Pro Tools. We've taken full advantage of this awesome Pro Tools feature, making it incredibly fast to render ambiences with Krotos Studio. Check out the video now!

Krotos Studio simplifies and accelerates the process of creating these sounds. With its intuitive interface and vast library of presets, filmmakers can quickly find and customize the perfect sounds to match their vision.

Whether it's the haunting whisper of the wind, the ominous echo of footsteps in a deserted hallway, or the unsettling rustle of leaves in a forest, Krotos Studio allows for rapid experimentation and fine-tuning. This ease of use and flexibility means that even those with limited sound design experience can produce high-quality, effective ambience sound effects, enhancing the overall impact of their scary films.

Enhance your sound design approach by applying these Effortless Sound Design in Pro Tools, and build impact by Creating Cinematic Sound Effects In Krotos Studio. You can also explore a wide range of assets on a budget in our free sound effects library.

What Ambiences Do We Need?

It's a pretty simple scene. We see a character sleeping, before the camera pans out to show an ominous figure lurking behind them.

Adding Realism with a Room Tone

Before we can get into the spooky stuff, a layer of realism is essential to situate the environment in which the scene is taking place. We use the Apartment preset in Krotos Studio's vast library of ambiences to do this, then we tweak the various sounds to balance the scene.

Establishing Discomfort with Wind Sound Effects

Next, we'll add a bed of eerie wind sounds. There is no actual wind source in the clip, but that's okay. What this layer does is add a sense of strangeness and discomfort to the scene, and the imagination of the audience separates the source sound from their viewing experience. Creepy!

Adding Atmosphere with Eerie Cinematic Sound Effects

Next we'll use the Eerie Scene preset to establish the idea that something isn't quite right in our clip.

Moving through the XY Pads, we can get some undulating, morphing layers to add some atmospheric scariness to the scene.

Adding Drama with Impact Sound Effects

Now that we have the bed in place, lets embellish the scene with some impactful sound effects.

We have an impact sound to open the scene from the Morbid Hit preset. This is a powerful boom which hooks the viewer from the moment the clip starts. Next we have some more impacts for when we see the character lurking in the background. We use the Metal Hit preset and layer it up with some pitch shifting to add more power.

Ending the Scene with a Dramatic Stinger

As we come to the climactic moment of the scene, we want a dramatic stinging sound effect to let the viewer know that our sleeping character is in a heap of trouble.

We use the Atomic Braam & Dark Entry presets layered up for some daunting drones, with a high pitched Screaming layer, before our scene cuts to black. Our sound effects are complete!

You can add much more to this scene using the library of over 200 presets available in Krotos Studio, and it is made so much easier using Krotos Studio as a plugin in DaVinci resolve in the Fairlight tab.

Buy Now

How-to guide
This is some text inside of a div block.

Working with Audio in Final Cut Pro – Every Feature Explained

Learn all the audio editing features of Apple’s big-hitting NLE software with this guide

James Russell
October 17, 2025
Read Story↗

Final Cut Pro is an industry staple video-editing software for those who work on Mac systems. And, like many other Apple native applications, it approaches things in a unique way that can be tricky to get the hang of initially. This includes its audio functionality.

This guide will focus on Final Cut Pro’s audio editing capabilities to get you up to speed with its workflow in no time at all. By the end, you should have a firm grip on the audio functions and can always refer back to this page if needed.

Adding media to Final Cut Pro

To start working with audio in Final Cut Pro, you need to import some media into a project. Project management works uniquely in Final Cut Pro. You first need to create a Library, which will act as your primary parent folder. Inside a Library, you can create separate Events. Finally, inside of any event, you can create a project, where you can edit content.

Once you’ve got a project set up, importing media (including audio) is easy. Head to File>Import>Media (or hit Command+I). You’ll then be met with the Media Import window, where you can select a folder directory for Final Cut Pro to locate media. If you have some audio files ready to work with, you can point Final Cut Pro to them here and then select Import All

Once the import is complete, all audio files should appear in your Browser panel. If your Browser panel isn’t visible for whatever reason, you can navigate to Window>Show in Workspace>Browser (or hit Shift+Command+1). Audio can now be dragged onto the Magnetic Timeline at your leisure.

Recording a Voiceover in Final Cut Pro

If you don’t have any pre-existing audio to work with, you can record your own as a Voiceover. And in Final Cut Pro, it couldn’t be easier! With your Playhead in the desired starting position on the Magnetic Timeline, simply navigate to Window>Record Voiceover (or hit Shift+V).

Once the Record Voiceover command has been selected, you’ll be met with a settings panel, showing your microphone input level, the Input Gain amount, a text field to enter a Name for your Voiceover, as well as an expanded Advanced Settings menu if desired.

Before we record, it’s important to get the input levels of your microphone set appropriately. If your microphone is working and active, you should see the Input Level meter fill up green when you speak. 

Do a quick test, speaking naturally - how you would if recording an actual Voiceover - and adjust the Input Gain amount until your signal is averaging at a nice level. It shouldn’t be too quiet, but also shouldn’t be reaching maximum. If it reaches the max, the clipping indicator will light red. This should be avoided at all costs. It’s always better to increase audio volume later, than try to reduce it after the signal’s already clipped.

Once you’ve set up your levels, you can choose the Event location, where recorded files will be saved, from the Advanced Settings panel. Then, you’re ready to hit the record button. Upon hitting record, Final Cut Pro will give you a 3 second countdown before recording commences. To stop recording, simply hit the Stop button. Then, voiceover takes will be saved onto the Timeline for further editing.

Adjusting volume audio effect in Final Cut Pro

Once you have audio on Final Cut Pro’s Magnetic Timeline, you can begin editing it. The most immediate editing option is to either increase or decrease an audio clip’s volume by clicking and dragging its volume control up or down. This will essentially apply audio effects to the entire track.

You’ll also see the audio waveform change according to your adjustments. If any area of the waveform appears red, it means the signal is clipping. Try to avoid this.

Alternatively, with an audio clip selected, you should see further settings in the Inspector panel (upper right corner). You can also adjust the Volume of audio here. If your Inspector panel isn’t open for some reason, navigate to Window>Show in Workspace>Inspector (or hit Command+4).

If working with multi-channel audio clips, or you’d like to adjust the left and right stereo signal separately, you can also do so through the same Inspector panel with the desired audio clip selected. If it’s multichannel, the channels should list separately under the Audio Configuration tab. If you’d like to split a stereo track, find it in the Audio Configuration tab, and set it to Dual Mono, instead of Stereo.

Add fade in/out audio transitions in Final Cut Pro

Audio fade in, audio fade out, or audio crossfade are commonly sought-after audio effects when editing a project. Luckily Final Cut Pro has built-in audio-fading functions like other NLEs, and they’re super easy to use. 

How to audio fade in Final Cut Pro

To perform an audio fade in, you can zoom to the start point of your desired clip, then hover your mouse over the audio fade marker. Next, simply click and drag inward to the clip to adjust your fade.

How to audio fade out in Final Cut Pro

To add an audio fade out effect in Final Cut Pro, you can simply repeat the same process outlined for the audio fade in, except this time, you’ll want to zoom in on the end point of your audio clip and drag the audio fade marker from the opposite direction.

How to audio crossfade in Final Cut Pro

To apply an audio crossfade effect in Final Cut Pro, you need to have two adjacent audio clips you want to fade together next to each other on your timeline. With both clips selected, you can navigate to Modify>Adjust Audio Fades>Crossfade (or press Option+T)

Ducking volume audio effect in Final Cut Pro

Sometimes you might want to duck an audio clip’s volume only for a specific section. This can be to make way for an overlapping audio clip, or just to gain tighter control over your audio. You can do this in Final Cut Pro as well.

To duck audio for a certain amount of time, first select the Range Selection tool from the Tool menu (or hit R on your keyboard). 

From there, all you need to do is click and drag from your desired start and end points on an audio clip to set a specified range. Finally, you can click and drag the volume controller of the selected range to adjust its volume independently from the rest of the clip.

Keyframe audio effects in Final Cut Pro

There may be instances when ducking audio, or using an audio fade in, or audio fade out, in certain ways doesn’t suffice. Perhaps you need greater precision control over the ducking range, or over the fade during the start and end of the duck. Or it could be you want to adjust a completely separate audio parameter across time, like using an EQ or third-party plugin. That’s when Keyframes come in handy.

A keyframe allows you to set custom start and end points, where you can change a parameter (e.g. Volume) across time. Once keyframes are set, and the start and end values are adjusted, Final Cut Pro will automatically adjust the value from point A to point B across time. So, if you set your first keyframe value to -4dB at 0:10 seconds, and your second keyframe at 0dB at 0:25 seconds, Final Cut Pro will automatically adjust the volume values from -4dB to 0dB between that range of time.

To add keyframes, navigate to your inspector window with a clip selected. Then, next to any parameter that allows for keyframe control, with your mouse hovered over it, you should see a little diamond-shaped icon with a ‘+’ inside it on the right-hand side. We’ll be using the Volume parameter for our example. See the below screenshot for reference.

To add a keyframe, you can simply click this icon. Just make sure your Playhead is already in the desired location on the Timeline beforehand. You can then adjust the desired value of a keyframe when the Playhead is in the respective position.

For easier navigation between keyframe locations you can simply jump from each keyframe to the next (backwards and forwards) using the corresponding buttons in the Inspector panel. These appear next to the diamond-shaped keyframe button once two or more keyframes have been placed on your clip.

Audio visualizer settings in Final Cut Pro

Final Cut Pro has a few different settings to adjust the audio visualizer information any given clip displays, and this includes modifying the audio waveform display. Sometimes you may want to increase the thickness of a clip and its respective waveform to get a better look at what’s going on. If for some reason your Final Cut Pro isn’t displaying the waveform at all, this is also how you enable it.

Simply click the Toolbar icon demonstrated in the below screenshot and you’ll be met with a settings panel to customise the appearance of your clips. You can enable/disable the waveform audio visualizer, adjust the waveform thickness, adjust the overall clip thickness, and enable/disable additional clip information.

Using audio effects in Final Cut Pro

Final Cut Pro has a wide range of stock audio effect plugins available for use, ranging from compressors to equalisers, to saturators, and beyond. To access these, simply navigate to the Effects menu from the toolbar and scroll down to the Audio section. From there you can click and drag any effect onto a clip and modify the settings in the Inspector panel.

EQ audio effects in Final Cut Pro

EQ is one of many fundamental audio editing tools we can use to polish up an audio clip. Shape the tonal character of the audio by adjusting the bass, mid, and treble frequencies individually. If you’re using a microphone that sounds a bit muffled, or perhaps a bit too tinny, we can correct this using EQ.

To EQ audio in Final Cut Pro, simply click and drag one of the EQ effects from the Effects menu onto an audio clip. You can then open the effect from the Inspector panel and make changes accordingly. If your audio sounds too muffled or bass-heavy, try reducing the low-end. If it sounds too sharp and tinny, try reducing the high end. Over time, practice using EQ to master how to shape audio’s tonal qualities.

Compressor audio effects in Final Cut Pro

Compression is another go-to audio processing technique allowing us to shape the dynamic range of an audio signal. That means the range between the highest and lowest volumes. If you have a recording where one part is really loud, and the other really quiet, compression can help to even them out.

To apply some all-round gentle compression to your audio, follow these steps (although you may need to educate yourself a bit on compression for more advanced jobs). First, you can add a compressor to an audio by clicking and dragging one from the Effects menu onto an audio clip. Then, open the compressor’s advanced settings through the Inspector panel.

Finally, you can reduce the Threshold to around -25.0dB, set the Ratio to approximately 3:1, and adjust the Make Up gain to about +3dB. This should serve as a good starting point which you can alter incrementally to experiment with the sound.

Spatializer audio effects in Final Cut Pro

We can alter our audio’s behaviour across the spatial field by using the Pan tab in the Inspector menu. Simply open the drop-down Mode menu in the Pan tab, select a mode, and then corresponding settings will appear, allowing you to pan audio from left to right (if Stereo Left/Right is selected) or place audio sources within an entire surround sound field, depending on the Mode selected. There are a few Modes here to play with so feel free to take a look.

Audio cleanup with audio enhancer

Did you know you can attempt to automatically clear up any background noise, as well as perform a general audio cleanup using Final Cut Pro’s built-in Enhance Audio function, and it’s super simple to use too. With a desired audio clip selected, simply navigate to Modify>Enhance Audio (or hit Option+Command+A). And voila, using AI, Final Cut Pro should’ve automatically targeted any background noise and other commonly occurring audio problems within your clip.

How-to guide
This is some text inside of a div block.

Cinematic Tension Free Sound Effects Library

Cinematic Tension is Free Library from Krotos, containing risers, impacts & more. Download it here!

JJ Lyon
December 19, 2025
Read Story↗

Introducing Cinematic Tension: A 100% Free Library, containing risers, impacts, tension beds, textures are more to make your projects land with a blockbuster impact.

Crafted by the Sound designers behind Krotos Studio these Pro-level sounds are yours, without costing a thing and can be used 100% Royalty free, always.

Ramp up the tension in your trailers or action/thriller scenes, and propel audiences through your story with Impactful transitions

Enter your email address below to get the free Cinematic Tension library, and blow your audience away.

To push these tension cues further, follow the layering ideas in Creating Cinematic Sound Effects In Krotos Studio and shape backgrounds with Creating Ambience Sound Effects With Krotos Studio.

How-to guide
This is some text inside of a div block.

What is Diegetic Sound? Explanation and Examples

Learn what people mean when they use the term, with video examples to help you understand what diegetic and non-diegetic sounds are, what differentiates them, and how they can be used for unique cinematic effects

James Russell
October 17, 2025
Read Story↗

Diegetic sound, and by extension non-diegetic sound, is a fundamental concept of sound design that can get more nebulous the more you explore the craft. While the distinctions between the two are somewhat obvious once you are familiar with them, the difference between them can become blurry within the context of genre and more impressionistic styles of filmmaking. 

In this article, we hope to dispel any confusion around the terms, explore the questions they raise, and highlight some examples of how diegesis has been handled in film sound to create interesting results.

What is Diegetic Sound?

Diegetic sound refers to sonic elements that occur within the storyworld of the film, meaning any sound that is actually caused by or happening externally to the characters. This includes everything from onscreen dialogue and footsteps to offscreen ambiences such as birdsong and traffic. 

Due to films usually telling stories that exist within a shared reality, by default, most dialogue, Foley, and sound design happen within a film's world. If a character is hearing it, more often than not, you would describe the sounds as diegetic.

What is Non-Diegetic Sound?

Non-diegetic, or sometimes known as non-literal sound, can be described as any sound happening outside of the reality of a film. This can be as fundamental as voiceover narration or the score; if the characters can’t hear it, then it is non-diegetic sound. 

Non-diegetic sound can also be used to describe sound effects that portray the subjective internal world of a character, representing emotions and mental states. This kind of non-diegetic sound is more impressionistic and may contain elements of diegetic sound processed with extra audio effects, or be entirely textural, supplementing the score to convey what emotions should be felt. 

Diegetic Sound vs Diegetic Music?

Diegetic music is part of diegetic sound. For it to be diegetic, it must occur within the reality that the characters inhabit. Maybe there's a scene that features a live performance, or radio playing through a loudspeaker, or a character listening to music in their headphones… these are all examples of diegetic music. On the other had, if there's just a 'theme song' playing, and the characters can't hear it, it's non-diegetic (more on this below).

When mixing diegetic music, care should be taken to add sonic characteristics that inform the ear that it is emanating within a space or from a medium: reverbs, speaker emulators, realistic panning, etc. It shouldn’t sound like a studio multitrack recording has just been placed within the edit timeline. Otherwise, the viewer might not be able to ascertain where the music is supposed to be coming from. 

That being said, musicals often forgo these steps as the storyworld of the film already exists in a heightened reality.

Non-Diegetic Music and Narration

As previously mentioned, the score and narration are usually considered to be non-diegetic unless explicitly shown to be otherwise, such as the narration being a radio show or the score being performed by an in-universe band. Although the argument could be made that they remain non-diegetic until revealed to be otherwise, or vice versa. Internal monologue is not usually considered to be non-diegetic. 

Non-literal SFX can also blur the line between non-diegetic music and sound design, as sonic storytelling techniques such as soundscapes, hits, or stings can overlap between the two. In some films, it may be hard to tell what sounds are coming from the score or the sound design. This can create an interesting relationship, where similar sound palettes can be used by both in different ways, allowing for a cohesive overall sonic identity for the film and an interplay between the two. This is more common in genre films such as horror or sci-fi. 

Trans-Diegetic Sound

A helpful way of bridging the gap between diegetic and non-diegetic sound is with Trans-Diegetic Sound. This can literally be the combination of diegetic and non-diegetic elements, or a literal transition from non-diegetic to diegetic. Such as the score starting as a needle drop but moving into the ‘real world’ by transitioning to the song playing from a radio.

That being said Trans-Diegetic doesn’t solve all our previous questions. When does it stop being non-diegetic and start being trans-diegetic? Aren’t most film soundtracks trans-diegetic, as they usually have real-world dialogue alongside the score?

Examples of Diegetic vs Non-Diegetic Sound

We have selected a few interviews and scenes from films that help illustrate the difference between Diegetic and Non-Diegetic, and how playing with diegesis can lead to interesting results.

Diegetic Sound: Foley in Bladerunner 2049 (2017, dir. Denis Villeneuve) 

Foley is often a great example of diegetic sound; it directly places the characters within the world and helps the ears focus on what’s important. In this case, some fantastic Foley work that aids in telling the story, using the rattle of cutlery and groans of the floorboards to convey the sheer weight and strength of the character. 

Non-Diegetic Sound: Score and Sound Design in Bladerunner 2049 (2017, dir. Denis Villeneuve)

Non-diegetic sound can help set the tone of a scene, enhancing its overall cinematic qualities. In this example, the line between score and sound design is blurred. The score uses sounds reminiscent of the sci-fi engines or the world, and the sound design uses folk instruments. Coming together to aurally portray the atmosphere of this overwhelming cityscape. 

Diegetic and Non-Diegetic Sound (Trans-Diegetic): The Railroad in Stalker (1979, dir. Andrei Tarkovsky) 

In this classic sequence, the lines between score and sound design are blurred even further as we’re put into a similar meditative state as the characters. Starting with a sparse score and the diegetic sound of the railcar. They slowly combine through complementary rhythmic additions to the score and post-processing of the diegetic sound. Moving to and from the real world and creating a dreamlike monotony. 

Non-Diegetic to Diegetic (Trans-Diegetic): The drums in Birdman (2014, Dir. Alejandro González Iñárritu)

The free-flowing energy of Birdman greatly benefits from its jazz drum score by how it complements the in-the-moment feel of the cinematography. But with a narrative as meta as Birdman’s, moments where non-diegetic music becomes diegetic enhance this cohesion further. In this case, the score moves into the filmworld in the sound mix, gradually placing it within the streets of New York until the ‘real’ drummer is revealed. 

Diegetic to Non-Diegetic (Trans-Diegetic): The drums in Whiplash (2014, Dir. Damien Chazelle) 

2014 was a great year for jazz drumming in cinema. In Whiplash, at the climax of the story, we are treated to a drum solo that manages to conclude the psychological warfare of the narrative. All the tension is finally released, and the sound mirrors that. As we focus on Neiman’s double time swing, the diegetic sound is gradually pulled away and replaced with a hushed wash of noise. We are in Neiman’s flow state, an earned moment of stillness amongst the cacophony.

Summary/Conclusion

Most sound in film is unrealistic, an exaggeration of how things sound in the real world. Even if it is done in a naturalistic style, SFX such as fire will sound extra loud, or Foley elements will be more overt than they would in reality. Explosions and silencers on guns, for example, usually sound very unrealistic because we have learned to expect certain sounds to represent them in film. 

Sound design is an art form; whatever works for the story works. These terms are descriptive and not guidelines. Most film sound consists of diegetic and non-diegetic elements happening simultaneously, and the interplay between the two can result in new and interesting ways of telling a story. Where these terms become hard to define is usually when a film is doing something interesting that can be interpreted in many different ways, so don’t get too bogged down by it. Leave that to the academics. 

Instead, it can be helpful to think about diegetic and non-diegetic sound in broad strokes, moments where you want to move away from the real world and come back to it. Do you want to go inside a character's head or perhaps distance them from the audience? Strip all the sound away until you are left with just the score, or bring the audience crashing back to reality? It’s moments like these where playing around with diegesis becomes an invaluable tool in any sound designer's arsenal.

How-to guide
This is some text inside of a div block.

Using Krotos Studio as a Foley Sound Library

Building a Foley sound library requires sourcing thousands of sound effects and layering them. But what if there was an easier way?

JJ Lyon
December 19, 2025
Read Story↗

Exploring Krotos Studio for your Foley Sound Design

Foley sound effects are an essential part of any production—bringing realism and immersion to films, games, and content.

Traditionally, building a Foley sound library requires sourcing thousands of sound effects and layering them manually to match on-screen actions. But what if you could generate dynamic, high-quality Foley sounds on the fly?

With Krotos Studio, you get access to a powerful AI Foley engine that makes this not only possible, but with incredibly natural, detailed results.

What is Reformer AI in Krotos Studio?

Krotos Studio includes many Foley presets that utilise the Reformer AI engine to trigger and layer sounds dynamically. Unlike a traditional Foley sound library, where you search for static recordings for rustles and movements, Reformer AI let's you perform the sounds in real time.

The Reformer AI engine brings a level of interactivity and realism that makes sound design faster and more intuitive, replacing the need to manually place and sync individual samples.

How Does Reformer AI Work?

The Reformer AI Foley engine breaks sounds into grains and plays them back dynamically.

Instead of random playback, Reformer AI uses the movements you make on the XY pad to intelligently select parts of the Foley sound effects. This means the sounds created remain organic and lifelike.

Here’s how it works:

  • The XY section displays a coloured pins which represent segments of the sounds
  • Dragging inside the performance area triggers these grains
  • Moving Vertically controls the intensity of the sound
  • Moving Horizontally controls the character of the sound

With this method, you’re not just playing back pre-recorded Foley sounds—you’re shaping and performing them in real time.

Using Krotos Studio as a Foley Sound Library

1- Select a Reformer AI Foley Preset

Krotos Studio includes ready-to-use Foley presets powered by Reformer AI. You’ll find options like Clothing, Footsteps, Leather, Paper, and more.

2- Perform Your Foley Sounds

Rather than searching through a static Foley sound library, simply drag your cursor within the performance area to control the sound. Move vertically to adjust the intensity (light movements for subtle sounds, stronger movements for impactful cues), and horizontally to shape the tonal quality (adjusting the frequency response of the sound).

3- Sync & Export Your Foley Cues

Once you’ve performed your Foley sound, you can instantly send it to your timeline. Record directly in Krotos Studio and export your sound & Drag & drop it into your DAW or video editing software.

This process allows you to instantly create expressive, organic Foley cues without needing to manually edit layers of static files.

Why Use Krotos Studio Instead of a Traditional Foley Sound Library?

Using Krotos Studio as a Foley sound library alternative provides several advantages:

Faster Workflow

No more searching through folders of Foley samples. Perform your sounds in seconds.
Real-Time Customisation

Adjust the sound dynamically instead of using static recordings.
Natural & Expressive Sound Design

Reformer AI adapts to your input for more lifelike Foley cues.
Perfect Syncing

Dragging and dropping samples manually takes time, while performing sounds lets you sync them in real time.

Elevate Your Foley Workflow Today

With Krotos Studio’s Reformer AI engine, you get the power of a Foley sound library, but with more control and flexibility. Instead of endlessly searching for the right sound, you can shape and perform it in real time, ensuring a faster, more creative workflow.

Try it today and revolutionize how you create Foley sound effects for your projects.

How-to guide
This is some text inside of a div block.

Enhance Realism in Your Sound Design for Greater Impact

We share some advice on how to increase the realism of your scene sound design, as well as illustrate why it’s so important.

JJ Lyon
December 19, 2025
Read Story↗

Increase the realism of your scene sound design to boost your audience’s immersion and make your sonic experience more convincing

Movie sound effects don’t always sound like real life, and they don’t always need to. Sound design is an interesting balance of realism and giving the audience what they expect to hear when watching a movie or TV show.

However, in many scenarios, increasing the realism of your sound design is the key to boosting your audience’s immersion.

Make every detail believable by studying pacing in Creating Video Game Trailer SFX with Krotos Studio and add realism and depth with our advice in Creating Ambience Sound Effects With Krotos Studio.

In this article, we'll share some advice on how to increase the realism of your scene sound design, as well as illustrate why it’s so important.

The importance of realism in sound design

When watching older action movies, you may notice that punch sound effects are often comical in how they sound. However, unless you aim and focus on it, you don’t notice it. That’s because, in the context of a TV show or movie, it's exactly what you expect to hear.

Pay attention to the punch sounds in this fight scene from Indiana Jones and the Raiders of the Lost Ark

https://youtu.be/jW1CeAVPhVg?si=A49aGgkOd0X3O1Z5&t=84

Now compare that to the sound design in this fight scene from 2019’s John Wick: Chapter 3 - Parabellum.

https://youtu.be/v00zKyXbfD4?si=IkX0byRfTYFSVQQJ

You will notice that, in the much more contemporary action movie, the sounds of the punches are more subtle and realistic. Though they are not 100% accurate to how a real-life punch would sound, they are much closer, far less theatrical and overblown.

This is a more convincing approach to sound design that Hollywood has broadly adopted over the decades. It illustrates how, if you want to produce content that feels contemporary, it is essential to approach your sound design with realism.

When it comes to sound design for YouTube videos, Instagram Reels and TikToks, the level of realism you employ will depend a lot on the types of videos you are making.

Creating realistic sound design in a video editor

If you’re making comedy, TikToks or Reels then realistic sound design shouldn’t be a priority. Rather, you should focus on sound design that quickly and effectively communicates with your audience.

However, if you are making longer-form content like video essays or documentaries, having realistic sound design can massively elevate the reputability of your work, and improve how you are perceived by your audience.

How to make your sound more realistic

Fortunately, with many digital sound design tools available to all videomakers, creating realistic sound design in your video is easier than it’s ever been.

Our various Sound Design Bundles give you access to a range of tools to help you level up your own sound design realism.

Let’s take a look at how you can use some of these tools to make your sound design more convincing.

Level up your Foley

Reformer Pro sound design tool

Recording foley for TV and Movies is a real art form, and one which takes years of experience, a professional studio space, and hundreds if not thousands' worth of gear.

Fortunately, you can now access an entire Foley recording studio from within your video editing software. Reformer Prolets you perform realistic foley within your DAW and has been used on Game of Thrones, Cyberpunk 2077, Stranger Things, and many more iconic projects.

Reformer comes with a wide range of sound libraries which makes it well-suited for work on almost any video project.

Included with Reformer Pro are Leather Foley, Grass Rustling, Fruit and Veg Stab, Electrical Sparks, and many more packs to cover many contexts.

You can also try Reformer Pro as part of any of our range of sound design bundles.

Craft your own sounds

Weaponiser sound design tool

Having unique and layered sound effects is a surefire way to make your sound design more convincing.

Using dull and repetitive sounds can really take an audience out of a scene, but with a tool like Weaponiser, that’s a thing of the past.

Weaponiser allows you to layer up to 80 different sounds and manipulate them to create fresh and interesting sound effects.

As the name suggests, Weaponiser is perfectly suited to designed weapon sounds, but it’s also fantastic for footsteps, whooshes, rustles, and much more.

Once you have created a sound that you like within Weaponiser, you can perform your sound design using a MIDI controller for ultimate control.

Using MIDI also allows you to tweak sound effects whilst keeping the timing of effects exactly the same, saving you potentially hours on second and third drafts.

Weaponiser is available as a part of any of our sound design bundles.

Write reactive vehicle sounds

The key to realistic vehicle sounds is to have sound design that matches the motion of vehicles on screen. Vehicles produce sound over a long period of time and also move. As they move, the way the sound they are producing is perceived by a stationary listener changes.

Therefore, when designing vehicle sound your SFX must match how vehicles are moving on screen.

When using sound effect audio files this is difficult. Finding a prerecorded sample from an SFX pack that perfectly matches your video is – if not impossible – a very long and arduous process.

With Igniter, sound designers have the power to perform vehicle sound effects that perfectly match the action on screen. It’s an easy and effective way to make your vehicle sounds far more realistic.

Famous sound design from cinema history

Some films are great because of their visual effects, acting, or directing, but many films are made iconic by their sound design.

Of course, the best movies are those which bring all elements of the movie-making process together seamlessly.

Below we’ve compiled some of our favourite examples of sound design from movies of the last 50 years.

Wall-E

https://youtu.be/CZ1CATNbXg0?si=fHOozlkiP4awSRKJ

As Ben Burtt – sound and character voice designer on Disney Pixar classic Wall-E – describes in the behind-the-scenes of Wall-E, often the most inspiring projects for a sound designer are those that require a completely new world of sounds to be designed.

This is most true in animation where no audio is recorded with video, and particularly true for Wall-E where, for vast periods of the movie, there is no dialogue.

Benn Burtt and his team did a masterful job of bringing the robots of EVE and Wall-E to life with just sound design. Somehow Wall-E’s sound designers managed to tell a heart-wrenching love story without one word of dialogue.

For robot sounds in your own movies, check out the interface preset in Krotos Studio for free.

Sound of Metal

https://youtu.be/VFOrGkAvjAE?si=39_9dUoccKKUDdbS

Sound of Metal is a movie about sound and the lack of it. The protagonist – played by Riz Ahmed – is a drummer in a band who suddenly loses his hearing.

The movie follows his battle with his newfound deafness and his journey toward what he hopes will be a solution.

Part of what makes this film so immersive and gripping is the representation of Ahmed’s hearing loss through sound design. From high-pitched tinnitus, and sound effects; to muffled conversations, and a sonic representation of panic in stressful situations – Sound of Metal is sonically impeccable.

Budding sound designers would learn a lot about how to represent non-visual experiences in a visual medium from watching this movie.

Star Wars

https://youtu.be/vZ734NWnAHA?si=LOfdY-1YJENCOYZm

Star Wars has perhaps the most iconic sound design of all time. From the lightsabers to the blasters; the TIE Fighters to the X-wings; or R-2D2 to Chewbacca. Every sound in this movie is not only memorable but unlike anything else that came before it.

Star Wars is a master class of world-building through sound design. It’s especially impressive when considering the technological limitations of the day when compared to now.

Fortunately, sound design is a lot easier these days, especially when armed with a Krotos Sound Design Bundle.

Final thoughts…

Armed with the information in this article you should now be able to create your sound design projects with greater realism, no matter what kind of videos you are working on.

Remember, there are four tiers of our Sound Design Bundles available which makes them well-suited for newcomers to sound design and audio pros alike.

You can try our Sound Design Bundles for free with a 10-day free trial.

For more information on and advice on improving your scene sound design, be sure to check out our blog.

How-to guide
This is some text inside of a div block.

How to record and mix usable footsteps sound effects

Learn how to record, layer and mix realistic footsteps sound effects for film, TV and games quickly using foley, libraries and light processing.

JJ Lyon
December 19, 2025
Read Story↗

How to record and mix usable footsteps sound effects

Footsteps are some of the most common sound effects in film, TV, games, and online content – and some of the easiest to get wrong. This guide focuses on creating usable footsteps sound effects that drop cleanly into an edit or a game engine: synced to picture, consistent in level, and believable for the character, surface, and space.

The workflows here are aimed at video editors, filmmakers, content creators, and game-audio practitioners who need convincing walking sounds quickly, using a mix of recorded foley, libraries, and interactive tools.

Workflows and tools change over time, so it is worth checking the current state of plugins, libraries, and licences before locking in a pipeline.

Quick jump

Jump straight to what you need:

Download footsteps sound effects {#download-footsteps}

If you’re here because you need footsteps sound effects download options quickly, start here.

Below are typical formats and types used in film, video and game workflows.

Common formats

Most footsteps libraries provide:

  • MP3 – smaller downloads and quick previews
  • WAV (48kHz / 24-bit) – professional film and game workflows
  • Higher sample rates (96kHz) – useful for heavy sound manipulation

If you plan to stretch, pitch or layer sounds heavily, always start with uncompressed WAV files.

Recommended packs by use case

Film & video editing

  • Indoor footsteps sound effects
  • Wood floor footsteps
  • Walking footsteps sound effects

Games & animation

  • Running footsteps sound effects
  • Surface-based packs (grass, gravel, concrete)
  • Short one-shot assets for triggering systems

Ambience & environment

  • Corridor footsteps
  • Crowd movement layers
  • Distant walking sound effects

Download starter footsteps pack

Free starter footsteps sound effects

Includes:

  • Indoor footsteps
  • Walking footsteps sound effects
  • Wood footsteps
  • Running footsteps variations

Download the free pack

(Add Webflow button linking to your download page)

Why footsteps matter in your mix

Footsteps are easy to overlook because they’re subtle.

But they quietly carry important information about movement, character, and environment.

Movement and rhythm

Footsteps define pacing.

Slow steps create tension.
Running footsteps sound effects create urgency.
Heavy boots communicate weight or intimidation.

Even when viewers aren’t consciously listening, the rhythm shapes how a scene feels.

Matching the environment

Footsteps interact with the space around them.

Tile floors reflect sound.
Carpet absorbs it.
Wood resonates.

Matching the acoustic space helps footsteps sit naturally in the mix.

Recording realistic footsteps sound effects {#recording-footsteps}

Recording your own footsteps gives you the most control.

Fortunately, it doesn’t require an elaborate studio.

Surfaces: the most important variable

The surface determines most of the character.

Common Foley surfaces include:

  • Wood boards
  • Gravel trays
  • Tile slabs
  • Carpet tiles
  • Concrete panels

Even a small recording space can simulate many environments with the right materials.

Shoes and character

Footwear dramatically changes the sound.

Examples:

  • Trainers – light and soft
  • Boots – heavy with strong low frequencies
  • Heels – sharp transient clicks
  • Bare feet – soft skin movement

Always match footwear to the character.

Trying to turn trainers into boots with EQ rarely works.

Microphone placement

You don’t need multiple microphones.

A simple setup works well:

  • Mono mic placed 30–60 cm from the surface
  • Optional room mic for ambience

Record a short room tone at the start of each setup.

This helps smooth edits later.

Audio demo

Example: Wood footsteps

(Embed audio player in Webflow)

Raw recording vs processed mix comparison.

Editing and processing footsteps sound effects {#editing-footsteps}

Raw recordings almost always need a little shaping.

Cut on transients

Footsteps have clear impact transients.

Editing at these points makes sync easier and keeps the attack intact.

Avoid heavy time-stretching unless absolutely necessary.

Layering footsteps

Think of each step as three layers.

Attack
Heel or toe impact.

Body
Mid-range weight of the step.

Space
Room tone or reflections.

Layering these gives you more control in the mix.

Light processing chain

Footsteps rarely require heavy effects.

A simple chain often works best:

  1. High-pass filter (remove rumble)
  2. Light compression
  3. Transient shaping if needed
  4. Reverb to match the room

Over-processing usually makes footsteps sound artificial.

Spatial audio and positioning

Footsteps should reflect the camera perspective.

Close-ups

  • Detailed transients
  • Minimal reverb
  • Strong direct sound

Medium shots

  • Slightly reduced direct level
  • Subtle room reflections

Wide shots

  • Lower direct level
  • More ambience and reverb

Small changes in level and ambience are often more convincing than heavy processing.

Game audio implementation {#game-implementation}

Footsteps are one of the most common interactive sounds in games.

Unity and Unreal workflow

Typical implementation:

  1. Detect surface type
  2. Trigger matching footstep sound
  3. Randomise between variations

Using several variations prevents repetition.

FMOD and Wwise

Middleware allows additional control:

  • Randomisation pools
  • Pitch variation
  • Real-time parameter control based on movement speed

A sprinting character should sound different from a walking one.

Fixing common footsteps sound effect problems {#footstep-pitfalls}

Footsteps feel disconnected from the scene

Lower the direct level slightly and increase ambience or reverb.

Match the acoustic environment of the scene.

Footsteps sound thin or phasey

Check the mix in mono.

Align transient peaks between layers.

If problems persist, simplify the layering.

Footsteps feel repetitive

Use multiple variations.

Alternate between samples rather than repeating a single one.

Small variations dramatically improve realism.

The wrong shoe sound

If possible, replace the recording.

Changing the source usually works better than heavy processing.

Selecting tools and libraries

Both approaches are useful.

Sound libraries

  • Fast
  • Consistent
  • Ideal for background movement

Recorded Foley

  • Character-specific
  • Best for hero moments

Most workflows combine the two.

Interactive design tools

Tools such as Krotos Footstep Creator allow designers to quickly audition responsive footsteps sound effects and build layered combinations before exporting them to a DAW or game engine.

Frequently asked questions {#faq}

What are footsteps sound effects?

They are recordings of foot-surface contact used to convey movement, weight, and location in film, television, and games.

How do you record realistic footsteps?

Use real shoes on appropriate surfaces, record with a close microphone, capture room tone, and perform multiple variations.

What microphones work best?

A simple mono condenser or shotgun mic placed 30–60 cm from the action works well.

What format should footsteps be delivered in?

For most film and video workflows:

WAV – 48kHz / 24-bit

However, always follow the delivery specifications of the project or engine.

How do you sync footsteps to picture?

Align the transient peak of each step to the frame where the foot touches the ground.

Fine adjustments should be done in frames rather than seconds.

Where can I find high-quality footsteps sound effects?

High-quality libraries and sound design tools offer curated packs with multiple variations per surface and shoe type.

Practical takeaways and next steps

To keep footsteps sound effects efficient across projects:

  • Prioritise timing and believable source recordings
  • Build reusable palettes per scene
  • Label assets clearly for quick retrieval
  • Maintain consistent master formats

As a simple exercise, record one surface with three different shoe types and multiple walking speeds.

Build layered stems and test them against picture.

You’ll quickly learn what feels convincing.

Try it yourself

If you want to experiment quickly:

  • Download a starter footsteps pack
  • Try interactive footsteps tools
  • Explore preset-based sound design workflows

Download free footsteps sound effects

How-to guide
This is some text inside of a div block.

Working with Sound Effects and Audio Clips in Final Cut Pro

Work better with sound files and audio in general in Apple’s NLE software, and come out with better audio for your video, film or YouTube channel

James Russell
October 17, 2025
Read Story↗

Apple’s Final Cut Pro (FCP) is a comprehensive video editing suite with a vast range of features, capable of advanced and complex jobs, as well as all the basics. This guide focuses specifically on sound effect and audio clip editing within the software and aims to get you up to speed with this area of FCP in no time at all.

By the end of this read, you should be much more confident working with sound effects and audio clips in Final Cut Pro. We’ll be covering basic functions like muting, volume adjustment and rearranging audio clips, as well as reversing audio, adding crossfades, automation, looping and more.

For a more in-depth guide to all of Final Cut Pro’s audio functionality, beyond just audio clips and sound effects, check out Our Guide to Working with Audio in Final Cut Pro. It covers recording, adding media, and some other functions not included in this article. Likewise, for a headstart building a library of sounds, check out our Free Sound Effects collection, and learn How to Download Free Sound Effects and Use them in Your Projects.

Basic Audio Clip Editing in Final Cut Pro

Here are the simple editing features you should be able to grasp as a Final Cut Pro beginner who is looking to become an intermediate or expert user.

How to Move Audio Clips in Final Cut Pro

Moving audio clips in Final Cut Pro couldn’t be simpler, and you’ll likely do it constantly during any edit. Select the audio clip in the timeline, then drag it left or right to reposition it against your video. You can also drag it vertically to place it on a different audio lane if your timeline is busy.

For more precision, use the Position tool (P), which lets you move audio freely without rippling the surrounding clips.

How to Mute Audio Clips in Final Cut Pro

To mute audio in Final Cut Pro, select the clip and press V to disable it. This keeps the clip in place visually but silences it during playback and export.

Alternatively, open the Audio Inspector and lower the Volume slider to –infinity dB. Muting is especially useful when testing variations of your sound design or comparing different takes.

If you need temporary silence while still monitoring waveforms, you can use the Mute button in the inspector instead.

How to Replace Audio Clips in Final Cut Pro

Replacing an audio clip allows you to keep timing while swapping out the sound itself. To do this quickly, select an existing audio clip, then drag a new audio file from the Browser onto it. You can then choose from one of the replacement options.

FCP will instantly update the clip while preserving its position in the timeline. This is perfect for refreshing temp sound effects or swapping out early draft recordings.

How to Trim Audio Clips in Final Cut Pro

Trimming audio clips is essential for fine adjustments; getting your audio clips just right. To trim a clip, hover your cursor over the start or end of it until you see the Trim handles, then click and drag inward to shorten the clip. You can also use the Trim tool by hitting T on your keyboard.

The waveform updates in real time, helping you trim to the exact transient you need. For precise edits, zoom in using Command + Plus. Trimming does not ripple other clips, so it’s ideal for localised adjustments.

How to Split Audio Clips in Final Cut Pro

Splitting an audio clip lets you isolate sections, remove mistakes, or apply different effects to each segment. Move the playhead to the exact frame where you want the cut, select the audio clip, and press Command + B to perform a blade cut. Or, use the Blade tool by hitting B on your keyboard.

You’ll now have two independent audio segments you can move, trim, or process separately. This comes in handy when adding fades, correcting timing issues, or removing breaths from dialogue.

Advanced Audio Clip Editing in Final Cut Pro

Here are some of the essential audio tools you'll need to master for an expert-level, professional workflow with Final Cut Pro.

How to Automate Audio Clips in Final Cut Pro

Automation allows you to control volume changes across time. To automate a clip’s volume, first select your audio clip and press Control + A to toggle Show Audio Animation.

Then, click the Volume parameter, add keyframes by Option-clicking on the volume line. Drag keyframes up or down to boost or reduce levels at specific moments.

Automation is ideal for ducking music under dialogue or emphasising certain sound effects. You can animate pan or effect parameters here too. Overall, it’s an efficient way to add a wide range of complex effect changes over time. Mastering this skill is highly recommended.

How to Loop Audio Clips in Final Cut Pro

Looping audio clips helps extend ambience, music beds, and repeating sound effects. Looping audio in FCP doesn’t work like many other softwares. We need to manually copy and paste an audio clip to repeat numerous times. To do this, click and drag your desired audio clip whilst holding the Option key. You can then drag a duplicate of the clip in front of your original, making a loop.

Lastly, if you wish to combine your newly duplicated clip to your original, you can consolidate them into a single clip by selecting both and hitting Option + G, or by selecting New Compound Clip from the drop-down menu after Ctrl+clicking the selected clips.

How to Reverse Audio Clips in Final Cut Pro

Reversing audio is great for creative sound design, transitions, and accent moments. First, select the audio clip, open the Retiming menu (via the speed dropdown above the timeline), and choose Reverse Clip.

FCP processes the audio instantly, and the waveform flips horizontally to reflect the reversed direction. This works particularly well on impacts, risers, breaths, and whooshes.

How to Normalise Audio Clips in Final Cut Pro

Normalising helps you correct inconsistent loudness by raising overall gain to an ideal level. To do this, select your audio clip and open the Audio Inspector, then click the Loudness checkbox under Audio Enhancements.

The Loudness slider automatically boosts quieter sections and controls peaks for more balanced playback. Normalisation is helpful for dialogue recorded at uneven levels or inconsistent sound effects. You can combine this with compression for even better dynamic control.

How to Pan Audio Clips in Final Cut Pro

Panning lets you place audio across the stereo field (left and right). This is ideal for immersive sound effects or more expressive spatial mixing. Firstly, select your clip, open the Audio Inspector, and locate the Pan Mode dropdown. Choose options like Stereo Left/Right, Basic Surround, or Dialogue. Then adjust the Pan slider to move the sound between speakers.

This is great for matching on-screen action or widening your final mix.

Using Audio Clip Effects in Final Cut Pro

Final Cut Pro includes built-in audio effects such as EQ, Hum Removal, Noise Gate, and Reverb. To apply one, open the Effects Browser, select the Audio category, and drag your chosen effect onto the clip.

You can tweak effect settings inside the Audio Inspector, where each effect opens up its own adjustable panel. This workflow is ideal for sweetening dialogue, enhancing sound effects, or shaping ambience.

Using Audio Clip Transitions in Final Cut Pro

Here are a few handy features for Final Cut Pro users to transition in and out of different audio clips, and therefore sections in the wider project.

How to Fade In Audio Clips in Final Cut Pro

Fading in helps smooth the start of an audio clip and avoids sudden or distracting entrances. To fade in audio in FCP, hover your cursor over the start of the clip until you see the Fade Handle, then drag it to the right.

You can adjust the curve shape by Control-clicking the fade icon to choose Linear, S-curve, or +3dB fades. This gives you finer control over how gradually the sound emerges.

How to Fade Out Audio Clips in Final Cut Pro

Creating a fade-out ensures your audio ends smoothly. To add an audio clip fade out, hover your cursor near the end of the clip until the Fade Handle appears, then drag leftwards to create a fade-out region. Curve options (Linear, S-curve, +3dB), once again allow for different styles of volume decay, especially useful for music or ambience.

How to Crossfade Audio Clips in Final Cut Pro

Crossfades help blend two audio clips by smoothing the transition between them. Overlap the end of one clip with the start of another on the timeline. Then select both clips, open the Modify menu, and choose Adjust Audio Fades > Apply Crossfade.

How-to guide
This is some text inside of a div block.

The Best Sound Effects to Download for Video Editors and Foley Artists

Don’t settle for sub-standard sounds. Browsing for SFX can sometimes feel like sorting the wheat from the chaff. We’ll tell you how to choose more quickly and easily, for the benefit of your end result

James Russell
October 17, 2025
Read Story↗

In this article, we'll give some pointers for finding high-quality sound effects for your projects. Where you should be looking for them, whether they're paid-for or free sound effects, and other considerations that you should bear in mind when downloading sound effects libraries from the internet.

We might not all agree on the definition of "high quality" when in comes to sound effects, but we can probably align on a few factors. The files you use shouldn't contain background noise, should be of a high audio 'resolution' (bit depth and sample rate), and should be the right fit for the context of your wider project. You'll also likely want to pick royalty-free sound effects over others, or maybe even work with good-quality sounds for free. Read on and we'll give you some specific insights on what you should be considering when making your choice of where to source your sound effects.

1. Places To Go for High-Quality Sounds

Where to actually look for high-quality sound FX online

The first port of call for paid (and sometimes free) sounds is a certified online vendor or marketplace for royalty-free SFX, such as our very own Krotos Audio SFX Libraries. Websites like this will carry hundreds, or in some cases even thousands, of sound packs, depending on how cohesive the website's selection is trying to be. More specialised sites, such as Paul Stoughton’s Penguin Grenade, will have more specific sound pallets made to fit certain narrative genres or sonic aesthetics (in this case, sci-fi and experimental sound design). More generalised libraries, such as our own, will contain a selection of both genre-focused sounds and others with a broader use case, such as animal sound effects or Foley footsteps.

So if you're working on a project that will require highly specific sounds, finding a specialist will help you locate more unique sounds for your project that can bring your spaceships or dungeon-dwelling dragons to life.  Of course, larger vendors often license and sell works from these creators when they can; for example, Krotos Audio also proudly hosts the work of Penguin Grenade and Mattia Celloto.

Other vendors we would like to highlight, such as industry mainstays A Sound Effect, can be found in a previous article about the best royalty-free sound effects library in 2025.  There are also websites built specifically around free-to-download sounds. While the quality of the sounds on these sites varies hugely, and you cannot guarantee the sounds are royalty-free, there is some gold in places such as Free Sound if you know where to look. A more comprehensive list of free SFX websites can be found here if you're up for the hunt.

2. What do we Mean by High-Quality Sounds?

What to look out for, both in the format and content of your sound effects

(Image by Marcel Gnauk from Pixabay)

As a general rule, whatever sounds you want to use should be in the highest possible quality you can get them in. Audio files, such as WAVs, even at their highest quality, are relatively small in size compared to a lot of other file formats, much to the chagrin of cameramen the world over. So don’t stress over storage when that extra amount of data can mean the difference between the monster in your game or film sounding realistic, or like a low-quality seal bark that has been pitched down. The higher the quality, the more processing, such as pitch shifting or time stretching, can be applied before digital artifacts become noticeable.

The standard audio quality for online sound FX vendors is 96,000Hz (96kHz)with a bit depth of 24, which is plenty big enough for any of the aforementioned edits. However, when it comes to mixing a film, the industry standard remains WAVs at 24-bit and 48,000Hz (48kHz). So if the sounds are only having effects such as reverb or distortion added to them, then you can get away with audio files of 48kHz. However, we would avoid this if you have the option, as you never know what you may need that sound for in a future project. You can always bounce a higher-quality sound into a lower-size format; this is not the case in reverse and can lead to headaches further down the production chain.

Outside of file type and size, audio quality can refer to how well the sounds themselves have been captured and how usable the sounds are. A poorly done recording can also be made at 96kHz, so don’t judge by the numbers and use your ears. Does it match the energy of the scene? Will it aesthetically mesh with other sounds you have already used, i.e. having a synthesised sound that clashes with the realistic design of the rest of the audio? Is it a mono file when it should be stereo? These are all things to consider when listening to your options.

One point we refer to often is whether there is enough variety of the same sounds within the sample pack. If you're going to use the sound a lot, like with footsteps or gunfire, then only having a few iterations of the sound will become noticeable incredibly fast. So in this case, the quality of a singular audio file can be perfect, but due to the lack of variation, the pack is of a lower quality as it simply isn’t as usable as one with, let's say, 15 variations of the same or similar gunshots.

Requirements like this are amongst the many reasons we made Krotos Studio, so you could get infinite variations of your bespoke sound without noticeable repeats of the same audio file.

3. Royalty Free and Other Considerations

Things to bear in mind and avoid, especially if you're being paid or the project itself is making money

(Image by Horst Schwalm from Pixabay)

The term has been mentioned a few times in this article already, so to clarify for anyone who may not know, royalty-free refers to copyrighted material that can be used by others in works for profit without having to pay any extra fees. In relation to sound, this means that once you have purchased a sound library (and therefore gained a license to use the sounds), you can use the material as many times as you want in as many projects as you want without having to pay anything else. This also extends to some free sound websites that claim to be royalty-free, but we recommend triple-checking the user agreement of the site and seeing whether that extends to each sound. Some sites, such as Free Sound, allow users to specify different Crative Commons licenses for their sounds.

Another thing to be aware of is whether the site you're purchasing or downloading the sounds from owns the license to distribute their content. Signs like not specifying that they are royalty-free or contain no copyright, not having an explicit user agreement page, or hosting audio that is instantly recognisable as someone else's copyright are instant red flags and should result in you not using the site or any of the sounds contained within it. What springs to mind are forum sites containing Skywalker Sound material from the Star Wars franchise, or sites distributing BBC Archive Sound Effects. This material is easily tracked by the copyright holders and can lead to fines or royalty payments if used improperly.

This is why we advocate for investing in high-quality sounds from vendors within the industry, so you can be sure that you can use the sounds without any extra hidden fees or legal issues.

How-to guide
This is some text inside of a div block.

What is Sound Design? A Practical Guide for Creators Who Need Great Audio

What is Sound Design? A Practical Guide for Creators Who Need Great Audio

JJ Lyon
December 19, 2025
Read Story↗

What is Sound Design? A Practical Guide for Creators Who Need Great Audio

Sound design is the process of creating, editing, and shaping audio so visuals feel real, immersive, and emotionally convincing. It includes everything from footsteps and ambience to cinematic impacts, creature sounds, dialogue cleanup, and spatial placement.

TL;DR

  • Sound design makes visuals feel believable by adding the cues the brain expects (space, movement, distance, emotion).
  • It’s not just “adding SFX” — it’s intentional recording, editing, layering, and placement to support story and impact.
  • Professional-sounding results usually come from workflow clarity, not mystery: spot → source → layer → mix → deliver.
  • Modern tools let creators generate and customise sounds in real time and drag them straight into an edit.

Table of Contents

What is sound design?

Sound design is the process of creating and shaping audio elements to support storytelling, realism, and emotional impact.

That includes recording, editing, layering, and placing sounds so they align with what audiences see and feel. It is a core part of audio post-production across film, video, games, theatre, and digital content.

The meaning goes beyond simply adding sound effects. It’s the creative decision-making that turns a sequence into an experience.

How sound design shapes storytelling and viewer perception

Sound design works because audio cues help audiences interpret what they’re seeing — space, movement, distance, and emotion. Even small details (a tail on a footstep, subtle room tone, distant texture) can change how real a scene feels.

Imagine a scene where someone walks into an empty warehouse. Without sound design, it may look correct but feel emotionally flat. Add footsteps with natural reverb, distant environmental noise, and subtle structural creaks — suddenly the space has scale, tension, and texture.

Sound design also guides attention:

  • A well-timed impact reinforces an edit.
  • A rising sound builds tension.
  • Ambient textures establish mood without stealing focus.

Sound design doesn’t just support visuals — it actively shapes how audiences experience them.

Core elements of sound design

Most professional sound design combines several core components working together.

Foley and sound effects

Foley refers to recreated physical sounds that match on-screen movement, such as footsteps, clothing, and object handling. It restores realism that production audio often misses.

Sound effects extend beyond realism. They include designed sounds like cinematic impacts, interface clicks, transitions, and stylised motion accents. These reinforce timing and make visual edits feel intentional.

Ambience and soundscapes

Ambience provides environmental context. Even “quiet” locations contain subtle textures — air movement, distant activity, room tone.

Ambience maintains continuity across cuts and prevents scenes from feeling unnaturally silent. It establishes location, scale, and emotional tone.

Dialogue editing and cleaning

Dialogue editing focuses on clarity and consistency: removing unwanted noise, balancing levels, and smoothing continuity between edits.

Clear dialogue is one of the fastest ways to make a project feel professionally finished. Even small improvements can change how an audience judges overall quality.

Synthesis, processing, and whooshes

Some sounds can’t be recorded naturally — or can’t be recorded cleanly — and are created through synthesis and processing. Think sci-fi textures, creature sounds, cinematic transitions, and stylised motion.

Here, pitch, timing, texture, distortion, modulation, and dynamics become creative tools.

Mixing, spatial placement, and deliverables

Mixing balances all sound elements so they work together: levels, EQ, dynamics, and stereo or surround placement.

Spatial and binaural approaches can add depth by simulating how humans hear sound in physical environments.

Film and video workflows typically focus on:

  • Final mix (balanced, clean, intentional)
  • Deliverables (correct formats and versions for the platform)

Start Creating Faster with Krotos Studio

If you want to generate, customise, and perform sound effects in real time — then drag and drop them straight into your edit — Krotos Studio is built for exactly that workflow.

Instead of hunting through folders, you shape the sound as you go.

Start your free trial and experience how fast professional sound design can feel.

Sound design vs similar roles

Sound design overlaps with related disciplines, but each serves a distinct purpose.

Sound design vs audio engineering

Audio engineering focuses on capture, signal integrity, and technical recording quality. Sound design focuses on creative sound creation and storytelling.

In many creator workflows, the roles overlap — especially for editors and game developers.

Sound design vs sound editing

Sound editing involves organising, cutting, and syncing audio. Sound design involves creating and shaping the sounds themselves as part of the creative build.

Sound design vs Foley

Foley is one component of sound design. Sound design also includes ambience, synthesis, effects, and spatial placement.

Foley restores realism. Sound design builds the full sonic world.

Practical examples across media

Film and TV: building atmosphere and emotion

Sound design creates emotional depth and environmental realism. Subtle low-frequency textures build tension. Environmental ambience establishes location.

Without it, even visually strong scenes can feel incomplete.

Video games: implementation and interactive audio

Game audio often responds dynamically to player actions. Footsteps change based on surfaces. Environments shift based on location. Intensity adapts to gameplay.

Many pipelines use middleware to connect sound behaviours directly to gameplay systems, making audio interactive rather than static.

Theatre and live events

Live productions rely on cues to reinforce narrative timing and transitions. Systems must remain flexible and reliable because performances vary.

Advertising and branded content

Short-form content depends on clarity and impact. Tight transitions, accents, and clean dialogue make messaging land fast and feel polished.

Typical sound design workflow (step-by-step)

1) Concept and spotting

Watch the piece and mark where sound is needed:

  • Movement and actions
  • Transitions and edits
  • Environmental context
  • Emotional cues

This defines your sound “shopping list.”

2) Sourcing

Sounds typically come from:

  • Libraries
  • Field recordings
  • Synthetic or processed elements

Efficient sourcing preserves creative momentum. Real-time creation tools can reduce friction by letting you shape sounds instantly and drop them into your timeline.

3) Editing and layering

Layering creates richness:

  • Transient detail (attack)
  • Texture (body)
  • Low-frequency support (weight)
  • Movement (whooshes, swells, tails)

The goal is intention and believability — not unnecessary complexity.

4) Mixing and final pass

Check for:

  • Dialogue clarity
  • Ambience continuity
  • Balance and dynamics
  • Correct export formats

Quick checklists for Premiere Pro and DaVinci Resolve workflows

Premiere Pro checklist

  • Identify key moments requiring reinforcement
  • Add ambience for continuity
  • Layer effects for movement and edits
  • Clean dialogue using built-in tools
  • Balance levels and export

DaVinci Resolve checklist

  • Use Fairlight for dialogue cleanup
  • Add environmental layers
  • Layer motion effects
  • Apply EQ and spatial placement
  • Export with correct settings

Tools, software, and hardware professionals use

DAWs and plugins

DAWs (digital audio workstations) provide advanced editing and mixing. Common examples include Pro Tools, Logic Pro, and Reaper.

Many editors also design sound directly inside Premiere Pro or DaVinci Resolve.

Field recorders and microphones

Field recording creates unique material and adds authenticity — especially valuable in film, games, and branded content.

Middleware in game pipelines

Game workflows often use middleware to integrate sound behaviour with gameplay logic so audio adapts in real time.

Time-saving tools and libraries

Modern tools allow creators to generate and customise sounds in real time, reducing reliance on static libraries and speeding up iteration.

Skills, training, and career paths

Core skills to develop

  • Critical listening
  • Editing and timing
  • Layering and texture
  • Synthesis and processing
  • Spatial awareness and balance

Repetition and real projects accelerate improvement.

Building a portfolio

A strong demo reel shows transformation. Before-and-after comparisons clearly demonstrate your impact.

Career paths

Sound designers work across film, TV, games, advertising, and digital media. Roles and pay vary widely by region and sector, so always review industry-specific data rather than relying on general claims.

Quick wins for beginners (5 practical exercises)

1) Create footsteps from scratch

Record multiple surfaces and sync to picture.

2) Match ambience across cuts

Prevent silence gaps and boost immersion instantly.

3) Build a simple whoosh

Layer texture + transient + tail. Adjust pitch and timing.

4) Clean dialogue quickly

High-pass where needed, reduce noise carefully, level for clarity.

5) Export checklist

  • Check peaks and levels
  • Confirm dialogue intelligibility
  • Ensure no chopped tails
  • Verify platform format compatibility

FAQs

What is sound design?

Sound design is the process of creating and shaping audio elements to support storytelling and realism.

What are the core elements of sound design?

Foley and sound effects, ambience and soundscapes, dialogue editing, synthesis, and mixing.

What are common examples?

Footsteps in film, interactive game sounds, ambient environments, cinematic impacts, and transitions.

How does sound design differ from audio engineering and Foley?

Sound design focuses on creative sound creation. Audio engineering focuses on technical recording quality. Foley focuses on recreating physical sounds.

Where is sound design used?

Film, TV, theatre, video games, advertising, and digital media.

What tools do professionals use?

DAWs, field recorders, sound libraries, and middleware in some game pipelines.

Does sound design pay well?

Pay varies widely by country, sector, and experience level.

How can beginners practice?

Rebuild short scenes, layer effects to picture, and compare before-and-after versions.

Next steps and resources

Sound design becomes easier and faster when the workflow stays simple and your tools don’t interrupt creativity.

If your goal is to create and customise sound effects in real time — then drop them straight into your edit — Krotos Studio is designed for that momentum.

Start your free trial today and see how quickly you can move from idea to finished sound.

How-to guide
This is some text inside of a div block.

Design Cinematic Sound Effects for Trailers

Molly and Matt Recreate the 28 Years Later trailer using Krotos Studio Pro

JJ Lyon
December 19, 2025
Read Story↗

Krotos Sound Designers Molly and Matt set themselves a challenge: Recreate the 28 Years Later trailer in full, using Krotos Studio Pro!

In this video, they talk through the choices they made, the sounds they used, and share some excellent tips and tricks in the process.

Watch Our Behind the Scenes Video

Watch Our Trailer Redesign In Full

How-to guide
This is some text inside of a div block.

How to create retro video game sound effects

If you edit in Premiere Pro or DaVinci Resolve and need usable blips, pickups and hits that sit immediately in the timeline, these tips will keep you fast and consistent without losing the retro charm

JJ Lyon
December 19, 2025
Read Story↗

Don’t waste hours hunting dusty samples or over processing thin bleeps, this guide starts with the common ways people get retro game SFX wrong, then walks you through a fast, reliable workflow to make authentic, usable sounds for edits and games. If you edit in Premiere Pro or DaVinci Resolve and need usable blips, pickups and hits that sit immediately in the timeline, these tips will keep you fast and consistent without losing the retro charm.

Common mistakes that make retro game SFX sound amateur

A lot of rookie and time‑pressed workflows fall into repeatable traps that turn promising bleeps into forgettable noise. Three big offenders are relying on a single low quality chiptune pack without adapting timbre or pitch, over processing that kills the simple punch of 8 bit tones, and ignoring loudness, stereo placement and file format needs that editors and engines expect. Fixing those early saves hours later.

Why copying popular packs fails

Downloaded packs are a good shortcut, but copying them verbatim often makes your sounds feel pasted on. If you do not adjust pitch relationships, envelope length and harmonic content, a blip that should announce a UI action will sit oddly against your scene or soundtrack. Tweak pitch, decay and filter to match the visual rhythm, and create a few pitch variants so the sound belongs to your edit or game rather than sounding like a stock asset.

Processing pitfalls that strip character

It is tempting to reach for reverb, heavy compression and full range EQ to “polish” a sound. For 8 bit work, those treatments often blur attack and remove the crisp transient that sells a retro effect. Keep reverb minimal or off, use gentle compression if you must, and shape only the top octave and low mids. Let the simplicity of the waveform and a short envelope carry the identity.

How to think like a retro SFX designer (principles that save time)

Retro sound design is more about subtraction than addition. Prioritise clarity with simple waveforms, short envelopes and decisive pitch choices. A clear, small sound reads better in a mix than a complex, long one that competes with dialogue and effects. Think in layers, not complexity, so you can reuse pieces across a set.

Work in layers by combining a tiny synthetic hit with a body or noise layer for grit. The core tone provides pitch and recognition, the noise layer adds texture and presence. Finally, design for the medium: preview in mono, keep export formats and bit depth sensible for your editor or game engine, and keep headroom so your SFX behave predictably once mixed.

Keep it small and distinct

Short, harmonically simple sounds cut through gameplay and timelines. Aim for sub 300 millisecond hits for UI and pickups, slightly longer for impactful events. Use abrupt attack, brief decay, and avoid sustaining harmonics unless the design calls for ambience. If the sound reads immediately, it saves edits and prevents endless tweaking.

A fast, repeatable workflow to create retro video game sound effects

Speed comes from a constrained process you can repeat. Sketch quickly, add a small texture, then prepare assets for export in a consistent way. The goal is to produce sets of one shots and loopable elements that you can drop straight into Premiere Pro, Resolve or a game engine.

1. Pick a sound palette

Choose a small palette of waveforms, for example square for leads, pulse for chimes, saw for risers and white/pink noise for percussive hits. Set consistent pitch relationships, for instance fifths and octaves, so variations from the same palette feel cohesive.

2. Synthesis → layer → process

Create a core tone with a short envelope and decisive pitch. Add a thin noise or click layer for attack, then apply measured bit reduction and a gentle LP or HP filter to sell the retro timbre. Avoid heavy modulation; small LFO movement or pitch envelopes are usually enough.

3. Export and name consistently

Normalise or set a target LUFS range that preserves headroom, choose sample rate and bit depth appropriate to your output, and export clear filenames like ui_blip_01_22050Hz_16bit.wav. Include variants with pitch shifts in the name so editors can quickly pick a match.

Practical examples: UI blips, jumps and impact sounds you can make fast

Concrete mini recipes help you build a small library quickly. Use one patch and a few tweaks to create a set that feels like a family, and remember how simple layering and timing changes can multiply your output.

Menu/UI blip (quick recipe)

Start with a short pulse wave, attack 0, decay 120 to 160 ms, slight pitch envelope descending 2 to 5 semitones for movement. Add a high frequency click layer using noise with a 10 to 30 ms decay, then apply a small high shelf boost for presence. Keep reverb off.

Jump or coin pickup (making variations)

Use a rising pitch envelope on a square wave for pickups. Create three variants by shifting start pitch by 3 to 7 semitones and by nudging the decay time slightly. Offset the click or noise layer by 10 to 20 ms for natural variation that reads differently when repeated.

Hit/impact (from tiny blip to punchy hit)

Layer a low decay square or saw wave for body, add a gated noise burst for attack and a tiny sub sine for weight if needed. Apply gentle saturation to glue layers, but keep transient shaping tight so the hit feels punchy and not muddy.

Final checks before exporting SFX into your edit or game

Before you export, run through a short checklist to avoid rework. Confirm loudness and leave headroom so sounds sit predictably in Premiere Pro or Resolve timelines. Aim for consistent peak levels and consider a LUFS target if you need uniformity across a set.

Verify mono compatibility and phase, particularly for game use where single channel playback is common. Name files clearly, include metadata or a simple README if you hand the set to other team members, and double check loop points for seamless playback when creating looped backgrounds or UI atmospheres. Finally, export the formats your editor or engine expects and test a couple in situ.

Where Krotos can speed up making retro video game SFX

A rapid sound creation tool replaces time lost hunting through libraries by letting you audition and tweak sounds in real time. Template patches and tweakable controls mean you can produce cohesive sets quickly, and quick export options reduce friction from idea to usable file. That is a practical shortcut for editors and designers under tight deadlines.

Speeding up ideation and iteration

Interactive presets let you iterate by ear rather than scrolling through folders. Tweak attack, decay, bit depth and noise balance, generate pitch variants, then export a small family of sounds in minutes. That shortens the design loop so you can try multiple directions without losing momentum.

Fit into your existing edit/game pipeline

Exported one shots and short loops slot straight into NLE timelines or into engines like Unity and Unreal. Keep the workflow non generative and editable, so you retain creative control and can adjust parameters later. This approach keeps ethical boundaries clear, ensures traceability of your creative choices, and makes final assets straightforward to adjust by hand.

If you want to experiment, try creating a tiny set of three sounds now, export them and drop them into your timeline. Krotos offers presets and demo assets that speed prototyping, and the community forums are useful for quick tips and feedback. Explore a trial to see how much time you can reclaim.

Frequently asked questions

What are retro video game sound effects?

Retro video game sound effects are short, often synthetic sounds that evoke early arcade and console audio, typically using simple waveforms, short envelopes and limited harmonic complexity. They include UI blips, pickups, jumps, impacts and simple ambiences designed to be instantly recognisable and efficient in playback.

How can editors use retro video game sound effects in a production workflow?

Editors use these SFX to add character to interfaces, on screen interactions and stylised sequences. Drop one shots directly into Premiere Pro or DaVinci Resolve timelines for sync hits, layer variants to avoid repetition, and adjust levels and panning to sit under dialogue and music. Export consistent sets so you can swap sounds quickly during fine cut.

What makes retro video game sound effects sound authentic?

Authenticity comes from minimalist design choices: brief envelopes, basic waveforms such as square, pulse and saw, limited harmonic content and restrained use of effects. Bit reduction, simple filtering and a focused transient all contribute. Consistent pitch relationships and small variations help maintain a coherent retro identity.

How can retro video game sound effects be created quickly without losing quality?

Constrain your palette, work in layers, and adopt a repeatable template. Sketch a core tone in under five minutes, add a noise or click layer, apply light bit crushing and EQ, then export variants. Use presets and batch export to speed iteration while keeping control of levels and format.

What file formats work best for retro video game sound effects?

For editors, WAV files at 16 bit and 44.1 or 48 kHz are reliable and easy to import. For game engines, check your engine requirements but common choices include 16 bit WAV or compressed formats for runtime. Keep mono one shots for single channel use and supply loopable WAVs with clear loop points for background elements.

How can Krotos help with retro video game sound effects?

Krotos tools can speed up ideation by offering tweakable presets and interactive controls that let you audition changes immediately. That reduces library hunting and repetitive processing. Exports can be organised into consistent sets for editors and engines, and the workflows are designed to stay editable so you retain creative control.

How-to guide
This is some text inside of a div block.

What's the Best Sound Effects App for PC & Mac?

Discover the ideal software programs for working with sound: organizers, creators and browsers made for audio post, Foley and sound design apps for PC and Mac creators

James Russell
October 17, 2025
Read Story↗

Today’s sound designers have some things easy, and some things harder. In turn, this also doesn’t mean there aren’t some truly amazing pieces of software being created for post-audio work. We certainly are in a Renaissance period of audio tools, just look at our own exploraions in video-to-sound to get an idea of how fast things are moving. So getting the lay of the land and knowing what is out there is a necessity in keeping pace with the times.

In this article, we aim to list some standout apps for Mac and PC that can find a home in any studio. Hopefully, paying dues to our peers that are also dedicated to audio innovation and the art of sound design. Of course, what can be considered ‘best’ depends on where your interests lie and what you need for the job, but we think we have something here for everybody.

If budget is a worry, also see our article on the Best Sound Design Software for Filmmakers on a Budget

1. Krotos Studio

AI-powered desktop app and plugin that lets you create custom high-quality sound effects and music in real time.


Want the equivalent of having a Foley studio, field recordist, and a composer inside your Mac or PC? Well, look no further than our very own Krotos Studio. Using state-of-the-art machine learning (not generative AI) and our own expansive catalogue of SFX, we have made a way for you to create, edit, and customise sounds in real time. Be it designing and triggering footsteps, making cinematic impact sounds, or vehicle sound effects, Krotos Studio has it all and more.  

Working as a standalone app or as a plugin within your DAW, Krotos Studio makes it quicker and easier to create usable sounds for your project that you may be missing from your sound effects libraries, or that you've failed to capture in your sound recordings.

Pros of Krotos Studio

  • Extenstensive Preset Library
  • Integrated AI assistant
  • Drag and drop boutique sounds to any DAW
  • Create endless iterations of a needed sound until it’s just right
  • With only a few clicks of a mouse, create unique, professional-quality sounds

Cons of Krotos Studio

  • To use your own SFX requires Krotos Studio Pro
  • Sounds are exported already processed and layered as one file (baked in)
  • Doesn’t replace all recording and sound design jobs

2. iZotope RX 11

An industry-standard tool for fixing noise, spectral problems, removing wind, de-bleeding and much, much more

The industry standard in audio repair for years now, iZotope RX is a necessity for anyone working with recorded audio in any form. Whether it's the usual suspects of dialogue recording, such as a lav mic rustle or unpleasant reverb, matching the EQ of a real-world sound to your sound design, or de-noising your sound recordings to turn them into something no one has ever heard before, iZotope RX has the tools for you.

Acting as a standalone audio editing software, or inside your DAW as a plug-in, it has never been easier to refurbish and restore audio that would have been unusable only a few years ago.

Pros of iZotope RX

  • An exhaustive amount of audio repair and editing tools
  • Can save a lot of time and money in the long run by fixing problematic audio
  • Can be used to get even more uses out of your pre-existing SFX
  • Can be ‘misused’ for interesting experimental results

Cons of iZotope RX

  • Hefty price tag for the full ‘advanced’ suite of tools
  • May sometimes struggle with some audio faults in comparison to other audio repair tools
  • Not necessarily a replacement for good sound recording, and can be exploited as a way to cut corners in production

3. FabFilter Pro-Q 4

An EQ that sets the standard in the world of music and any other audio application

EQ is probably the most used tool in any sound designer's arsenal, or for anyone working with audio at all, for that matter. Being able to adjust and shape the frequencies of a sound is as fundamental as adjusting its volume, so investing in an EQ  that does more than the generic one packaged within your DAW can pay back dividends.

FabFilter Pro Q has been a go-to for audio post-production for a while now, and it's not hard to see why. Spectral dynamic processing, infinite options for EQ curves, and full Dolby Atmos functionality, among many other features, make it incredibly flexible within most use cases that can be thrown your way.

Pros of FabFilter Pro Q4

  • Highly usable UI that can control all uses of the EQ in your session from one window
  • Built-in Spectral Analyzer
  • Up to 24 EQ bands
  • Contains a lot of smart tools for dealing with problem frequencies

Cons of FabFilter Pro Q4

  • Still ‘just’ an EQ, with useful tools that expand its uses, but its main result isn’t far off from most modern EQs
  • Expensive for an EQ (but fairly priced compared to a lot of plugins)

4. Soundly

Manage the sound files you already have on your hard drive, and find them when it counts

Offering a highly usable sound FX library, as well as a sound management platform to better organise your already existing SFX, Soundly is a trusted platform for making your sounds easier to find and implement within your projects. With more sounds always being added to its cloud library, as well as being able to export files directly from Soundly into your DAW of choice. A perfect choice for smaller projects with tight turnarounds, or as a way of supplementing and utilising your existing sound libraries.

They also offer a free version of the Soundly software, which comes with limited access to their sounds and previews of their premium content.

Pros of Soundly

  • Built in SFX cloud library
  • Metadata search functionality for finding/organizing sounds
  • Easy to preview, import, and export audio from the platform

Cons of Soundly

  • Monthly subscription cost for the full SFX cloud library and storage
  • Not much need if you already have an organized SFX library you are familiar with
  • Not all the sounds within its library are as usable as others

5. Phase Plant

Semi-modular softsynth developed for music producers and sound designers

Every sound designer needs a synthesizer, but with so many to choose from that are designed predominantly for musicians, it can be hard to know which one to go for. Well, Phaseplant has you covered. Boasting the normal oscillators alongside wavetable synthesis, samples, as well as granulators and infinitely flexible forms of modulation, Phase Plant has a deep well of possibilities that reward experimentation.

Be it vehicle sounds or granulator-led atmospheres, Phase Plant is more than just a synthesizer. While it is undoubtedly great as a musical tool, its ability to let you shape and express sound makes it an invaluable tool for expanding your SFX into unknown territories.

Pros of Phase Plant

  • Flexible synth engine with many options for sound generation/manipulation
  • Comes with Kilohearts essential Effects
  • MPE Compatibility
  • Bottomless well of possibilities

Cons of Phase Plant

  • It can be complicated to learn the full range of its capabilities
  • Its depth could lead to a lot of time spent experimenting without guaranteed results if you are in a tight timeframe

6. Sound Particles

Hollywood's unseen secret weapon

A standalone immersive audio workstation powered by 3D engines and particle systems, Sound Particles is a playground of tools that allow you to create variations from a single sound source, pan and re-record them with virtual microphones, granulate, destroy, arrange, and much more than is possible to list in this article. Think of it more like a CGI engine for sound, made for post-audio work and surround sound. Compatible with your plug-ins and virtual instruments, and with its own built-in AI assistant (not generative), Sound Particles is truly a massive application for Sound Effects creation and processing.

It even includes its own audio recording, multitracking, and editing, as well as its own file management system for your sounds. So if need be everything can be done within its framework. A true beast that has been used in countless Hollywood productions.

Pros of Sound Particles

  • Usable for everything from sound effects creation, spatialization, processing, score composition, etc.
  • Can convert CGI files directly into parameters to control sound
  • Batch processing of sounds
  • Compatible with ambisonic speakers, 3D audio, Adobe Atmos, etc.

Cons of Sound Particles

  • Hefty price tag for the full range of its capabilities
  • A large learning curve to get used to
  • It might only be necessary for larger-scale productions, with cheaper, less complicated options offering some of its functions
How-to guide
This is some text inside of a div block.

How to do automated dialogue replacement (ADR) in Premiere Pro

This guide explains what ADR is in plain terms, why it matters to editors and filmmakers.

JJ Lyon
December 19, 2025
Read Story↗

Automated Dialogue Replacement, or ADR, is the process of re-recording an actor's lines after filming to replace or improve the on-set audio. Done fast and accurately it can rescue a scene, restore intelligibility and give you creative control over delivery. This guide explains what ADR is in plain terms, why it matters to editors and filmmakers, how the workflow works, a step by step application in Premiere Pro and DaVinci Resolve, checks to run before you hand over audio, and where Krotos tools can speed up the parts of the job that often slow you down.

ADR in plain English: what it actually means on set and in the edit

ADR is simply replacing or improving spoken lines by recording them again in a controlled environment, then syncing those performances back to picture. Unlike dubbing, which replaces all spoken parts for localisation or language conversion, ADR is usually used to fix specific lines where production audio is unusable or performance needs tightening. Voiceover can be similar technically, but it is typically recorded to narrate or comment, not to match a lip movement on screen.

Why you might need ADR
When production audio suffers from road noise, rain, aeroplane rumble, crowds, or a boomy lavalier, ADR becomes the most reliable fix. You might also ADR because an actor’s mumble missed a key line, microphone clipping ruined a moment, or continuity of performance needs a subtle adjustment. ADR is preferable to hunting for a cleaner take in the library when dialogue must match lip movement exactly, or when you want an actor to deliver a different line read to better serve the edit or tone.

Why ADR matters for video editors, filmmakers and creators

Good dialogue is the backbone of most scenes. Clean, well matched ADR means clearer storytelling, fewer times where crucial lines get lost in the mix, and more control over emotional nuance in the cut. For editors, ADR removes the need to sacrifice clarity with heavy processing or awkward EQ tricks that can make a scene sound unnatural. For filmmakers it restores the option to shape performance after the shoot without reshooting entire scenes.

Practical benefits during tight deadlines
When a deadline is breathing down your neck, solid ADR reduces time spent scouring sound libraries for passable clips or trying to mask issues with music. It lets you deliver a near-final dialogue pass to the mixer, keeping rounds of revision with directors and actors to a minimum. For broadcast and localisation, ADR makes creating clean dialogue stems straightforward, which speeds up conform and ensures compliance without a frantic last-minute fix.

How ADR works: the core components and typical post workflow

At its core ADR follows a predictable sequence. Spotting identifies lines that need replacement. You prepare a guide track that helps the actor match timing and performance. Recording captures the new takes in a quiet, treated space. Syncing aligns the recorded audio to picture with timecode or waveforms. Editing trims and matches performance to lip movement, and mixing blends ADR into the scene so it sits naturally.

What you need before you record
Checklist items that remove wasted sessions: locked picture or a near-final picture, a reference mix so the actor hears cues and ambience, a guide track with timecode and slate markers, clear cue sheets showing lines and frame numbers, and a quiet recording environment with a suitable microphone. Also have room tone recorded on set and a note of the on-set microphone style to help match texture later.

How the recorded ADR gets back into the edit
Syncing options include timecode as the cleanest method, a visible slate frame for manual alignment, or waveform matching when the old and new takes have shared reference content. After syncing, create dialogue stems or labelled tracks for delivery to the mixer. Common practice is to provide production audio, ADR takes, and room tone in separate stems so the re-recorded performance can be blended with original ambience if needed.

Step-by-step ADR workflow in Premiere Pro and DaVinci Resolve

This is a practical path from cut to recorded line back in your timeline. The same principles apply in both NLEs with small UI differences.

Preparing the edit and exporting a guide
Lock your picture and create a guide track containing: the locked picture’s background audio, a clearly marked slate frame or a 2 second tone for alignment, and brief stems that include the production dialogue bleed so the actor can match phrasing and pacing. Export as a stereo file at the project sample rate, clearly labelled with scene, take, and timecode. Send the file with a cue sheet that lists lines and exact frame numbers for each ADR cue.

Recording, choosing takes and replacing dialogue
In the session, play the guide for the actor and let them run multiple takes. Coach delivery for energy, breath placement and timing rather than trying to force a waveform match. When you import takes back into Premiere Pro or Resolve, align using timecode or waveform. Trim aggressively to remove false starts, use short crossfades to hide edits, and adjust clip gain to match the scene level. Choose takes that match emotional intensity first, then micro-edit timing so lip sync feels natural rather than mechanically exact.

Mixing ADR into the scene
Start by matching ambience and perspective, not only level. Use subtle reverb or convolution impulses that reflect the original room, and blend in room tone to mask edits. Gentle EQ can match tonal balance, and a de-esser removes sibilance introduced by different microphones. Create a dialogue stem that contains the final ADR performance and cleaned production audio as a backup, and include notes about any processing applied so the re-recorded audio can be tweaked by the mixer without hunting for decisions.

Quality checks and common ADR mistakes to avoid

Before you call a cue done, run a set of checks that flag the usual pitfalls.

Key things to check
Listen for lip sync across a variety of speakers and devices. Assess whether the performance matches emotional tone and timing, confirm consistent levels and tonal match, and check background ambience for continuity. Pay attention to breaths, mouth clicks and any unintended room resonances that can betray a studio take.

Common mistakes
Avoid over-tight editing that makes dialogue sound chopped, and do not ignore room tone which is the simplest way to make edits sit. Watch out for phase problems when blending ADR with production audio, and be wary of mismatched reverb settings that create different spatial perceptions. Over-processing with heavy EQ or compression can rob the performance of natural dynamics and make the ADR obvious.

Quick pre-deliver checklist
Before sending to your mixer, verify: sync points are correct across the session; levels are consistent and headroom is intact; breaths and clicks are addressed; room tone is present to cover edits; and files are labelled with scene, take and version metadata.

Troubleshooting fixes
If lip sync is off by a few frames, nudge the clip and use micro-crossfades for smooth transitions. For tonal mismatch try gentle EQ boosts or cuts around problematic bands rather than extreme filters. If the ADR sounds too dry, add a matched ambience bed or convolution reverb set to short pre-delay to recreate distance. For phase issues, check polarity and consider deleting a low-frequency band where phase artefacts are strongest.

Where Krotos tools can help your ADR workflow, practical and honest fit

Krotos tools are useful where sound design and ADR editing meet. They can speed up creation of supporting audio that helps ADR sit naturally in a scene, saving time looking through multiple libraries or assembling long ambience layers by hand. That means faster turnarounds and fewer excuses to compromise on sound quality when deadlines tighten.

Practical use cases for Krotos tools
Generate room tone and ambience beds that match the scene to mask ADR joins, quickly create foley hits like footsteps or cloth rustles to cover lip sync blemishes, and build whoosh or impact beds to support emotional beats without opening a full SFX library hunt. Procedural tools can also let you iterate variations quickly, so you can audition different textures and settle on what best supports the performance.

Trust and boundaries when using procedural or library tools
Krotos is a creative assistant, not a replacement for an actor’s performance. Use procedural generation and libraries to support authenticity, not to impersonate speech or mislead about who performed the line. Keep clear versioning and documentation for any generated sounds you deliver, so collaborators and clients understand which parts are actor ADR and which are added design. When AI or algorithmic methods are involved, treat them as tools for efficiency and sound shaping, while maintaining transparency and ethical use.

If you want to explore how Krotos tools can fit into your ADR workflow, try a free trial or book a short demo with the team to see presets, workflow examples and community presets that match common ADR scenarios. Join our user community for quick tips, shared presets and practical patches that other editors and sound designers use to get results faster.

Frequently asked questions

What is ADR Automated Dialogue Replacement?

Automated Dialogue Replacement, often shortened to ADR, is the process of re-recording dialogue in a controlled setting after filming, then replacing or augmenting the original on-set audio in postproduction. The goal is to restore clarity, correct performance issues, or change delivery while matching timing to the picture.

Technically ADR sessions use guide tracks, timecode or slate markers to keep new lines aligned with lip movement. ADR differs from other voice recording processes because it must pay close attention to timing, emotional match and ambience so the replacement feels natural in the final mix.

What is the difference between voiceover and ADR?

Voiceover is generally recorded for narration, exposition or off-screen commentary where the speaker does not need to match lip movements. ADR, by contrast, must be synchronised to what the actor is doing on screen and usually replicates or replaces words the actor originally said.

The workflows overlap technically, but ADR requires additional steps such as frame-accurate syncing, performance matching to on-screen action, and often more complex blending with room tone and production audio to preserve realism.

What is ADR in additional dialogue?

Additional dialogue refers to any lines recorded in post that are not part of the primary on-set performance. This can include background actors, crowd ADR, loop groups and small corrective lines. It is used to enhance the scene ambience, fix missing background elements, or replace problematic on-set background chatter.

These additional lines are treated like ADR in that they are recorded to match timing and perspective, but they tend to focus more on texture and presence rather than precise lip sync to a single character.

What is ADR and Foley?

ADR is the re-recording of spoken lines to replace production dialogue. Foley is the custom recording of everyday sound effects, like footsteps, clothing rustle and table knocks, performed in a studio and synced to picture. Both are postproduction processes that aim to improve the realism and clarity of an image and sound mix.

They serve different purposes but are complementary. ADR fixes and refines speech, while Foley restores and enhances the tactile sounds that situate a performance in a believable space. Both benefit from a careful matching of perspective and ambience so the finished scene feels cohesive.

How-to guide
This is some text inside of a div block.

Tips for the Modern Content Creator

When your video lands in someone's feed, it needs to hook them immediately. Here's how

JJ Lyon
December 19, 2025
Read Story↗

Did You Know...

Approximately 34 million videos are posted on TikTok daily. That’s 272 videos posted every second. 16,000 videos per minute and 981,000 videos per hour.

With numbers like these, it is vital that your videos standout. If and when your video lands in someone's feed, it needs to hook them immediately. This isn’t just for TikTok either. Whether you're a filmmaker, a YouTuber, or something else altogether, the right sound effects can elevate your content from good to unforgettable. 

The three steps to a successful piece of content are as follows:

1 - Hook your audience to stop them scrolling

2 - Keep them engaged for the length of your video

3 - Make you provide something of value

If any of these three steps fail, then your audience is going to click away. 

So what do you do?

You could of course learn the latest TikTok dance, (Yes, people still do TikTok dances…we can hardly believe it either), Or you could perhaps jump on the latest trending meme.

…or you can stay true to yourself, and deliver something exceptional. With that in mind…

How can you make your content stand out?

By making Sound Effects like no one else can.

Think about a scene from any film or TV series you love. Now think about it on mute. Does it feel the same in your mind? Sound is the cliffhanger; the jump scare; the punchline.

Cinematic sound effects for content creators

For content creators, sound design is a fundamental element that breathes life into a story. There are so many ways that you can get powerful cinematic sound effects into your projects:

Working with Sound Designers and Sound Effect Editors

If you have the time, and the budget to work with sound professionals on your projects, then this is a fantastic way to make your content stand out. Sound designers and editors can take your directions and use their skills and experience to provide cinematic, pro-level sound effects to your projects

But sometimes, money is tight. If you are trying to make something of yourself with your content, you often are aiming to generate income & obtain sponsorships, collaboration deals, or a range of other opportunities. 

Whilst this could eventually lead to you having more resources to invest back into your content, more often than not, you’ll want to keep expenses to a minimum. So what’s an alternative?

Purchasing Sound Effect Libraries

Did you know you can use the same resources as Hollywood professionals to create sound effects for yourself? This is often a more affordable alternative when you cannot justify hiring a sound designer.

Sound effects libraries can be found for almost any circumstance. Whether you need footsteps, clothing movement, weather, animals, guns, there is a library out there for the job.

Exploring our list of the top 10 sound effect library resources, and checking out our completely FREE SFX page can help you on your way to building a library. You can also rely on the free libraries from the BBC, Adobe, or use freesound.org to start to build your library from nothing, for nothing!

But beware…

Money, money, money

When you need to buy multiple Individual sound effect libraries, the cost can add up. Yes, some libraries are inexpensive, but often don’t contain many sound effect files, or can be of very low quality. At this point, you may as well go back to ripping low quality mp3s by screen recording youtube

Other libraries can claim to have every sound you could possibly want, at production-level quality. But for a steep price.

Tick Tock, tick tock

There’s also the time factor. How long will it take you to google around for all the sound libraries you would need? You’re looking at days of searching. Hours of time downloading them, and even more hours exploring the sound effects inside. And what if the sounds don't work within your project, after all that time and money spent?

This can be combatted, with our next solution:

Using Sound Effects Platforms

If you are a video creator, you're probably using stock footage from Artlist or another similar platform in your projects. These all in one platforms can set you up with Stock footage, but also music and sound effects too, and can seem like the ideal solution for your needs as they are much more affordable. But these platforms carry problems in themselves:

Licensing - Reading the fine print

Are you sure that once your project is complete, using these platforms, that you will be able to share it on your channels and monetise it? Many of these platforms are not Royalty Free and you may need to pay a licensing fee to them afterwards, or they can remove your videos for using copyrighted footage or sounds.

Tick Tock, tick tock…(Wait, didn't we use this already?)

Yes. But unfortunately, sound effects platforms don’t save you all that much time. You still need to search for the sounds you need on their sites, and audition them. Then you need to download them, all of this takes as much time as you would take when searching for libraries.

Using the same assets as everyone else.

Unfortunately, with popular platforms such as Artlist and Soundly, creators often end up using the same music, sound effects and stock footage as everyone else. But the question at the start of this article was “how can you make your content stand out?”.

Explore Krotos Studio for the best of all of these worlds

Krotos Studio is leading the charge, setting a new standard for content creators to make an impact with their sound effects.

The platform has an enormous library of sound effects, at an affordable price, and is being developed with input from some of the world's most skilled sound designers.

You can achieve production quality sounds, fast, with intuitive interfaces that makes creating and manipulating sound effects more efficient for content creators than ever before. The use of ethical AI technology takes the frustration and slowness out of searching for the sounds you need.

With Krotos Studio you can generate high-quality, sound effects as you edit, directly in sync with your footage. This dramatically streamlines sound design, and gives you the tools to stand out in an ocean of amateur sounding content.

Krotos Studio is revolutionizing the craft of sound design. This innovative, AI-powered app offers a comprehensive suite of tools that empower you to create breathtaking sound effects effortlessly.

Imagine seamlessly enhancing your videos with top-tier sound effects and music, all without ever leaving your favorite editing software like Premiere Pro or DaVinci Resolve. Krotos Studio makes it possible. Simply drag and drop sounds directly into your timeline for a workflow that is smoother than ever.

Elevate your projects with an ever-expanding library of incredible, 100% royalty-free sound effects. From immersive background ambiences that transport your audience to another place, to hyper-realistic Foley sounds that add a touch of authenticity, the creative possibilities are limitless. Picture your audience utterly captivated by the rich, detailed audio landscape you can craft in real-time.

Don’t miss out on this opportunity to revolutionize your sound design process.

Start your free trial of Krotos Studio today and experience the magic of instant sound creation. Transform your stories into unforgettable experiences now.

How-to guide
This is some text inside of a div block.

How to Create Footstep Sound Effects (Advanced): Krotos Studio Pro 101

Follow along in this tutorial to understand how footsteps presets can be designed and operated in Krotos Studio Pro.

JJ Lyon
December 19, 2025
Read Story↗

Follow along in this tutorial to understand how footsteps presets can be designed and operated in Krotos Studio Pro.

Building a more advanced footsteps preset

Here’s a step by step guide to creating a more complex footsteps preset in Krotos Studio.

  1. In the hamburger menu, click load factory presets, open the preset templates folder and select footsteps template 01.

The layout for this preset is as follows:

Tabs

Tab 1 - left footsteps

Tab 2 - right footsteps

Engines

Engine 1 - heels on a concrete surface

Engine 2 - toes on a concrete surface

Engine 3 - heels on a gravel surface

Engine 4 - toes on a gravel surface

Using the release trigger to control footsteps

We can control the space between the heel and toe sounds being triggered. This is done with the release trigger in the sampler engine.

Disable the release trigger in the heel engines, and enable it in the toe engine. This way, we can trigger the heel sounds when we click the mouse, and toe sounds when we release it.

We have disabled the note trigger button. This ensures that we won't trigger the sound effect when we are moving across the surface of the XY pad.

Using Panning

In this preset, I have panned the left foot ever so slightly to the left, and similarly the right foot to the right. This adds a little bit of dimension to the footsteps, as if walking from a first person perspective.

Our preset is finished! Now we can:

  • Create heel and toe sounds separately using the release trigger
  • Trigger the left and right footsteps with their own button
  • Move across surfaces with the XY pad

Learn more from the other tutorials in our 101 Series:

How to create an ambience preset

How to create a footsteps preset

How to create an advanced footsteps preset

How-to guide
This is some text inside of a div block.

The Power of Silence: Times When Less was More in Sound Design

We’re all about getting the sound design right, but when does that mean taking away more sounds from a scene than you leave in? When is less more?

James Russell
October 17, 2025
Read Story↗

Here at Krotos, we’re obsessed with sound, but even we should know when silence works best. In film, the moments where silence is called for can be obvious: a quiet moment between old lovers, a morning in a remote location, a character falling peacefully asleep. But what about when silence is less expected, and used as a conscious choice by the sound designer? Silent moments can be used to punctuate the cacophony; otherwise, loudness can lose its impact as it turns into information overload.

Take the battle of Helms Deep from The Lord of the Rings: The Two Towers (below). If you were to hear every weapon collision, horse gallop, yell, stab, and scream, it would sound like nothing after a few minutes. Your ears would fatigue, and your attention wouldn’t be drawn into every moment the director is trying to highlight. In the film, strategic moments of silence are used to draw you in and reduce the battle down to the bare sonic components necessary for each shot.

In this article, we’ll break down some sequences we consider to be key examples in using silence to elevate a scene. Exploring why they work and how they impact the viewer.

If you’re on the lookout for some sounds to break up your own loud moments with relative silence, Check out our selection of Free Sound Effects. If you get a kick out of our movie rankings, how about our list of the most iconic movie battle and fight scenes.

1. 2001: A Space Odyssey (Stanley Kubrick, 1968)

A malicious AI terminates a crewmate in the void of space.

You rarely get true moments of silence in cinema, especially ones which are diegetic rather than portraying a character's emotional state; this is because there are few environments on earth where there is no sound whatsoever. Short of an anechoic chamber or a high-end recording studio, even the stillest desert or emptiest building will contain atmospheric ambient sounds. This leads to a lot of quiet moments in film retaining sounds such as breathing or wind to prevent unnatural silence.

But in space, there is no sound. In 2001, Kubrick uses true diegetic silence to portray the horror of the endless void. Moving from the uncomfortable coldness of the ship's internal noise and the crew's laboured breaths, to the unfeeling stillness of space as we watch Dr Frank fight against the inevitable. There’s nothing that can be done, and the silence heightens that more than any screams or spacesuit foley ever could.

2. Bande à Part (Jean-Luc Godard, 1964)

Three people try to share a minute of silence.

As previously mentioned, true silence is more likely to be used in non-diegetic moments: A dream sequence, a character's subjective POV, something that's emotive and surreal enough visually that the silence brings attention to itself. The helicopter crash in The Life Aquatic with Steve Zissou (Wes Anderson, 2004) springs to mind as an example of this. These moments of silence bring the post-production of the movie to attention, like the rug has been pulled away by the movie's orchestrator, shattering the illusion of reality for cinematic effect.

Godard, in contrast to the above example, uses silence for the sake of the jarring effect it has on its own, with no flashy cuts or imagery to frame it differently. A character proposes a minute's silence, then after 3, 2, 1, the atmosphere of the cafe is unnaturally taken away. We are left in this unnatural, uncomfortable feeling, caused, and seemingly sustained, by the characters, until the bubble is popped by the very character that suggested it, bringing the atmosphere back so we can breathe again. An example of meta filmmaking at its finest.

3. Star Wars: Episode II - Attack of the Clones (George Lucas, 2002)

An iconic sound effect punctuated by the perfect use of silence.

In stark contrast to the two previous arthouse films of yesteryear, we jump to a critically panned blockbuster of recent memory, with 62% on Rotten Tomatoes. You might not have expected a film like this to appear here, but if you look past the clunky dialogue and cheese, you will find the industry's best and brightest minds behind the scenes: in this case, Ben Burtt and his incredible team at Skywalker Ranch.

Unlike Kubrick’s depiction of space, in Star Wars, there is sound: you hear the starfighters whizz past, you feel the sonic weight of a star destroyer; this has been established from the first shot of the first film. In a franchise full of so many iconic sounds, the seismic charges from Episode II are up there with the lightsaber. But in this particular scene, the usual symphony of laser fire and spaceship engines is violently taken away. A deafening silence before a deafening explosion makes an already fantastic sound not only hit harder, but remain in our minds long after the film itself has faded.

4. Raging Bull (Martin Scorsese, 1980)

A moment of stillness before a seminal cinematic beatdown.

A return to the non-diegetic, this time in the hands of another master, Martin Scorsese. Where the internal is represented by washes of reverberated tones and processed atmospheres in this key scene from Raging Bull. Moments like this can act like a breather for the audience. The ground falls away, realism becomes surrealism, and you’re interacting with the narrative through the subjective emotion of the characters rather than the literal account of what's happening. The subtext becomes the text, only for a moment, before the real world takes over again.

In this case, a man begging for a beating, if only to show how much he can take. The sounds of the crowd die away as time slows, and we are left with only soft breaths and a metallic ambience. We are locked into the moment between the characters, like how time slows before a car accident. Before we are violently brought back to reality by the first punch. A moment of silence during a flurry of extreme violence. This scene might work without this sequence; the beatdown would still be harrowing. But we would have lost an unsayable thing, a moment that can be interpreted differently by everyone.

5. Saving Private Ryan (Steven Spielberg, 1998)

The Mount Olympus of war sequences, a true masterclass in loud and quiet.

A similar use of silence to the previous example, with another American master at the helm. It’s interesting how the D-Day beach landing scene is regarded as such a realistic portrayal of war, despite the amount of surrealism that occurs during its most iconic segments. It can be easy to think realism means reality, but reality is subjective, and is entirely based on whose perspective you’re in.

In the case of Saving Private Ryan, you experience the skirmish as not only the main character, but also as if you’re amongst the soldiers yourself. Of course, we have the harrowing and iconic shellshock sequence, where, like in Raging Bull, the surroundings give way to a droning atmosphere. Explosions and bullet impacts are still there, but they are distant. We’re in the character's mind, stunned and completely overwhelmed at what’s happening.

We also have the incredible use of diegetic silence with the underwater sections, where the bullets sound almost delicate as they maim and kill. The camera is our POV, momentarily escaping the cacophony as it dips under the water, and desperately makes its way towards the beach. Spielberg’s use of both the real and surreal throughout the sequence is to maximum effect, which is why it still stands as the best example of warfare in cinema.

6. Akira (Katsuhiro Otomo, 1988)

The loudest example of silence in a genre-defining movie opening.

This entry feels like a culmination of all the previously mentioned techniques, and it’s all contained within the first thirty seconds of the film. One of the most iconic pages in Manga adapted into one of the most iconic openings to an animated movie. Akira’s beginning shows how opposites can be used for great effect: in this case, deafening silence instead of deafening loudness. The city's soundscape begins as just wind, like that of a desert wasteland. Before it is erased by the growing void, dying away to complete silence as the frame becomes pure white.

The sequence wouldn’t be improved with a hard-hitting explosion. Just like the moment of silence before the explosion in Attack of the Clones, but more. It sums up the tragedy of what’s being depicted, while remaining respectful to its obvious parallels to the destruction of Nagasaki and Hiroshima. The loudest silence in cinema.

How-to guide
This is some text inside of a div block.

How to Do Anything with Audio in Premiere Pro

Discover how to effectively work with audio in Adobe Premiere Pro. Learn to import, adjust levels, and enhance your audio for professional results.

JJ Lyon
December 19, 2025
Read Story↗

Adobe Premiere Pro isn’t just a top-tier video editing software; it also excels in audio production. With powerful audio tools and seamless integration with Adobe Audition, Premiere Pro brings professional-level sound design directly into your editing suite.

Unlike other NLEs where audio features might feel secondary, editing audio in Premiere Pro using it's built-in tools, like the Essential Sound Panel and Auto Ducking, allow you to mix, edit, and enhance audio right inside the software. Let’s explore some of Premiere Pro's standout audio features and see how they can elevate your projects!

Adding Audio Tracks in Adobe Premiere Pro

To start, import your media by going to the Project panel, and selecting "Import media". You can also press file > import or the shortcut Ctrl+I. Choose the files you want and drag them onto your timeline.

To add a new audio track, right-click on an existing track in the timeline and select “Add Track.” For ambient sounds, sound effects, or music, use a stereo or 5.1 surround track. For dialogue, a mono track is usually ideal as it keeps vocals centered and clear, reducing unwanted noise across the stereo field.

Adjusting Audio Levels in Premiere Pro

To change the volume of an audio track in Adobe Premiere Pro, use the volume slider in the Audio Track Mixer panel. Each mixer channel is labeled with its corresponding track from the timeline. For adjusting the volume of a single clip, select the clip on the timeline and modify its volume in the "Effect Controls" panel. Open this panel by selecting the clip and navigating to the top of the screen.

Accessing the Audio Mixer in Premiere Pro

To access more advanced audio editing capabilities, open the Audio Track Mixer by going to the "Window" menu and selecting "Audio Track Mixer." This will allow you to adjust levels, add effects, and manage multiple audio tracks more effectively.

Separating Audio from Video in Premiere Pro

When you import a video with attached audio into Adobe Premiere Pro, the audio and video are linked by default. To unlink them, right-click on the clip in the timeline and select “Unlink.” Alternatively, you can use the shortcut Ctrl+L to link or unlink audio and video on a selected clip.

Recording Audio in Premiere Pro

To record audio from a microphone in Adobe Premiere Pro, start by creating a new mono audio track in your timeline. Then, open the Audio Track Mixer panel, find the track you want to record to, Choose Input, and then select your microphone from the input options. You can also record directly to an audio track by clicking the microphone button

Once your input is set, click the Arm for Record (R) button on the track to enable recording. Begin recording by pressing the Play button in the timeline, and your audio will be captured directly onto the selected track.

Zooming In and Out in Premiere Pro

To get a closer look at your audio waveforms in Adobe Premiere Pro, use the Zoom tools. You can zoom in and out on the timeline by holding the Alt key (Option on Mac) and scrolling with your mouse wheel.

To further control your audio, enable the Gain Line by clicking the wrench icon in the timeline panel and selecting “Show Audio Keyframes.” This will display a changeable gain line on each audio clip, allowing you to adjust the volume by clicking and dragging the line up or down directly on the waveform.

Fading audio files in and out in Premiere Pro

To fade audio in or out, hover over the top corner of the audio clip in the timeline until you see a fade handle, then click and drag it to set the desired fade length. Alternatively, select the clip and use the Effect Controls panel to adjust the fade duration directly.

Crossfading two audio files in Adobe Premiere Pro

To create a crossfade between two audio clips in Adobe Premiere Pro, make sure the clips are aligned next to each other on the timeline. Then, open the Effects panel and locate the Audio Transitions folder.

Drag either the Constant Power or Exponential Fade transition to the point where the two clips meet to create a smooth crossfade effect.

Once the crossfade is applied, you can adjust its duration by clicking on the transition in the timeline and dragging its edges to extend or shorten it. To set a new default duration for all future transitions, navigate to Edit > Preferences > Timeline, and change the Audio Transition Default Duration to your desired length. This allows you to customize how transitions are applied across your project, ensuring they fit the specific needs of your audio design.

This process makes it easy to blend two audio clips seamlessly, enhancing the overall flow and cohesiveness of your audio track.

Premiere Pro audio effects - EQ

To add eq to an audio track in Adobe Premiere Pro, select the audio clip in the timeline and navigate to the Effect Controls panel. From there, find the Audio Effects section and apply the Parametric Equalizer effect.

Open the Edit button next to the effect to access the equalizer settings and adjust the frequency bands as needed.

To add a low-cut filter and remove unwanted bass frequencies, enable the low-cut option by checking the appropriate box and adjust the frequency slider to set the cut-off point to your desired level. There are a number of eq audio effects in premiere pro to explore, each with different results, but the Parametric EQ is a flexible and easy to use starting point

Audio compression in Adobe Premiere

To apply compression to an audio track in Adobe Premiere Pro, select your clip in the timeline and go to the Effect Controls panel. Add the Dynamics effect from the Audio Effects section. Click the Edit button next to the effect to open the dynamics controls, where you can enable and adjust the compressor settings.

To apply basic compression, enable the Compressor toggle, set the Threshold to around -20dB, adjust the Ratio to 3.0:1, and use the Make-Up Gain slider to boost the output level by 3.0dB. Use the visual meter to see how the compression affects your audio.

Spatial Audio in Adobe Premiere Pro

To adjust the stereo field of your audio in Adobe Premiere Pro, select the audio clip and go to the Effect Controls panel. Look for the Panner controls within the audio track settings.

Use the Pan slider to move your audio from left to right across the stereo field. You can also adjust the Balance controls to bring audio closer or farther away. Additionally, modify the Spread parameter to widen or narrow your audio placement within the stereo field, creating a more immersive listening experience.

Adding external effects in Adobe Premiere Pro

Adobe Premiere Pro allows you to use third-party plugins in your audio effects chain. To set this up, go to Edit > Preferences > Audio and navigate to the Audio Plugin Manager. From there, you can add directories for Premiere Pro to scan for any installed third-party plugins and enable them from the list of available plugins.

Once scanned and enabled, you can add these plugins to any audio track by opening the Audio Track Mixer, clicking the Effects dropdown menu, and selecting your desired plugin.

Get Stuck in with audio in Premiere Pro

In Adobe Premiere Pro, you have a wide range of tools to enhance and refine your audio. From adjusting volume and panning to using external plugins, Premiere Pro offers a comprehensive set of audio features that can rival standalone DAWs.

Easily apply EQ, compression, and spatial effects directly within your timeline, and take advantage of third-party plugins to expand your creative possibilities. Whether you're fine-tuning dialogue or creating an immersive soundscape, Premiere Pro’s audio capabilities provide flexibility and control to achieve professional results right within your video editing workflow.

How-to guide
This is some text inside of a div block.

Design Entire Scenes With Krotos Studio

Dive into the video below to see Krotos Studio in action, and discover how it can take your projects to the next level.

JJ Lyon
December 19, 2025
Read Story↗

Dive into the video below to see Krotos Studio in action, and discover how it can take your projects to the next level.

Building full scenes becomes seamless when combining cinematic layers from Cinematic Sound Effects using Krotos Studio, and getting accurate environmental textures.

Introduction to Krotos Studio

In the realm of sound design, the tools we use can make or break the final product. Whether you're a seasoned sound design professional, video editor, content creator, or just dipping your toes into the world of sound, Krotos Studio is a game-changer. In the video above, we dive into the benefits of Krotos Studio.

All of the sounds created using Krotos Studio are 100% Royalty-free. Feel free to use them in any of your projects!

Why Krotos Studio?

Sound design is an art form. It's about creating a sonic world that complements the visual, enhancing the viewer's experience. Krotos Studio is not just another sound design tool; it's an intuitive platform that allows anyone to craft, manipulate, and perfect your sounds with ease.

Key Features Highlighted in the Video:

  • Diverse Range of Sounds From ambiences to footsteps, Krotos Studio offers a wide range of sound design categories to fit any scene or requirement.
  • Performable Shape the sound intuitively and in real-time using your mouse or MIDI controller. Perform your sound to the right timing and length, achieving exactly the right emotion you need.
  • Real-time Performance Adjust the elements of your sound in real-time. More birds? More wind? You're in control.
  • Drag and Drop Once you've crafted the perfect sound, simply drag and drop it onto your timeline. It's that easy.
How-to guide
This is some text inside of a div block.

Sound Effects for Visual Novels with Krotos Studio

Multimedia Composer and Sound Designer Stephen Cromwell, who demonstrates his approach to Krotos Studio for visual novels.

JJ Lyon
December 19, 2025
Read Story↗

Using Krotos Studio for Visual Novels

Krotos Studio is becoming an essential part of many content creators' toolkits.

Krotos Studio can also hugely simplify the process of Creating Video Game Trailer SFX, and it's simple to make Game Audio with Krotos Studio too. In fact – whatever you're making, we've probably got more than enough ways for you to build it yourself.

One such creator is Multimedia Composer and Sound Designer Stephen Cromwell, who demonstrates his approach to Krotos Studio for visual novels below. Be sure to watch the video until the end to see how he additionally creates magic spell sound effects with Krotos Studio!

Watch the video below

Visual novel sound effects with Krotos Studio

Krotos Studio is a fast and efficient workflow for all kinds of content creation. In the video, Stephen adds ambience to a project by dragging them into the timeline in Cubase.

By playing the audio back, Krotos Studio automatically records the output. Stephen then drags the file out of Krotos Studio and places it under his footage before trimming and fading it to match the clip's length.

Creating magic spell sound effects

Stephen also demonstrates a workflow for creating powerful magic spell sound effects in a re-design video. He combines multiple scenarios including fire, electricity and explosions to create an exciting and dynamic magic attack sound.

Scenarios used in this video

  • Ambience - Apartment
  • Weapon - Explosion
  • Whoosh - Electricity
  • Whoosh - Fire

Stephen demonstrates Krotos Studio's versatility, covering a range of uses from ambience to magic spell attacks. Creating Hollywood-quality sound effects has never been easier!

How-to guide
This is some text inside of a div block.

Best Tools for Sound Design

The best software for sound design depends on three things: what you’re making, how you work, and how much time you’re willing to invest learning it.

JJ Lyon
December 19, 2025
Read Story↗

Best Tools for Sound Design: Practical Picks for Creators Who Want Results Fast

Search for best tools for sound design and you’ll get two extremes.

Either a 9,000-word gear dissertation written by someone who owns modular synths the size of a wardrobe.
Or a vague “Top 10 Plugins” list with affiliate links and no context.

Neither is particularly helpful when you’re mid-edit, your timeline is open, and you need a cinematic whoosh that doesn’t sound like it came free with Windows 98.

This guide is different.

It’s built for filmmakers, video editors, content creators and game audio practitioners who care about speed, repeatable workflows and professional results. We’ll cover software, plugins, synths, field gear and libraries, but always through the lens of use case.

Not “what’s objectively best.”
What’s best for what you’re actually doing.

If you just want the short version:

  • You need one solid DAW or sound-design environment
  • A tight plugin toolkit, not 400 presets
  • A way to generate and shape sounds quickly
  • A simple recording setup
  • And a workflow that doesn’t collapse under deadline pressure

Now let’s unpack it properly.

What to Consider When Choosing Sound-Design Tools

Before we talk brands and plugins, zoom out.

The best software for sound design depends on three things: what you’re making, how you work, and how much time you’re willing to invest learning it.

Use Case: Film, Game, Foley or Ambience?

Film sound design prioritises sync, clarity and mix translation.

Game audio needs variation, optimisation and integration with engines like Unreal or Unity, often via middleware like FMOD or Wwise.

Foley requires performance and timing.

Ambience design leans on layering, spatialisation and texture.

If you’re mainly cutting social ads in Premiere, your needs are different from someone building adaptive systems in Wwise.

Start there.

Workflow Fit: DAW Compatibility and Export

If you live in Premiere Pro or DaVinci Resolve, your tools should integrate cleanly. Export formats, drag-and-drop workflows and sensible file handling matter more than exotic modulation matrices.

If you’re working with Unreal or Unity, consider how easily your sounds can be structured for variation and parameter control.

Interoperability beats novelty.

Budget and Learning Curve

There are excellent free tools for sound design. There are also deeply complex instruments that require a long-term relationship.

Be honest about your time.

If you want fast, repeatable results, tools with intuitive interfaces and performance-based workflows will serve you better than something that requires a YouTube playlist titled “Part 1 of 37.”

Core Software You Should Consider

Let’s start with the backbone.

DAWs Suited to Sound Design

There’s no single “best DAW for sound design,” but some are particularly well-suited.

Reaper
Flexible, lightweight, absurdly customisable. Excellent for post and sound design if you’re comfortable tweaking.

Pro Tools
Industry standard in film and post-production. Strong editing, solid routing, reliable in larger studio environments.

Ableton Live
Incredibly fast for creative sound design, resampling and layering. Less traditional for post, but powerful for generating material.

Logic Pro
Strong built-in instruments and effects. Good balance between music and design.

If you’re a Premiere or Resolve editor, you may not want a full second ecosystem. In that case, consider tools that let you generate and export sounds quickly without deep DAW dependency.

Standalone Sound-Design Apps and Toolkits

There are also standalone sound design environments designed to accelerate workflows rather than replace your DAW.

These tools focus on:

  • Preset-based performance
  • Layered sound structures
  • Rapid export into your timeline
  • Built-in variation

They’re particularly useful for creators who don’t want to build everything from oscillators up.

Speed is a feature.

Essential Plugins and Virtual Instruments

Plugins are where people tend to overspend.

You do not need 27 reverbs.

You need a tight, reliable toolkit.

Core Utility Plugins

If you’re serious about sound design software, start here:

  • EQ – for carving space and shaping tone
  • Compression – for control and punch
  • Transient shaper – for sharper attacks
  • Reverb (convolution + algorithmic) – for space
  • Delay – for depth and movement
  • Saturation or distortion – for weight and texture

With just those, you can create convincing film and cinematic sound effects.

Creative Plugins

Once the basics are covered, add creative tools:

  • Granular processors for texture
  • Wavetable or FM synths for evolving tones
  • Resynthesis tools for transforming recordings
  • Pitch and time manipulation plugins

For cinematic sound design, granular and distortion-based tools often give the biggest return on effort.

Bundles vs Single Purchases

Plugin bundles make sense if:

  • You’re starting from zero
  • You want consistent UI and workflow
  • You value convenience over hunting deals

Single purchases make sense if:

  • You know exactly what you’re missing
  • You’re solving a specific problem

Don’t buy bundles for the fantasy version of yourself.

Synths and Samplers for Sound Design

When people search “best synths for sound design,” they’re often imagining massive modular rigs.

Let’s simplify.

Hardware vs Software

Hardware synths offer tactile control and happy accidents. They’re brilliant for exploratory sessions and hands-on sound design.

But they require space, budget and recording time.

Soft synths are:

  • Cheaper
  • Instantly recallable
  • Easier to integrate into film and game workflows

For most creators, software wins on practicality.

Samplers and Resampling

Samplers are often more powerful than synths for sound design.

Record a metal hit.
Stretch it.
Layer it.
Reverse it.
Resample it again.

Resampling builds complexity quickly. It’s one of the fastest ways to generate cinematic material without starting from scratch every time.

Field Recording and Capture Gear

If you want unique sounds, record them.

Recorders and Microphones

A solid portable recorder and one good microphone will get you far.

For beginners:

  • A handheld field recorder
  • Built-in stereo mics for ambiences
  • A basic shotgun mic for focused capture

Professionals may add:

  • Contact mics
  • Lavalier mics
  • Parabolic setups

But start simple.

Practical Tips for Faster Results

  • Record longer than you think you need
  • Capture variations in intensity
  • Monitor with headphones
  • Check noise floor before committing

The best tools for sound design often include a willingness to step outside and record something yourself.

Libraries, Foley and Sample Workflows

Sound effects libraries are useful. They’re also overwhelming.

Curating Libraries

Don’t hoard. Curate.

Keep:

  • Clean, high-quality recordings
  • Clearly licensed assets
  • Well-tagged files

Organise by category and intensity. Rename files sensibly. Your future self will thank you.

Speed Tricks

Templates matter.

  • Pre-build SFX tracks in your DAW
  • Use colour coding
  • Tag frequently used sounds
  • Save layered combinations as presets

If your workflow feels slow, it’s usually organisational, not creative.

Spatial Audio and Advanced Topics

If you’re working in immersive formats, spatial design becomes central.

Ambisonics and Binaural Basics

Ambisonics capture spatial information in all directions. Binaural rendering simulates 3D audio over headphones.

For film and VR, these formats increase immersion, but they also increase complexity. Consult official documentation and industry guidance before committing to a spatial pipeline.

For most content creators, well-crafted stereo with depth cues is enough.

Game Engine Integration

If you’re designing for Unreal or Unity, structure matters.

Use middleware like FMOD or Wwise to:

  • Create parameter-driven variation
  • Control layering dynamically
  • Optimise performance

The best tools for sound design in games are often the ones that support adaptation, not just playback.

AI and Assisted Sound-Design Tools

Let’s address it calmly.

AI-assisted tools can:

  • Generate textures
  • Suggest variations
  • Assist with tagging and organisation

They cannot replace human judgement, timing or storytelling intent.

In professional workflows, AI works best as an assistant, not an author. Human oversight remains essential, particularly where licensing, originality and narrative cohesion are concerned.

Use it to accelerate.
Not to abdicate.

Quick Workflows and Hands-On Demos

Let’s make this practical.

Create a Cinematic Whoosh in 5 Steps

  1. Start with a noise or airy texture source
  2. Add a transient layer for impact
  3. Shape with a transient shaper
  4. Apply subtle pitch automation
  5. Add reverb tail for space

Export, align to picture, adjust timing by frames.

Done.

Rapid Ambience Build for a Short Film

  1. Lay down a base ambience (room tone or field recording)
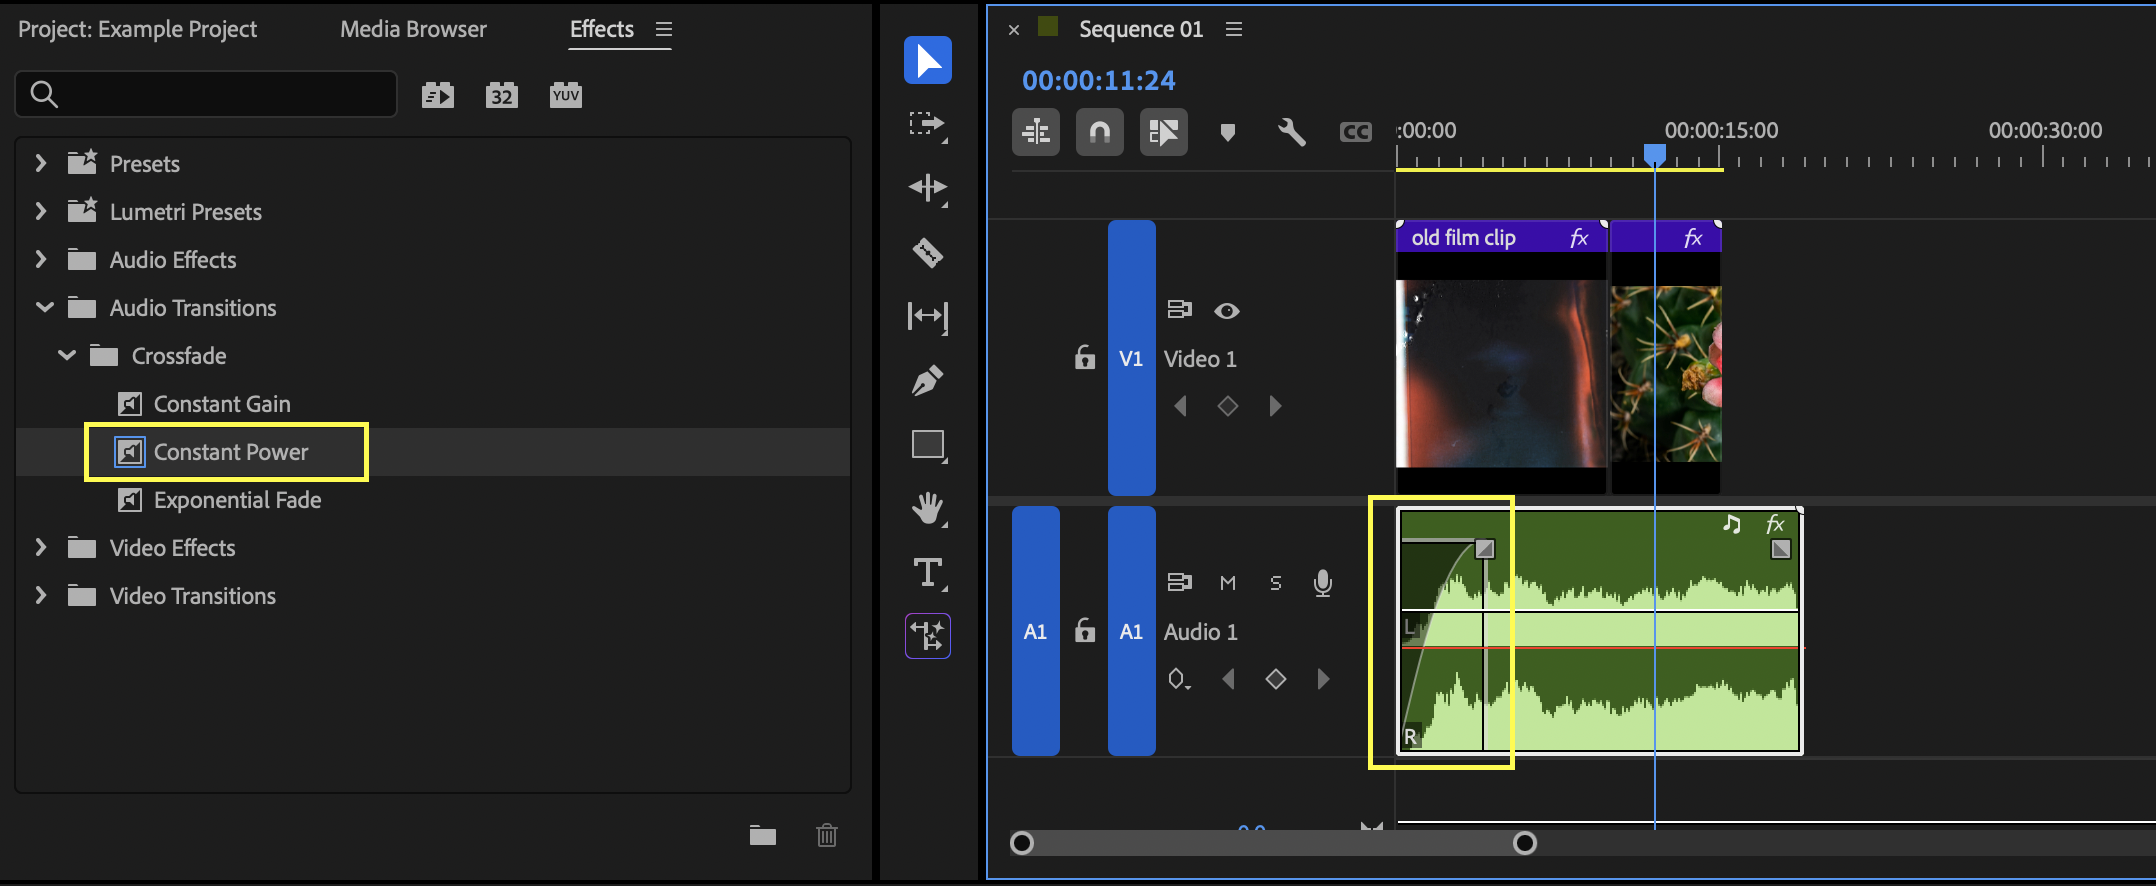
  2. Add mid-detail layer (distant traffic, wind, interior hum)
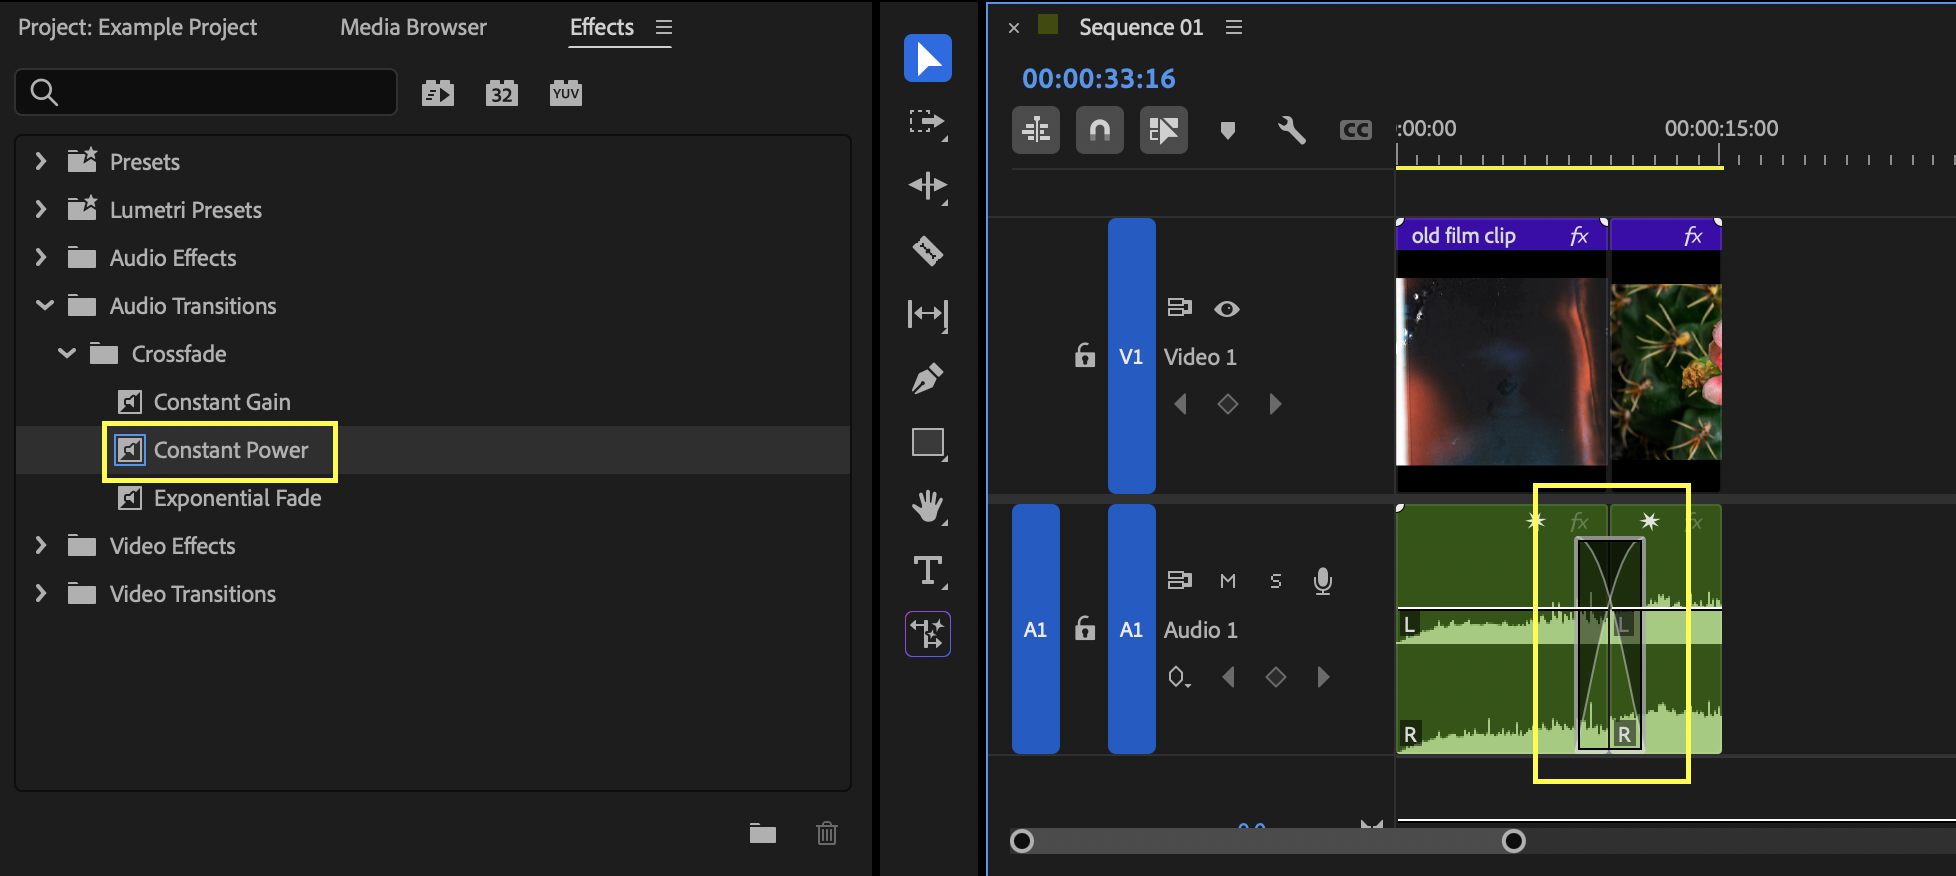
  3. Introduce micro-movements (cloth, subtle creaks)

  4. EQ to carve space for dialogue
  5. Check loop points and transitions

Five layers are often enough. Twelve are usually indulgent.

Recommendations by Use Case and Budget

Beginner (Free or Budget)
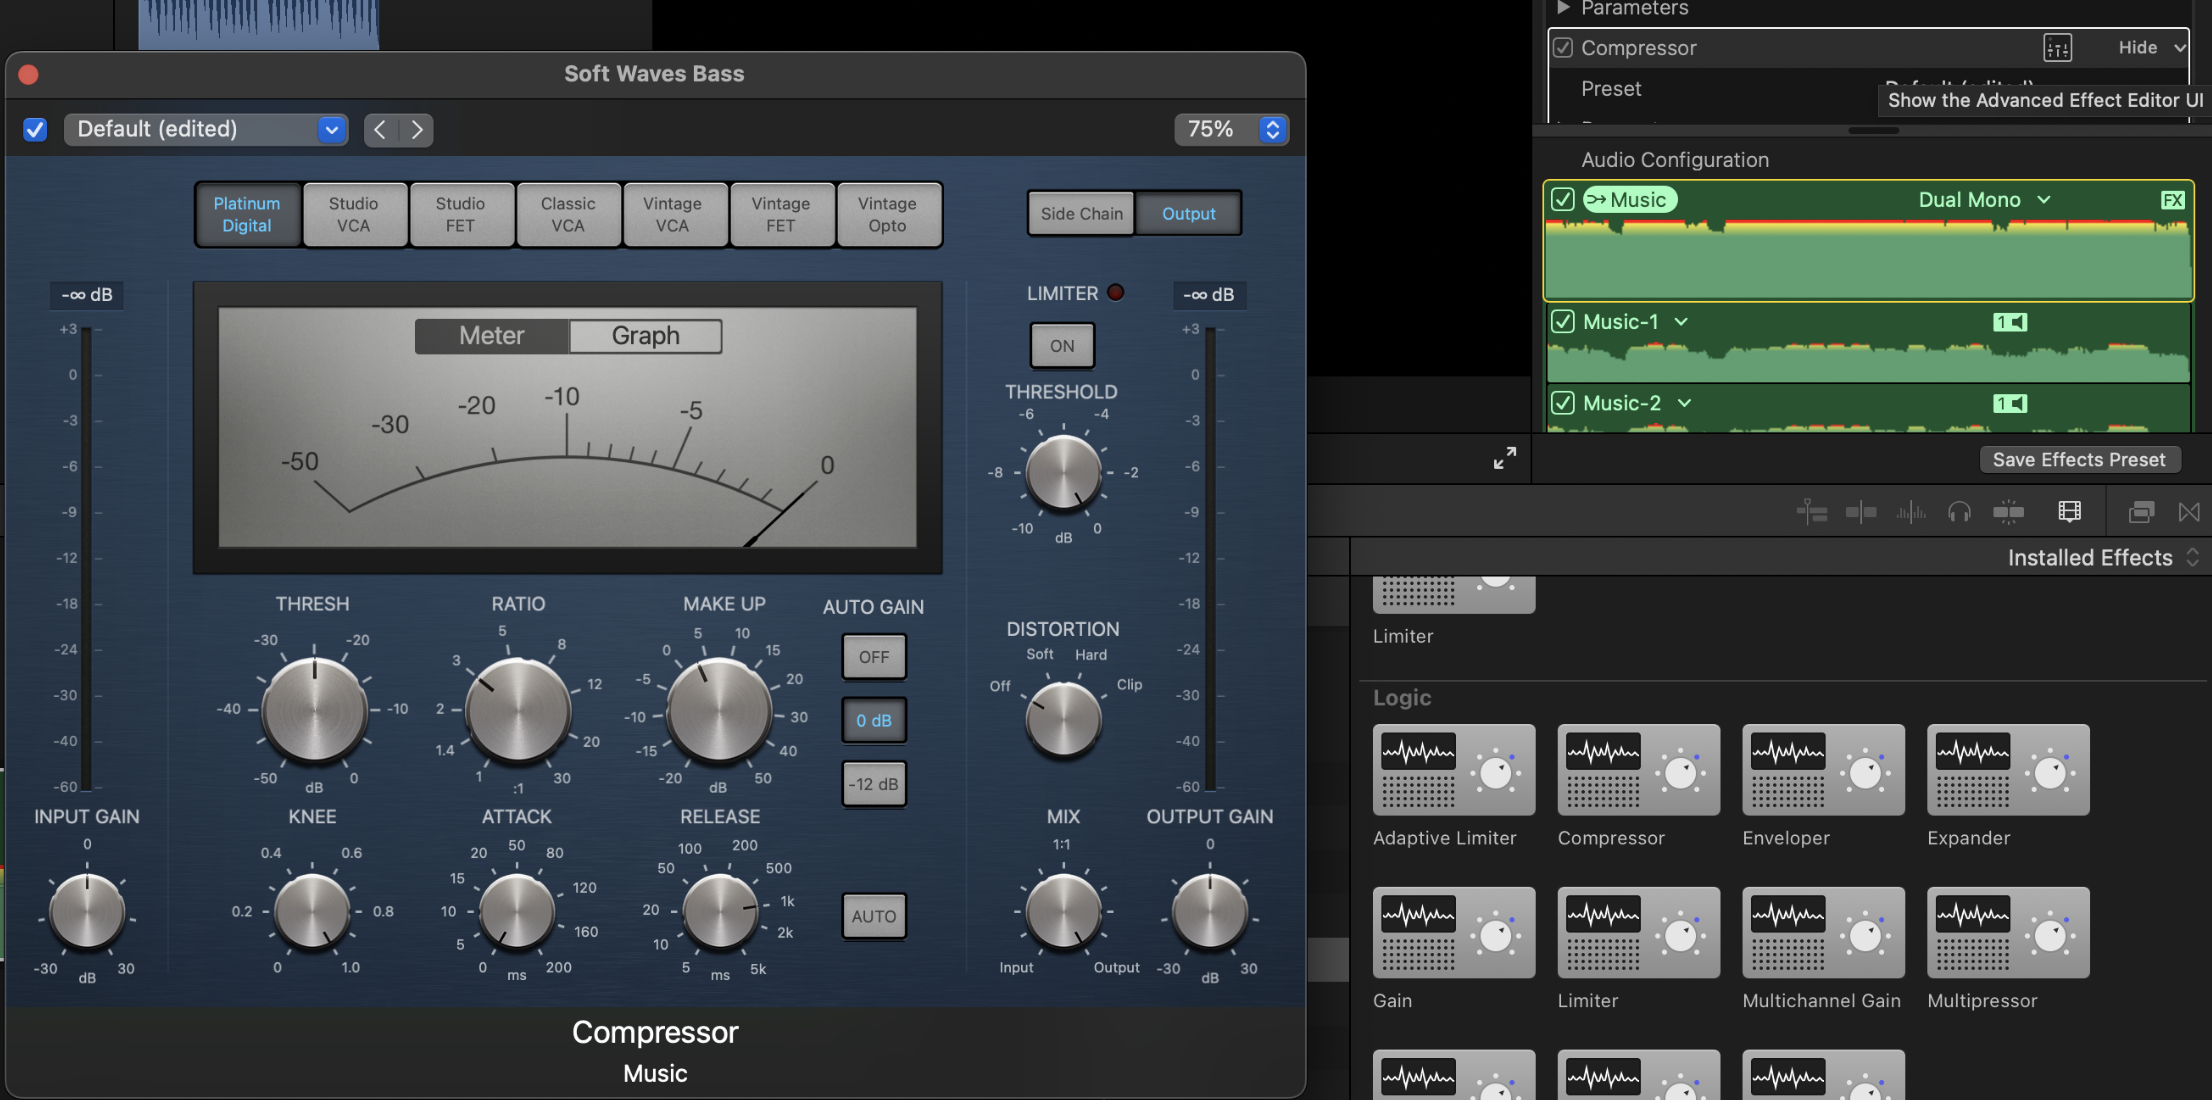
  • Reaper or entry-level DAW
  • Stock plugins + one creative free plugin
  • Affordable handheld recorder
  • Curated free libraries with clear licences

Focus on workflow, not gear.

Mid-Level (Fast, Professional Results)

  • Reliable DAW with routing flexibility
  • Core plugin bundle
  • Standalone sound-design tool for rapid generation
  • Dedicated shotgun mic

This is where speed and repeatability really improve.

High-End (Hardware + Software)

  • Pro Tools or advanced DAW
  • Full plugin suite
  • High-quality field recorder and mic collection
  • Hardware synth for tactile exploration
  • Middleware integration for game workflows

Useful if you’re deep into post or game production.

FAQs

Which software is best for sound design?
The best software depends on your use case. Reaper, Pro Tools, Ableton and Logic are all strong, but workflow fit matters more than brand.

What DAW is best for sound design and why?
One that supports precise editing, routing and export into your target platform. Flexibility and speed matter more than features on paper.

What hardware equipment do professionals use?
Field recorders, shotgun mics, quality monitors, sometimes hardware synths. But the workflow matters more than the badge on the mic.

Are there AI tools available, and how effective are they?
Yes. They can assist with generation and organisation, but professional results still require human direction and oversight.

Final Thoughts

The best tools for sound design are the ones that make you faster without compromising quality.

Not the most expensive.
Not the most complex.
The ones that fit your workflow.

If you want to speed things up, explore quick-start tutorials, try tools designed for rapid SFX generation, or join a community where creators share workflows and case studies.

Sound design doesn’t need to be mysterious. It needs to be intentional, organised and repeatable.

Preferably before the client review call.

How-to guide
This is some text inside of a div block.

Foley at Your Fingertips: A Guide to Krotos Studio's Foley Category

Discover how to produce realistic Foley sound effects quickly and easily with Krotos Studio's intuitive tools and presets. Perfect for any production!

JJ Lyon
December 19, 2025
Read Story↗

Krotos Studio is the perfect solution for quick and authentic Foley sound effects when a Foley studio is out of budget. Discover what you can achieve with our quick guide!

The short video below shows how you can create realistic, high-quality Foley with a few simple gestures, letting you focus on the more important parts of your production.

After refining your Foley skills in Foley Sound Effects for Video Editors, broaden your palette with practical recordings from Car Sound Effects Added to Krotos Studio Pro - 7 Everyday Vehicles.

Foley Sound Effects Presets in Krotos Studio

The Foley category provides a huge collection of essential Foley sound effects from clothing rustles to door closes and beyond. With just a few clicks, you can create realistic Foley by clicking in the performance area in synchronisation with your footage.

The Foley category covers all essential sounds for realistic movements across a range of materials. Leather, denim, wool, polyester, and even velcro are included. It also covers more specific sounds such as keys, bags, paper rustles and plastic bags.

But that's not all! Krotos Studio also covers a whole manner of specialist Foley sounds such as gore, blood, water movement and gun handling for those less-required, but still essential sounds. Explore all Foley presets, and watch what they include and sound like.

Why Krotos Studio for Foley?

Krotos Studio eliminates the time-consuming traditional process of collecting individual sounds, and then layering, editing, and looping them to build sound effects for your projects. Instead, it generates unique versatile Foley effects with a few click and drag gestures.

Creating Movement Foley in Krotos Studio

The Foley category presets are performed with either X-Y pads or clickable buttons, depending on which preset you choose.

Gesture-Based Presets

In each gesture-based preset, you will see 2 X-Y pads. To trigger Foley sound effects, simply click inside the left X-Y pad.

Foley Sound Effects Gesture-Based Preset

The Y axis controls the level or volume of the sound effect, and the X axis controls the pitch. In the right X-Y pad, you will see 4 material types, one in each corner. The closer you are to a particular corner, the more of that material you will hear. You can click along the sides or centre to combine materials for more complex textures!

Tip: try short clicks for shorter movement gestures, or click and hold for longer gestures. Move across the X-Y pad to match the motions of your footage, like a real Foley artist!

Button-Based Presets

Not all Foley sounds require gesture movements. Sounds such as door closes, opens and locks are short, single sound effects. For these types of presets, you will see a series of clickable buttons on the preset, appropriately labelled to describe the sounds on each button.

Foley Sound Effects Button-Based Preset

The button-based interfaces are found throughout the Foley category, for lightswitches, keyboards, metal lockers, padlocks and more.

Tip: You get a new sound every time you click, meaning your sound effects don’t become repetitive! Use the pitch controls to tailor these sounds even further; pitch upwards for smaller, lighter doors, and pitch downwards for big, heavy doors.

Exporting Foley Sound Effects From Krotos Studio

Krotos Studio records in the background as you perform, no need to hit a record button. Simply create your Foley by clicking and dragging in the left X-Y pad and you will see the recording alert on the application.

Krotos Studio Recording Notification

Once you are happy with your Foley, click and hold the drag recording button, and drag out of Krotos Studio into your video editor, sound editor or DAW.

Krotos Studio Drag Recording Notification

Release the click when hovering over the timeline in your editor and your Foley sound effects will be immediately added to your project.

Tip: You can set a location to store all of your sound effects using the burger menu in the top left corner. Set the location to where your other footage is stored to keep all of your assets together automatically.

Summary

Krotos Studio's Foley category offers an incredibly versatile and powerful collection of sounds for creating dynamic and realistic Foley. From the simplicity of using a single material to the complexity of combining them, Krotos Studio provides a vast array of possibilities for creating Foley, quickly and easily.

Explore all Foley presets, and watch what they include and sound like.

Start your journey today and unlock the potential to create Hollywood-grade Foley sound effects in seconds.

How-to guide
This is some text inside of a div block.

Discover Krotos Studio: 10 Essential Features for Creators

Unlock your creativity with Krotos Studio's. Streamline sound design, access a vast library, and enjoy real-time audio workflow for efficient production

JJ Lyon
December 19, 2025
Read Story↗

In today's fast-paced world of content creation, having pro audio tools that save time and streamline creativity is crucial. Krotos Studio transforms how creators approach sound design, offering quick and intuitive ways to generate custom sound effects. Whether you're working in social media, film audio and TV, video game audio or music, leveraging Krotos Studio’s game-changing features will maximise your efficiency. 

There are 10 key features in Krotos Studio that every creator should know about when it comes to audio crafting. With this knowledge, Krotos Studio will quickly become one of go-to post production audio solutions for pro sound creation that is fast and, crucially, a whole lot of fun.

To get the most for your money, check out the Best Sound Design Software for Filmmakers on a Budget and learn workflow tips with these tips on Effortless Sound Design in Pro Tools. For those looking to expand further, try out the advanced features in Krotos Studio MAX.

1. AI powered creative sound design tools

Sound effect designing can be time-consuming and complex, but with Krotos Studio’s AI-powered features, it is so much easier. You can generate realistic soundscapes in seconds, reducing the time spent on manual adjustments. 

Imagine the ease of crafting intricate and unique sound effects, without wasting hours of valuable time. Krotos Studio’s non-generative AI streamlines the technical side, letting you focus on the creative one. This accelerates production speed and makes the process incredibly fun and enjoyable.

2. Huge royalty-free sound library

Goodbye, endless sound hunting.

Krotos Studio’s extensive sound effect library puts millions of high-quality sounds at your fingertips, cutting the search time in half. now, Dynamic sound creation is a few clicks away.

Whether you need a bustling city or a sci-fi spaceship hum, you wont need to find it; you can simply create it. The library’s intuitive layout ensures that you can locate, customise, and implement sound effects faster than ever. This means more time for you, and less time on google. Doesn’t that sound lovely?

3. Real-Time Audio Workflow

Waiting for sounds to render interrupts creativity and slows down your workflow. With real-time audio manipulation, Krotos Studio lets you adjust and experiment with sound effects in the moment, creating interactive audio

You don’t need to time stretch and transpose individual files. With Krotos Studio you can simply paint a gesture into the XY pad and perform the speed and pitch yourself, then simply drag and drop the sound to your timeline.

This immediate processing makes every change feel fluid and interactive, so you can test ideas and fine-tune sounds without breaking your creative flow. Whether it’s tweaking pitch or adjusting tempo, everything can be done in real-time in synchronisation with your footage, making your process faster and more fun.

4. Intuitive Audio Tools

We are adding incredibly intuitive sound design tools to Krotos Studio every month. AI powered ambience generation; granular AI engines, dynamic crowd generators, the list goes on, with more updates and features always on the horizon.

As technically powerful as these tools are, they are also designed to be user-friendly and intuitive. This means everyone — from complete beginners to experienced sound designers — can dive right into Krotos Studio without spending hours learning what makes sound good to begin with. 

The easy-to-navigate interface prevents time wasting, fumbling through endless parameters with strange names, and complex menus. Instead, you can focus on crafting sound effects without technical obstacles. The simplicity of Krotos Studio encourages creative experimentation, enabling you to get started quickly and create with efficiency and ease.

5. Multiple-output audio capabilities

For sound engineers, designers and audio post production editors who are looking to use sounds that they can experiment with and shape further, You can.

Krotos Studio’s multi-output makes it fast and simple to record every corner of an XY pad to its own track, for further customisation and manipulation. It’s easy to set up, meaning you spend less time routing tracks in Pro Tools, and more time bringing your projects to life with realistic audio environment design.

6. A performance layout for every situation

Our performance templates are designed to cover every possible sound effect. For immersive background sound effects, you can have 2 XY pads, with an entire soundscape in each corner for easy mixing. Whooshes can be created with an elegant XY pad that contains all your sounds, that you can then shape in the stereo field. Foley can be layered up for fast and slow gestures and movements, and so many more.

Krotos Studio consolidates all of these sound effect types into simple macro controls and XY pads, improving simplicity, without oversimplifying; allowing you to focus on the fun part—creating compelling soundscapes.

7. Quick FX

Placing your sounds within a realistic environment can be tedious, but not with Krotos Studio. Quick FX allows you to dial in echo and reverberation in a matter of minutes. Adding these sounds can be done within the software, with simple intensity control, allowing you to move on to other aspects of your project quickly. 

8. AI Ambience Generator with text-to-preset 

The AI ambience generator uses our groundbreaking non-generative AI technology. It lets you describe your scene with a few words, and in seconds you will receive an automatically-generated custom preset based on your query. It’s so fast, don't even need to browse our library! Just describe and go. This saves so much time in audio editing,

9. Crowd Generator

Creating crowd sound effects — known in the post-production industry as ‘Walla’ — can be tedious and challenging, but not with our Crowd Generator. Now you can control an entire crowd by painting gestures into the XY pad. You can rapidly grow a crowd from a few people to an entire auditorium in the time you need to! No need to cross fade, no need to edit sound files. Blend seamlessly between male and female voices, and control pitch independently.

10. A VST plugin, DaVinci Resolve Plugin, and a Standalone version, all in one

Whether you feel at home in a digital audio workstation (DAW), or non-linear video editor (NLE), Krotos Studio covers all bases. The standalone version allows you to drag and drop sound effects directly into any timeline or folder you need, covering Adobe Premiere Pro, Capcut, Sony Vegas and beyond. If you work directly within a DAW and are familiar with vst plugins for professional audio production, you can use the VST version like you would use your other studio production tools in Pro Tools, Ableton Live, Logic Pro, Studio One and more.

11. New sound effects packs every month, based on your requests.

The Krotos Studio in-house sound design team travels around the world, microphones in tow, to record the world around us, bringing those recordings into the Krotos Studio library. Each sound effects pack is meticulously designed to balance pristine quality recordings with the productivity-enhancing features of Krotos Studio. From essential categories, such as Room Tones, background ambiences, through to cinematic sound effects that are polished and designed, we deliver a selection of incredible presets that users request and ask for every month.

Krotos Studio is sound design software that designed with audio innovation in mind, offering sound creation tools that push the boundaries of what’s possible in sound design. Whether you’re crafting realistic foley sounds or otherworldly effects, Krotos Studio's tools are built for speed and efficiency. Its forward-thinking features empower creators to work faster, smarter and more creatively, transforming the sound design process into an engaging and enjoyable experience. Your knowledge about audio industry tools doesn't matter, and you dont need to learn and understand about audio plugins, virtual instruments or audio processing. Krotos Studio is audio software for everyone.

How-to guide
This is some text inside of a div block.

Crowd sound effects like you’ve never heard before

Discover Krotos Studio's new Crowd Generator. Control crowd noise dynamics effortlessly for any scene, enhancing your audio design with ease

JJ Lyon
December 19, 2025
Read Story↗

There's a brand-new crowd generator in Krotos Studio

Imagine being able to orchestrate crowd noise like Freddie at Live Aid. Chatter, booing, cheers, applause, laughter, whispers, conversation; all sculpted and shaped by you with just a few gestures...This would be pretty amazing right?

Well, check out what we've been up to this month...💅

Fill large‑scale scenes by combining custom reactions from Creating Video Game Trailer SFX with Krotos Studio and quick assets from our free sound effects collection. You can also explore a wide range of assets in our free sound effects library.

The thing about crowd sound effects...

They are notoriously hard to fit into a scene. Normally, a crowd in a film or TV show is the result of numerous layers added in post-production, like in the example here:

This process takes time you just don't have ⏰. You have to scour the internet for a good crowd sound effects library, then buy it & download it. Next, you go through the process of auditioning the files one by one hoping that one that might work. You drag the sounds into your project, hit play, watch it back and...

"Nope - doesn’t work. this sounds ridiculous, what was I thinking. I need to go find another library..."

Why are Crowd sound effects are so difficult to get right?

There could be so many factors as to why it didn't work:

  • "This sounds too busy"
  • "This isn't busy-sounding enough"
  • "This file is too short, but when I duplicate it, I hear this one guys voice looping."
  • "...Come to think of it, why is that one guy louder than everyone else?"

Sure enough. Crowd sound effects are difficult. So the gang here at Krotos had a thought…💡

"What if there was a dynamic crowd engine inside Krotos Studio? Wouldn't that be so cool and make everything so much easier?" - Krotos Team, 2024

What if you could control every aspect of the crowd? It could be louder and quieter when you want it to be, rather than when the audio decides?

What if the sound wasn't four seconds too short for our video footage?🙄

These problems are painful, inconvenient, time-consuming... and an all-round headache.

So, we fixed it.

Crowd sound effects for every situation imaginable

Only need a handful of people in your crowd? No problem! Keep the crowd intensity parameter low in the XY pad. Want your scene to feel like you have sold out Wembley stadium like Freddie? Crank it up.

Fully-customisable crowd sound effects presets

There is no other crowd sound effect engine like this available anywhere, believe me, we checked. No other sound effects solution provides complete and total control over every aspect of how a crowd could sound, in a way that is dynamic, performable and fast.

The sounds you generate will never repeat. no need to duplicate, no need to repeat anything, just load a preset and go.

Download the 16 new crowd presets from Krotos Studio

Hear them in action in our Preset Explorer

  • Booing Crowd
  • Mob Rage
  • Laughing Crowd
  • Social Crowd
  • Callouts 1
  • Callouts 2
  • Callouts 3
  • Large Crowd
  • Coughing Crowd
  • Wedding Celebration
  • Standing Ovation
  • General Conversation
  • Happy Crowd
  • Murmuring Crowd
  • Whispering Crowd
  • Applause
How-to guide
This is some text inside of a div block.

Audio mixing and mastering: how to get fast, deliverable results

This guide gives a compact, stage based workflow you can apply immediately, plus practical checks and examples for Premiere Pro, DaVinci Resolve and game audio pipelines. Follow the stages, use a couple of go to references and you will deliver professional, consistent results fast.

JJ Lyon
December 19, 2025
Read Story↗

Quick mixes and masters are survival skills for editors and filmmakers, but the shortcuts people take when rushed are what usually ruin the result. Too much bright EQ to "fix" muddiness, last minute loudness guessing, scattered file names and missing references all turn a quick job into a late night of rebuilding sessions. This guide gives a compact, stage based workflow you can apply immediately, plus practical checks and examples for Premiere Pro, DaVinci Resolve and game audio pipelines. Follow the stages, use a couple of go to references and you will deliver professional, consistent results fast.

Why quick mixes and masters often fall apart

When deadlines tighten, a few recurring mistakes surface and compound. Understanding these traps stops you repeating them and saves rework.

Typical technical mistakes

Poor gain structure is the silent mix killer. Tracks that are recorded or bounced too hot force you to clamp levels later, creating pumping or brittle top end. Masking is another common problem, where dialogue, music and effects compete in the same frequency ranges so nothing reads clearly. Overuse of compression and boosting with EQ to "add presence" can create harshness and fatigue. Finally, weak monitoring practices matter a lot, especially in home setups. If your monitors or headphones exaggerate highs or bass, you will compensate in the wrong direction and the result will not translate to other systems.

Workflow and delivery failures

The human side of the job also breaks things. Missing reference tracks, unclear loudness targets and inconsistent naming conventions mean you spend time hunting and fixing instead of mixing. Last minute picture changes or audio swaps without version control create rework. Delivery errors happen too often, such as exporting stems at the wrong sample rate, forgetting to include metadata, or not labelling exports with clear versioning. These create extra rounds of communication and can spoil a clean handover to clients or mastering houses.

A simple principle to avoid those failures

A reliable approach is to work in clear stages and make decisions that are measurable and repeatable. That reduces guesswork and speeds delivery.

Set measurable targets and references

Pick one or two reference tracks that match the tone and loudness you are targeting, and import them into your session. Define loudness targets early, for example LUFS for streaming or broadcast loudness specs for festivals. Build a template that already has routing to busses or stems, basic processing on dialogue or music channels, and metering on the master. Templates save minutes that quickly add up, and measurable targets stop you from chasing subjective "sounding louder" fixes.

Adopt a 'mix to purpose' mindset

Decide what the deliverable must achieve before you noodle with effects. For an edit where dialogue is king, prioritise clarity and intelligibility. For a trailer or promo, focus on impact and transient punch rather than perfect neutrality. Resist unnecessary polishing that does not serve the picture. A fast, purposeful pass that supports the film or edit will usually out-perform a detailed, directionless tidying session.

A fast, repeatable workflow for audio mixing and mastering

Use a checklist that structures the session so you do the right things in the right order, and you keep momentum.

Preparation and session housekeeping

Start by checking sample rates and session format against the picture deliverable. Import audio and align it to picture or markers, then label tracks clearly with role prefixes such as DLG, MUS, FX, FOLEY. Create group busses for dialogue, music and effects, and route individual tracks to those busses. Load your chosen reference tracks into a dedicated reference bus. Save an incremental version and make a quick snapshot of routing and levels before you start heavy processing.

Fast mixing pass (30 to 60 minutes)

Work top down. First, gain stage every track so levels sit sensibly into your busses. Then apply subtractive EQ to remove masking, especially from dialogue tracks, taking out rumble and competing mid frequencies. Use narrow cuts to tame problem resonances. Light compression gives control and consistency, avoid multi band surgery unless necessary. Place elements with panning and reverb to create separation. Finish with automation to prioritise clarity; ride faders for key lines and music ducks rather than relying on aggressive sidechain compression. Keep notes on changes so revisions are quick.

Quick mastering and export

On the master bus apply a transparent EQ only if the reference suggests it, then a gentle limiter to reach your loudness target, checking with LUFS and true peak meters. Dither if you are reducing bit depth. Export a stereo master and stems for dialogue, music and effects, using clear naming that includes project, date and version. Save a low resolution MP4 or AAC as a fast client preview alongside your deliverables.

Real-world examples: apply the workflow to common projects

Different projects need slightly different priorities. Here is how the same workflow adapts to common scenarios.

Short-form video (YouTube/Reel) in Premiere Pro

Prioritise intelligibility and consistent perceived loudness. Import dialogue, drop a single ambience layer and add music. Use sidechain ducking on the music bus or automate the music fader so dialogue sits on top. Aim for platform loudness targets, for example around minus 14 LUFS for many streaming platforms, and export with an H.264 preset plus an isolated stereo master WAV for archiving. Keep one ambience track and one effects track to keep the session light and editable.

Short film scene in DaVinci Resolve

Handle dialogue editing first, cleaning breaths and removing clicks. Create stems for dialogue, ambience and FX so the picture editorial team can lock picture without losing flexibility. Foley and spot FX should be placed with attention to sync and perspective. For festival exports, run a short mastering pass that honours the festival loudness spec and deliver stems labelled with scene and take information. Resolve’s Fairlight makes bussing and stem exports efficient, so use templates to save setup time.

Game audio and middleware pipelines

When preparing SFX batches, aim for consistency. Normalise to a sensible reference level and create short variations for randomisation. Make loopable ambience beds with clean start and end points, and keep versions for different distance or intensity levels. Export with clear naming and metadata for FMOD or Unity, including suggested parameters like volume, priority and approximate LUFS or RMS. Deliver both stems and single hit files so designers can implement quickly.

Final checks before you deliver or export

A final pass that focuses on translation and file hygiene will save headaches.

Before you hand over, check your mix in mono to catch phase and balance issues, listen on headphones, laptop speakers and a TV or phone to check translation, and scan for artefacts or sync drift. Confirm LUFS and true peak are within the target range, and that all edits align with picture. Export stems and a stereo master, include clear file names, sample rate and bit depth in the file name or accompanying readme, and embed metadata where your workflow requires it. Make a backup and keep a changelog or brief client handover note that lists versions, loudness targets and any known issues. That transparency prevents small problems from becoming big ones.

Quick listening checklist

Listen in three quick passes. First, mono with the reference track to validate balance and phase. Second, stereo on headphones to inspect imaging and sibilance. Third, a consumer playback device to check perceived loudness and impact. While listening, confirm the dialogue remains intelligible, there are no clicks or unintended distortions, and music levels support the picture without overpowering it. If anything fails these checks, fix the root cause not just the symptom, then re-export.

Where Krotos tools slot into a fast mixing and mastering pipeline

Krotos tools are helpers rather than replacements, built to speed the creative SFX and ambience steps that often eat the most time when you are juggling edits.

Speeding creative SFX and ambience

Having a toolbox of procedural whooshes, editable Foley elements and layered ambience generators means you can create usable sounds on the spot instead of trawling sample libraries. That reduces the time spent hunting and lets you iterate mixes quickly, trying different emotional weights without committing hours. Exportable stems and variations mean you deliver clean, organised material for the mix pass, so your session stays tidy and fast.

Practical integration and trust boundaries

Krotos assets and tools fit alongside your DAW or NLE workflow, exporting stems and named files ready for FMOD, Wwise, Premiere Pro or Resolve. Use them as part of a transparent pipeline, keeping source files and versioned exports so changes are traceable. On AI and automation, Krotos aims to be ethical and non generative in ways that respect provenance and human oversight. Treat tool generated assets as collaboratively created content, verify and edit them as needed, and document any third party or library sources where attribution is required. That builds trust with clients and keeps your workflow defensible.

If you want to speed your next mix, try Krotos and explore the community resources and quick start templates that speed setup and iteration. Sign up for a free trial or request a demo, download starter templates for Premiere Pro and Resolve, and join the forum to see how other creators use Krotos tools in real projects. Quick tutorials and project files are designed to get you from import to deliverable without the usual hunting and guesswork.

Frequently asked questions

How much should I pay for mixing and mastering?

Pricing varies depending on experience, turnaround time and deliverables. For simple projects like short form videos you might budget for a modest flat fee for a mix and master that includes stems and a stereo master, while larger or more complex jobs such as feature scenes, trailers or music releases typically command higher rates. If you work with freelance engineers, ask for a clear rate card and what is included so you can compare value rather than price alone.

A practical approach is to align cost with the deliverable and risk. If you need tight turnaround, revisions or stems for multiple platforms, expect to pay more. For repeat work, negotiate package rates and templates to reduce per job cost and speed delivery.

What does audio mixing and mastering mean?

Mixing is the process of blending multiple audio elements into a coherent stereo or surround output. It involves balancing levels, EQ, compression, panning, reverb and automation to ensure dialogue, music and effects work together for clarity and impact. Mastering is the stage after mixing where the final stereo mix is prepared for distribution, focusing on tonal balance, loudness, and ensuring the file translates across playback systems and meets platform or broadcast specifications.

Think of mixing as building the scene and mastering as preparing the finished print that will be shown to the world, with checks for loudness, metadata and final quality control.

What is harder, mixing or mastering?

Hardness depends on perspective. Mixing requires many detailed creative decisions across many tracks, so it can be more time consuming and subjective. Mastering is narrower in scope but requires a high level of objectivity and subtlety, because small changes at that stage affect the entire mix and must work on all playback systems. Both disciplines require listening skill, good monitoring and disciplined workflows.

In practice, people find mixing harder early on because it involves more moving parts. As you gain experience, mastering demands become clearer and the skills required are different rather than strictly harder.

What do you call a person who mixes and masters music?

Someone who mixes music is typically called a mixing engineer. A person who masters is called a mastering engineer. If an individual offers both services they may be described as a mix and mastering engineer, or simply an audio engineer who handles both stages. In professional contexts, many teams separate the roles to get a fresh set of ears for mastering, but solo practitioners often manage both roles for smaller projects.

How-to guide
This is some text inside of a div block.

How to Create Cinematic Sound Effects: Krotos Studio Pro 101

In this guide, we’ll explore how to craft a powerful Cinematic Impact preset using Krotos Studio Pro.

JJ Lyon
December 19, 2025
Read Story↗

Creating Cinematic Impact Sound Effects

In this guide, we’ll explore how to craft a powerful Cinematic Impact preset using Krotos Studio Pro.

Examining the Dark Entry Preset in Edit Mode

To kick things off, let's examine the "Dark Entry" preset, which features four primary layers: Hit, Bram, Pulses and Symbols, and Scream. Each layer adds its own unique character to the sound effect, from low-frequency kicks and horn stabs to motion-filled pulses and chilling screams. Combining these layers can produce a cohesive and dynamic sound, allowing for individual or simultaneous triggering via the X-Y pad.

Starting from Scratch

When building your own Cinematic Impact sound, start by loading the "Cinematic Template 01" from the preset templates folder. In thie video, we label the tabs by right clicking in the fields and typing. We chose 'hit' 'scream' 'pulses' and 'cymbals'. Add the appropriate sounds to the core engines in each tab by dragging and droppping. For instance, we added impactful sounds to the Hit layer, Bram effects to the next, and so on.

Fine tuning the Envelopes

Adjust the amplitude envelopes and randomize pitch, panning, and levels to ensure each trigger sounds unique. By layering different sounds in separate engines, you create a rich, evolving selection of sounds with each click.

Experimentation

Experiment with panning, envelopes, and trigger points to achieve the desired effect. Once satisfied, combine all layers and test the full preset. If it meets your expectations, save it for future use by selecting "Save Preset As" from the menu.

This process highlights Krotos Studio Pro's versatility in creating complex and cinematic sound effects tailored to your specific needs.

How-to guide
This is some text inside of a div block.

Explore Iconic Star Wars Sound Effects This May the Fourth

In celebration of May the Fourth, we're exploring all the whomps, zooms, and pews that make Star Wars sound effects so memorable.

JJ Lyon
December 19, 2025
Read Story↗

Ever wondered what-in-the-galaxy makes that daunting breathing sound from our old pal Darth Vader?

In celebration of May the Fourth, we're exploring all the whomps, zooms, and pews that make Star Wars sound effects so memorable.

These distinctive sounds were masterminded by Ben Burtt, a pioneering sound designer whose work  with George Lucas has influenced sci-fi sound effects for decades. Burtt's journey into sound began in childhood when his father gave him a tape recorder to play with while he was ill. This early introduction sparked a passion that eventually revolutionized movie sound design.

Join us as we explore some of the most iconic and recognizable sounds from the Star Wars universe, including lightsaber clash sounds, blasters,  and find inspiration this Star Wars Day!

Continue your galactic journey by Celebrating a Month of Sci-Fi with Krotos Studio and dive deeper into film soundscapes with our Dune Part 2 Sound ReDesign.

Crafting the Lightsaber Clash Sound Effects

Burtt set the standards for modern sound design practice by creatively manipulating real-world sounds to enhance the story on screen. This is evident in one of the most iconic weapons in film history. You know the one…

The distinct whomp and hum of the lightsaber is one of the first sounds we think of when it comes to Star Wars. Ben Burtt created this iconic sound by combining the hum of an old projector motor with the feedback from a broken television. He then recorded these sounds by swinging a microphone around to mimic the movement of the lightsabers during a duel.

Cool Fact: Each lightsaber clash in Star Wars sounds slightly different. This makes sense, right? After all, each character in the film has their own morals and goals within the story, and Burtt tailored each lightsaber clash accordingly.

Attention to detail is vital when telling stories through sound, so let’s all remember to follow Burtt’s example in our own creations!

Eager for more details about the lightsaber and lightsaber clash sounds? Check out our expanded blog here.

Forming the Star Wars Blasters Sound Effects

Can I get a pew-pew?

Much like the lightsabers, each blaster weapon in Star Wars has its own unique sonic signature. For example, Han Solo's DL-44 pistol sounds distinctly different from the Stormtroopers' E-11 blaster.

This distinction is crucial for enabling viewers to differentiate the gunfire amidst the chaos of a shootout and identify whose shots are being fired. Universally, I think we all prefer the blaster fire of the DL-44's Pew Pew over the E-11, right? #gorebellion

To create these sounds, Burtt famously recorded himself striking high-tension power cables with a wrench. He then manipulated the recordings individually to craft the arsenal of blaster weaponry for which Star Wars is renowned. More details on the blaster sound effects can be found here.

Pew-Pew indeed!

Darth Vader: The Sound of Menace

Who's your daddy?

In Star Wars, Sith lord Darth Vader takes the concept of ‘Daddy Issues’ to another level. But would he be as terrifying if that signature breathing sound were removed, leaving only the resonant and booming voice of James Earl Jones?

Vader’s breathing was actually created by Burtt himself, who breathed through a scuba regulator. He processed this sound to add depth and resonance, giving it a chilling and inhuman quality that complemented James Earl Jones’ voice perfectly. This sound, coupled with Vader’s menacing stride timed to the Emperor's march and his flapping cape, cemented Darth Vader into the history books. Well done, Mr. Burtt; you've had us in awe since A New Hope in 1977.

Star Wars Vehicle Sound Effects

One part engine, one part lion, and you've got yourself a tasty starship indeed.

From the TIE Fighter to the millennium falcon, Ben Burtt famously combined animal roars, jet engine recordings, and more to create the symphony of flight that brings Star Wars space battles to life.

He used a range of jet engines, trains, and machinery, manipulating them as the basis for many of the film's vehicles. By layering these sounds and adding echoes, he created a sense of scale and mechanical complexity while remaining rooted in the familiar.

The TIE fighter are one of the most iconic ships in the Star Wars universe.

Like other elements in Star Wars, each starship has its own distinct sound. Burtt subtly adjusted pitch, distortion, and added unique mechanical elements to make each one feel distinct. learn more about tie fighters, the millennium falcon, and more star ships from the empire strikes back and beyond here.

Star Wars Droids, Robots & Technology Sound Effects

A barrage of Burtt-branded Beeps and Boops ahoy!

The Star Wars universe is filled with science-fiction wonders, accompanied by some of the coolest sounds in the films.

Take the beloved R2-D2, for example. Artoo's charismatic tuneful beeps were created by Burtt using the ARP 2600 synthesizer, combined with his own voice manipulations.

Cool Fact: This process was also used to create the sound effects for the beloved BD-1 robot in the video game Star Wars: Jedi Fallen Order, and for many robots in between!

Yoda, Boba Fett, The Force and All the parts in-between

Yoda

Ben Burtt revealed that Yoda's vocalizations included subtle recordings of animals like pigeons and seagulls, adding an otherworldly, slightly guttural quality to his voice.

Boba Fett

The roar of Fett's jetpack is a sci-fi classic. While the exact source remains a secret, it's widely speculated that Burtt used a recording of a pressurized tank being released, slowed down and manipulated for that powerful whooshing quality.

Jedi and The Force

Where to begin! lets stick to the Pushes and Pulls synonymous with The Force infused fight scenes in Star Wars. These feature a whoosh with a subtle airy quality, followed by a deep hum and sometimes a crash for the impacted object.  This builds a sense of energy moving through the air and sudden power being exerted. We've gone deeper into The Force sound effects here.

Stormtroopers Beyond Blaster Fire

The Stormtrooper sound design is one of the most effective in Star Wars.  It perfectly conveys their faceless uniformity, loyalty to the Empire, and mechanical ruthlessness. The voices likely came from the actors themselves, recorded through walkie-talkies or filtered to provide the tinny, radio-like quality. This removes most of the natural human qualities, making them sound mechanical and anonymous.

Wookies

To create the iconic Wookiee roars, Ben Burtt combined recordings of bears (for growls and grunts), walruses (for deep, resonant roars), lions (for ferocity and power), and badgers (for whines and pained sounds).  often using sick or injured animals, as their vocalisations provided extra emotional depth and a unique quality to the Wookiee language.

Droids

The droids in the Star Wars prequels were brought to life through a mix of mechanical and synthesized sounds. They used recordings of motors and everyday metal objects for beeps and whirs, heavily processed human voices (including Ben Burtt's), as well as synthesized tones for a robotic effect. These elements were then pitch-shifted, distorted, and carefully layered to create the unique vocalizations and personalities of each droid.

The Legacy Continues

We could talk forever about the sounds of star wars, as everything in the universe sounds so iconic. We'll provide a quick rundown of some of the other most influential sounds in Star Wars, from Stormtrooper soldiers, Chewbacca, Wookiee, droid robots, the force, death star, AT-AT, Yoda and beyond.

The Star Wars universe continues to grow, even nearly 50 years after Episode IV: A New Hope. What’s even cooler is that Burtt’s original recordings remain cemented in this universe, regardless of new technologies and developments in the world of sound.

Whether the lightsaber clash is your favourite, or the AT-AT stomps, Burtt's contributions to the Star Wars universe breathe life into George Lucas’s already compelling story. In the world of sound, his legacy continues to inspire filmmakers and sound designers, reminding us that even in science fiction, the most impactful sounds can often have the most humble real-world origins.

Read More Star Wars Content

Lightsaber Deep Dive: A Closer look at the Iconic Sci Fi Sound Effect

Star Wars Blaster Sound Effects: A Symphony of Sci-Fi Warfare

How-to guide
This is some text inside of a div block.

The Smartest Way to Work with Sound Effects and Foley in 2026

Sound design has been changing. Learn about the new ways Foley and sound effects are done in 2026 and stay ahead of the industry with this advice

James Russell
October 17, 2025
Read Story↗

It’s hard to miss: the way that almost every industry works has been changing. First slowly, then fast, and then seemingly instantly – computers, digital media and then artificial intelligence have shaken up the way things are done, and the ways that people work. Whether or not you call it “a revolution”, there are many new tools and techniques on the scene.

If you blinked, you might have missed it. And so in this article, we’re going to show you how the sound design workflow looks in 2026. What tools do people use? What traditions are being abandoned? And what is staying comfortably the same? Do we at least still use coconuts for the sounds of horses' hooves?

(Photo by Nairod Reyes from Pexels)

1. Don’t Worry – Recording is Still Alive and Well

While software like Krotos Studio acts as a Foley Studio inside your computer, the art of grabbing a boom mic or a field recorder is still very viable in today’s sound design workflow.

It's becoming more apparent that as technology improves, the old techniques never truly go away; they just become more specialised, and are saved for specific jobs within a production. Think about the resurgence of film cameras, for example. We now have the choice of what to use and when to use it, with the only reason to return to older methods being an innate characteristic within a medium rather than out of necessity.

Should you spend the time and effort recording? Or should you act more quickly and use something like Krotos Studios Footstep Presets? The choice is up to you, and entirely depends on the project, your taste, and how much budget and time you've been allowed.

Pros of Recording your Own Sound

  • You can capture material that simply doesn’t exist in sound banks and VSTs
  • It can be a spontaneous act that gives unexpected results
  • You gain intimate knowledge of the sounds, giving you a better idea of how they'll be useful
  • You can record material from multiple distances and angles, using different techniques to make sure you have everything you may need from a sound source
  • Achieve a sense of realism that's not always achievable with pre-recorded sounds or plugins

Cons of Recording your Own Sound

  • Requires experience with your location, sound source, and equipment to get the most out of the recordings
  • The recordings will require clean-up and editing afterwards to make them usable, which can be a time-consuming process
  • It takes time and planning to get what you need due to limitations of the location, noise pollution, and weather, etc.
  • Equipment can break or malfunction, losing work and wasting time (the infamous and feared SD card failure comes swiftly and painfully to mind).
  • Not necessarily better than an existing sound pack or VST of the same material

2. Fixed-length Sound Effects are Too Unwieldy

The standard length for atmosphere recordings in a sound pack is roughly around three minutes, which is more often than not fit for the task, but not always. Especially if the sound would be perfect if only that darn seagull wasn’t squawking every 20 seconds, or a particular voice in a crowd would just shut up. These moments require either editing out of the recording, meaning that the recording's length will be much shorter and may need repeating, or means the almost perfect sound is going to have to be replaced.

This isn’t just an issue with longer recordings like soundscapes and atmos; this can also be an issue with one-shots and FX, such as car passes or gunshots. While a good sound pack will have multiple instances of each sound (to avoid having audible repeats of the same file if a sound is being used a lot), this isn’t always a guarantee. This can leave you with your desired sound having only a handful of takes to use, which will become distracting for the viewer unless you heavily edit the sound. Even if there are a boatload of takes of a sound, if it's being used a lot, this issue still can present itself.

A solution to this is to use VSTs or software that utilises high-quality recordings within its framework, which allows for continuous generation of atmospheres or iterations of the same sound, such as our very own Krotos Studio. The aim of the game is to create custom, for-the-purpose sounds that are repeatable and fully bespoke to whatever duration that works within your project. A more specific example of this would be Weaponiser, which allows you to layer and modulate audio quickly and easily in real time, allowing for your perfect gunshot or sci-fi sound to be repeatable and tweakable without exhausting your sound banks.

3. Ethical AI Integration could Assist Your Work

AI has certainly become THE buzzword for technology companies over the last few years, seen by its integration into everything from fridges to televisions. With the onset of generative AI destabilising the creator economy at large and being embraced by industry giants such as Coca-Cola, jobs that would have required a massive team of people only a few years ago can now be done with minimal effort and even less investment.

Understandably, AI’s use has generated a lot of pushback from creatives who feel their work is being ravenously devoured by plagiarism machines for seemingly no tangible benefit to themselves or society at large.

We want to make clear that we do not use generative AI here at Krotos, and have no intention of replacing sound designers with AI. Our own models are trained entirely on our own material and doesn’t analyse user data in any way to enrich itself. Our aim for AI is for it to act as an assistant, minimising time wasted searching for specific sounds and focusing on the important creative decisions that are the heart of sound design as an art form.

For further clarification, please read our statement on AI.

4. The Old and the New Can Go Together

The key idea we are trying to hit home with this article is that there is no need to limit yourself when it comes to working as a sound designer in the modern era, and that goes for both old and new techniques. We now have access to so many resources that you can make do with almost any setup in almost any environment, but this increase in speed and efficiency shouldn’t mean every step in the process should be the same level of effort.

Time gained through using a tool such as the city ambient preset in Krotos studio should allow you to experiment more with the unique aspects of your sound design. Try out those electroacoustic experiments you have been planning for the psychedelic trip sequence. Why not record those real-world elements that will tie that fight sequence together? Experimentation is the most fun part of sound design, and all it takes is curiosity and time.

Use what is at your disposal to create something unique. If everyone starts using the same sounds and tools for all the same jobs, then why did we ever stop using the legacy sound packs that everyone already recognises? Sound design may usually be ‘invisible’ to the viewer when it comes to foley footsteps and atmospheric soundscapes, but there is a reason so many sounds from franchises such as Star Wars have become iconic; they simply had never been heard before. So, misuse your fancy software for interesting results, use an old microphone trick, take inspiration from outdated techniques using new tools. Let's hear something new.

How-to guide
This is some text inside of a div block.

Why you Need to Improve the Sound in Your Videos Today

Discover how improving audio quality can elevate your video content. Learn tips to enhance clarity, immersion, and engagement in your projects.

JJ Lyon
December 19, 2025
Read Story↗

Getting better at your craft is usually a case of incremental performance improvements. Here’s why upping your audio game should be your next step to improve.

Whatever type of content creator you are, and whatever your technical or creative background, the sound quality in your videos is of paramount importance. When a YouTube video is uploaded in 480p, you can bet money on the top comment being about the quality of the video. People don’t like to consume videos of sub-par quality when they’re accustomed to watching other content in 1080p and above, and the same is true of audio quality.

Common audio issues include:

  1. Lack of clarity or fidelity
  2. Changes in volume
  3. Unwanted background noise
  4. Badly timed sound effects
  5. Bad sound effects altogether

It’s not always immediately obvious what’s wrong with a piece of content’s audio, but even to the layperson, poor audio quality can turn viewers off the video and off of you as a creator. With that in mind, let’s take a look at some of the main reasons why you need to improve the sound in your videos.

To Increase Clarity

Regardless of the type of content you create, if it contains any form of dialogue, it’s crucial to ensure that it’s clear and transparent throughout. This is particularly challenging if you are recording audio outdoors or in otherwise noisy environments, but that makes it all the more important to take the time to get it right.

You’ve probably come across a piece of commentary, narration or dialogue in the past where the volume or clarity fluctuates to the point that you have to constantly adjust the volume or rewind parts of the video. In which case, you know first-hand how much it can take away from the enjoyment of the content.

In order to maintain optimum clarity in your content’s audio, always record it with the highest quality equipment and settings that you possibly can. It’s also important to get the recording volume correct as this avoids clipping the signal or having to crank the gain in post, thus introducing other problems. You should also try to minimise background noise where possible, and use a wind muff on your microphone to control wind noise when recording outdoors.

To Create a More Immersive, Engaging Experience

A good game will captivate you with its audio, as well as its graphics and gameplay. A good movie will use audio in such a way that you feel as though you’re one of the characters. By the same token, you can massively enhance the immersion and engagement of your video content with professional and realistic audio.

Poor quality audio on the other hand, whether that’s music, dialogue or sound effects can hamper a video’s realism. This may prevent your audience from engaging with the video in the way you want them to. If a video is badly shot, you may be inclined to rerecord it, and sound quality should be held to the same standards.

In addition to the audio recording tips discussed in the section above, ensuring that you apply professional sound effects and foley to your videos will help to promote a sense of immersion in your content. This is not just about using high-quality sound effects, but applying them in a realistic manner too. Krotos Studio makes this particularly easy thanks to its huge library of professional-grade sound effects, and the expressive XY pad allows you to ‘perform’ your effects in real time for a more immersive audio experience.

To Heighten Drama, Tension or Peril

This next motive for improving your sound quality is particularly relevant to those working with audio for TV or film, but the idea applies to any form of content in which you want to create or reinforce a sense of tension. Tying appropriate music into your content is a great way to add a professional polish to the overall production, and can even help to make the experience more engaging and memorable for viewers too.

Take this scene from The Titanic for example, in which the ship finally splits in two. In the movie, a quiet bed of music is used to heighten the sense of peril in listeners. A minor key is used to evoke a feeling of sadness or negativity

https://www.youtube.com/watch?v=XEQ8FGXWeQ8

While the music is relatively quiet and accompanied by the sound of the ship fracturing and passengers screaming, the same clip without the music takes on a different feeling altogether.

https://www.youtube.com/watch?v=Xhjb10Og_l0

That said, the version without the music has a slightly more eerie feel to it, and in some ways could be described as more immersive as the passengers wouldn’t have had a musical accompaniment at this point. This demonstrates that it’s not only important to have music of a high quality and suitable style, but it should also be applied in such a way that it reinforces the theme and intended message of your video.

To Reinforce Emotionality

As well as being able to heighten drama and tension in your video content, music can also be used to reinforce the emotionality of a scene or theme. Again, this is not a new thing when it comes to audio for TV and film, but the likes of TikTok and Instagram are now home to huge libraries of slowed and pitched-down audio that is intended to sound more emotive.

In this video of footballer Cristiano Ronaldo after his team’s World Cup match loss, notice how the audio becomes increasingly pitched and filtered down as he becomes more emotional. Once again, music in a minor key is used to evoke a negative feeling in the listener.

https://www.tiktok.com/@futt_ronaldo2/video/7264519754931572000?is_from_webapp=1&sender_device=pc&web_id=7122420500454295045

On the other hand, music in a major key can be used when you want to create a more positive feeling that is uplifting for the listener. A great example of this is in Despicable Me 2, after the main character has a positive first date. Not only is the musical content more uplifting, the song is Happy by Pharell Williams, and the word is used liberally in the lyrics.

https://www.youtube.com/watch?v=CJ9Tdvqlo_Y

The nature of the scene in the film combined with the musical and lyrical content is a guaranteed recipe for giving the audience a sense of joy. Correctly matching the audio in your video with the context is a quick way to improve the sound in your videos. 

To Avoid Distracting Your Audience

There are some cases when video content only requires very simple or minimal audio, and you might be asking yourself how you can improve upon that. The best way to look at it is that many viewers won’t notice really good audio, but all viewers will notice really bad audio. Much of getting high-quality sound in your videos is about avoiding or removing anything that may distract the audience.

For example, when you’re watching two people speaking in a video and their dialogue perfectly matches their movement, you’re unlikely to consider that the audio and video are well-synced. However, as soon as the audio falls out of sync with the video, you can’t unnotice it and it distracts you from the rest of the video. This clip from The Lion King depicts this well.

https://www.youtube.com/watch?v=mdypP_qOVI0&t=106s

At the start of the video, the audio is correctly synced with the video, but towards the end of the video they fall out of place with one another. This makes it hard to concentrate on what’s really going on, and subtracts from the enjoyment of the experience. This is not only true for dialogue, but for inappropriately selected music, bad or loud sound effects, wind noise or other poorly-implemented audio.

FAQ

Why is audio quality important in video?

As with poor video quality, poor audio quality can devalue the authenticity and enjoyability of a video. This may stop people from continuing to watch a particular video, or from watching future videos from the same creator.

What is the importance of recording quality sound?

As well as judging videos with our eyes, we also judge them with our ears too, even subconsciously. Videos with low resolution audio, unintelligible dialogue, lots of background noise or highly variable volume can really deter from the overall quality of a video, sometimes making it difficult to watch.

How can I improve the sound quality of a video?

Start by recording with as high-quality settings and equipment as you are able to. Capturing the best quality audio at the source will make your job as a video editor and creator much easier. It’s also important to record audio at the correct volume. Take your time when editing and applying post-processing to your audio, and consider how an audience will hear it. It’s also important to use professional sound effects and music if you want your videos to be of the utmost quality.

How-to guide
This is some text inside of a div block.

How to Download Free Sound Effects and use Them in Your Projects

Looking for free SFX? Learn what to look and how to make your selections for when choosing what files and sounds to pick for your projects

James Russell
October 17, 2025
Read Story↗

Free sound effects can be a great way to add that extra layer of detail and immersion to your videos without breaking the bank. In this article, we’ll outline practices for organizing your workflow, helping you to come out with high-quality sounds for free.

What Should We Look For in Free Sounds?

If you search for sound effects without knowing the pitfalls, you could risk problems such as sounds dropping in quality, unexpected payments, viruses, or sounds mysteriously disappearing from your project’s timeline.

Intellectual Property and Copyright Issues

The first thing to look out for when using free sounds within your work is to make sure it's not infringing on anyone else’s intellectual property rights (most notably, copyright). Different sites will have different rules for what their sounds are to be used for, and may have a license that requires attribution or forbids modifications. In the case of the BBC Sound Effects Library, they may simply forbid their use in any project that’s looking to generate profit. So, read the content license and user agreement thoroughly before rushing to use a site's sounds within your work.

It’s certainly not impossible for a website to host illegal sound files from renowned sources (eg, lightsaber sounds from Skywalker Studios), so be sure that the website is reputable and not hosting illegal material. Lest you fear the wrath of a copyright lawyer from a multi-million dollar media conglomerate.

The sounds you download from our Free Sound Effects packs are free for you to use in your own productions.

Is it Royalty-Free?

Another thing to look out for is that the sounds are royalty-free; otherwise, you may be charged royalties/license fees if your work is being used to generate income on every instance of the sound's use. Some sites may be free at the point of use, but require royalties later. Make sure you’re getting your sounds from one of these 10 Best Royalty-Free Sources for Sound Effects.

The sounds you download from Krotos Studio and from our Free Effects collections are all royalty-free.

How’s the Quality?

Finally, what you should look for in free sound effects is sound quality. As a rule of thumb, WAV-format files at a sample rate of 48kHz and a bit depth of 24 bits are great for most video applications. 16 bit files will be good for most applications, too, assuming they won’t be manipulated too many times.

MP3s and other lossy (compressed) audio formats such as OGG can degrade in quality if you are exporting your video as a smaller file size, and generally are not used in professional contexts. You wouldn’t use a low-quality, compressed video file, so don’t make the mistake with audio either.

It’s possible to find WAV files at a higher resolution of 96,000kHz, which can be more useful if you’re intending to manipulate the audio files.

The Basics: Import a WAV File into your Video Project

Step 1: Drag your audio into your project media folder

Just like importing video into your editor, you should always first upload your audio into your project's media folder so that it's linked within the project file. We recommend keeping all audio assets that you intend to use within a clearly labeled folder. Just in case your project struggles to locate the source audio file, you can relocate it easily and relink it to your project.

Step 2: Drag your audio into your timeline from the media folder

This isn’t always the case, but you may first need to create an audio track within your video editor to import audio from the media folder.

Once you have done this, locate the place within the timeline you wish to import the sound to, then drag your audio file from the media folder onto your timeline.

Designing a Custom Sound Effect in Krotos Studio

We feel it's worth mentioning that we offer a 7-day free trial of Krotos Studio, in which you have access to all its features, including sound packs and presets ranging from city and nature atmospheres to Foley such as footsteps or clothing.

Step 1: Building your sound

Select a preset that best matches what you are looking for using the preset menu on the left side of the page (Foley, Cinematic, etc.). You can download a range of sound packs straight away upon opening the software to greatly increase the range of sounds available within Krotos Studio. To do this, select the library icon at the top of the page, then download whatever you may need for your project.

In this case, we want the sound of a cityscape from a distance. So we’ve selected the City preset in the Ambiences section. Using the parameters on the right side of the software, you can shape your sound to match what you are looking for. For example, since our footage is viewing the city from far away, we want more of the skyline sound rather than the traffic. So I’ve moved the point closer towards the skyline side.

Step 2: Recording your Sound

To record your sound, hit the blue start button on the right side of the window. This will record your sound until you press stop. If we wanted to gradually add more sirens or car horns, we could move the parameter while it's recording. For this example, we wanted a static atmosphere, so we left the parameters as we had set them.

Step 3: Importing your Sound

Once you have your sound recorded, you can drag and drop it straight from Krotos Studio into your video editor or DAW. Simply click and drag either the blue waveform or the white arrows to move the audio over to your editor. You can now either record another sound or another take of your intended sound if your first recording isn’t quite right.

Step 4: Foley Example

We’ll use a Footsteps preset from the Foley category as an example of how different sounds are performed using Krotos Studio. As footsteps aren’t a continuous sound, each has to be triggered by a click of a mouse (or a MIDI keyboard if you have one). We’ve also used some reverb in the ‘Quick FX’ module to add a bit more character to the walking sounds.

To record, we simply start clicking within the parameters we want – in this case, a tiled floor. The recording will begin automatically and stop after you have stopped your performance for a few seconds. Like before, to import it into your video editor, simply drag and drop the blue waveform from Krotos Studio and drop it within your timeline.

Downloading SFX from Around the Web

For this example, we are going to focus on Freesound. To download audio from Freesound, you need to create an account. This is free and doesn’t require much time, since this is a community-led website, use the opportunity to get involved and leave a nice comment on a sound you are going to use, or upload your own work.

Following the guidelines we set above, we recommend first making sure that you can use the sound. In this example, the audio is considered Creative Commons. Meaning the creator has given over any copyright to the public domain, meaning it's free to use however you like.

The second thing to check is whether or not the sound quality is up to specifications for the intended use. In this case, we will be using the sound alongside other atmospheric SFX to give the illusion of a distant thunderstorm. Therefore, we’ll likely not need to process the sound using timestretching or pitchshifting, meaning its sample rate of 48kHz is perfectly adequate.

Finally, to download, we simply hit the download sound button. This will automatically add the sound to the downloads folder, ready for use.

How to Organise your Free Sound Effects

Like we mentioned earlier, we recommend organizing your sound effects that you are using within a particular project into a dedicated folder. Therefore, if you are unfortunate enough to encounter any media problems with your project file, you can easily relink your sounds. This also goes for labeling your sounds. If they have a generic name when you download them, why not rename them to something that better describes them so you can easily locate them later? Life is too short to listen to hundreds of files labeled ‘sfx 23’ or ‘thunder 2’.

How-to guide
This is some text inside of a div block.

Creating Ambience Sound Effects With Krotos Studio

We guide you on using the ambiences sound effects presets within Krotos Studio to create realistic and immersive soundscapes.

JJ Lyon
December 19, 2025
Read Story↗

Creating a realistic and immersive experience for your audience requires ambient sound effects. These effects provide background and atmosphere, enhancing your content's depth and realism. Below, we guide you on using the ambiences sound effects presets within Krotos Studio to create realistic and immersive soundscapes. Once you’re comfortable with ambience building, explore automated generation in the AI Ambience Generator Quick Overview and move faster with Creating your first Ambience Preset.

"I've never seen anything easier and faster than Krotos Studio for tailoring ambiences and adding them to scenes."
Josh Beal, ACE - Editor (Fleishman Is in Trouble, Locke & Key, Jupiter's Legacy)

Ambience Sound Effects Presets in Krotos Studio

Krotos Studio offers a wide selection of ambience sound effects presets, ranging from natural environments like forests, beaches, and marshlands, to urban settings such as cities, suburbs, and specific locations like London Downtown and Berlin District, as well as indoor spaces like apartments, offices, and various types of public spaces including restaurants, hospital rooms, and transportation interiors, and even unique settings like submerged environments and starships. Explore all ambience presets, and watch what they include and sound like.

Why Krotos Studio for Ambiences?

Gone are the days of trawling through sound effects websites in search of high-quality ambiences. With Krotos Studio, you have a vast selection of curated Hollywood-grade ambience presets at your fingertips.

Krotos Studio eliminates the time-consuming traditional process of collecting individual sounds, then layering, editing, and looping them to build a soundscape. Instead, it generates a unique, seamless and neverending soundscape, with each sound element customisable by you. You don't have to worry about the duration of the soundscape, either. Whether you need a short sound clip or a prolonged scene, you can generate the perfect ambience for any duration.

Quadrants in Krotos Studio

Quadrants refer to the corners of the XY pads in the preset interfaces, each containing up to four types of sound effects. These contain unique sound elements packed with numerous variations. These sounds can be mixed and matched to create various ambience effects, customised to your specific project needs and duration.

1. Use a Single Quadrant

For example, in the ‘City’ ambience preset, one XY pad contains the sounds of a city skyline at the top left quadrant and traffic sounds at the bottom right, and another pad contains sirens and car horns.

To use a single quadrant, you position the dot on the XY pad according to the sound you want.

For instance, if you only need the sound of traffic, you position the dot at the corner with the traffic sounds. This will start generating a never-ending, unique stream of traffic ambience. Krotos Studio continuously records what you hear, and the sound is ready to be dragged out onto your project timeline or folder.

Tip: Placing the dot at the bottom left corner of XY pads (or where there’s no sound label) will mute all sounds from that pad. Think of it as intensity or volume control.

You can slide along the bottom of this pad to gradually increase the intensity of traffic.

A single quadrant allows you to isolate and use specific sounds from a preset. It's a straightforward way to add a specific ambience to your project.

2. Use Two Quadrants

From the above example, in the ‘City’ ambience preset, one quadrant contains the sound of a city skyline and another traffic sound. You can combine these two sounds.

Position the dot between these two quadrants on the XY pad to blend both sounds. The top right corner will blend them at their full intensity. Move the dot around the XY pad to craft the perfect sound that matches your content.

Tip: What you shape and hear is what gets recorded. You can sculpt your ambience sounds in real-time. This is great for movement or changing scenes within your project.

3. Use Three Quadrants

You can combine two XY pads. You could blend the sound of traffic from one XY pad with the sounds of sirens and car horns from another XY pad to create the ambience of a traffic jam!

Using the ‘City’ preset, for example, you can blend three layers working together for a busy city scene with police cars driving by. Once the police cars have passed by, you can move away from the sirens and return to your busy traffic soundscape.

Pro Tip: If you are working within a Digital Audio Workstation (DAW), you can load Krotos Studio as a plugin and automate the movements of the dots.

4. Use Four Quadrants

To use all four quadrants, position the dot on the XY pad to find a suitable mix between all the sounds. For instance, you can position the dot closer to the skyline quadrant for a steady city soundscape or move it closer to the traffic quadrant for street-level sounds. You can follow the same process for the sirens and horns quadrants. You use all four quadrants to create the most detailed city ambience.

The closer you position the dot to a particular quadrant, the more present that ambience layer will be. Move the dots in the XY pads up to the top right-hand corner to use all four quadrants at maximum volume and intensity.

5. Use Four Plus Quadrants

Some presets have up to four sounds on an XY pad instead of two. This allows you to create a mix of up to four sounds. You can combine these layers by moving the dot closer to the centre of the XY pad. This provides you with an even more complex and layered soundscape.

But it doesn't stop there. You can then bring in the sound effects from the second XY pad.

Top Tip: You get access to over 50 soundscape combinations from certain presets, providing a vast range of possibilities for creating the perfect ambience for your project.

With four plus quadrants, the combinations of ambience sound effects are truly endless.

6. Combining Presets

To combine presets, you drag the sound effects generated from one preset onto a track in your editing software and repeat the same from another. This allows you to mix and match sounds from different presets, creating a perfectly tailored soundscape to your project.

You could combine various presets to create unique soundscapes; for instance, blending the 'City' and 'Suburbs' presets could produce a town-like ambience, merging 'Forest' and 'Marshland' presets could result in a dense nature soundscape, or pairing the 'Countryside' and 'Suburbs' presets could evoke the ambience of a village.

Summary

Krotos Studio's Ambiences category offers an incredibly versatile and powerful tool for creating immersive and realistic soundscapes. From the simplicity of using a single quadrant to the complexity of combining multiple presets, Krotos Studio provides a vast array of possibilities for enhancing the depth and realism of your projects.

With Krotos Studio and a bit of imagination, the combinations of ambiences are endless. Explore all Ambience presets, and watch what they include and sound like.

Start your journey today and unlock the potential to create Hollywood-grade ambience sound effects in seconds.

How-to guide
This is some text inside of a div block.

YouTube Audio Library is dead

Youtube Audio library is holding you back.

JJ Lyon
December 19, 2025
Read Story↗

Still digging through the same tired sound effects everyone’s been using since forever? Come on — you’re a creator, not an archaeologist. The YouTube audio library is basically a museum at this point: old files, crushed MP3s, and sounds your audience has already heard a hundred times. If you want your edits to feel fresh, your audio can’t be an afterthought. It’s 2025 — your visuals deserve better than “generic swoosh 04.”

That’s why Krotos Studio is such a cheat code. Need footsteps? Perform them in seconds. Need a punchy whoosh, a hit, a riser, a creepy texture? Build it fast, right inside your workflow, and it’s yours — not another recycled preset from the internet. You can spend half your day searching for “good enough”… or spend a minute creating something that actually fits your cut. Your call. Try Krotos Studio for free and make every edit sound like it looks.

How-to guide
This is some text inside of a div block.

Kingsman: The Secret Service Church Scene Remade with Krotos Studio

Sound designer Molly Isaac pays homage to the iconic action scene by re-designing all of the sound effects using only Krotos Studio.

JJ Lyon
December 19, 2025
Read Story↗

In one of the most iconic moments in recent cinema, Colin Firth proved that he is a certified Badass in an action film...

Yep, this guy.

The church massacre scene from Kingsman: The Secret Service has gone down in history as one of the most exciting single-shot combat sequences in all of cinema history. Not to mention the fact that the man is a national treasure.

Our Sound Designer Molly Isaac is well-aware of this too, so she paid homage to the incredible action scene by re-designing all of the sound effects using only Krotos Studio.

...Gah, just watch it already!

The scene is full of combat sound effects, gunshots, gore and a whole assortment of additional dynamic sound effects.

Krotos Studio confidently covers all bases though, thanks to its collection of over 350 fully-performable sound effect presets. The presets included cover everything from Foley and ambiences, through to the action-packed chaos you see in the clip above.

— and this number grows bigger as we add new content every month.

Molly's awesome stop-start edit of how it was made shows you which presets are used, how they were performed, and how they sound. The results are pretty special!

Creating sound effects with Krotos Studio is as simple as:

  1. Selecting a sound
  2. Performing it on the simple, intuitive interface
  3. Dragging and dropping the sounds directly into onto your timeline
"In Krotos Studio, you can generate high-quality sounds incredibly quickly. Every time you click and create a sound, it is instantly available to drag into your project - So in a very short space of time I was able to create a really effective result!" - Molly Isaac, Krotos Sound Designer

Feeling inspired? Take Krotos Studio for a whirl with a 7-day free trial!

How-to guide
This is some text inside of a div block.

How to pan spatial audio for realistic depth and faster mixes

This guide gives a fast, practical panning workflow you can use in Premiere Pro, DaVinci Resolve or your DAW to restore realistic depth quickly, then shows where smart SFX tooling can accelerate auditioning and iteration.

JJ Lyon
December 19, 2025
Read Story↗

Spatial mixes often sound flat or confused for the same handful of reasons: everything sits on the same reverb send, pans are treated as left or right only, and editors wait until the last minute to check in mono or on headphones. That costs time, creates awkward editorial passes and makes localisation feel fake rather than believable. This guide gives a fast, practical panning workflow you can use in Premiere Pro, DaVinci Resolve or your DAW to restore realistic depth quickly, then shows where smart SFX tooling can accelerate auditioning and iteration.

Common panning mistakes that flatten spatial audio

Treating panning as a left right knob only. Many editors assume dragging a clip left or right is enough to place it. That alone affects azimuth, not distance, so distant objects still sound like they are sitting in the same room as the lead actor.

Applying identical reverb and EQ to every element, which collapses space. Sending dialogue, footsteps and distant crowd beds to the same reverb with identical settings removes the cues the ear uses to separate foreground from background.

Overwidening with stereo tricks that create phantom images or phase issues. Overuse of stereo widening, mid side hacks or extreme delays can produce unstable localisation on speakers and headphones, and often disappears or collapses in mono.

Skipping mono and headphone checks until the end. Problems that only appear in mono or on mobile headphones are expensive to fix if they surface in the delivery stage.

Misreading pan versus depth

Panning moves a sound across the horizontal plane, but distance is mostly perceived by level, direct to reverberant ratio, early reflections and high frequency content. A clip panned left at the same level and with the same EQ as foreground dialogue will still sit with the dialogue. Use level drop, low pass filtering and longer, darker reverb tails to convey distance. Think of azimuth and depth as separate axes you combine, not the same control.

Reverb and bussing pitfalls

Using a single reverb buss for everything gives a single room colour, which flattens the scene. Instead create at least two reverb groups: a tight room for foreground elements and a larger, darker send for background ambience. Adjust early reflection timing and high frequency damping per group, rather than sending everything to one setting. This preserves cohesion but keeps layers distinct. Also avoid printing heavy reverb early; keep sources dry until staging decisions are final.

Core principles for convincing spatial audio and panning

Think in three dimensions, not one. Azimuth covers left to right, elevation covers perceived height and distance involves level, spectral content and reverb timing. Treat each axis independently so you can mix them together to sell believable positions.

Use complementary cues to sell distance. Level differences, high frequency roll off, early versus late reflection balance, and reverb character all work together. Small adjustments across several cues create convincing depth more reliably than big changes on a single parameter.

Adopt object based thinking. Treat important sounds as movable objects with their own processing chain. Give each object the right amount of priority, so the ear can lock onto the important elements while the background supports the picture.

Prioritise perceptual cues over visual mimicry

The ear cares about arrival time, spectral detail and the ratio of direct to reflected sound. You do not need pixel perfect placement to convince a listener, you need to match these perceptual cues. For example, a crowd at the back of frame should be lower in level, darker in high frequencies and sit in a more diffuse reverb. That will read as distant even if the clip is not panned exactly to the visual centre.

Layering and grouping for speed

Group tracks into foreground, mid and background buses early. Apply broad processing to each bus rather than chasing dozens of individual clips. This reduces decision fatigue and makes it fast to audition different depth relationships. Use subgroup automation for quick scene moves instead of editing a hundred clips.

Use automation as a storytelling tool

Static pans feel dead. Automate movement when objects pass, when camera pans occur, or when action crosses the frame. Even subtle micro panning and level automation gives life and helps localise transient-rich sounds like footsteps and impacts.

Step-by-step panning workflow for fast, realistic mixes

The following workflow works in most NLEs or DAWs. First do the native/manual approach to understand placement, then use auditioning tools to accelerate iteration.

Prep: import, label and route tracks, keeping sources dry as long as possible. Create buses for foreground, mid and background. Label everything clearly so you can mute, solo and route quickly during editorial passes.

Anchor strategy: lock dialogue and main action in place first, using them as anchors. Once anchors are solid, place supporting FX and ambience relative to those anchors. This prevents rework when editorial changes the timeline.

Staging: make broad choices for width, elevation and depth, then refine with automation, EQ and reverb adjustments.

Setup and routing

Organise tracks by role, not by actor. Have dialogue, props, SFX and ambience lanes, and route them to corresponding buses. Keep a dry master or a pre fader bus that lets you switch between dry and spatialised versions quickly. If you work in Premiere Pro or Resolve, use submix buses or return channels for reverb and mid side processing. Good routing saves time when you need to audition alternate mixes or print stems.

Rough placement and depth staging

Block positions quickly. Pan objects roughly first, set relative levels to establish distance, then add different reverb sends for foreground and background. Use high frequency roll off to push elements back and a slight increase in pre delay on background reverbs to simulate distance. This rough pass should take minutes; the goal is to set clear relationships so you can focus on polish later.

Refine with automation and polish passes

Automate movement, level rides and micro pans for realism. For impact sounds, tighten transients with transient shapers and add a short, bright early reflection to help localisation. For moving objects, align automation to picture cuts and camera motion. Finally, use gentle mastering EQ to clear conflicts and keep headroom for the delivery spec.

How this approach works in real scenes: three practical examples

Applying the principles above to real scenarios makes the method concrete and repeatable, whether you are nailing a two person scene, a chase or building a documentary soundbed.

Dialogue scene: clarity with space

Anchor the dialogue centre and keep it dry until you have the basic edit. Route room tone and small props to a subtle room bus with a short, tight reverb, and send distant ambience to a larger, darker reverb with more diffusion. Reduce upper mids slightly on background props so they do not compete with speech, and automate small level dips during overlapping sounds to keep intelligibility.

Action scene: motion and impact

Block whooshes and impacts first, panning motion broadly and setting levels to establish foreground and mid layers. Use short pre delays and brighter early reflections for close impacts, and darker long tails for distant blasts. For fast moving elements, step out motion automation early so editors can adjust timing without re exporting many assets.

Ambience and crowds: believable depth

Split ambience into multiple beds, for example near crowd, distant crowd and room reverb. EQ each bed differently, shaving highs on the distant bed to imply distance, and keep the near bed slightly brighter. This prevents one flat atmosphere and gives you objects to move or mute when picture changes demand focus on foreground action.

Final checks before export: quick QA for spatial mixes

Before you hand over a deliverable, a short set of checks will save time and notes from clients later. Verify mono compatibility, confirm your levels meet delivery loudness and headroom targets, and audition on headphones and small monitors. Also ensure your export format and metadata match the delivery spec, including object counts versus beds and correct channel mapping.

Listen across systems

Do quick A B checks on headphones, nearfield monitors and a consumer device such as a phone or TV. Sounds that blur or disappear on one platform often indicate phase, panning extremes or an over reliant spectral element. These quick checks catch issues that a single system cannot.

Technical export sanity checks

Freeze or print automation if your delivery requires baked stems. Confirm no broken routings remain after bouncing, check file names and metadata for clarity, and ensure channel maps match the spec. A final look at headroom and loudness prevents surprises when the mix is ingested.

Where Krotos helps: speed-up, auditioning and SFX placement

After you understand the manual workflow, Krotos tools can speed up the repetitive, time consuming parts: finding the right whoosh, matching a set of footsteps across surfaces, or generating layered ambience variants so you can audition options in context without hunting through libraries.

Rapidly generate and audition relevant SFX categories, such as whooshes, footsteps and ambience, to reduce library hunting. Rather than pulling dozens of files, you can produce matched variants that share tonal character, making consistent panning and depth decisions easier.

Create grouped, editable stems or objects that slot into your spatial staging without destructive commits. This keeps your workflow flexible for editorial changes, and lets you export ready to drop assets for timelines and stems for final mixes. Audition variations in place, tweak parameters and export only the selected stems, saving iteration time.

When AI is part of the workflow, Krotos focuses on tools that support your creative decisions, not replace them. The aim is to provide reliable, editable outputs you can refine, with clear provenance for sourcing and no ambiguity about what was generated versus recorded. That helps maintain ethical standards and keeps you in control of the final sound.

Try it yourself. If speed and iteration are priorities, download a free trial to explore presets, example sessions and SFX packs that illustrate the workflows here. Join the Krotos community to share tips, grab ready made libraries and pick up producer created session files to practise on your timeline.

Frequently asked questions

What does panning do in audio?

Panning positions a sound along the horizontal plane between left and right channels. In stereo it moves the perceived direction of a source by altering level and timing between channels. In immersive formats, panning also includes elevation and depth cues, creating a three dimensional placement.

Panning alone does not create distance. To suggest a source is nearer or further away you need to combine panning with level changes, spectral shaping and appropriate reverb or early reflection settings.

Is spatial audio better or worse?

Spatial audio is not inherently better or worse, it is a different tool for different goals. It is better when the aim is immersive, believable placement and motion, particularly for film, VR and game work. It can be worse if applied without thought, because poor spatialisation exposes phase, masking and mono compatibility issues.

Choose spatial formats when they add story value, and always validate mixes across the delivery systems your audience will use. Good process and checks make spatial audio a reliable creative resource.

What is spatial audio used for?

Spatial audio is used to place sounds in three dimensions, improving immersion and helping listeners localise events in a scene. It is common in film and TV mixes, interactive media such as games and VR, and platforms that support object based audio like Dolby Atmos.

Practically, it is used to separate dialogue from ambience, place moving effects across a soundstage, and create depth in environmental beds so that listeners feel surrounded rather than listening to a single plane of sound.

What is the panning rule in audio?

A practical panning rule is to treat panning as one of several localisation tools. Pan for azimuth, use level and EQ for distance, and reverb for space. Prioritise the most important element, usually dialogue or focal action, and make other elements support it without masking.

Also check mixes in mono and across playback systems to ensure your panning choices are stable. Keep automation tidy and non destructive so editorial changes can be accommodated without redoing complex routing.

How-to guide
This is some text inside of a div block.

Exploring Iconic Star Wars Sound Effects: Starship SFX

Have you ever wondered how those epic space battles in the George Lucas created Star Wars saga come to life?

JJ Lyon
December 19, 2025
Read Story↗

Exploring Iconic Star Wars Sound Effects: Starship SFX

Star Wars Starship Sound Effects: A Deep Dive Into Our Favourite Galaxy

Hey there, Sci-Fi fans! Have you ever wondered how those epic space battles in the George Lucas created Star Wars saga come to life? Well, a huge part of the magic lies in the starship sound FX. Whether it's the iconic hum of a lightsaber, the breathing of Darth Vader, or the menacing roar of a Tie Fighter, these sounds play a crucial role in immersing us in a galaxy far, far away.

From the whoosh of a starship passing by to the pew-pew of blaster Fire, these SFX are carefully crafted to bring the epic battles of Star Wars to life. And let's be real, who doesn't get chills down their spine when they hear the unmistakable sound of a Tie Fighter zooming across the screen?

Star Wars Tigh Fighter

Besides the cool spaceship designs and epic battles, one thing that really brings the Star Wars universe to life is the iconic SFX. laser fire, lightsaber hum, to the roar of a Tie Fighter zooming by, these sounds are just as important to the franchise as the characters themselves, whether from Lucasfilm, Disney, the original trilogy, the prequels, sequels video games, cartoons...gosh the list is endless now I think about it.


But have you ever stopped to wonder how these out-of-this-world sound FX are created? lets explore the world of starship Sound FX, where sound FX editors and soun designers work their magic to bring these fantastical spacecrafts to auditory life.

While each starship in Star Wars has its own unique sound, Sound Designer Ben Burtt followed a few core principles when designing them. Let's a take a closer look at some Star Wars sound effects, this time, the iconic sounds of the starships in this iconic universe of lightsabers, weapons, droid robots, electronic beeps and boops and beyond.

Movement and Power

Real world engine sounds are the backbone of the starship. Burtt often started with the sounds of real-world jets, trains, or powerful machinery, manipulating them for that otherworldly feel. he'd then layer these with animals, such as bear or walrus calls.

star wars battle scene

Realism with a Sci-Fi Twist

Even in the depths of space, Burtt grounded the sounds in reality. Layering different old motor vehicle sounds and adding echoes created a sense of scale and mechanical complexity while staying rooted in the familiar. We see this in the sounds of r2-d2, jedi force power, even in the scuba breathing apparatus of Darth Vader's breathing.

Personality Through Sound

Each starship has its own voice. Burtt subtly adjusted pitch, distortion, and added unique mechanical elements to make them feel distinct. Speed and power is channeled through every ship and this philosophy became the basis of many of the sounds of Star Wars.

X-Wing Star Fighter

x wing star ship star warsThe X-Wing's iconic shriek is likely derived from jet plane motor recordings, heavily manipulated and pitched higher. Burtt often added a subtle Doppler effect, enhancing the sense of speed and maneuverability. To achieve a unique texture, he particularly used the sound of a P-51 Mustang, an American World War II Fighter aircraft, combining these with other recorded mechanical noises to give the X-wings a distinctive presence in the movies.

TIE Fighter

The TIE Fighter's menacing scream goes beyond powerful flight. Burtt blended animal roars into the mix, creating an aggressive, unsettling whine that perfectly reflects the Empire's ruthless power.

The unique screeching sound was achieved by combining an elephant call with the sound of a car driving on wet pavement. This blend of natural animal noise and a mundane human-made sound created the eerie and aggressive scream of the TIE Fighters, making them distinctly unsettling and instantly recognizable in the Films

Millennium Falcon

Your favorite hunk of junk has a surprisingly complex soundscape. There's a deep, throaty rumble at its core, reminiscent of the sound of cars, large trucks and machinery , but also a higher-pitched whine and occasional rattles that hint at its unreliable, cobbled-together nature.

The primary sound of the Millennium Falcon's hyperdrive malfunction was produced by capturing the inertia starter of an old biplane, speciFically an aged aircraft with a uniquely grating mechanical sound. This gave the Falcon's hyperdrive its memorable failing sound that added to the tension and character of the ship in key scene

Star Destroyer

These massive capital ships don't just move, they rumble with might. They sound deep, full of echoing roars, incorporating slowed-down recordings of very large machinery, explosions for that immense feel.

Beyond the Core Fighters

The galaxy is filled with even more incredible-sounding spacecrafts. And While Burtt hasn't given every secret away, it's good to put our design skills and an analytical ear to the test, to see if we can identify some similarities and suggest some ideas to explore in our own designs.

Slave I

Featuring a distinctive rhythmic pulse, it likely incorporates a combination of percussive mechanical sounds and a deep hum, giving it a unique, intimidating presence.

Naboo Star Fighter

These sleek ships have a high-pitched, almost ethereal engine sound, suggesting advanced technology and an emphasis on speed and elegance.

Podracers

The high-pitched whine of their engines evokes high-speed turbines, mixed with a crackling, almost electrical quality for added intensity

The Legacy of Starships

Ben Burtt didn't just create the sound of what we hear – he created sonic identities. Every roar, whine, and whoosh tells a story of the ships themselves and the factions that wield them. His work is a testament to the brilliance of how transformative sound can be, taking us on journeys across the galaxy without ever leaving our cinema seats to be immersed in the electronic ambiences of the ship interior; the ominous scream of the battleships and more. So if you are looking to replicate these iconic star wars sound effects, try some of these tips out, by exploring your own sound effects libraries, or venturing out with a microphone into your own universe of sounds. You just might capture something incredble!

To understand cinematic world‑building, revisit Celebrating a Month of Sci-Fi with Krotos Studio. You can also explore a wide range of assets in our free sound effects library.

How-to guide
This is some text inside of a div block.

Enhancing Nature Videos With Ambience Sound Effects from Krotos Studio

Discover how ambient sound effects transform nature videos into immersive experiences. Sign up for Krotos Studio to access unique royalty-free sounds.

JJ Lyon
December 19, 2025
Read Story↗

In the realm of nature videos, travelogs and documentaries, ambience sound effects play a pivotal role in transporting viewers into the heart of the natural world. These subtle yet powerful sounds are the unsung heroes that breathe life into visual storytelling, turning mere footage into an immersive sensory experience.

The rustling of leaves in a dense forest, the gentle lapping of waves on a secluded shore, or the distant calls of wildlife in a savannah – each of these ambient sounds enriches the narrative, adding depth and authenticity to the visual spectacle. They create a sense of place, evoking the atmosphere of the environment being showcased and enhancing the emotional impact on the audience.

Without these nuanced layers of sound, the majesty and intricacy of nature's landscapes would be diminished, leaving the visuals feeling flat and disconnected. In essence, ambient sound effects in nature documentaries are not just about hearing the environment; they are about feeling present within it, fully experiencing the awe and wonder of the natural world.

This video, created by Era VP, captures this very notion. The video captures glimpses of the natural world that we often slip by in day-to-day life. By adding ambient sound effects to the footage, you are suddenly experiencing the imagery captured in a way that is more present and immersive.

Simple and effective projects like this can be brought to life using Krotos Studio's ambiences category.

Refine outdoor ambience further wth our tips on Creating Forest Ambience Sound Effects in Seconds and contrast your tone by Creating City Ambiences.

Sign Up For Free

Stop spending hours searching, editing, and layering sound effects. Now you can effortlessly shape unique royalty-free sound effects from an ever-growing choice of scenarios. Sign up for free today!

How-to guide
This is some text inside of a div block.

Create sound effects for games with faster workflows

Quick workflows to craft usable sound effects for games — foley, whooshes and ambience you can export to Unreal, Unity or middleware like FMOD

JJ Lyon
December 19, 2025
Read Story↗

Sound Effects for Games: A Practical Guide to Sourcing, Designing and Shipping SFX

If you’ve ever searched for sound effects for games, you’ll know the experience:

Six tabs open. Three “free” libraries that aren’t quite free. A forum thread from 2014. Someone arguing about sample rates. And you still don’t actually have the sounds you need.

This guide is here to simplify that.

Whether you’re building in Unity or Unreal, working with FMOD or Wwise, or just trying to get something playable into a build without your CPU staging a protest, this is a practical walkthrough of how to find, adapt and ship SFX faster, with fewer licensing headaches and a workflow that doesn’t collapse under its own ambition.

We’ll cover what you actually need, where to get it, how to integrate it, and how to optimise it so your game sounds good and runs properly.

No mysticism. No theory for theory’s sake. Just usable steps.

What Are the Essential Types of Game SFX?

Before you download a 40GB “Ultimate Everything Pack”, it helps to know what you’re looking for.

Most games rely on a handful of core SFX categories:

  • Foley: footsteps, cloth movement, object handling
  • Impacts and interactions
  • Whooshes and transitions
  • UI sounds
  • Ambience and environmental layers
  • Creatures, vocals and character elements
  • Procedural or generative elements for variation

That’s the backbone of most game audio design. The specifics vary by genre, but the structure tends to repeat.

If you’re working quickly, clarity here saves time later. You’re not hunting for “cool sounds”. You’re solving functional problems in the mix.

Where to Get SFX: Free vs Paid

There’s no shortage of video game sound effects online. The issue isn’t availability, it’s quality, consistency and licensing clarity.

A Quick Checklist Before You Download Anything

When evaluating a sound library or sample pack, check:

  • Audio quality and noise floor
  • Clean loop points where relevant
  • Sensible metadata and tagging
  • Clear licence terms
  • Available formats and sample rates

If the licensing page reads like a legal escape room, that’s usually a sign to step back.

Free libraries can be useful for prototypes and placeholders, particularly for UI sounds or simple ambience layers, but they often lack consistent recording quality or structured metadata. That becomes painful at scale.

Paid libraries and professional sound libraries tend to offer:

  • Higher recording standards
  • Better organisation
  • Loop-ready assets
  • Fewer “mystery files”
  • Clearer usage rights

And if you’re building something commercial, licensing clarity matters. Royalty-free does not mean lawless.

For teams who need speed and control, tools that let you design and customise SFX rather than endlessly browse static files often save more time than another marketplace search. That’s where structured sound design tools come into their own, especially when you’re iterating rapidly and need variation without manual editing for every single asset.

Formats, Bit Depth and Sample Rates for Games

This is where people either overthink things or ignore them entirely.

For most modern workflows:

  • 24-bit WAV is a safe master format during production
  • 44.1kHz or 48kHz is standard, depending on your project settings
  • Compressed formats (like OGG or platform-specific codecs) are typically handled at engine level

Use WAV for editing and integration. Let the engine or middleware handle compression where appropriate.

Higher sample rates are not a personality trait. They’re a decision based on target platform, performance and memory constraints.

Organisation: Tagging, Naming and Not Hating Yourself Later

A clean library workflow is one of the least glamorous but most powerful things you can do for your game audio.

Use consistent naming conventions. Include category, descriptor and version where relevant. Keep folder structures predictable. If you’re working in a team, agree on conventions early.

Metadata is your friend. If your engine or middleware supports tagging and search, use it properly. Searching for “footstep_concrete_light_v2” is a lot nicer than opening “audio_final_FINAL3.wav”.

It’s not thrilling, but it saves hours over the life of a project.

Integration: Unity and Unreal (High-Level Workflow)

Once you’ve sourced your SFX for games, they need to live somewhere sensible inside your build.

Unity

In Unity, the process is straightforward.

Import your audio assets into the project folder, configure import settings according to your target platform, then assign them to Audio Sources within your scene or prefabs. From there, route them through mixer groups to control levels and apply shared processing.

Pay attention to spatial settings for 3D positional audio, particularly rolloff curves and max distance. Poor attenuation settings can undo good sound design surprisingly quickly.

Unreal

In Unreal, imported sounds can be turned into Sound Cues, where you can define playback logic, randomisation, layering and attenuation.

Even at a high level, understanding that Unreal separates raw audio files from cue logic is helpful. It encourages variation and control rather than one-file-per-event thinking.

Concurrency settings are also important. Without them, you may discover that 200 overlapping footsteps are technically possible, but not advisable.

Using Middleware: FMOD and Wwise

If you’re working with FMOD or Wwise, the workflow becomes event-driven.

You create events, assign SFX to those events, and use parameters to control behaviour dynamically. This is where adaptive and interactive sound effects really shine. You can vary pitch, intensity, layering or filtering based on gameplay variables without exporting multiple static files.

Even at a basic level, middleware allows:

  • Controlled randomisation
  • Layer switching
  • Real-time parameter changes
  • Cleaner separation between design and implementation

You don’t need to use every advanced feature on day one. Start with simple event structures and controlled variation. Expand as the project grows.

Procedural and Generative Audio: Quick Wins

Repetition is one of the fastest ways to make a game feel small.

Simple procedural techniques, even subtle pitch variation or layered one-shots triggered randomly, can dramatically reduce fatigue. Instead of exporting 12 near-identical files manually, you can design variation into the playback logic itself.

This is particularly useful for:

  • Footsteps
  • Gunshots
  • UI interactions
  • Environmental loops

You don’t need a fully generative system to benefit. Small layers of variation go a long way.

Looping, Layering and Variation Techniques

Seamless loops are essential for ambience and environmental beds. Always test loops in-engine, not just in your DAW. Context changes perception.

Layering adds richness without increasing repetition. A single impact might combine transient, body and tail layers. Adjusting balance or swapping one layer can create multiple believable variants from a shared structure.

Avoid obvious repetition by:

  • Using multiple similar assets
  • Introducing timing variation
  • Combining layers with slight pitch or filter differences

Players notice repetition faster than you think.

3D Positional and Spatial Audio Basics

Good spatial audio supports immersion. Poor spatial audio distracts.

Use 3D positional audio for in-world sounds and keep UI or non-diegetic elements appropriately anchored. Test attenuation curves in real gameplay scenarios rather than isolated test scenes.

Be mindful of performance. Not every sound needs full spatial processing. Prioritise what the player needs to localise.

Audio Optimisation and Performance

File size, memory and CPU usage matter, especially on mobile or VR.

Optimisation strategies include:

  • Using compression where appropriate
  • Limiting simultaneous instances with concurrency settings
  • Streaming longer ambience files
  • Reducing unnecessary stereo assets to mono where spatialised

Profile your build. Guessing is not optimisation.

Mixing, Mastering and Loudness for Games

Balancing SFX with music and dialogue is ongoing work, not a final checkbox.

Establish relative level ranges early. Keep headroom for unexpected layering. Test on multiple playback systems. What sounds punchy on studio monitors may be aggressive on small speakers.

Loudness standards vary by platform, but consistency and clarity matter more than chasing numbers.

Licensing and Legal Considerations

When using third-party sound effects for games, clarity is essential.

Royalty-free typically allows commercial use without per-sale fees, but may restrict redistribution of raw files. Creative Commons licences vary significantly. Some require attribution. Some restrict commercial use.

If you’re unsure, check the licence terms directly or seek clarification before shipping.

For teams working professionally, using clearly licensed libraries or creating your own assets reduces risk significantly. It’s not glamorous, but it avoids unpleasant emails later.

Test, Iterate and Get Feedback

Playtesting should include sound checks.

Watch how players respond. Are important cues clear? Is anything fatiguing? Does repetition become noticeable over longer sessions?

Telemetry can help identify over-triggered events. Player feedback, even informal, often highlights issues you’ve tuned out.

Iteration is normal. Silence is rarely the solution, but refinement usually is.

Ready to Move Faster?

If you’re searching for sound effects for games, you likely want two things: quality and speed.

The right libraries, clear licensing, structured integration and lightweight optimisation workflows make that possible. Whether you’re prototyping an indie project or scaling a team, having tools that let you generate, customise and integrate SFX quickly can make a measurable difference to your production time.

Try a sample pack or start a free trial, get SFX into your build in minutes, and spend less time browsing tabs from 2014.

Your game will sound better for it. And you might finally close a few of those tabs.

How-to guide
This is some text inside of a div block.

How to Create Ambience Sound Effects: Krotos Studio Pro 101

Follow along in this tutorial to understand how ambience presets can be designed and operated in Krotos Studio Pro.

JJ Lyon
December 19, 2025
Read Story↗

Follow along in this tutorial to understand how ambience presets can be designed and operated in Krotos Studio Pro.

Building a basic ambiences preset

Here’s a simple step by step to creating your own Ambience preset, using your own sounds in Krotos Studio.

  1. In the hamburger menu, click load factory presets, open the preset templates folder and select ambience template.

This template comes with the performance area pre-mapped in the same layout as many of the factory ambience presets. There are two XY pads, with two layers on each pad. The modulation is pre-assigned to the volume parameters of each layer, enabling you to control the balance by moving the puck around in the XY pad. Layer 1 is mapped to the Y axis, Layer 2 to the X axis of the first pad, and layers three and four are mapped in the same way on the second pad. This enables you to control the volume of each layer separately, or blend them together.

Note that this preset uses the Granular core engine in all 4 layers. Note trigger is disabled, and loop and autoplay are already enabled. These settings are important for a smooth and infinitely repeating soundscape.

Building a city preset

Let’s re-create the city preset with some custom sounds to demonstrate the process, then you can replicate this with whichever layers you want to use for your own project. We have skyline, traffic, sirens and horns across the 4 layers here. Let’s find something similar…

  • Search for ambience, drag to layer 1

With each new layer I add, I rename the tab to match the sound content. This enables me to have a clearer overview of which sounds I have added, and where they are located.

  • Search for traffic, drag to layer 2

The traffic here is a little rumbly, so I have adjusted the pitch slightly to mix it better with the ambience layer

  • Search for helicopters, drag to layer 3
  • Search for walla, drag to layer 4

I’ve chosen samples that are relatively long and consistent, which will give the Granular engine some flexibility to work with. Now, when I move across the axes in the XY pads, I can blend seamlessly between the layers, and my performance is captured automatically.

When in the DAW, I can assign each of the four layers to record out to their own track, enabling me to fine tune the individual layers afterwards.

The ambience template

…There you have a basic Ambience triggering preset. Hopefully you have been able to follow along and build an Ambiences preset from your own library of sounds. Try to experiment with some other parameters too!

Ideas to try when designing ambience sound effects with Krotos Studio Pro

Dragging the pitch parameters to a macro dial to control the pitch of your Ambiences.

Add another surface to a sampler and map the volume to a macro dial, to add in additional texture

Creating an Ambiences preset from a template

This template is set up to allow you to create your own version of the Krotos Studio Ambiences workflow.

The essence of an ambience preset is that the layers begin to play back automatically. You do not need to click inside the XY pad to trigger the sounds like you might for a footsteps preset, for example. Instead, the XY pads act as mixers between elements of an ambient soundscape. This is achieved through the Autoplay functionality.

Exploring an Existing Preset

The ‘Quiet Village’ preset consists of two 4 zone XY-pads in the performance view, with three sounds in each. Below we show how many combinations can be achieved from a single preset.

Mixing Layers

Mute

Just Bells (1 Layer)

Bells and Birdsong (2 Layers)

Bells, Birdsong and Wind in the threes (3 Layers)

Bells, Birdsong, Wind in the Trees, Activity (4 Layers)

Bells, Birdsong, Wind in the Trees, Activity, Water Fountain (5 Layers)

Bells, Birdsong, Wind in the Trees, Activity, Water Fountain, Car Passbys (6 Layers)

By combining 6 layers in this way, there are up to 720 permutations that you can achieve from a single preset.

You will notice that the bottom left corner of each pad is left empty. This is done to to mute the entire XY pad if you wish. Position the pucks in the empty corners, and the sound will be muted.

Want to learn more? Check out our other tutorials

How to create an ambience Preset

How to create a footsteps Preset

How to create an advanced footsteps preset

How-to guide
This is some text inside of a div block.

How to speed up sound design in DaVinci Resolve

This guide shows a repeatable Fairlight workflow that keeps picture-locked editors moving and helps sound designers work faster & cleaner.

JJ Lyon
December 19, 2025
Read Story↗

Sound design in DaVinci Resolve can either be a secret weapon that lifts a picture into filmic territory or a time sink that leaves editors replaying the same two clips while the deadline creeps closer. Common problems include chaotic project structure, fiddly clip-by-clip processing, and endless hunting for the right whoosh or footstep. This guide shows a repeatable Fairlight workflow that keeps picture-locked editors moving and helps sound designers work faster, cleaner, and with output that plays nicely with mixers and game engines.

We start by diagnosing the ways Resolve projects stall, then switch to a plan-and-layer method you can adopt immediately. Later you get a concrete Fairlight step-by-step, three adapted project examples, a final export checklist, and a practical look at how Krotos tools plug into this workflow without replacing craft. If you want templates or starter libraries, there is a quick CTA before the FAQ.

Why sound design in Resolve often stalls (and the usual mistakes)

Projects slow down because small inefficiencies cascade. Editors open timelines with no track or template system, drop clips in without naming or colour-coding, and rely on clip-based fixes that are hard to replicate. The result is a project where you cannot quickly audition alternate Foley takes, or hand off stems to a re-recording mixer without confusion. People also process individual clips with heavy EQs and effects instead of using buses, which multiplies work and creates inconsistent tone across scenes. Hunting through folders or multiple libraries for one-off SFX eats minutes that become hours. Sync issues follow when sample rates or frame rates are mismatched, and handover exports fail because nobody ran simple QA checks for phase, levels, or clicks.

Resolve's flexibility is brilliant, but it rewards discipline. If your session has no consistent naming, no buses, and no stems plan, you will waste time. On the other end, over-processing individual clips splinters your tonal control and makes later mix changes painful.

Typical time sinks

• Searching dozens of folders for a single impact or ambience track, copying and reformatting it manually.

• Making small clip-based fades across dozens of short edits instead of applying automation or template fades.

• Re-exporting stems because export sample rate or bit depth did not match the deliverable spec.

• Repeating the same EQ settings on multiple clips rather than processing on a bus, so changes require touching each clip.

• Fixing sync drift because the timeline, clip, or project frame rate was inconsistent.

Those small tasks are manageable one at a time, but they add up fast. Create a checklist and a template and you recover those minutes.

Audio mistakes that sound bad but look innocent

• Excessive EQ on individual clips. It seems precise until you play two scenes back to back and the tonal jump screams. Use subtractive EQ on buses, not clip-by-clip surgical boosts.

• Misrouted effects, for instance inserting a reverb directly on every Foley clip rather than using sends. This multiplies CPU load and makes wet/dry balance impossible in context.

• No crossfades between edits. Short pops, clicks, or abrupt edits vanish with short crossfades or shape-aware fades, but people sometimes neglect them because they "look fine" in the editor.

• Using clip-based fades rather than automation. Clip fades are static and become awkward when audio range changes; automation lets you adapt dynamically across a scene.

• Ignoring phase and mono compatibility checks until the final mix. A stereo ambience bed may cancel badly in mono if you do not verify early.

Spotting these mistakes early saves time, and prevents you handing over a session that a mixer has to rebuild.

The better approach: plan, standardise and work in layers

Work from a template that enforces naming, routing and colour coding from the outset. Standardisation does not stifle creativity, it frees it by removing busywork. Create dedicated buses for dialogue, Foley, ambience, atmos, SFX and music. Route clips to these buses and do most processing at the bus level, keeping clip edits surgical and non-destructive. Prefer automation and sends for level changes and spatial effects rather than baking effects into lots of clips. Build reusable presets for EQ, compression and common reverb/delay chains, and maintain a quick-search library or cue sheet for frequently used SFX categories.

Think in stems from the beginning. If the project will require stems for picture editorial, broadcast, a re-recording mixer, or game middleware, prepare those tracks and routing early so you avoid last-minute re-renders.

Why templates save time

A good Resolve/Fairlight template contains pre-coloured tracks, track naming conventions, bus routing, common plugin chains on buses, a marker template for cue points, and a bin folder structure for SFX categories. When you open a new project you can immediately drop dialogue, lay a rough Foley pass, and use search-friendly bins to find the right impact or whoosh quickly. Templates reduce cognitive load: instead of deciding where to put each clip you follow a proven layout. That means faster rough passes, more consistent mixes, and far fewer export headaches when handing over stems or delivering for broadcast.

Templates also let you standardise loudness targets and session metadata, so every project starts on the same technical footing. You will thank yourself on delivery day.

Step-by-step Fairlight workflow to create fast, consistent sound design in Resolve

This section gives a practical, repeatable sequence for working in Fairlight so you can produce professional-sounding results without losing your deadline. The workflow assumes picture lock or near picture lock. If you still expect picture changes, keep edits destructive-light and avoid final renders until the last pass.

Begin with careful project setup, then create a fast rough pass to anchor dialogue and temp SFX. Layer Foley, ambience and whooshes in order of importance, use automation and buses for tonal control, and export stems with clear naming and correct metadata.

Project setup and organisation

Open Resolve project settings and confirm timeline frame rate, sample rate and timeline resolution. Common standards are 48 kHz sample rate for video and 24-bit depth for stems, but match any client spec. Name the project and timeline with the production code and scene information to avoid confusion later.

Create bins for Dialogue, Foley, Ambience, SFX, Music and Reference. Inside those bins, subcategorise SFX into Whooshes, Impacts, Footsteps and Crowds. Colour-code tracks: dialogue in one colour, Foley in another, ambience in a soft tone, SFX bright for visibility. Pre-create track presets for stereo ambience, mono Foley and stereo music, including default clip gain and fade durations. Add marker tracks for editorial notes and cue points.

Set up buses: DIALOGUE bus, FOLEY bus, AMBIENCE bus, SFX bus, MUSIC bus and MASTER bus. Route each track to its respective bus rather than directly to the master. Save this as a template for future sessions.

Editing, layering and shaping SFX

Start with a quick rough pass. Lock picture and lay down a temp SFX pass: basic footsteps, essential impacts and a bed of ambience. Keep it rough and focused on timing and energy. Replace the temp SFX with polished layers by category: first Foley for lip and body contact, then primary SFX like gunshots or door slams, finally whooshes and transitional sounds.

When editing, use the clip trim tools and quick crossfades. Aim for short fades on hits and longer, shaped fades for ambience. Use clip gain to set relative levels before touching bus processing. Time-stretch or slip-edit sparingly; prefer replacing the clip with a better-timed sample if possible. Layering rules: never use more than two strong midrange elements at the same spot, let one element dominate and others support texture and stereo width. Use EQ on clips for surgical problems, and reserve bus EQ for tonal shaping across the category.

Use automation lanes on buses for movement, and save automation snapshots for scenes with repeatable dynamics.

Mixing, bussing and exporting stems

Apply gentle bus processing rather than many instances on clips. For example, a DIALOGUE bus might have a low-cut, transparent de-esser, and a light compressor. FOLEY and SFX buses might share a transient shaper or saturation. Use sends for ambience reverb so you can balance wet/dry centrally.

When preparing stems, mute buses you do not want and export each bus as a separate stem. Choose consistent formats such as WAV 48 kHz 24-bit or client-specified formats. Add metadata, timecode and a descriptive filename that includes project code, scene, stem type, sample rate and bit depth. Export a stereo master and isolated stems for Dialogue, Foley, Ambience, SFX and Music. If delivering for a game engine, confirm any required channel layouts or naming conventions used by middleware like FMOD or Wwise.

Run a simple checklist before export: confirm sample rates, check no clipped regions, verify bus routing, and ensure all muted or bypassed plugins are intentional. Then render.

Three real-world projects: short film, fast promo and game cinematic

Different projects need slightly different priorities. The overall workflow is the same, but the allocation of time and the focus of processing changes with scope and deadline. Below are three concise templates for prioritisation.

Short dialogue-driven film (polish first)

When the narrative hinges on dialogue, spend time on repair and clarity. Start with noise reduction on problem clips, spectral repair where needed, and breath/tick removal. Build layered ambience beds that support the scene without competing with speech. Foley should be clean and tightly edited to sync with performance. Use multiple ambience layers for movement and depth, and automate subtle EQ moves to keep the dialogue present through scene changes. Export stems for a re-recording mixer: dialogue grouped separately, ambiences and Foley in their stems, plus a premixed stereo for reference. Add detailed session notes and cue sheets so the mixer understands context.

Quick promo/YouTube (fast turnaround)

Speed and impact trump deep polish. Use your template, import existing SFX libraries, and make a one-pass bus process: quick de-essing on dialogue, broad bus compression on SFX and a single ambience bed looped and automated for energy. Replace only the most obvious temp SFX. Keep the headspace tight, ensure the loudness meets platform targets and export a single stereo mix plus optional music-free stem if requested. Skip deep spectral repair unless acutely necessary. The goal is a clean, punchy deliverable that sounds professional but is fast to produce.

Game cinematic/trailer (middleware-ready)

Trailers and cinematics often need discrete stems and tightly labelled assets. Prep stems by category and export in consistent lengths with timecode burn or filename time offsets. Use descriptive, middleware-friendly naming like project_scene_stemtype_variant_v01. Deliver ambiences in loopable formats and include dry and wet versions of key impacts for audio programmers. Provide a simple cue sheet that lists sample start times, intended usage, and any sync notes. If the cinematic will be implemented dynamically, include alternate variations and metadata that helps programmers randomise or layer assets in engines like Unreal or Unity.

Final checks before export and delivery

Before you hit render, run through a composed final checklist. Aim to catch errors that are easy to fix now but costly later.

First, level and headroom checks. Confirm dialogue peaks sit comfortably below clipping, with reserved headroom of at least 3 dB for stems and a true peak target that matches delivery specs, often -1 dBTP. Verify loudness targets for the platform, such as -16 LUFS for stereo web delivery or client-specified broadcast targets.

Next, phase coherency and mono compatibility spot-checks. Solo pairs of stereo tracks in mono at a few points to ensure no dramatic cancellation. Walk the timeline in mono to find unexpected disappearances.

Check sync and edit slopes. Scrub picture and audio at cuts where hits and footsteps land. Pay attention to edit slopes and crossfades; a punchy impact needs a short fade, ambience benefits from longer, shaped fades.

Confirm render settings and sample-rate consistency. Make sure the project sample rate matches the exported stems and the file naming tells the recipient everything they need. Use descriptive file names with project code, scene, stem type, sample rate and bit depth.

Finally, archive the session. Export a project backup, consolidate used media into an archive folder, and produce session notes or a cue sheet listing stems, timecodes and important plugin settings. Store a quick README with naming conventions used and any relevant middleware instructions.

Where Krotos fits into a faster Resolve workflow, and ethical guardrails

Krotos tools and libraries are not a magic wand to replace craft, but they are a practical accelerator. Instead of spending 30 minutes searching multiple libraries for a whoosh or building dozens of variants by hand, Krotos tools can help you generate and audition variations quickly, create layered impacts or ambience beds that slot into your buses, and export ready-to-use stems that respect your session structure. Use them as a collaborator to fill beds, make rapid alternates for clients, or create stylistic SFX that would otherwise take hours to assemble.

Practical places to use Krotos include prepping ambience beds for a scene, rapidly creating whoosh families for editorial to choose from, and generating multiple impact variations to hand to a re-recording mixer. Keep the human in the loop: use generated sounds as starting points, then shape and place them with your mixes and automation so they serve the picture.

Practical spots to plug Krotos into your session

• During the rough pass, generate quick variations of whooshes and impacts to replace temporary sounds and help editorial pick the right energy.

• To prepare ambience beds, assemble layered textures with slight variations in timing and spectral content, export them as stems and drop them into your AMBIENCE bus.

• Create alternative Foley or impact variations and label them clearly in bins so you can swap them without hunting multiple

How-to guide
This is some text inside of a div block.

Developing new music production software for content creators using Artificial Intelligence.

This project was implemented within the framework of the "Development of Digital Products and Services" program of the National Recovery and Resilience Plan Greece 2.0

JJ Lyon
December 19, 2025
Read Story↗

This project is carried out within the framework of the National Recovery and Resilience Plan Greece 2.0, funded by the European Union – NextGenerationEU.

The official web portal of the action is:https://digitalsme.gov.gr

Ιnvestment plan budget: €816,668.43, of which €415,554.60 constitutes the company's private participation, while an amount of €401.113,85 will be covered by resources from the Recovery and Resilience Fund.

Content creation has become much more accessible in recent years, attracting a large number of contributors with different levels of experience, all of whom want to create and upload high-quality content faster than ever before.

In 2019, 500 hours of video were uploaded every hour to YouTube (Tubefilter, 2020). Audio quality expectations have never been higher for amateur or professional users. However, creating high-quality music for videos/games/other content is time-consuming, still requires a high level of knowledge/expertise, and involves either a series of expensive and difficult-to-use tools, or a huge volume of competing content that is difficult and time-consuming to navigate.

This is an insurmountable obstacle for many new/amateur or independent content creators, especially those who want to engage in content creation as a full-time occupation. Krotos offers solutions in music creation for content creators with Krotos Studio Music (B2C).

Krotos will seek and create an innovative and highly accessible solution for music creation for all skill levels. This experimental project has enormous technical and commercial potential.

To meet the expectations of a demanding online audience, content creators must integrate high-quality music into their visual creations.

Despite the increase in the possibilities for uploading videos, podcasts and games in an increasingly democratized space, integrating unique musical content remains a huge challenge.

It is widely accepted that high-quality music and sound can enhance content and increase popularity.

The goal for Krotos Studio Music is to offer a controllable, highly dynamic, adaptive music system, where even a YouTuber or content creator can easily put together anything from a simple 30-second cue to a complex orchestral score.

The goal is for users to be able to define this music using keywords and then execute it with simple manipulations and set any duration or dynamics.

Behind the scenes, the system will leverage the latest AI processes to automatically ensure that an excellent result is always produced that matches the expectations and requirements of users. For the first time, any content creator will be able to create, perform and adapt professional-quality music of any genre without having to have any experience, significantly reducing costs.

How-to guide
This is some text inside of a div block.

How to Choose Sound Effects to Download

Too many SFX, too little time? Learn how to whittle down your options and what to look out for when selecting your perfect sound

James Russell
October 17, 2025
Read Story↗

We’ve all been there: a browser full of a million tabs of different options for a door closing or an obscure bit of Foley. With a huge number of sound packs out there, and free sound archives popping up, choosing what to use in you project only seems to get harder.

The plethora of choices makes what should be a simple decision needlessly complicated, not to mention the legal rigamarole and the laundry list of other workflow considerations that come attached to the audio post production workflow.

In this article, we'll give you strategies for how to narrow down the field and choose sound files quickly, easily and with as little fuss as possible. From fundamental sound effects, to genre-specific noises, this article will have you covered.

Are They Royalty-Free?

This is a basic yet easily overlooked aspect of SFX, especially when using free sound effects websites of dubious origin and intent. Make sure you sounds come from one of the Providers of Royalty-Free Sounds. If this is overlooked, the consequences of licensing can be severe for yourself and your employer, so think twice the next time you’re sailing the seven seas of the internet.

Royalties are owed whenever you use someone's intellectual property, such as music or SFX, in your work without the right license or permissions to do so. This is usually why providers who offer royalty-free sounds make such a big deal in pointing it out, as we do for Krotos Studio and with our own free soundpacks.

If you're on a site that doesn’t explicitly state that the sounds are royalty-free outright, then we would recommend avoiding using them unless there is an explicit part of the user agreement that your project is exempt from (for example, not-for-profit works may use BBC archives SFX in some cases, but others shouldn’t be doing so).

This is another reason to be sceptical about file-sharing and piracy sites, as well as any blogs that may not know they're sharing copyrighted material.

Are you Certain They’re From That Source?

This is a caveat to the previous point, but it is common for the aforementioned BBC archive’s sounds, or others with definable origins, to turn up in some places. While it may be tempting to drag and drop such usable sounds into your projects, doing so can land you in hot water suddenly and without warning. Especially in the age of algorithmic copyright checkers.

(Photo by Tima Miroshnichenko from Pexels)

This also extends to sites that offer paid-for sounds and seem legitimate, but may seem a little dodgy in other ways, such as having to pay them outside of the website with a code, or some other unusual means of payment. These sites may just be reselling other people's work illegally, so if something feels off, it may be worth doing your research within the sound design community to see if anyone has flagged the site before.

Outside of the legal and ethical aspects of using these sounds, these sites may also have other nefarious intentions, such as malware or selling your data. If they're comfortable stealing other people's work for profit, what else might they be fine with doing?

Are They Unique?

Moving away from the legal implications, and focusing on the creative aspect of sound design, is the evergreen question of ‘Am I doing something that’s already been done?’. The more you become familiar with sound design and pay more attention to movies and television, you undoubtedly start to notice the same sounds popping up over and over again. Think of the infamous Wilhelm Scream which makes fun of this phenomenon in a meta way.

You want your work to mesh with the image and distract from the artifice behind filmmaking, hiding the cuts and helping to sell the illusion. To do this, you need sounds that haven’t been heard a million times already. So avoid sounds that are too recognisable, too generic for the task, so that the fakery is noticeable. You can also use sound design tools such as Weaponiser to combine multiple sounds to create something more unique and specialised. Or if you really want tailored sounds that perfectly match, then maybe try our very own Krotos Studio Pro to create sounds in real time to the image.

With Krotos Studio, you'll always have unque sound effects when you perform them yourself

Think of the famous adage of sound design, which is that sound effects should be invisible to the viewer. If people are noticing the sound design, you may be overstepping your role and distracting from the story and picture. Of course, one size does not fit all; in a comedy film, using stock and recognisable sound effects can make the joke even funnier. So pick your battles, I would argue the hard-hitting and memorable sounds of Dune 2 are certainly not invisible.

Is the Quality High Enough?

In your search for unique sounds that stand out from the crowd, you may find yourself gravitating towards community sites such as freesound.org for inspiration. Websites that offer free sound effects can contain some really unique material due to the size of their user base, with atmospheric recordings in particular, you can find a surprising array of site-specific recordings. However, you cannot guarantee audio quality due to the material being uploaded by whoever has access to a microphone and an internet connection. With some sounds being uploaded in MP3, which simply won't do for a professional production.

In general, professional audio quality for film sound has a sample rate of 96,000 Hz with a bit depth of 24 (most commonly as WAVs). The higher sample rate allows for editing, such as pitchshifting or timestretching, with minimal artifacts, and is therefore invaluable for creative sound design. Therefore, we recommend that any sounds you're looking for that you intend to manipulate and process (for example, using real animal sounds to create a sci-fi creature) be of this quality. Since Krotos Studio was developed specifically to deliver high-quality sounds for video and game projects, ensuring high resolution isn't a problem for our users.

For sounds that you're going to leave mostly unchanged, 48,000 Hz can be plenty, but we would recommend getting the 96 kHz files if you can, as you never know what sounds may be useful for other tasks later on in the production.

Are there Enough Variations of Each Sound?

Just because you’ve found the perfect sound, doesn’t mean the job is finished, especially if you’ve only found a single sound file of it. If a sound needs to be repeated many times within a project, you'll need many more variations on said sound to avoid noticeable repetition. Be it gunshots or car passes, the more a sound repeats, the more the brain picks up the similarities between the files, and the more unnatural they begin to feel. This can also be the case with atmospheric recordings that sound perfect until you realise they're too short; some sneaky looping and crossfading can get the job done if you need an extra 20 seconds or so. But if you need many more minutes of said atmosphere, the ear will begin picking up the innate rhythms and phrasing within the recording.

To avoid this, you need to make sure you're using the right sounds for the job from the get-go. Look for sound packs that offer numerous repetitions of the same sound at both the same proximity and other distances. Variations in the performance of the sound will help too. If you're doing a construction scene, for example, you would not want all the hammer hits to be of the exact same strength. You want to have enough variations that you have enough for the focal moments of the sound, and can make even more variations out of them via layering if you need to.

(Photo by Los Muertos Crew from Pexels)

Variety is key; the more iterations of a sound, the better. So when you're looking for soundpacks or through sound libraries, always keep in mind how prevalent the sound you're looking for is within the scene(s). Plugins such as Reformer can help in layering your sounds and performing them alongside the image to avoid these noticeable repetitions.

Get Unique Variations Every Time When you Make Your Own with Krotos Studio

If you're looking for something a bit more bespoke to your image, straight out of the box, without the need to download even more sound packs. Krotos Studio offers a free trial, so you can start experimenting straight away. Here is an example of a bedroom door preset:

Other examples of Krotos Studio’s presets can be found here.

How-to guide
This is some text inside of a div block.

The Best Places to Download Free Sound Effects on the Web

Discover the best sites for sounds with this list of the best locations online to access quality SFX without needing to pay for them

James Russell
October 17, 2025
Read Story↗

We know it: sound effects libraries can be expensive. Whether you’ve already spent your budget on some highly specific sci-fi vehicle sounds, or simply lack the budget to begin with, knowing where to find sounds for free can save your behind when deadlines are looming.

Of course, something being truly free in this world is rare. One of the negatives of searching for free sounds is the likelihood that you’ll have to wade through badly categorised – and often bad quality – sounds. In this article, we’ll outline the pros and cons of each site and help you navigate the roadblocks that may become apparent when incorporating free sounds into your projects.

1. Free SFX Packs from Krotos Studio

With our free high-quality SFX packs offering everything from general atmospheres and Foley elements to specifically designed laser and gunshot sounds, it’s likely that we already offer what you’re looking for. Created using our very own Krotos Studio and completely royalty-free, these packs are a great place to start if you want a quick fix without any of the extra hassle. These sounds can be downloaded directly to your device to use in any way you wish; however, we recommend using them within Krotos Studio so you can layer and shape sounds to match your project with ease.

So whether you want to make your own lightsaber sounds for your fan video, or some keyboard Foley for your short film, give our free SFX packs a try.

2. Freesound

Freesound is an internet staple at this point, full of both the best and worst sounds the internet has to offer. With over 625,000+ samples hosted, the quality of the sounds featured fluctuates on a user-to-user basis, but if you know where to look and are clever with your search terms, you can find some real gold. Just be sure to double-check the attributions of what you want to use to make sure the uploader is happy with their work being used without credit or a license.

Freesound is, at the end of the day, a community of sound recordists from various walks of life. So audio quality and format can never be a guarantee, but we don’t know a sound editor who hasn’t had to use it one time or another.

3. Krotos Studio (Free Trial)

While this is a time-limited free trial (5 days), we feel it's worth mentioning simply due to the overwhelming amount of SFX available through Krotos Studio. Full to the brim with everything from combat sounds and cinematic atmospheres to everyday foley such as footsteps and doors, there's plenty of quality that can be wrung out in no time. Paired with the intuitive Krotos Studio software, the range of sounds possible expands exponentially. Sculpt in real time your sounds to image, or record a session of experiments to give yourself a range to work with later. You can certainly put those five days to good use.

See our easy walkthrough of Krotos Studio and our other tutorials over at our blog to help get started as quickly as possible.

4. BBC Sound Effects Library

The BBC’s legendary audio archive contains some of the most iconic SFX ever recorded, many of which you will have heard in countless productions throughout your life. With over 33,000 categorized sounds, an easy way of searching the database, and a built-in web-mixer, you can almost be certain they have something you're looking for. However, this does come with a catch. Taking a look at their licensing page reveals that things aren’t as simple as they seem, with limitations on what type of content the sounds can be used in, and other legal specifics. Be sure to read through carefully if you’re planning on using these sounds.

That being said, for non-commercial and educational projects, or for students learning sound design, this collection really is an invaluable slice of sonic history.

5. Internet Archive

The Internet Archive is full to the brim with media that has fallen through the cracks of copyright and licensing (or just outright public domain). You truly never know what you will find, multiple lifetimes' worth of forgotten art and media stored away simply to preserve the past. Amongst all this, there are countless soundpacks and field recordings from now-defunct 90s companies, internet hobbyists, and fellow sound archivists uploading their additions in the archive. It can be hard to find what you're looking for, but collections such as the one linked above do what they can to herd the ever-growing ‘library of Babel’.

Well worth exploring, but with the open nature of these sounds’ sources, professional sound quality is certainly no guarantee. It may be worth doing some research to make sure that particular cat sound you found is legal to use.

6. Zapsplat

Founded by sound designer Alan McKinney, Zapsplat is an ever-growing archive of (mostly) free sound effects and music. With the site currently hosting 160k+ sound effects, there's plenty to trawl through, and with dedicated library curators, you can be sure that what they have is up to their standard. While it is true that most sounds on their site are free to download, to do so, you must register an account, and even then, the quality is capped off at MP3. To download WAVs of the sound, you must either be a premium member or pay a one-off price.

So not really viable in professional contexts unless you're willing to pay, but it could be worth it for smaller-scale personal projects or as a way of testing out sounds before buying the higher quality version.

7. Sound Dino

A straight-up library of sound effects with no bells or whistles, Sound Dino has over 30,000 sounds in categories ranging from ‘edible’ to ‘firearms’. Gearing more towards online content creation for platforms such as YouTube, Sound Dino only provides MP3 downloads for their sounds. Which certainly isn’t up to scratch for professional work, but could maybe be useful as a temporary sound until a better quality replacement is found. To add to that, not all sounds are necessarily recorded well. Within a short search, I did find some clipped recordings of cars, for example.

All that being said, Sound Dino is refreshingly straightforward with no need to register an email account or anything like that.

8. Free Sound Effects

With a lot of the SFX sounding as old-school as the website looks, Free Sound Effects has a nostalgic charm to it that reminds us of the early days of the internet. Unlike the above, Free Sound Effects do offer WAVs of their sounds, but since the recordings themselves are of such low bitrate, it won’t do much to improve their usability. If you're working on something that is purposefully shooting for some old-school, late 90s or early 2000s aesthetic, then this site is a goldmine for you, as it has all the crunchy sounds your heart desires (more than 50,000 free sounds by all accounts).

They offer a paid VIP account with access to ‘pro’ recordings; however, we can’t vouch for their quality, as it is hard to ascertain what sounds on their site would be included.

9. Pixabay

A community-led website that has been designed to make things as easy as possible for content creators to find sounds, stock images and video. Pixabay offers free-to-use sounds which are mostly of high quality, being community-led, some are, of course, better quality than others. With a broad royalty-free and license-free model, you can use these sounds in most contexts, short of selling them off as your own. However, these sounds are again limited to MP3 quality, so they’re not up to scratch for use in movie or video game projects.

It is nice that the sounds are often sorted by popularity, so the quality stuff does tend to float to the top.

10. Free SFX

Another SFX site that is geared towards the internet video creator, Free SFX hosts an impressive variety of sounds that cover a lot of niches your videos may need. Specifying pieces of technology, such as vacuum cleaners or cassette players, or genres of music, your royalty-free needs are mostly met here. But like the last few examples, the audio quality is limited to MP3, and it seems to be that way to usher you towards their paid sites for access to the higher quality stuff.

Not bad and certainly has its uses, great if you're just dragging and dropping sounds into a video editor for a YouTube skit.

How-to guide
This is some text inside of a div block.

What is foley sound, definition, examples and quick workflow

JJ Lyon
December 19, 2025
Read Story↗

You need believable, sync-ready Foley that lands in your edit fast, without hunting through endless libraries or booking a studio. This guide gives a one-line definition of Foley, explains who benefits, and delivers a priority-driven, creator-first workflow to get usable Foley into Premiere Pro, DaVinci Resolve or a game pipeline quickly.

What Foley sound actually is (quick answer)

Foley is the reproduction of everyday sounds added in post-production and performed to picture so they match the action on screen. Editors, filmmakers, game designers and content creators use Foley to replace or augment production audio with clearer, more cinematic sounds that cue the audience where to look and feel.

• Common examples editors need: footsteps, doors and latches, fabric swishes, prop hits, glass clinks and small object interactions.

• Foley is always matched to picture, performed in sync with movement, and often layered with ambience and design elements.

• It fills gaps from noisy location tracks, increases clarity around dialogue and gives hits the extra weight that stock SFX sometimes lacks.

When you’ll spot it

Foley tends to show up in dialogue-heavy scenes where footsteps or clothing distract from speech, in action beats where impact needs punch, and as ambience fills to avoid hollow or sterile room sound. If a viewer notices an object move without hearing a matching sound, you probably need Foley.

Why Foley matters for your edit (speed and storytelling wins)

1. Makes scenes feel real and tactile, for example adding soft footsteps during a close conversation to keep attention on performance.

2. Fixes production problems quickly, such as replacing a noisy location mic with clean, matched shoe hits.

3. Clarifies action, like emphasising a switch or drawer slam to direct the viewer’s focus.

4. Provides consistent sonic textures across cuts, reducing distracting jumps in room tone.

5. Controls pacing through tight, edited hits, which can speed or slow perceived action without re-cutting footage.

Quick win examples

• Tighten footsteps to match rhythm for pacing: trim or nudge steps to the actor’s gait and use shorter decay for brisk scenes.

• Add fabric swishes to sell a costume change close to camera: a subtle high-frequency swish keeps the cut feeling alive.

• Boost a prop hit with a short layered 'snap' sample to sell a punch or door slam, then duck the music slightly for impact clarity.

Fast Foley workflow for editors: picture-to-mix in 6 steps

1. Spot the scene, prioritise hits

• Scrub the scene, mark required Foley with markers or labels in the timeline. Prioritise dialogue-area ambiences and key action hits first.

1. Choose a source fast

• Pick from three sources: premade library for speed, quick live-record for unique performance, or procedural/automated texture for backgrounds.

1. Gather samples and rough sync

• Drag candidate sounds into the timeline, place the transient on the frame where the action lands and audition at low latency.

1. Tighten performance to frames

• Use transient editors, slip edit and nudge shortcuts to align transients to frames. Keep peaks within a short window so sight and sound read as one.

1. Layer and mix for clarity

• Start with levels: clear primary hits -10 to -6 dBFS, background layers lower. Use simple EQ to scoop conflict frequencies from dialogue and light compression for consistency.

1. Export or handoff

• Bounce stems or consolidated clips with handles for final mix. Include metadata notes and timecodes if passing to a sound team.

Priorities and what to defer: fix dialogue-adjacent sounds and important impact hits first, leave minor ambiences and micro-foley for later passes or for a dedicated sound designer.

Time-boxed approach

• 20 minutes, rush: spot, grab library hits for dialogue-adjacent Foley, quick level and export.

• 60 minutes, typical edit: spot, replace key hits with recorded or higher-quality samples, tighten sync and do basic layering.

• 90 minutes plus, polish: record bespoke performance for emotive hits, detailed layering, EQ automation and final stems.

Quick sync tips

Use your DAW or NLE nudge keys in 1-frame increments and enable grid-snapping to the frame rate. Use transient detection to find attack points and align those to the frame where motion begins. When in doubt, prioritise visual-onset over exact waveform peak, then trim fade-ins to avoid clicks.

DIY Foley checklist: what to record, where to stand and how many takes

Footsteps

• Record multiple shoes on relevant surfaces: hard wood, concrete, carpet. Stand naturally where the actor would be, perform walks at slow, medium and fast tempos. Props

• Capture handles, keys, tins, cups, doors and drawers. Record both close-up hits and room-offset versions. Fabrics

• Swishes, jacket zips and rustles. Perform near the mic and slightly off-axis for variety. Ambience

• Short room tone loops of the shooting space for matching reverb, and clean ambiences for backgrounds.

Dos

• Do multiple takes of each action, including directional variants.

• Do a quiet sweep for room noise at the start and end of each session.

Don’ts

• Don’t overperform, subtlety often reads better on camera.

• Don’t forget to move the source a few centimetres between takes for natural variation.

Minimal mic setup

• Phone or handheld recorder (Zoom, Tascam) with built-in mic works for low friction. If you have it, use a cardioid shotgun or small-diaphragm condenser for close work.

Microphone shortcuts

If you must use a phone, record in airplane mode, keep the mic unobstructed, and get within 15 to 30 centimetres of the source for props. For footsteps, a phone underfoot inside a soft box or shoe mat gives surprising body. Record a parallel room mic placed 1 to 3 metres away for ambience.

Take-management

Label files by scene_shot_element_take, for example 12A_foley_footstep_hard_01. Record 3 to 6 takes per action; mark best takes with a quick star rating in your file browser or DAW project. A simple CSV or text log with timecodes saves hours when editors search later.

Choose fast: library, live-record or procedural/automated Foley

Rush edit

• Best choice: SFX library, supplemented by one or two quick recordings for unique sounds.

• Why: immediate consistency and speed.

Polished short film

• Best choice: combination of recorded Foley for performance-specific bits and curated library layers for weight.

• Why: performance fidelity and craft.

Game or interactive

• Best choice: recorded assets plus procedural variants for randomness; provide stems for middleware like FMOD or Wwise.

• Why: interactivity requires many permutations and controllable stems.

Pros and cons

• Libraries: fast and reliable, but may need pitch or timing tweaks to avoid sounding generic.

• Live-record: most realistic and bespoke, but needs quieter environments and time.

• Procedural/automated tools: great for generating variety and background textures quickly, especially for games, but they should be used alongside human-performed assets for key moments.

How to combine sources

• Start with library for core hits, replace highest-priority moments with recorded takes, and add procedural layers for subtle variability across repeated actions.

Rush-edit checklist

• Priority elements: footsteps in dialogue scenes, door slams, props that are visually emphasised.

• Keep edits to one pass: library hit, sync, level, quick EQ.

Polish checklist

• Replace obvious library hits with recorded takes for character movement.

• Add soft ambience stems recorded on location.

• Create 2 to 3 layered variants per key hit for mix flexibility.

Tools, speed hacks and ethical notes on AI-assisted audio

Useful tool categories

• Field recorders and mobile phones for quick capture.

• DAWs and NLEs for editing and transient work.

• SFX libraries and sample managers for quick recall.

• Middleware like FMOD and Wwise for game-ready stems.

Speed hacks

• Make project templates with pre-placed tracks for footsteps, props and ambience.

• Keep a standard folder structure and file naming convention.

• Use batch renaming and simple scripts to add metadata.

• Create stems and layer presets for common hits so you can drag and drop.

Ethical note on AI-assisted tools

• Automated tools can speed many tasks, for example generating variations or procedural textures, but they do not replace editorial judgement or the need for clearances. Use AI to assist, not to deceive. Be transparent about sources when required and ensure any generated content complies with rights and attribution rules.

Speed hacks to steal

Set up a single session template per project type, preloaded with tracks, routing and EQ chains. Create a 'best-of' library of five go-to footsteps, three fabric swishes and two impact snaps that match your visual style. Tag and rate assets so your NLE search finds them in seconds.

Ethics in a sentence

Use AI and procedural tools to augment your workflow, always maintain creative control, and respect legal and moral boundaries around source material and attribution.

Before you go: try it yourself

Want to speed this up in your next edit? Download a Foley starter checklist, grab a free sample pack or try a hands-on trial of tools that suit your workflow. Join a creators community to swap shot lists, presets and quick-start templates so your next Foley pass is faster and less fiddly.

Frequently asked questions

What is an example of Foley sound?

An example of Foley sound is footsteps recorded in post to match an actor walking on screen. Other examples include the rustle of clothing as someone moves, a door latch clicked at the exact frame of a cut, or a cup clink timed to an actor picking up and putting down a glass. These sounds are performed or chosen to sync precisely with picture and enhance believability.

What are the three types of Foley sound?

Foley is often grouped into three functional categories: footsteps, cloth and garments, and props. Footsteps cover all footwear on surfaces. Cloth includes costume swishes, zips and fabric movement. Props cover small object interactions such as keys, cups, doors and weapon handling. These categories help teams allocate tasks and mic techniques efficiently.

How to make Foley sound?

To make Foley sound, start by spotting the edit and marking the required actions. Choose whether to use a library, record quickly on set or create procedural layers. Record multiple takes with a close mic and a room mic, label takes clearly, then import into your NLE or DAW. Align transients to the frame, layer for weight, use EQ to remove conflicts with dialogue and compress lightly for consistency. Export stems or consolidated clips for final mix.

Are Foley sounds vocal?

Foley sounds are not typically vocal. They are physical recreations of environmental and object sounds performed with props and surfaces. However, some Foley artists use their voices or mouth noises for special effects or to sketch ideas quickly, but final deliverables usually rely on recorded props or processed samples for realism and consistency.

How-to guide
This is some text inside of a div block.

How to use an AI soundscape generator to create ambience

AI-generated ambiences can be brilliant time-savers, but a few predictable mistakes make them feel synthetic and hard to mix.

JJ Lyon
December 19, 2025
Read Story↗

Quick AI ambience tools are tempting because they promise usable background sound in seconds, a real gift when deadlines loom and you do not have time to hunt libraries or book a location. That said, a rushed one-shot approach often creates tracks that sit oddly under picture, clash with dialogue, or loop badly. This guide shows common pitfalls to avoid, then gives a compact Premiere Pro and DaVinci Resolve friendly workflow to generate believable ambience with an ai soundscape generator, quickly and reliably.

Why AI ambiences often sound flat, distracting or unusable

AI-generated ambiences can be brilliant time-savers, but a few predictable mistakes make them feel synthetic and hard to mix. The biggest trap is relying on a single generated track. A single layer tends to be sonically thin, lacking depth and perspective. Editors then push EQ and level to compensate, which introduces masking and harshness.

Context is frequently ignored, producing a mismatch between room size, dynamics and perspective. If the image shows distant hills but the audio sounds like a small studio, the viewer notices. Looping and phase issues crop up when clips are poorly edited or exported in the wrong format. Finally, workflow time sinks happen when people try to perfect one giant prompt rather than iterate fast with stems.

Common sonic problems

Typical audible issues include static or repetitive textures, unnatural dynamics where everything sits at the same loudness, and frequency buildups in the midrange or high end that become grating. Poor stereo imaging, such as a collapsed centre or exaggerated side content, can ruin spatial cues. These happen because a single generated file often blends foreground and background into one flat field, and because prompts may not constrain perspective or dynamics.

Workflow mistakes that waste time

Common time-wasting habits include generating full mixes instead of stems, which limits your ability to adapt the audio to picture. Skipping a quick reference check against a real recording means you miss obvious perspective problems. Finally, failing to name and export usable files or skips on metadata makes handover messy for review and integration.

The better approach: design for mixability and speed

Design with mixability first, then polish. Work in stems so you can quickly duck ambience under dialogue or boost a foreground texture without re-rendering everything. Match perspective and dynamic range to the picture by using short test renders and references, not long one-shot generations. Use restrained prompting and iterative passes rather than trying to conjure a perfect scene in a single prompt.

Keep ethical safeguards in mind. Confirm licences for generated content and avoid presenting generated ambiences as field recordings when provenance matters. When in doubt, label generated files in your deliverables so teams and clients know what they are hearing.

Designing for mixability

Export stems for background ambience, room tone, foreground atmos and discrete effects. Keep tails intact so loops crossfade naturally, and provide dry and wet options if the generator allows it. Conservative levels and conservative processing mean you can slot the sounds into a mix quickly, and they will survive level changes and scene cuts without needing rework.

Prompting with reference and constraints

Short, targeted prompts plus a sonic reference achieve consistent results faster. Rather than verbose descriptions, give the generator a clear role, for example background rural ambience, distant birds, very low wind under 100 Hz. Add a reference clip when possible and constrain duration. This reduces back-and-forth and helps you generate stems that match your visual perspective.

A compact step-by-step workflow: generate, refine, integrate

You want to move from empty timeline to mix-ready ambience in a handful of quick passes. Set up your reference, decide which stems you need, generate multiple short passes, then import and place stems on separate tracks in Premiere Pro or DaVinci Resolve for final tuning.

Prepare your reference and timeline

Pick a 10 to 30 second reference clip that matches the scene in perspective and dynamic feel. Decide whether you need a loopable bed or a timed bed that follows edits. Create a temporary track stack in your NLE called Ambience 1, Ambience 2, Foreground FX so you can audition quickly and turn layers on or off without moving regions around.

Generate and refine in quick passes

Produce short stems, for example 15 second background bed, 8 to 12 second foreground textures, and 3 to 6 second discrete effects or whooshes. Label files clearly with role, tempo or loop info. Export conservative dry and processed versions where possible, so you can choose whether to apply local processing in the NLE or use the generator's FX.

Import, place and finish in Premiere/Resolve

Import stems to separate audio tracks. Use a gentle high pass at 40 to 80 Hz to clear mud and low pass if the ambience competes with highs. Use buses or sends for shared reverb so ambience sits in the same acoustic space as dialogue. Normalise to a conservative headroom, for example peak no higher than minus 6 dB, then balance by ear against your reference render or production dialog.

Apply it now: three short scenarios (doc, sci‑fi, game level)

Different projects need different sensitivities. Here are three quick scenarios and how to approach them so the ambience enhances rather than distracts.

Documentary exterior, keep it honest

For documentary exteriors aim for subtlety. Prompt for distant ambience, low wind, distant traffic and intermittent wildlife. Split stems into background bed, distant events and close practical sounds, and place them at lower levels than dialogue. Use sidechain ducking or manual automation to prevent masking of spoken audio.

Sci‑fi interior, texture without clutter

Sci fi interiors benefit from layered synthetic textures. Combine a low synthetic drone stem with higher modulation textures and a set of concrete mechanical hits for events. Keep the drone low in level and reserve midrange energy for mechanical hits that sync to picture, leaving headroom for effects and dialogue.

Game level, make looping and middleware easy

For game levels export loopable stems with clean tails and matching sample rates. Provide both a loopable bed and discrete FX stems, and annotate fades and intended loop points in filenames or metadata. For middleware provide stems marked dry or wet and include notes for intended layering behaviour in engines like Unity or Unreal.

Final checks before export or delivery

Before you hand anything over do a short checklist to catch common mistakes and keep deliverables clean.

Do quick technical checks for loudness, headroom and phase. Ensure sample rate and bit depth match the session. Verify loop points and fades are seamless, and that stems are organised and clearly named. Legally confirm usage rights, document whether content is generated, and preserve your reference clips for future checks.

Export settings and filenames

Use descriptive filenames such as scene01_amb_bed_15s_48k_24b.wav and include sample rate and bit depth in the name when handing over. Deliver lossless stems for final mixes, for example WAV at 48 kHz 24 bit, and provide compressed versions for review if requested. Include a simple README listing stems, loop points, and any attribution or licence notes.

Where Krotos can speed up and secure your ambience workflow

Krotos can serve as a rapid starting point for stems and textures that you refine in your NLE or DAW. Think of it as a collaborator that gets you usable building blocks quickly, so you spend less time hunting libraries and more time shaping specifics.

The practical benefits include faster iteration, clear export organisation and controls that let you export dry and processed versions, loopable beds and discrete stems. These options preserve mixability and make review cycles shorter. On the ethical side, follow your project licensing rules, mark generated files where required, and rely on written project permissions rather than assumptions.

Speed and control for editors

Quick generation plus sensible export options reduces library hunting and shortens review loops. You can generate multiple alternatives, import them into Premiere or Resolve, and decide on the spot which stem combination best supports the edit.

When to use Krotos and when to record

Use generated ambiences for time-sensitive drafts, layered textures and when you need consistent atmospheres across edits. Choose field recording when authenticity, provenance or very specific on-set idiosyncrasies are essential. Combining both approaches often yields the best results.

Ready to try this on your next edit? Join the Krotos community, try a free trial or demo, and share a before and after from your project in our forums. We offer quick onboarding resources and support to get you mixing faster.

Frequently asked questions

What are ai soundscape generator?

An ai soundscape generator is a tool that uses algorithmic models to produce ambient audio textures, atmospheres and environmental sounds from text prompts or references. It is designed to create background beds, textures and discrete effects that can be used in video, games or audio projects.

These tools are useful for rapidly prototyping sonic ideas and creating layers you can refine in a DAW or NLE. They are not a substitute for careful mixing or field recording when project requirements demand precise authenticity or specific provenance.

How can editors use ai soundscape generator in a production workflow?

Editors can use these generators to create starting points and alternate ambiences quickly, label stems for mixability and provide multiple options for clients during review. Generate short stems, import them on dedicated tracks in Premiere or Resolve, and use buses, EQ and automation to integrate with dialogue and effects.

Treat generated files as modular components to be adjusted in context. This keeps iteration fast and reduces the need for last minute library searches or expensive re-recording.

What makes ai soundscape generator sound authentic?

Authenticity comes from perspective, dynamics and detail. Matching the scene by using references, producing stems rather than a single mix, and preserving natural tails and spatial cues will improve believability. Realism also depends on how you process and place stems in the mix, using reverb, EQ and level automation to match on-screen distance.

Careful listening and quick A B checks against field recordings or trusted references are essential to ensure the generated soundscape aligns with the picture.

How can ai soundscape generator be created quickly without losing quality?

Work in short, iterative passes. Produce 10 to 30 second stems that are clearly labelled, generate both dry and processed versions, and audition them against a reference clip. Keep prompts targeted and add a sonic reference rather than long descriptive text. This approach minimises wasted generations and keeps the output mixable.

Integrate early into your timeline and make small adjustments rather than re-generating large mixes, which saves time and preserves quality.

What file formats work best for ai soundscape generator?

For professional delivery, lossless WAV files at 48 kHz 24 bit are a solid default. Provide loopable beds with clean fades and include both dry and processed versions if possible. For quick reviews, compressed MP3s at a reasonable bitrate are acceptable, but always supply lossless stems for the final mix.

Keep sample rate and bit depth consistent with your session to avoid resampling artefacts.

How can Krotos help with ai soundscape generator?

Krotos provides tools to quickly generate usable stems and textures with export options designed for mixability, such as dry and wet variants and clear stem labelling. These features speed up iteration, reduce library hunting and make it easier to hand over organised stems for review or integration.

Krotos also supports sensible export organisation and metadata, which helps keep deliverables clear. For projects requiring strict provenance, combine generated stems with recorded material and document usage and licences as part of your delivery.

How-to guide
This is some text inside of a div block.

Foley recording techniques: how to capture fast, usable SFX

Below is a practical, no-nonsense guide to making Foley sessions predictable, editable and fast to deliver, plus where Krotos tools can speed up the parts you never have time for.

JJ Lyon
December 19, 2025
Read Story↗

Foley sessions are brilliant when they hum along: quick cues, tidy takes, and editors grinning because the picture suddenly feels alive. More often they turn into a scavenger hunt: the wrong shoes, noisy room, mismatched intensity, and folders full of unlabelled WAVs that nobody wants to touch. If you are juggling deadlines, an overfull effects library and picky picture editors, you need a compact, performance-led workflow that gets usable SFX into the timeline fast. Below is a practical, no-nonsense guide to making Foley sessions predictable, editable and fast to deliver, plus where Krotos tools can speed up the parts you never have time for.

Why most Foley sessions end up sounding fake, noisy or unusable

When things go wrong in Foley, it is usually a mixture of technical, performance and organisational problems. Editors hate unusable takes because they cost time, and filmmakers lose patience because sound that does not match picture kills immersion. Understanding the common failure modes helps you prevent them, rather than spending hours in the edit bay patching holes.

Common technical mistakes

Bad mic choices, noisy rooms and phase issues are the usual suspects. Using a shotgun mic when you want a close, dry texture gives you an unusable distance perspective. Placing mics too close or too far without checking the room response creates artefacts you cannot easily remove. Wind, handling noise and poor cables show up as low frequency rumble or intermittent clicks. Phase cancellation can occur when combining multiple mics without checking relationships, leaving your takes thin or hollow. Often the fix is simple: pick a microphone suited to the perspective you want, control the distance, and run phase checks before the first take.

Performance and timing problems

Performance failures usually look like two things, timing and intention. If the actor does not match the screen pace, even a perfect recording feels wrong. Conversely, overdubbed actors often chase perfection and create sterile takes that do not sit with picture. Exaggeration or under-performance are common when the performer does not understand the intended perspective, for example a soft indoor hallway step versus an outdoor gravel walk. These mistakes multiply the editing time because you get lots of unusable takes or need complex crossfades to make things feel right.

Logistical and post-production pitfalls

Poor planning turns an efficient session into a mess. Not having the right props, overlooking shoe variety, or failing to slate properly all cost time. File naming that leaves editors guessing, no stems or reference tracks, and missing backups are classic post-session traps. A tidy folder with clear metadata and stems saves the editor hours and reduces back-and-forth. Spend ten minutes organising at source and you will reclaim hours later.

A better principle: performance-first, capture-for-editing

Shift your priorities away from the myth of a single perfect take. Aim for convincing performance, consistent perspective, and organised capture. That way you give editors material they can slice, layer and match without wrestling with noise or endless alignment.

Performance over perfection

A slightly messy but expressive take is often more useful than a technically pristine but lifeless one. Editors want options: variations in timing, intensity and weight that can be layered or time-stretched. Encourage performers to deliver short, repeatable cues with small intentional differences, for example a light, medium and heavy footstep for the same frame. This approach reduces the need for surgical editing and yields faster, more natural results in context.

Record for editability

Adopt a capture-for-editing mindset. That means recording stems, close and room pairs, slate or reference tracks and short multiple takes rather than long runs. A close mic gives you the texture, a room mic gives environment and space. Slating each take with a spoken cue and timecode note makes later sync trivial. Multiple brief takes, each labelled for intensity and perspective, are far more flexible than a two-minute run which might contain the single usable moment you need.

A step-by-step Foley workflow you can use today

This is a repeatable routine that works whether you are in a small studio, an ADR room or a repurposed garage. It favours speed, predictable results and delivering editor-ready stems.

Pre-session checklist

• Spot the scene with the editor or director, make a short cue list and mark priority frames. Focus on what needs sound now, and what can come from libraries.

• Build a prop and shoe matrix. For footsteps, prepare a set of shoes and map them to characters, surface types and velocities.

• Do a quick acoustic check of the room, listen for hums, vents or traffic. If there is persistent noise, decide room or close mic strategies to avoid it.

• Test the signal chain: gain staging, phantom power, headphone mixes and slate mic levels. Record a 30 second test clip for each mic and listen back in headphones.

• Prepare file naming conventions and session templates so you can capture uniformly across projects.

These prep steps take 15 to 45 minutes and prevent common interruptions. The point is to remove guesswork from the session, so every take is rapid and deliberate.

Recording session routine

Run a tight loop for each cue, the same rhythm keeps the performer focused and the editor happy.

• Slate: speak the cue name, take number and a short note about intensity into a dedicated slate mic channel. If you have timecode, record it. If not, a verbal slate is still a lifesaver.

• Performance: record short takes, 1 to 4 seconds for footsteps, 3 to 10 seconds for cloth and movement, and isolated strikes for impacts. Aim for three to five useful variants per cue: light, standard, heavy.

• Variation: change distance, angle, or prop subtly between takes. For footsteps, shift weight or heel-toe emphasis. For cloth, alter rubbing speed or direction.

• Quick review: listen back to the head and tails of the recording in context, check for clicks, handling noise or room surprises. If the take fails, do the same take again rather than moving on.

• Mark good takes in your DAW or recorder with a quick flag and note for the editor.

This loop keeps sessions moving and creates edit-friendly banks of material.

Fast post-session organisation

Do these three things before you leave the session, while details are fresh.

• File naming: Use a predictable convention such as Project_Scene_Cue_Shoe_Surface_Take_Role.wav. Include intensity markers like Light, Med, Heavy when relevant.

• Backup: Copy raw files immediately to at least two locations, for example an external SSD and a team server or cloud folder. Verify checksums if you can.

• Export stems: Bounce quick dry close stems and a room stem for each cue, at editorial levels. Create a short rough mix referencing the picture where possible so the editor can hear perspective options.

Immediate tidy-up prevents last-minute rescue missions. Editors will thank you, and you will avoid repeat sessions.

Three real-world Foley examples: footsteps, cloth and impact hits

Examples help make the abstract concrete. Below are practical ways to capture three common Foley categories so they are edit-ready and expressive.

Footsteps, fast, edit-friendly approach

Match surface and shoe, but do not overcomplicate it. Select three shoes that represent the character range and prepare corresponding surfaces. Record short sets: heel-first, toe-first, shuffles and sudden stops. For each position capture close and room pairs, then slate and label with intensity.

• Surface match: brief samples on each surface for tone reference. Record a 5 to 10 second loop of natural walking for context.

• Intensity variants: label takes as Light, Med, Heavy. These labels help editors pick the right weight quickly.

• Perspective: capture close dry for editorial placement and a room/ambience for match and bleed. If editors want distance, include a medium-distance microphone or a natural distant take.

Deliver a labelled take set that lets editors crossfade or layer to match eyewinks and camera moves, rather than forcing them to time-stretch one perfect step.

Cloth and movement, capture the nuance

Cloth is about texture and micro-movement. Use a cardioid condenser for close texture and an omni or room mic for body ambience. Mic the area where rubbing is most evident, for example sleeve seam or shoulder area, and record directional motions in short bursts.

• Mic placement: place a close mic 10 to 30 centimetres from the action for texture and a room mic further back for space.

• Gesture syncing: perform the exact camera gesture while watching picture if possible, record the motion several times with slight speed and force changes.

• Dry versus room: provide a dry close take and a room take. If fabric rustle is noisy, record quieter versions by adjusting contact pressure rather than moving away from the mic.

Label takes with the action type, for instance Sleeve_Rub_Left_Med_Take03, to make assembly fast and obvious.

Impacts and whooshes, size and distance cues

Impacts sell weight and whooshes sell motion. Think in layers: the close hit for attack, a medium layer for body and a distant layer for room. Record hits with different striking implements and record each at close, medium and far distances.

• Prop selection: use objects that produce the right timbre, then tweak with layering. A wooden hit plus a deeper thud and a metal clang can combine into a believable door slam or object drop.

• Distance cues: capture the same hit from three distances to give editors choice. A near mic provides the transient, a room mic adds decay.

• Whooshes: record source motions for authenticity rather than relying on stock effects alone. Swing small objects or flags to create real Doppler-like textures, and capture passes at varying speeds.

Provide stems labelled Attack_Body_Room with intensity tags so editors can assemble a convincing impact quickly without hunting through libraries.

Final checks before you deliver or export Foley stems

Before handing files to the editorial team, run through a short pre-delivery checklist as prose so nothing gets missed.

Listen to a few takes in sequence against picture where possible, confirm slates match the filename and take numbers, and verify timecode or verbal slates are clear. Inspect the head and tail of each clip for clicks, pops or handling noises and trim conservatively rather than aggressively. Check phase and polarity between close and room microphones by soloing pairs and listening for thinning or comb filtering. If you see phase issues, flip polarity and listen again.

Assess noise floor and consistency. Measure the background noise and confirm it is even across takes, normalise gently if needed to get editorial reference levels, but avoid heavy processing at this stage. Maintain consistent nominal levels across similar cues so the editor is not surprised by jumps. Finally, apply metadata and organise folder structure: a ReadMe with the session notes, a directory for dry stems, a directory for room stems, and a rough mix. Export in formats the picture editor requests, for example 48 kHz 24 bit WAV, and include a zipped reference pack if they prefer a single download.

Where Krotos tools plug into this workflow and save time

Krotos tools are helpful in the parts of the workflow that tend to slow you down: auditioning variations, layering quickly and producing export-ready stems without deep library hunting. They are not a substitute for performance-led recording, instead they complement it by letting you iterate rapidly on sound design choices and produce polished stems to hand to editors.

Use Krotos tools to construct and audition layered whooshes and atmospheres fast, combining recorded hits with generated textures to test different emotional directions in minutes. The ability to tweak parameters and audition multiple variations without stopping the edit helps you respond to feedback quickly, and exporting grouped stems ensures the files slot directly into editorial timelines or game audio projects. Krotos tools also help when you need to build quick ambience beds or background layers that otherwise require hours of searching through libraries.

When discussing AI-assisted features, we take a measured tone. Tools that use intelligent algorithms can speed up repetitive tasks, but they should operate within clear boundaries and respect editing transparency. Treat AI suggestions as starting points that you, the human creative, evaluate and refine. This approach preserves trust and keeps creative control where it belongs, while still offering credible time savings.

Best tasks to reach for Krotos

• Creating whooshes and motion textures quickly, then exporting separate stems for attack and ambience.

• Building and auditioning atmospheres with multiple variations so editors can pick mood and density.

• Rapidly layering and processing impacts to test weight and distance without rebuilding from scratch.

• Exporting organised, labelled stems that slot into Premiere Pro, DaVinci Resolve, FMOD or Wwise workflows.

These are the high-value places where short time investments return large editorial gains, freeing you to focus on the picture and creative decisions rather than library hunting.

If you want to try these techniques and see how Krotos fits into your process, we have a few easy ways to get started. Try a free trial to explore toolsets in your own projects, download a sample asset pack to use alongside your recordings, or follow a short tutorial that walks through building whooshes and exporting stems for Premiere Pro or DaVinci Resolve. Join the Krotos creator community to compare workflows and ask questions in real-world scenarios, because hands-on testing and peer tips are the fastest way to level up.

Frequently asked questions

How are Foley sounds recorded?

Foley sounds are recorded by performing actions that match the on-screen activity while capturing the audio with microphones. This usually happens in a studio space where props, shoes and surfaces are used to recreate footsteps, movement and specific object sounds. The performer watches the picture or a playback and times their actions to the actors, creating takes that editors can sync to the video.

Recording often involves close microphones for texture and room microphones for ambience, with multiple short takes at varying intensities to provide editors flexibility. Slates and notes are used to identify takes, and stems are exported so picture editors can quickly assemble or swap layers.

What are the various types of recording techniques?

Recording techniques vary by the desired perspective and sound category. Close mic techniques capture texture and transient detail and are useful when editors need a dry sound to place precisely in a mix. Room mic techniques capture the space and natural decay, useful for distance and ambience. Stereo or spaced arrays are used for atmospheres and wider scenes, while spots and close condensers are preferred for detailed prop sounds.

Other specific techniques include contact miking for resonant objects, shotgun mics for directional distance capture, and binaural or ambisonic methods for immersive formats. Practical constraints such as room noise, mic bleed, and the intended deliverable format guide which technique you choose.

What techniques do Foley artists use?

Foley artists use a mix of performance techniques and sound engineering practices. Performance techniques include varying weight, timing and articulation to match the on-screen movement, as well as creative substitutions where one prop stands in for another to achieve the right sonic character. They also use repetition and small variations to give editors edit points.

Engineering techniques include capturing stems (close and room), slating, gain staging, and running quick quality checks for clicks or phase issues. Foley artists plan a prop matrix and shoe set, rehearse key cues, and track metadata. They often layer multiple sources to build complex effects, for example combining a close impact, a thud, and a reverberant room layer.

What is a Foley recording?

A Foley recording is the captured audio performance that reproduces on-screen sound effects, such as footsteps, clothing movement and object interactions. It is typically recorded in a controlled environment with performers timing actions to the picture, producing takes that are specifically designed to sync with the visuals.

The final deliverable usually includes multiple stems and labelled takes so editors can pick the best combination to match camera perspective, dialogue

How-to guide
This is some text inside of a div block.

How to trim audio quickly and cleanly in Premiere Pro and Resolve

This guide gives you a tidy, keyboard-driven workflow for Premiere Pro and DaVinci Resolve that keeps edits natural and export-ready, plus short checks you can run in two minutes to avoid rework.

JJ Lyon
December 19, 2025
Read Story↗

Most people rush the snip. They eyeball a waveform, chop it, and move on. That quick decision usually costs time later: missing consonants, clicks, dropped ambience and awkward pacing that need fixes across the scene. This guide gives you a tidy, keyboard-driven workflow for Premiere Pro and DaVinci Resolve that keeps edits natural and export-ready, plus short checks you can run in two minutes to avoid rework.

Common trimming mistakes that make your audio sound amateur

Experienced editors bruise their timelines the same way. Cutting to the waveform without listening loses leading consonants and breaths, which makes dialogue and foley sound disjointed. Hard cuts with no fades or crossfades create clicks, pops and sudden level jumps that grab attention for the wrong reasons. Ignoring room tone and ambience produces edits that read as gaps, so the ear says something is missing even when the image looks fine. And when clips are unorganised, markerless or undocumented, accidental deletions and misplaced trims become a workflow hazard.

Why abrupt trims betray the performance

Removing tiny bits of audio can remove emotional nuance. Leading consonants and breaths contribute to phrasing and intention; chopping them off makes a line feel clipped or hurried. Trailing decay and reverb tails give a sense of space, and cutting them too early makes Foley snaps and dialogue end unnaturally. When you preserve these micro-elements you retain the actor's rhythm and the scene's realism.

The visual-only trap

Waveform peaks are useful, but they do not tell the whole story. Transient energy, subtle breaths, and reverb tails can be hidden behind similar-looking peaks. If you edit by sight alone you will likely misplace edit points where a breath or a soft consonant sits under the waveform. Listen in context at a comfortable level, and trust your ears to find the real edit points.

Principles for fast, clean trimming that stays invisible

Adopt a few principles and trimming becomes predictable. First, always listen in context, with picture and supporting tracks playing. That ensures edits sit with other elements and preserve pacing. Use short fades or crossfades to disguise joins, instead of trying to micro-edit every sample. Matching room tone and ambience around cuts makes joins read as continuous rather than patched. Finally, work non-destructively and learn a small set of keyboard shortcuts that speed repeatable tasks, so you do more with less mouse travel.

Prioritise intelligibility and emotional rhythm

Choose edit points that preserve meaning and emotional intent, not perfectly symmetrical waveform slices. If a pause carries a reaction or lets a joke land, keep it. If a line needs tightening for pace, remove silence while leaving the lead-in consonant. The aim is to maintain intelligibility and the performer’s rhythm, not to create technically perfect but emotionally flat audio.

Preflight for speed

Do these quick prep steps before your first cut: name and colour-code tracks, add marker lanes for problem spots, and set a comfortable reference monitoring level. Solo the problematic track initially, then reintroduce beds and music for context. These small habits reduce mistakes and stop you hunting for clips when you need to be decisive.

A lean step-by-step trimming workflow for Premiere Pro and Resolve

This is a repeatable pass you can run in ten to twenty minutes for a scene. Prep first: organise tracks into dialogue, beds, Foley, SFX and music. Create marker lanes for pickups or troublesome syllables. Set a reference level so your ears do not fatigue and you retain perspective across clips.

For the first pass, perform a keyboard-driven, context-aware trim. Work with the playhead, add edits where necessary, ripple-trim pauses and remove obvious noise. The point here is speed and coherence, not perfection. In Premiere use Add Edit at the playhead and the trim tools to move edit points quickly. In Resolve use the Cut or Edit page split and trim tools to do the same. Mark any tricky spots for a later pass.

Refinement is where you shape joins. Apply short fades and crossfades to disguise edits, use clip gain to balance relative levels, and align ambient beds so the background reads continuous. For surgical fixes, run a cleaning pass to remove breaths, mouth clicks and other micro-noise. Use spectral tools or precise automation for anything that needs sample-level attention, then re-check in picture for timing.

Fast keyboard-driven trim pass

Order these operations for speed: mark the playback points or in/out, cut at the playhead, ripple or roll the trims to tighten pauses, then hit play and listen. If something still feels off, flag it with a marker and move on. The goal of the first pass is to get the scene musically tight. Perfection comes in the refinement pass.

Cleaning breaths and room tone quickly

Reduce breaths using tiny fades and small clip-gain dips rather than completely deleting them. For obvious clicks, a spectral repair or a single-sample fade fixes the problem without pumping. When you reduce a breath, add a millisecond fade to avoid a sudden level change. If a breath sits on a noisy bed, colour and align a short room-tone loop under the edit so the ear senses continuity.

Quick fixes for real edit scenarios

Different edits have different priorities. For interviews tighten pauses but keep reaction beats and small hesitations that sound honest. For voice-over remove distracting breaths and match the ambience to the picture cut so the VO always feels anchored. Foley and footsteps need to be trimmed and nudged to land on steps and impacts, with fades applied so the hits do not clip the ambience. For whooshes and transition FX, trim to synchronous timing points and shape envelopes so the sound accelerates or decays with the action.

Editing an interview for pace

Decide where the story needs momentum. Cut to tighten obvious long pauses but keep short hesitations that add credibility. Use tiny crossfades and add a matched room-tone under the join so the result reads as one continuous take. If a breath sounds intrusive, reduce it in place rather than removing it entirely, and re-listen with the interviewer present to check naturalness.

Timing a whoosh to an action hit

Place the whoosh so its peak or end lines up with the visual hit. Trim the start to avoid a pre-roll muddiness, and shape the tail with a fade to prevent it from masking dialogue. If the whoosh needs to build, use a short ramped fade-up rather than a hard volume boost, so the effect breathes with the image.

Final listening checklist before you export

Before you render, run a short listening checklist. Play the entire scene at a couple of monitoring volumes and on different outputs to uncover level or phase issues. Watch the edits against the picture playback to check sync and pacing one last time. Scan for DC offsets, clipping, or audible clicks at edit points and ensure any fades are consistent across similar cuts. Confirm ambience beds are continuous and that any stitched room tone does not shift noticeably between shots.

Quick export sanity checks

Do a single short reference export in the target delivery format and listen through headphones and a speaker. This catch-all verifies levels, timing and whether any processing behaves differently in the rendered file. If something jumps out, fix it in the timeline and re-export rather than chasing problems after the final render.

Where Krotos can speed your trimming and sound-building

When you are hunting for that exact whoosh, ambience or impact, time vanishes. Krotos helps reduce time spent sourcing and shaping SFX by providing ready-to-tweak sounds and quick-generation tools that let you audition and adapt elements to the picture. Instead of spending hours in sound libraries, you can produce layers that fit the edit and then import the files into your NLE or DAW for final trimming.

Krotos works as a collaborator not a replacement: reach for it when you need creative beds, atmospheres or whooshes fast. For surgical jobs such as de-clicking dialogue or resolving phase problems, traditional manual edits or spectral tools remain the right approach. Krotos outputs standard audio files that slot cleanly into your existing workflow, so you keep control of final edits.

When discussing generative tools and automation we take an explicit, careful approach. Trust and boundaries matter. Use generated sounds as starting points you listen to critically, and keep human oversight on editorial decisions. That way you gain speed without sacrificing craft or ethical clarity.

If you want to test the time savings, try a Krotos trial or join the community to grab presets, quick-start templates and support from other creators. It is a fast way to explore how ready-made beds and whooshes can reduce the time you spend hunting and let you focus on the fine trims that matter.

Frequently asked questions

What is trimming in audio editing?

Trimming is the process of shortening or adjusting the start and end points of an audio clip to remove unwanted silence, noise or unwanted material, or to align the clip with picture or other audio elements. It includes removing pauses, tightening phrasing and setting edit points so the audio sits naturally in the mix.

Trimming also covers fine adjustments like applying fades, crossfades and clip gain to ensure the joins are inaudible and that the clip transitions smoothly into surrounding audio.

How to edit and trim audio files?

Open the file in your NLE or DAW, set a comfortable monitoring level, and work with the playhead to find the edit points. Use cuts or split commands to isolate sections, then ripple-trim or roll the edge to tighten timing. Apply short fades or crossfades to disguise joins and use clip gain to balance levels. For problem noises, use spectral repair or manual fades. Always re-check edits in context with picture and other tracks.

Work non-destructively by keeping original takes and using markers to flag tricky areas so you can iterate without losing material. Learn a handful of shortcuts to speed the process.

What do you mean by sound editing?

Sound editing is the broader craft of assembling and shaping audio elements for a production. It covers dialogue editing, cleaning, Foley and footsteps, sound effects, ambience beds and syncing to picture. The aim is to make the audio believable, intelligible and emotionally supportive of the visual story.

It includes both creative choices, like designing whooshes and textures, and technical tasks, like removing noise, correcting timing and preparing files for mixing and final delivery.

Can I trim audio on my phone?

Yes, basic trimming can be done on a phone using many mobile audio or video apps which provide cut, split and fade functions. These are useful for quick edits or social content. For complex projects, multi-track sessions or precise spectral repair, a desktop NLE or DAW gives the control and fidelity professionals need. Mobile tools are great for fast fixes, but keep desktop editing for final polish.

How-to guide
This is some text inside of a div block.

How to add Ambience sound effects to a horror video

Discover how ambience sound effects elevate tension in scary films. Krotos Studio makes it easy to create immersive and chilling soundscapes.

JJ Lyon
December 19, 2025
Read Story↗

The importance of ambience sound effects in scary films cannot be overstated. These sounds are crucial in building tension, creating an eerie atmosphere, and immersing the audience in the film's world. The subtle creak of a floorboard, the distant howl of the wind, or the unsettling silence of an abandoned room can elevate the sense of dread and suspense, making the viewer's experience more intense and emotionally engaging. The right ambience can turn a scene from simply visually disturbing to deeply unsettling and memorable.

Krotos Studio simplifies and accelerates the process of creating these sounds. With its intuitive interface and vast library of presets, filmmakers can quickly find and customize the perfect sounds to match their vision.

Whether it's the haunting whisper of the wind, the ominous echo of footsteps in a deserted hallway, or the unsettling rustle of leaves in a forest, Krotos Studio allows for rapid experimentation and fine-tuning. This ease of use and flexibility means that even those with limited sound design experience can produce high-quality, effective ambience sound effects, enhancing the overall impact of their scary films.

To build fear without overpowering the mix, layer tension cues from our Cinematic Tension Free Sound Effects Library and refine your sound beds with our guide to Creating Ambience Sound Effects With Krotos Studio.

What Ambiences Do We Need?

It's a pretty simple scene. We see a character sleeping, before the camera pans out to show an ominous figure lurking behind them.

Adding Realism with a Room Tone

Before we can get into the spooky stuff, a layer of realism is essential to situate the environment in which the scene is taking place. We use the Apartment preset in Krotos Studio's vast library of ambiences to do this, then we tweak the various sounds to balance the scene.

Establishing Discomfort with Wind Sound Effects

Next, we'll add a bed of eerie wind sounds. There is no actual wind source in the clip, but that's okay. What this layer does is add a sense of strangeness and discomfort to the scene, and the imagination of the audience separates the source sound from their viewing experience. Creepy!

Adding Atmosphere with Eerie Cinematic Sound Effects

Next we'll use the Eerie Scene preset to establish the idea that something isn't quite right in our clip.

Moving through the XY Pads, we can get some undulating, morphing layers to add some atmospheric scariness to the scene.

Adding Drama with Impact Sound Effects

Now that we have the bed in place, lets embellish the scene with some impactful sound effects.

We have an impact sound to open the scene from the Morbid Hit preset. This is a powerful boom which hooks the viewer from the moment the clip starts. Next we have some more impacts for when we see the character lurking in the background. We use the Metal Hit preset and layer it up with some pitch shifting to add more power.

Ending the Scene with a Dramatic Stinger

As we come to the climactic moment of the scene, we want a dramatic stinging sound effect to let the viewer know that our sleeping character is in a heap of trouble.

We use the Atomic Braam & Dark Entry presets layered up for some daunting drones, with a high pitched Screaming layer, before our scene cuts to black. Our sound effects are complete!

You can add much more to this scene using the library of over 200 presets available in Krotos Studio, and it is made so much easier using Krotos Studio as a plugin in DaVinci resolve in the Fairlight tab.

How-to guide
This is some text inside of a div block.

Sound to picture: practical guide for creators

A tight, practical guide to taking sound to picture fast, a repeatable workflow, the prep you need, three worked examples you can copy, quick fixes for common problems, and clean delivery tips to hand off to editors or engines.

JJ Lyon
December 19, 2025
Read Story↗

A tight, practical guide to taking sound to picture fast, a repeatable workflow, the prep you need, three worked examples you can copy, quick fixes for common problems, and clean delivery tips to hand off to editors or engines.

Fast sound-to-picture workflow: spotting to final pass

Good spotting and a clear order of operations keep you fast and confident. Follow this sequence and you will avoid the usual library-hunting and last-minute panic.

1. Spotting. Mark what needs sound and where.

2. Source or create SFX. Grab library hits, record foley or use SFX creation tools for ambiences and whooshes.

3. Sync and timing. Align hits to picture then tighten with nudging or retiming.

4. Rough mix. Balance levels so dialogue, music and SFX sit together.

5. Polish and review. EQ, dynamics, fades and final pass for loudness and delivery.

Time-saving priorities: place broad placeholders early, use temp FX for pacing, and only commit to expensive layering when a shot needs it. Automate auditioning and library browsing to replace hunting through folders, but hand-edit where lip sync, transient hits or complex overlaps demand pixel-perfect timing.

Automated tools are great for getting usable results quickly, especially ambiences and whooshes. Hand-edit when texture, timing or a recognizable sound must match precisely. Use automation to audition and iterate, then lock in the parts that matter.

Spotting pass: mark exactly what needs sound

Label hits, ambiences, breaths and transitions on the timeline. Use a simple code: H for hard hits, A for ambience, B for breath and T for transitions. Timestamp each marker with a short note, for example 01:12:03 H door slam. Colour-code tracks or markers for speed, for example red for impacts, blue for ambience. This saves minutes when you jump between scenes or hand off to another editor.

Mark in and out points for sections that need multiple layers. If a shot has fast cuts, add frame-accurate markers to avoid confusion during layering.

Decide fidelity: placeholders vs final assets

Choose quick library hits or generated sounds for pacing, and plan final layering only for shots that will be seen or heard closely. Use placeholders to test timing and dynamic relationships, then replace them with higher fidelity assets in the polish pass. If a moment is background texture, a single, matched ambience might be enough. If it is on-screen or emotionally important, commit to layered, bespoke SFX.

A practical rule, save time now: if you would not notice the finer detail in a final screening, leave it as a refined placeholder until picture lock.

Prepare files, templates and plugins before you start

A five-minute setup now saves an hour later. Export a cut-only copy of the edit and gather reference assets first.

Essential assets include the reference edit or video, dialogue stems, temp music and a cut-only export with handles. Put these in a project folder with clear versioning. Confirm your session settings: sample rate, frame rate and timecode must match the video to avoid drift and resampling artefacts.

Create session templates for Premiere Pro and DaVinci Resolve that match your standard workflow. Keep a backup export plan, for example a consolidated clip and an XML or AAF for handoffs.

Session templates & track naming

Use a predictable track stack: dialogue, SFX, foley, ambiences, music. Name tracks with short prefixes, for example DLG_Lead, SFX_Impacts, FLY_Foley, AMB_Room, MUS_Main. Bus groups for SFX, dialogue and music to keep fast automation and group processing simple. Set up a monitor bus and a print bus so you can audition layers without committing.

Save templates with your preferred routing, metering and a few starter EQ and compression presets. Loading the template should feel like putting on a familiar toolbelt.

Quick plugin and library checklist

Have a short list of essentials ready to audition: de-noise, de-click, transient shaper, EQ, limiter and a convolution reverb for room matching. Index your favourite SFX libraries into a fast browser or collection so you can drag and audition quickly. If you use a SFX creation tool, set up favourite presets or categories for footsteps, doors, whooshes and ambiences.

Store a few go-to plugins on a quick-access rack to avoid opening menus mid-edit. A tidy library and plugin list speeds work and reduces decision fatigue.

Three copyable sound-to-picture examples you can run now

Practical examples you can implement in a single session. Copy these workflows and adapt to your project.

Example, dialogue clean-up and ambience

Import dialogue stems and a cut-only video. Run a gentle noise reduction on a copy of the dialogue stem, then remove obvious clicks and pops. Create a room tone track by extracting a few seconds of quiet from the scene, loop it, and place it under trimmed cuts to mask edits. Subtle, high-frequency ambience works well to glue edits, but keep the level low so it does not compete with speech.

Finish with a light EQ to remove rumble and a compressor to even levels. Check intelligibility at typical listening volumes and on headphones.

Example, impact and whooshes

For a punchy impact, layer a transient core, a low-frequency body and a texture or crack for high-end presence. Add a high-speed whoosh for movement, align the peak to the frame when the action hits, then nudge the body layer a few frames to taste. Use transient shapers to tighten punch and short reverb or impulse responses sparingly to place the hit in a room.

Timing is king here. If an impact feels slow, nudge in single frames. If it feels too sharp, add a very short pre-ring or increase the body layer.

Example, promo/transition polish

Balance music with stings and hits for a short promo. Sidechain the music to key dialogue or stings using a fast attack and medium release so the vocal or hit pokes through. Place musical stings on decisive frames, and automate levels to keep clarity during dense moments. Export a short punchy pass and verify loudness targets for the platform.

A quick listen on laptop speakers will reveal whether the mix translates, make small automation moves rather than large EQ edits.

Fix common sound-to-picture problems fast

These fixes get you out of trouble without scrapping an entire session.

Start by locating the symptom, then pick the fastest remedy that preserves performance. Prioritise fixes that are reversible so you can iterate quickly.

Sync and timing fixes

If audio drifts, check frame rate and sample rate mismatches. Confirm timecode in the project settings and relink audio to the picture if needed. For small timing mismatches, use nudging in your DAW or clip-based retiming. When a long clip drifts progressively, reconform using an exported cut-only file with matching timecode.

If you have multiple takes, align a stable transient like a clap or slate to speed up bulk fixes.

Clarity and masking fixes

Use subtractive EQ to create space, for example dip 300 to 600 Hz on SFX to open space for dialogue, and gently reduce energies that compete. Dynamic ducking with sidechain compression works well where dialogue and music clash. For stubborn frequencies, apply narrow notches and check in context.

High-pass non-dialogue tracks to remove rumble. Always automate levels to keep ambience present without masking speech.

Technical nasties: noise, clicks and phasing

For noise and broadband hiss, use conservative denoising on dialogue stems, keeping an eye on artefacts. Fix clicks with de-click tools or short fades. For phasing, try a polarity flip, check mono compatibility and reduce overlapping stereo-rich layers or delay-align them to the reference.

If you hear comb filtering, solo overlapping layers and adjust timing or EQ to remove the clash.

Export, organise and hand off final sound with confidence

Delivery is often where things go sideways. A predictable export and clear notes save headaches.

Export stems for dialogue, SFX, ambiences and music as WAV at the session sample rate and bit depth, typically 48 kHz and 24-bit unless your pipeline asks otherwise. Name files with project, version, stem type and timecode such as PROJECT_v02_SFX_01_01_12_03.wav.

Include a short mix note describing changes, loudness target, reference video name and timecode for critical cues. Attach a cut-only video or XML/AAF when handing to editors or engines.

Export templates and stems

Always export at least these stems: DLG, SFX, AMB, FOLEY and MUSIC. Add a full mix and a reference mixdown. Use a consistent naming scheme and include sample rate and bit-depth in a short manifest file. Do a quick sonic QC by listening on headphones and a pair of speakers and verify file integrity.

Hand-off checklist for editors and engines

Include the final video reference, dry and wet stems, the session or template used, notes on automations and any marker information. For game engines or middleware, provide named one-shots, loopable ambiences and any suggested RTP cues. If you used generated assets, document their sources and any licensing notes.

Next steps with Krotos: speed up your sound-to-picture work

Krotos tools are built to speed auditioning, creation and iteration. Use them to sketch ambiences, generate whooshes and audition layered impacts without digging through folders. Integrate Krotos into your template so you can create and drag-ready assets straight into Premiere Pro or DaVinci Resolve timelines.

There are tutorials and starter templates that mirror the workflows above, and a community where creators share presets and tips to shave time off repeatable tasks. When you use automated or generative features, treat them as collaborative helpers, not final answers.

Calm reassurance on provenance and ethics: when a tool helps you create sounds, check the asset source and licensing before delivery, document which parts are created or edited, and keep transparent notes for clients. Trustworthy workflows are about auditability and clear attribution, especially when projects scale or go into games or broadcast.

Try a guided tutorial or trial

Open a demo scene, follow a step-by-step tutorial to recreate one of the examples above and time yourself. A small test edit will quickly show the time saved in auditioning and layering.

Join the community and share presets

Ask questions, swap templates and download presets from other creators. Community templates are a fast way to standardise session layouts and get projects moving quicker.

If you want to see the difference in real time, try a Krotos demo, watch a short workflow video or download a starter template to test on a small scene. Join the community for presets, feedback and workflow tips.

Frequently asked questions

How do I put sound in a photo?

Putting sound in a photo usually means creating a short video that pairs your still image with audio. In Premiere Pro or Resolve import the image, set its duration to the desired length, then add your audio track beneath it. Adjust fades and timing so the audio starts and ends naturally and export as an MP4 or MOV.

If you need the image to feel alive, layer ambience, subtle movement like a whoosh or a voiced narration. For social platforms, check their preferred codecs and loudness targets before export.

How to merge audio with photo?

Merging audio with a photo is an export step. Place the image and audio together on a timeline, make sure they are aligned to the desired start time, then export a video file. Use the correct export settings for the destination, for example H.264 for online platforms.

If you need the audio embedded in an MP3 or MP4 with cover art only, some tools can attach an image as artwork rather than creating a video. For most editing workflows, exporting a short video is the simplest solution.

How do I add a voice to an image?

Record or import the voice track into your session, place the voice on the timeline aligned with the image, and adjust levels and EQ so the speech is clear. Add a little room tone or subtle ambience beneath the voice to stop it sounding like it is floating in silence.

If the voice must be intelligible on small speakers, use light compression and check on different listening devices. A gentle high-pass filter around 80 Hz reduces low rumble.

How do I add noise in a picture?

To add noise as an audio texture underneath an image, import a noise or ambience track and place it below the visual asset in your timeline. Keep the level low and use EQ to remove masking frequencies so it supports the main content without competing.

If you mean visual noise, that is a video or image effect, handled inside your editor. For audio noise, loopable ambiences and subtle grain can make a still image feel like a place rather than a flat card.

How-to guide
This is some text inside of a div block.

Krotos Studio for Game Audio

Sound designer Vinny Mesa demonstrates his approach to Krotos Studio, where he re-designs a gameplay clip to create audio assets for video games.

JJ Lyon
December 19, 2025
Read Story↗

Krotos Studio is being used by creators and sound designers worldwide to create Hollywood sound in seconds.

One such sound designer, Vinny Mesa, demonstrates his approach to Krotos Studio in this informative video, where he re-designs a gameplay clip to create audio assets for video games.

Learn how game sound translates to Cinematic Trailer Sound Effects, and Learn how to Build Creative Glitchy Transitions with Krotos Studio with our guides across the site.

Watch the Video

Creating Game Audio Assets with Krotos Studio

Krotos Studio makes it easy to create assets to import into Wwise or FMOD.

Vinny selects a scenario and blends the sounds together in the performance area, then records the sounds onto the timeline.

Vinny covers the weapon selection menu, ambiences, footsteps and gunshots all with the Krotos Studio presets, to create a fully comprehensive soundscape.

Did you notice how Vinny uses multiple footstep layers to add extra details to the grassy areas of the clip? Using multiple presets together is a great way to add extra details to your sound designs.

Another creative idea Vinny demonstrates is reducing the 'Strength' parameter in the AK47 Single Shot preset to emulate the suppressor attached to the character's weapon in-game. This is a great way to add versatility and dynamics to your gunshots.

Krotos Studio in Ableton Live

Vinny records Krotos Studio directly to a track in the traditional workflow using Ableton's 'Resampling' mode. You can also use Krotos Studio's drag-and-drop functionality to place sound effects onto the timeline with ease.

Scenarios Used in This Video

  • Ambience - Countryside
  • Weapon - AK47 Single Shot
  • Interface - Modern UI
  • Footsteps - Boots Forest

Vinny's workflow is fast and effective, thanks to Krotos Studio. He shows how easy it is to create sound effects and shares some cool ideas to explore yourself. Performing and controlling sound effects couldn't be easier!

How-to guide
This is some text inside of a div block.

Painting' Sound Effects with Krotos Studio

Discover how filmmaker George Kamenov uses Krotos Studio to turn sound design into an artistic process, enhancing your project's mood and atmosphere.

JJ Lyon
December 19, 2025
Read Story↗
"It's like you're painting on your sound effects!" George Kamenov

Have you ever thought of sound design as a form of art, where each sound effect is a brushstroke that shapes your project's mood and atmosphere? Filmmaker George Kamenov sees it this way, especially when using Krotos Studio. He describes the experience as akin to "painting on your sound effects," highlighting the unique way in which you interact with sound effects in Krotos Studio.

"This is a tool that every filmmaker and editor should be using." George Kamenov

In this detailed video, George demonstrates how Krotos Studio transforms the task of adding sounds to video into a creative art form. Removing the headache of making stock sound effects work for the scene.

"As a filmmaker, I always try to record sound effects for my videos on location. But that's not always what the project needs, or sometimes I'll end up forgetting something, and then I might try to pull sounds from some platform, but those don't work either because the tempo doesn't match, or I straight up just can't find a sound effect that fits. In those cases, having something like Krotos Studio where I can just play back my clip and perform the exact combination of sound effects I need with the exact tempo and timing that I need can be a lifesaver."

Discover how to turn images into audio effects and ambiences by reading about the Image to Sound Effects Available in Krotos Studio, and learn how our AI Ambience Generator can make your production process quicker and more unique, too.

How-to guide
This is some text inside of a div block.

Creating Video Game Trailer SFX with Krotos Studio

Sound Designer Pierre Griscelli used Krotos Studio to recreate the cinematic video game trailer sound effects for The Last Of Us: Part 1. Watch the video below!

JJ Lyon
December 19, 2025
Read Story↗

Sound Designer Pierre Griscelli used Krotos Studio to recreate the cinematic video game trailer sound effects for The Last Of Us: Part 1. Watch the video below!

Every sound used for the trailer comes from Krotos Studio's library of over 140 presets.

Krotos Studio's Cinematic Category

The trailer is full of cinematic sound effects, impacts, transitions, whooshes and more.

Fortunately, Krotos Studio has an entire category dedicated to cinematic sound effects, allowing Pierre to recreate the sound effects for this trailer entirely from within the software.

"Krotos Studio is a powerful and customisable tool allowing to create and perform sound effects as well as ambiences in real time. The catalogue of presets is well-stocked so far and regularly fed with new sounds" - Pierre Griscelli

Bring cinematic energy into gameplay trailers by studying Call of Duty Black Ops 6: Cinematic Sound Effects with Krotos Studio and perfecting pacing in Creating Cinematic Sound Effects In Krotos Studio.

How-to guide
This is some text inside of a div block.

Getting Started Using the Krotos Studio Panel in Premiere

How to install and use the Krotos Studio Video to Sound panel inside Adobe Premiere. Select a region, choose your elements, and sound effects are selected and synced to your timeline automatically.

JJ Lyon
December 19, 2025
Read Story↗

Welcome to Video to Sound in Adobe Premiere

Video to Sound now runs directly inside Adobe Premiere via our new plugin integration. Simply select a region of your timeline including video, choose elements for the scene, hit Analyse and sound effects are synced automatically on the timeline. Once on the timeline, you can swap these for other sound effects with a few clicks, for something more appropriate to your vision, all while maintaining the sync.

This workflow is powered by our Video to Sound technology and our vast library of high-quality, royalty-free sound effects recorded by the world's best sound designers.

The plugin is AI-assisted and only uses real, royalty-free audio. It does NOT use generative AI to create or synthesise audio.

The plugin is part of the Krotos Studio platform — free to try, then available as part of a subscription. We offer different levels of use based on your subscription plan: Studio, Pro or Max.

What you can do with the plugin

Using the plugin you can automatically add synchronised, high-quality sound effects to your projects in Adobe Premiere. At this time, you can choose between a number of different elements to add to a scene:

  • Ambiences
  • Whooshes
  • Transitions
  • Risers
  • Impacts
  • Cloth

These will be automatically chosen, downloaded and synced based on the region of video you have selected.

Footsteps and Spot Effects will arrive in the plugin very soon and will be immediately available as part of your subscription plan.

Before you start

You will need the latest version of Creative Cloud and a version of Premiere newer than 2025.0.0 (25.0.0) to use the plugin.

Getting Started

1. If you are new user, create an account at krotos.studio. If you already have an account, head to Download. Your download will start automatically.

  1. Once downloaded, run the installer; this will install the Premiere plugin and the Krotos Studio standalone (this is also accessible from the Premiere plugin and allows you to dive deeper into designing sound effects is the plugin doesn't get you the results you are looking for)
  2. Open Premiere
  3. Add the plugin from Window > UXP Plugins. It will appear and can be used as a floating window or docked.
  4. Log in via the plugin using your krotos.studio account credentials.
Using Google Sign-in? Google Sign-in is not currently supported in the plugin. You will need to create a password. Click Forgot Password on the login screen, set a new password, then return to the plugin and use that password to log in.
Krotos Studio login screen inside the Premiere plugin
  1. Select the elements you want to add to the scene. Click to select, click again to deselect.
  2. Select a region on your timeline using I and O on your keyboard, or right-click to set your in and out points. Drag the points to adjust. Video to Sound will only analyse between these two points.
Timeline with in and out points set in Adobe Premiere
  1. Once you have selected a region and your elements, hit Analyse and Render. Your video will be analysed and sound effects will be automatically added to tracks in your project.
  2. To adjust the mix, click any clip on the timeline to adjust its level or delete it. This applies to every clip added by Video to Sound.

Swapping sound effects

If a sound effect does not fit the scene, you can swap it directly in the plugin UI while keeping it in sync. This is possible for all elements except Cloth.

Swapping is done from the Results tab. You are taken to this tab automatically once analysis is complete and your sound effects have been placed on the timeline.

Ambiences

Use the Grid view showing each clip added to the timeline. Click a cell in the grid to select a clip, or click the clip on the Premiere timeline itself and the grid will update automatically. Browse the list of alternative sound effects, or use the search to narrow down results. Click the play button to preview an alternative. Once you have chosen one, click Swap and the clip will be replaced directly on the timeline.

Ambiences grid in the Results tab showing swap options

Whooshes, Risers and Impacts

These elements include both a Simple and Advanced mode.

  • Simple mode — choose a Style and Intensity, then click Swap All to replace all clips for that element in the analysed region at once.
  • Advanced mode — swap individual assets while leaving others in place. Use the grid to select a specific clip (or click the clip on the Premiere timeline), choose an alternative from the list, and hit Swap.
Whooshes Advanced mode showing the grid and swap options

FAQ

Is the plugin using generative AI?

No. All use of AI is assistive, not generative. We use real, high-quality recordings made by our sound designers. AI is used only to decide which sound effects to choose, combine and place. Nothing is generated or synthesised.

Footsteps are marked as Coming Soon — what's the ETA?

We are working on a game-changing solution for footsteps. It should arrive very soon.

How many times can I analyse?

There is a fixed limit based on your plan. This also applies during the Beta.

  • Free (account only, no active subscription) — 5 analyses
  • Krotos Studio — 10 analyses
  • Krotos Studio Pro — 100 analyses
  • Krotos Studio Max — 200 analyses

Can I swap assets after analysing a new region?

You can only swap assets immediately after analysing a region. If you analyse a new region, swapping applies to that new region only. You cannot go back and swap assets from a region analysed earlier in the session or on a previous day. This is a current limitation of the workflow.

What are the minimum system requirements?

You will need Adobe Premiere 25.0.0 or above. We recommend updating to the latest version of Creative Cloud.

Where are my downloaded assets stored?

Assets are stored in a persistent folder outside your project directory.

  • macOS: /Users/{user}/Library/Application Support/Adobe/UXP/PluginsStorage/PPRO/26/External/com.krotos.studio.videoToSfx/PluginData/sessions/
  • Windows: C:\Users\{user}\AppData\Roaming\Adobe\UXP\PluginsStorage\PPRO\26\External\com.krotos.studio.videoToSfx\PluginData\sessions\

How-to guide
This is some text inside of a div block.

7 Reasons this Sound Effects Platform is Perfect for Content Creators

Discover Krotos Studio, the ultimate pro sound effects software for PC and MAC. Enjoy an extensive library, intuitive interface, and seamless DAW integration.

JJ Lyon
December 19, 2025
Read Story↗

Krotos Studio distinguishes itself as a pro sound effects program for PC and MAC, catering to the diverse needs of audio professionals and content creators. Quality SFX are a click away with Krotos Studio, and the inner sound designer in us all needs royalty free sound effects libraries to deliver pro quality sounds. So with that said, here are...

If you are evaluating tools for daily production, get a quick overview of core Krotos capabilities. To prototype scenes without budget friction, try ready to use sounds from the Free Sound Effects page.

7 Simple Reasons to consider Krotos Studio in your sound recording workflow

1. Krotos Studio Is An Extensive Foley Sound Library

Krotos Studio boasts a vast collection of ready-to-use pro sound effects that span a broad spectrum of categories, ensuring creators can find the exact sounds they need swiftly and efficiently. Plus there is new quality sound effects libraries every month. Foley is essential for your projects to bring character movements to life and reality, and pro sound effects users know that realism is essential. So regardless of what sounds you need, Krotos Studio has quality sound effects to cover all bases.

2. Krotos Studio has A Highly Intuitive Interface

The program is designed with user-friendliness in mind, making it accessible for beginners yet robust enough for professional audio editors. This intuitive interface facilitates a smooth workflow, allowing users to navigate and utilize the program’s features with ease. Whether you are using pro tools, adobe audition, or another sound designer environment, you can get started right away making pro sound effects.

3. Krotos Studio Offers Real-Time Audio Manipulation

Offering real-time audio production, mixing and audio effects, Krotos Studio enables users to modify and adjust sound effects on the fly, just like professional sound designers do.. This not only enhances creative freedom but also significantly speeds up the production process. with the intuitive workflow you'll get new sounds that are royalty free, every time.

4. Krotos Studio Offers Seamless Digital Audio Workstation Integration

Krotos Studio integrates flawlessly with every major Digital Audio Workstation, including pro tools. This makes it a flexible and indispensable tool in any professional sound design setup. This integration simplifies the process of incorporating sound effects into various projects

5. Krotos Studio Provides Creative Control and Flexibility

The program offers extensive control over sound design, allowing creators to manipulate audio in numerous ways. From subtle adjustments to significant transformations, Krotos Studio equips users with the tools to craft distinct and memorable soundscapes. all local files, you can drag and drop royalty free sound effects into any project. There is a suite of audio effects built in too, thanks to the Quick FX feature, which provides reverbs to place your sounds in any space, and a filter to simulate distance.

6. Krotos Studio Supports a Range of Audio Formats

Compatibility with multiple audio formats ensures that the Krotos Studio sound library can be used in a variety of media projects. This versatility is crucial for creators who work across different platforms and need a reliable program that can handle various file types for quality sounds. Any good quality Audio post-production software needs to cover audio editing, audio effects and beyond, and Krotos Studio does this with ease thanks to its WAV file format and high sample rate.

7. Krotos Provides Regular Updates and New Features to the Platform

Krotos is dedicated to continual improvement, regularly updating the program with new features and sounds. This commitment to innovation keeps Krotos Studio at the forefront of audio design technology, meeting the dynamic needs of modern creators. you subscription provides unlimited downloads, no credit systems or limits. every library is yours.

Try Krotos Studio Yourself

Join Krotos Studio today and harness the power of an incredible piece of audio software in your soundtracks.

F.A.Q

What is the best app for adding sound effects to videos?

For content creators looking for a powerful and versatile pro sound effects library, Krotos Studio offers a comprehensive audio software that enhance audio projects and streamline sound production. Whether you are working on films, games, or digital media, Krotos Studio audio software is designed to elevate your work with superior soundtracks. Content Creators using Krotos Studio for their projects can be confident that their stories will be hear loudly and with passion.

How-to guide
This is some text inside of a div block.

What is sound design in film, practical definition and workflow

JJ Lyon
December 19, 2025
Read Story↗

Sound design can feel like the last thing on your plate when the edit is due, yet it is the single fastest way to make a cut read like it was made by a pro. This guide gives a practical definition, a prioritised checklist and a 30 to 90 minute sprint workflow you can use in Premiere Pro or DaVinci Resolve, plus quick recipes for crowds, footsteps, whooshes and ambiences. You will also get a calm ethics checklist for procedural and AI‑assisted tools.

Sound design in film, the short, practical definition

Sound design in film is the craft of choosing, creating and placing every non‑musical and musical audio element so picture, performance and emotion read more clearly. It blends creative choices about what a scene should feel like with technical tasks that make those choices sit in the mix.

Examples of effect:

• A single pair of footsteps, timed and tonalised, can sell a character’s weight and mood.

• A low rumble beneath dialogue can make a room feel enormous and tense.

• A tight whoosh on a transition sells speed and focus better than a long musical sweep.

• Subtle ambience swaps prevent location confusion between cuts.

Fast win for editors: prioritise dialogue clarity, then key SFX that explain action, then atmosphere. That order saves time and raises perceived production value quickly.

Why sound matters

Sound clarifies action, builds atmosphere, and guides emotion. Thin explosions reduce visual impact; mismatched footsteps distract subconsciously. Good sound tells the audience where to look emotionally and spatially without shouting.

A simple workflow: fix muddled dialogue first so lines are intelligible, add focused footsteps to sell movement, then lay a low ambience to glue the edit. Each step adds storytelling information.

Creative vs technical work

Creative work chooses and shapes the sound palette: selecting ambiences, designing whooshes, sculpting crowd textures. Technical work edits, aligns, EQs, routes to buses and delivers stems. Both matter. For speed, make decisive creative choices early, then use predictable technical recipes so those choices survive loudness comps and last‑minute changes.

Design the intent first, then apply standard technical procedures to make it stick.

Core elements to assemble a film’s sonic world

Group audio into actionable categories so you and your client can prioritise. Main pieces: dialogue and ADR, production tracks, foley, sound effects, ambiences, music, and the final mix/processing. Treat each as a tool with a distinct job.

• Dialogue and ADR: priority one. Clean, intelligible speech carries the story. Avoid heavy processing until sync and level are locked.

• Production tracks: useful for room tone and natural performance texture, but often noisy, use selectively.

• Foley: footsteps and cloth sell presence. Replace when production sound is unusable.

• Sound effects: hits, swells, mechanical noises and whooshes that explain action or direct attention.

• Ambiences: long tones and atmospheres that set location and energy.

• Music: guides emotion and pacing. Temp music is fine early; reserve final balance for later.

• Mix and processing: buses, EQ, compression, reverb and automation make everything sit together.

When strapped for time, focus on dialogue clarity, essential foley for visible actions, and two ambiences that prevent jarring spatial jumps.

Prioritisation checklist

1. Clean dialogue and ADR fixes: remove obvious noise and level‑match lines.

2. Lay primary ambience and room tone to hold edits together.

3. Place key SFX that clarify action: door slams, impacts, footsteps.

4. Add foley to visible interactions to sell movement and weight.

5. Drop temp music low; focus on transitions and cues later.

6. Quick pre‑mix on buses and automate levels for clarity before detailed processing.

Use this as a sprint blueprint, not a rigid rule. If a shot depends on a single whoosh, do that whoosh before ambience.

SFX category examples

• Crowds: long layered loops for background, short pops for focal reactions. Maintain consistent level and texture across cuts.

• Footsteps: vary timing, surface and weight. Replace sync issues with discrete hits and crossfade for continuity.

• Whooshes: short, frequency‑focused swells for cuts and reveals. Layer a high transient with a low rumble for body.

• Ambiences: source location beds and subtly filter or pitch‑shift between cuts to avoid a static feel.

Pick the smallest number of SFX that clearly explain the scene. More is not always better.

Step‑by‑step workflow you can use inside Premiere Pro and DaVinci Resolve

This is a time‑boxed sprint you can run in 30 to 90 minutes to get a professional, deliverable temp mix.

1. Prepare the timeline: lock picture tracks and create labelled audio tracks for Dialogue, Foley, SFX, Ambience and Music. Create two buses/submixes: DialogBus and SFXBus.

2. Quick dialogue clean: trim breaths, remove obvious clips, apply a gentle high‑pass and a light de‑noise if required. Level‑match clips so speech sits consistently.

3. Lay ambiences under edits as long forms, crossfading between scenes to avoid gaps.

4. Place key SFX and foley on visible actions. Use scrubbing and frame nudge to sync precisely.

5. Route tracks to buses; add basic compression and EQ on Dialogue bus, a touch of reverb send on SFX for space, and ride levels with automation.

6. Export stems: Dialogue, SFX+Foley and Music as separate files. Deliver a stereo premix and the individual stems for finalising.

If you only have 30 minutes, complete steps 1 to 4 and a fast level pass. That alone improves the edit significantly.

Fast temp mix recipe

• Rough levels: Dialogue -6 to -3 dB peak, SFX around -12 dB, Ambience -18 to -24 dB, Music -18 dB.

• Basic EQ: high‑pass dialogue at ~80 Hz to remove mud. Gentle de‑ess if sibilance distracts.

• Duck music under dialogue with sidechain compression or automated rides.

• Add subtle sends: small plate for close SFX, longer hall for distant ambiences.

• Quick check on headphones and monitors to confirm dialogue intelligibility.

Judge success by clarity and storytelling: if the action reads without studying the picture, you have a solid temp mix.

Importing SFX and matching to picture

Use frame‑accurate scrubbing and nudging to place hits. In Premiere, comma and period nudge by frames; in Resolve use similar keys or the Inspector to slip audio. Match transients visually in the waveform, then tidy with micro‑fades to avoid clicks.

Transient shaping and short transient‑enhancing EQ make whooshes snap without raising overall level. Layer a transient‑heavy top layer with a low body layer and time the top layer to hit just before the visual peak for perceived impact.

Speed tools and techniques for rapid SFX creation

Keep a toolkit of category packs, parametric generators and batch processes to produce usable SFX fast.

• Procedural/parametric SFX generators give instant variations for whooshes and ambiences, useful when you need many similar hits.

• Layered libraries and category packs let you swap textures quickly for crowds and footsteps. Keep 5 to 10 favoured variations per category.

• Automated video‑to‑sound tools can suggest SFX placements. Use them for drafts, then humanise the results.

• Export formats: WAV, 48 kHz, 24 bit is safe for film and game engines. For loops, add clear loop points and metadata.

When building category packs, name files consistently, include a short README and save useful presets for EQ, reverb and transient shaping.

Procedural whooshes and how to use them

Combine a filtered noise sweep for the body, a pitch‑bent oscillator for motion, and a short transient hit for attack. Automate low‑pass cutoff and pitch to shape movement. Keep a dry and a wet version so you can choose quickly on the timeline.

Use procedural whooshes when many variations or timing changes are likely; they adapt well without hunting through single samples.

Batch export tips for game audio

• Naming: scene_event_variation_take.wav (for example street_crowd_murmur_v02_take1.wav).

• Folders: group by type then by scene/event (crowds/street/, footsteps/wood/).

• Metadata: embed cue name, loop points and description when possible. Save stems and a full mix for QA.

• Format: WAV 48 kHz 24 bit; provide mono one‑shot SFX and stereo ambiences.

This keeps assets friendly for FMOD, Wwise, Unreal and Unity import pipelines.

Ethics, AI and trusted workflows: boundaries and best practice

As AI and procedural tools become common, use a simple decision framework before employing generated or assisted sounds. Respect rights, be transparent with clients, and verify quality before delivery.

Generative AI creates audio from learned patterns; procedural tools create variations from parameters or pre‑recorded material. Each has different legal and quality implications.

Ask before using an assisted sound: do you have the right to use and distribute it, does it meet the client quality bar, and is it documented in delivery notes? If any answer is no, choose human‑recorded or properly licensed alternatives.

When to use assisted tools

Use assisted or procedural tools when speed is essential, many variations are required, or you need parameter‑driven consistency that’s easy to update. Prefer human‑created sound for close‑ups, signature character sounds, or any moment requiring uniqueness and clear licensing.

For client work with strict IP rules, get sign‑off on tool usage early. For commercial distribution, favour assets with clear licensing.

Minimum checks before delivery

• Listen on at least two playback systems (studio monitors and headphones).

• Verify sync across cuts and watch the video while listening to ensure hits land on‑frame.

• Confirm metadata and licensing for each asset and include a delivery note stating which tools were used to create or modify sounds.

• Run an intelligibility check for dialogue and a loudness pass if the client requires a specific LUFS target.

These checks protect quality and legal risk without slowing your workflow.

If you want to test these workflows on real projects, try Krotos tools free or explore their step‑by‑step video tutorials and community presets. Krotos provides quick‑start packs and a user community that shares presets and scene‑specific packs tailored to Premiere Pro, DaVinci Resolve and game engines to get usable results fast.

Frequently asked questions

How do you describe sound design in film?

Sound design in film is the process of creating, selecting and placing audio elements so picture and performance communicate clearly. It includes dialogue editing and ADR, foley, sound effects, ambiences and music choices, all mixed and processed to support story and emotion. The role spans creative decisions about how scenes should feel and technical actions to make those decisions work reliably in the final mix.

What are the 5 main elements of sound design in film?

A simple breakdown: dialogue, foley, sound effects, ambience and music. Dialogue carries information, foley sells presence, sound effects explain actions and focus, ambience sets space, and music directs emotion and pacing. Prioritise dialogue first, then foley and key SFX for visible actions, followed by ambience and music as time allows.

What is an example of sound design?

A chase sequence: crisp footsteps, tyre squeals, whooshes and a low rumble layered under fast cuts. Dialogue is kept clear with selective music ducking. Whooshes accentuate edits, tyre screeches localise vehicles, and ambience gives the scene consistent space, making speed and danger feel real without distracting from the picture.

How-to guide
This is some text inside of a div block.

Guide to Redeeming Your Krotos Studio Coupon Code

Follow these easy steps to sign up for a Krotos Studio subscription. Create an account, select your plan, apply coupon codes, and complete your checkout.

JJ Lyon
December 19, 2025
Read Story↗

1. Head to https://krotos.studio

Click on the Get Started button

2. Create an account (or Sign in)

Select Sign Up For Free for the monthly subscription (button on the right). (If you already have an account and you are signed in you will be redirected straight to step 3.)

3. Select Plan

After successfully signing up for free (or having logged in), you'll be redirected to the subscription signup page. Select the Krotos Studio Monthly plan.

4. Apply your Coupon Code

Enter your coupon code and click on Apply Coupon in the Payment Summary section.

5. Proceed to Checkout.

Fill in your Account Information and click “Proceed to Payment Details''. Then click on “Add Card” in the Payment Information section and add your card details to authenticate your order. You won't be charged anything for the period the complementary coupon covers.There's no long-term commitment. You can easily cancel your subscription from your account page at any time before the end of your complimentary period.

6. Download and Use Krotos Studio!

Select Subscribe in the Payment Summary section and you will be taken to the downloads page upon successful order completion.

Please follow this guide for installation and getting started info.

After redeeming your offer, jump right into Getting Started with Krotos Studio and expand your library with our free sound effects.

How-to guide
This is some text inside of a div block.

Effortless Sound Design in Pro Tools

Discover how Krotos Studio Pro enhances post-production workflows with powerful features. Watch our video for expert insights and tips on sound design.

Read Story↗

Krotos Studio Pro has already found its place in professional post-production workflows: its library of presets for high speed sound design and customisation have been enthusiastically received by pros in the industry.

Our recent blog with Sound Designer Wojciech Chołaściński (Witcher 4) was an exciting window into how Krotos Studio saves time whilst empowering creativity.

In this new video, our Head of Product Matthew Collings takes you through some of the key workflows using Krotos Studio Pro in Pro Tools.

We redesigned this clip using only Krotos Studio Pro, showcasing some highly requested features from the professional community:

  • Multichannel output from Krotos Studio Pro
    • Get the stems from every layer of every preset for more control in the mix
  • Audiosuite
    • Render any exact duration of ambience or music to the timeline at high speed
  • MIDI control
    • Use your MIDI keyboard to perform footsteps or other presets
    • Recording MIDI notes to the timeline
  • Adding your own sounds
    • Swap out a layer of any preset with your own assets to meet your needs
  • Drag and Drop
    • Bring any performance or happy accident into the timeline 
  • Performing foley
    • Perform cloth or foley movements in sync with your video
    • Routing to a bus and performing as you would with an instrument
  • Layering 
    • Using the output from multiple presets to create a unique gunshot

Integrate Krotos with Pro Tools faster by following How to use Krotos Studio inside Pro Tools AudioSuite and enhance impact through Creating Cinematic Sound Effects In Krotos Studio. You can also explore a wide range of assets in our free sound effects library.

How-to guide
This is some text inside of a div block.

Nature film sound effects

Check out this touching, powerful film, "Pulse of Earth" by TILIADESIGN, submitted as part of our Just Add Sound challenge.

JJ Lyon
December 19, 2025
Read Story↗

Check out this touching, powerful film, "Pulse of Earth" by TILIADESIGN, submitted as part of our Just Add Sound competition.

“Pulse of Earth: A Journey Through Time and Nature” captures humanity’s evolving relationship with the natural world, from ancient times to a sustainable future. This journey highlights the beauty, challenges, and hope surrounding our planet and its future.They say a picture is worth a thousand words, but no amount of words or images could fully convey the beauty and complexity of our world. This video captures just a fraction of the wonders our Earth has to offer—an invitation to appreciate, protect, and cherish it.

You can expand your Natural Soundscapes with Ambience Sound Effects, and check out these Quick Ways to Create Unique Forest Ambience Sound Effects.

What's new

Product updates

Every new pack, drop and unlock

For the craft

Deep dives

Long reads, worth the time

This is some text inside of a div block.

Magic sound effects: fireballs, fizzles and one very Evil Pulse

Krotos Studio's Magic category gives you fire, ice and arcane spell sounds you perform from an XY pad. Here's what's in the cauldron and how to cast it.

JJ Lyon
Dive in ↗

Heading 1

Heading 2

Heading 3

Heading 4

Heading 5
Heading 6

Lorem ipsum dolor sit amet, consectetur adipiscing elit, sed do eiusmod tempor incididunt ut labore et dolore magna aliqua. Ut enim ad minim veniam, quis nostrud exercitation ullamco laboris nisi ut aliquip ex ea commodo consequat. Duis aute irure dolor in reprehenderit in voluptate velit esse cillum dolore eu fugiat nulla pariatur.

Block quote

Ordered list

  1. Item 1
  2. Item 2
  3. Item 3

Unordered list

  • Item A
  • Item B
  • Item C

Text link

Bold text

Emphasis

Superscript

Subscript

This is some text inside of a div block.

Creatures and Animal Sound Effects in Krotos Studio

Bears, Dragons and One Very Angry Cat: New Creatures in Krotos Studio

JJ Lyon
Dive in ↗

Heading 1

Heading 2

Heading 3

Heading 4

Heading 5
Heading 6

Lorem ipsum dolor sit amet, consectetur adipiscing elit, sed do eiusmod tempor incididunt ut labore et dolore magna aliqua. Ut enim ad minim veniam, quis nostrud exercitation ullamco laboris nisi ut aliquip ex ea commodo consequat. Duis aute irure dolor in reprehenderit in voluptate velit esse cillum dolore eu fugiat nulla pariatur.

Block quote

Ordered list

  1. Item 1
  2. Item 2
  3. Item 3

Unordered list

  • Item A
  • Item B
  • Item C

Text link

Bold text

Emphasis

Superscript

Subscript

This is some text inside of a div block.

What is audio post production: a creator’s practical guide

JJ Lyon
Dive in ↗

Heading 1

Heading 2

Heading 3

Heading 4

Heading 5
Heading 6

Lorem ipsum dolor sit amet, consectetur adipiscing elit, sed do eiusmod tempor incididunt ut labore et dolore magna aliqua. Ut enim ad minim veniam, quis nostrud exercitation ullamco laboris nisi ut aliquip ex ea commodo consequat. Duis aute irure dolor in reprehenderit in voluptate velit esse cillum dolore eu fugiat nulla pariatur.

Block quote

Ordered list

  1. Item 1
  2. Item 2
  3. Item 3

Unordered list

  • Item A
  • Item B
  • Item C

Text link

Bold text

Emphasis

Superscript

Subscript

This is some text inside of a div block.

What is foley sound, definition, examples and quick workflow

JJ Lyon
Dive in ↗

Heading 1

Heading 2

Heading 3

Heading 4

Heading 5
Heading 6

Lorem ipsum dolor sit amet, consectetur adipiscing elit, sed do eiusmod tempor incididunt ut labore et dolore magna aliqua. Ut enim ad minim veniam, quis nostrud exercitation ullamco laboris nisi ut aliquip ex ea commodo consequat. Duis aute irure dolor in reprehenderit in voluptate velit esse cillum dolore eu fugiat nulla pariatur.

Block quote

Ordered list

  1. Item 1
  2. Item 2
  3. Item 3

Unordered list

  • Item A
  • Item B
  • Item C

Text link

Bold text

Emphasis

Superscript

Subscript

This is some text inside of a div block.

What is sound design in film, practical definition and workflow

JJ Lyon
Dive in ↗

Heading 1

Heading 2

Heading 3

Heading 4

Heading 5
Heading 6

Lorem ipsum dolor sit amet, consectetur adipiscing elit, sed do eiusmod tempor incididunt ut labore et dolore magna aliqua. Ut enim ad minim veniam, quis nostrud exercitation ullamco laboris nisi ut aliquip ex ea commodo consequat. Duis aute irure dolor in reprehenderit in voluptate velit esse cillum dolore eu fugiat nulla pariatur.

Block quote

Ordered list

  1. Item 1
  2. Item 2
  3. Item 3

Unordered list

  • Item A
  • Item B
  • Item C

Text link

Bold text

Emphasis

Superscript

Subscript

This is some text inside of a div block.

What is sound design in video editing: a practical explainer

JJ Lyon
Dive in ↗

Heading 1

Heading 2

Heading 3

Heading 4

Heading 5
Heading 6

Lorem ipsum dolor sit amet, consectetur adipiscing elit, sed do eiusmod tempor incididunt ut labore et dolore magna aliqua. Ut enim ad minim veniam, quis nostrud exercitation ullamco laboris nisi ut aliquip ex ea commodo consequat. Duis aute irure dolor in reprehenderit in voluptate velit esse cillum dolore eu fugiat nulla pariatur.

Block quote

Ordered list

  1. Item 1
  2. Item 2
  3. Item 3

Unordered list

  • Item A
  • Item B
  • Item C

Text link

Bold text

Emphasis

Superscript

Subscript

This is some text inside of a div block.

Foley in film: a practical explainer for editors and creators

JJ Lyon
Dive in ↗

Heading 1

Heading 2

Heading 3

Heading 4

Heading 5
Heading 6

Lorem ipsum dolor sit amet, consectetur adipiscing elit, sed do eiusmod tempor incididunt ut labore et dolore magna aliqua. Ut enim ad minim veniam, quis nostrud exercitation ullamco laboris nisi ut aliquip ex ea commodo consequat. Duis aute irure dolor in reprehenderit in voluptate velit esse cillum dolore eu fugiat nulla pariatur.

Block quote

Ordered list

  1. Item 1
  2. Item 2
  3. Item 3

Unordered list

  • Item A
  • Item B
  • Item C

Text link

Bold text

Emphasis

Superscript

Subscript

This is some text inside of a div block.

5 ways pro editors are using the Krotos Premiere Pro plugin

Five real workflow use cases for the Krotos Video to Sound Premiere Pro plugin. Demonstrated by Mike in under five minutes.

JJ Lyon
Dive in ↗

Heading 1

Heading 2

Heading 3

Heading 4

Heading 5
Heading 6

Lorem ipsum dolor sit amet, consectetur adipiscing elit, sed do eiusmod tempor incididunt ut labore et dolore magna aliqua. Ut enim ad minim veniam, quis nostrud exercitation ullamco laboris nisi ut aliquip ex ea commodo consequat. Duis aute irure dolor in reprehenderit in voluptate velit esse cillum dolore eu fugiat nulla pariatur.

Block quote

Ordered list

  1. Item 1
  2. Item 2
  3. Item 3

Unordered list

  • Item A
  • Item B
  • Item C

Text link

Bold text

Emphasis

Superscript

Subscript

This is some text inside of a div block.

A Letter to the Sound Community

Dive in ↗

Heading 1

Heading 2

Heading 3

Heading 4

Heading 5
Heading 6

Lorem ipsum dolor sit amet, consectetur adipiscing elit, sed do eiusmod tempor incididunt ut labore et dolore magna aliqua. Ut enim ad minim veniam, quis nostrud exercitation ullamco laboris nisi ut aliquip ex ea commodo consequat. Duis aute irure dolor in reprehenderit in voluptate velit esse cillum dolore eu fugiat nulla pariatur.

Block quote

Ordered list

  1. Item 1
  2. Item 2
  3. Item 3

Unordered list

  • Item A
  • Item B
  • Item C

Text link

Bold text

Emphasis

Superscript

Subscript

This is some text inside of a div block.

Getting Started Using the Krotos Studio Panel in Premiere

How to install and use the Krotos Studio Video to Sound panel inside Adobe Premiere. Select a region, choose your elements, and sound effects are selected and synced to your timeline automatically.

JJ Lyon
Dive in ↗

Heading 1

Heading 2

Heading 3

Heading 4

Heading 5
Heading 6

Lorem ipsum dolor sit amet, consectetur adipiscing elit, sed do eiusmod tempor incididunt ut labore et dolore magna aliqua. Ut enim ad minim veniam, quis nostrud exercitation ullamco laboris nisi ut aliquip ex ea commodo consequat. Duis aute irure dolor in reprehenderit in voluptate velit esse cillum dolore eu fugiat nulla pariatur.

Block quote

Ordered list

  1. Item 1
  2. Item 2
  3. Item 3

Unordered list

  • Item A
  • Item B
  • Item C

Text link

Bold text

Emphasis

Superscript

Subscript

This is some text inside of a div block.

How to use an AI soundscape generator to create ambience

AI-generated ambiences can be brilliant time-savers, but a few predictable mistakes make them feel synthetic and hard to mix.

JJ Lyon
Dive in ↗

Heading 1

Heading 2

Heading 3

Heading 4

Heading 5
Heading 6

Lorem ipsum dolor sit amet, consectetur adipiscing elit, sed do eiusmod tempor incididunt ut labore et dolore magna aliqua. Ut enim ad minim veniam, quis nostrud exercitation ullamco laboris nisi ut aliquip ex ea commodo consequat. Duis aute irure dolor in reprehenderit in voluptate velit esse cillum dolore eu fugiat nulla pariatur.

Block quote

Ordered list

  1. Item 1
  2. Item 2
  3. Item 3

Unordered list

  • Item A
  • Item B
  • Item C

Text link

Bold text

Emphasis

Superscript

Subscript

This is some text inside of a div block.

How to do sound design in Premiere: fast, practical steps

This guide starts by showing what typically goes wrong, then gives a fast, practical Premiere centred workflow to get pro sounding results without the guesswork.

JJ Lyon
Dive in ↗

Heading 1

Heading 2

Heading 3

Heading 4

Heading 5
Heading 6

Lorem ipsum dolor sit amet, consectetur adipiscing elit, sed do eiusmod tempor incididunt ut labore et dolore magna aliqua. Ut enim ad minim veniam, quis nostrud exercitation ullamco laboris nisi ut aliquip ex ea commodo consequat. Duis aute irure dolor in reprehenderit in voluptate velit esse cillum dolore eu fugiat nulla pariatur.

Block quote

Ordered list

  1. Item 1
  2. Item 2
  3. Item 3

Unordered list

  • Item A
  • Item B
  • Item C

Text link

Bold text

Emphasis

Superscript

Subscript

This is some text inside of a div block.

How to do automated dialogue replacement (ADR) in Premiere Pro

This guide explains what ADR is in plain terms, why it matters to editors and filmmakers.

JJ Lyon
Dive in ↗

Heading 1

Heading 2

Heading 3

Heading 4

Heading 5
Heading 6

Lorem ipsum dolor sit amet, consectetur adipiscing elit, sed do eiusmod tempor incididunt ut labore et dolore magna aliqua. Ut enim ad minim veniam, quis nostrud exercitation ullamco laboris nisi ut aliquip ex ea commodo consequat. Duis aute irure dolor in reprehenderit in voluptate velit esse cillum dolore eu fugiat nulla pariatur.

Block quote

Ordered list

  1. Item 1
  2. Item 2
  3. Item 3

Unordered list

  • Item A
  • Item B
  • Item C

Text link

Bold text

Emphasis

Superscript

Subscript

This is some text inside of a div block.

Audio mixing and mastering: how to get fast, deliverable results

This guide gives a compact, stage based workflow you can apply immediately, plus practical checks and examples for Premiere Pro, DaVinci Resolve and game audio pipelines. Follow the stages, use a couple of go to references and you will deliver professional, consistent results fast.

JJ Lyon
Dive in ↗

Heading 1

Heading 2

Heading 3

Heading 4

Heading 5
Heading 6

Lorem ipsum dolor sit amet, consectetur adipiscing elit, sed do eiusmod tempor incididunt ut labore et dolore magna aliqua. Ut enim ad minim veniam, quis nostrud exercitation ullamco laboris nisi ut aliquip ex ea commodo consequat. Duis aute irure dolor in reprehenderit in voluptate velit esse cillum dolore eu fugiat nulla pariatur.

Block quote

Ordered list

  1. Item 1
  2. Item 2
  3. Item 3

Unordered list

  • Item A
  • Item B
  • Item C

Text link

Bold text

Emphasis

Superscript

Subscript

This is some text inside of a div block.

Post production sound design: a practical guide for editors

This outline maps what to prepare, step-by-step examples, fixes for common snags and how to hand off final stems cleanly.

JJ Lyon
Dive in ↗

Heading 1

Heading 2

Heading 3

Heading 4

Heading 5
Heading 6

Lorem ipsum dolor sit amet, consectetur adipiscing elit, sed do eiusmod tempor incididunt ut labore et dolore magna aliqua. Ut enim ad minim veniam, quis nostrud exercitation ullamco laboris nisi ut aliquip ex ea commodo consequat. Duis aute irure dolor in reprehenderit in voluptate velit esse cillum dolore eu fugiat nulla pariatur.

Block quote

Ordered list

  1. Item 1
  2. Item 2
  3. Item 3

Unordered list

  • Item A
  • Item B
  • Item C

Text link

Bold text

Emphasis

Superscript

Subscript

This is some text inside of a div block.

Sound to picture: practical guide for creators

A tight, practical guide to taking sound to picture fast, a repeatable workflow, the prep you need, three worked examples you can copy, quick fixes for common problems, and clean delivery tips to hand off to editors or engines.

JJ Lyon
Dive in ↗

Heading 1

Heading 2

Heading 3

Heading 4

Heading 5
Heading 6

Lorem ipsum dolor sit amet, consectetur adipiscing elit, sed do eiusmod tempor incididunt ut labore et dolore magna aliqua. Ut enim ad minim veniam, quis nostrud exercitation ullamco laboris nisi ut aliquip ex ea commodo consequat. Duis aute irure dolor in reprehenderit in voluptate velit esse cillum dolore eu fugiat nulla pariatur.

Block quote

Ordered list

  1. Item 1
  2. Item 2
  3. Item 3

Unordered list

  • Item A
  • Item B
  • Item C

Text link

Bold text

Emphasis

Superscript

Subscript

This is some text inside of a div block.

Foley recording techniques: how to capture fast, usable SFX

Below is a practical, no-nonsense guide to making Foley sessions predictable, editable and fast to deliver, plus where Krotos tools can speed up the parts you never have time for.

JJ Lyon
Dive in ↗

Heading 1

Heading 2

Heading 3

Heading 4

Heading 5
Heading 6

Lorem ipsum dolor sit amet, consectetur adipiscing elit, sed do eiusmod tempor incididunt ut labore et dolore magna aliqua. Ut enim ad minim veniam, quis nostrud exercitation ullamco laboris nisi ut aliquip ex ea commodo consequat. Duis aute irure dolor in reprehenderit in voluptate velit esse cillum dolore eu fugiat nulla pariatur.

Block quote

Ordered list

  1. Item 1
  2. Item 2
  3. Item 3

Unordered list

  • Item A
  • Item B
  • Item C

Text link

Bold text

Emphasis

Superscript

Subscript

This is some text inside of a div block.

Film sound design: a how-to guide for editors and filmmakers

Film sound design is the craft of choosing, creating and arranging the sounds a viewer hears so the picture reads as real and emotionally engaging.

JJ Lyon
Dive in ↗

Heading 1

Heading 2

Heading 3

Heading 4

Heading 5
Heading 6

Lorem ipsum dolor sit amet, consectetur adipiscing elit, sed do eiusmod tempor incididunt ut labore et dolore magna aliqua. Ut enim ad minim veniam, quis nostrud exercitation ullamco laboris nisi ut aliquip ex ea commodo consequat. Duis aute irure dolor in reprehenderit in voluptate velit esse cillum dolore eu fugiat nulla pariatur.

Block quote

Ordered list

  1. Item 1
  2. Item 2
  3. Item 3

Unordered list

  • Item A
  • Item B
  • Item C

Text link

Bold text

Emphasis

Superscript

Subscript

This is some text inside of a div block.

How to pan spatial audio for realistic depth and faster mixes

This guide gives a fast, practical panning workflow you can use in Premiere Pro, DaVinci Resolve or your DAW to restore realistic depth quickly, then shows where smart SFX tooling can accelerate auditioning and iteration.

JJ Lyon
Dive in ↗

Heading 1

Heading 2

Heading 3

Heading 4

Heading 5
Heading 6

Lorem ipsum dolor sit amet, consectetur adipiscing elit, sed do eiusmod tempor incididunt ut labore et dolore magna aliqua. Ut enim ad minim veniam, quis nostrud exercitation ullamco laboris nisi ut aliquip ex ea commodo consequat. Duis aute irure dolor in reprehenderit in voluptate velit esse cillum dolore eu fugiat nulla pariatur.

Block quote

Ordered list

  1. Item 1
  2. Item 2
  3. Item 3

Unordered list

  • Item A
  • Item B
  • Item C

Text link

Bold text

Emphasis

Superscript

Subscript

This is some text inside of a div block.

How to trim audio quickly and cleanly in Premiere Pro and Resolve

This guide gives you a tidy, keyboard-driven workflow for Premiere Pro and DaVinci Resolve that keeps edits natural and export-ready, plus short checks you can run in two minutes to avoid rework.

JJ Lyon
Dive in ↗

Heading 1

Heading 2

Heading 3

Heading 4

Heading 5
Heading 6

Lorem ipsum dolor sit amet, consectetur adipiscing elit, sed do eiusmod tempor incididunt ut labore et dolore magna aliqua. Ut enim ad minim veniam, quis nostrud exercitation ullamco laboris nisi ut aliquip ex ea commodo consequat. Duis aute irure dolor in reprehenderit in voluptate velit esse cillum dolore eu fugiat nulla pariatur.

Block quote

Ordered list

  1. Item 1
  2. Item 2
  3. Item 3

Unordered list

  • Item A
  • Item B
  • Item C

Text link

Bold text

Emphasis

Superscript

Subscript

This is some text inside of a div block.

How to choose game audio software for fast sound design

This guide highlights common pitfalls, a better selection approach, a practical workflow, real-world examples, final QA checks, and where Krotos fits in.

JJ Lyon
Dive in ↗

Heading 1

Heading 2

Heading 3

Heading 4

Heading 5
Heading 6

Lorem ipsum dolor sit amet, consectetur adipiscing elit, sed do eiusmod tempor incididunt ut labore et dolore magna aliqua. Ut enim ad minim veniam, quis nostrud exercitation ullamco laboris nisi ut aliquip ex ea commodo consequat. Duis aute irure dolor in reprehenderit in voluptate velit esse cillum dolore eu fugiat nulla pariatur.

Block quote

Ordered list

  1. Item 1
  2. Item 2
  3. Item 3

Unordered list

  • Item A
  • Item B
  • Item C

Text link

Bold text

Emphasis

Superscript

Subscript

This is some text inside of a div block.

How to speed up sound design in DaVinci Resolve

This guide shows a repeatable Fairlight workflow that keeps picture-locked editors moving and helps sound designers work faster & cleaner.

JJ Lyon
Dive in ↗

Heading 1

Heading 2

Heading 3

Heading 4

Heading 5
Heading 6

Lorem ipsum dolor sit amet, consectetur adipiscing elit, sed do eiusmod tempor incididunt ut labore et dolore magna aliqua. Ut enim ad minim veniam, quis nostrud exercitation ullamco laboris nisi ut aliquip ex ea commodo consequat. Duis aute irure dolor in reprehenderit in voluptate velit esse cillum dolore eu fugiat nulla pariatur.

Block quote

Ordered list

  1. Item 1
  2. Item 2
  3. Item 3

Unordered list

  • Item A
  • Item B
  • Item C

Text link

Bold text

Emphasis

Superscript

Subscript

This is some text inside of a div block.

How to create audio for games: fast workflows and exports

A practical, creator-first roadmap for producing game-ready audio quickly, from a tight workflow overview to real, exportable examples and hand-off checks. Designed for editors, sound designers and game builders who need reliable, implementable results fast.

JJ Lyon
Dive in ↗

Heading 1

Heading 2

Heading 3

Heading 4

Heading 5
Heading 6

Lorem ipsum dolor sit amet, consectetur adipiscing elit, sed do eiusmod tempor incididunt ut labore et dolore magna aliqua. Ut enim ad minim veniam, quis nostrud exercitation ullamco laboris nisi ut aliquip ex ea commodo consequat. Duis aute irure dolor in reprehenderit in voluptate velit esse cillum dolore eu fugiat nulla pariatur.

Block quote

Ordered list

  1. Item 1
  2. Item 2
  3. Item 3

Unordered list

  • Item A
  • Item B
  • Item C

Text link

Bold text

Emphasis

Superscript

Subscript

This is some text inside of a div block.

How to speed up sound design with Krotos Sound Design Pro

Expect practical tips for creating whooshes, footsteps and car ambience, plus export and handoff checks so editors can drop assets straight into timelines

JJ Lyon
Dive in ↗

Heading 1

Heading 2

Heading 3

Heading 4

Heading 5
Heading 6

Lorem ipsum dolor sit amet, consectetur adipiscing elit, sed do eiusmod tempor incididunt ut labore et dolore magna aliqua. Ut enim ad minim veniam, quis nostrud exercitation ullamco laboris nisi ut aliquip ex ea commodo consequat. Duis aute irure dolor in reprehenderit in voluptate velit esse cillum dolore eu fugiat nulla pariatur.

Block quote

Ordered list

  1. Item 1
  2. Item 2
  3. Item 3

Unordered list

  • Item A
  • Item B
  • Item C

Text link

Bold text

Emphasis

Superscript

Subscript

This is some text inside of a div block.

How to create retro video game sound effects

If you edit in Premiere Pro or DaVinci Resolve and need usable blips, pickups and hits that sit immediately in the timeline, these tips will keep you fast and consistent without losing the retro charm

JJ Lyon
Dive in ↗

Heading 1

Heading 2

Heading 3

Heading 4

Heading 5
Heading 6

Lorem ipsum dolor sit amet, consectetur adipiscing elit, sed do eiusmod tempor incididunt ut labore et dolore magna aliqua. Ut enim ad minim veniam, quis nostrud exercitation ullamco laboris nisi ut aliquip ex ea commodo consequat. Duis aute irure dolor in reprehenderit in voluptate velit esse cillum dolore eu fugiat nulla pariatur.

Block quote

Ordered list

  1. Item 1
  2. Item 2
  3. Item 3

Unordered list

  • Item A
  • Item B
  • Item C

Text link

Bold text

Emphasis

Superscript

Subscript

This is some text inside of a div block.

The Stop Waiting Sale: Up to 50% Off Krotos Studio, Pro and Max Yearly

If you've been waiting for the right moment to subscribe to Krotos Studio, this is it.The Stop Waiting Sale is on.

JJ Lyon
Dive in ↗

Heading 1

Heading 2

Heading 3

Heading 4

Heading 5
Heading 6

Lorem ipsum dolor sit amet, consectetur adipiscing elit, sed do eiusmod tempor incididunt ut labore et dolore magna aliqua. Ut enim ad minim veniam, quis nostrud exercitation ullamco laboris nisi ut aliquip ex ea commodo consequat. Duis aute irure dolor in reprehenderit in voluptate velit esse cillum dolore eu fugiat nulla pariatur.

Block quote

Ordered list

  1. Item 1
  2. Item 2
  3. Item 3

Unordered list

  • Item A
  • Item B
  • Item C

Text link

Bold text

Emphasis

Superscript

Subscript

This is some text inside of a div block.

New in Krotos Studio: Infographics & Motion Graphics Pack

The new Infographics & Motion Graphics Pack brings performable sound effects for UI, data animations, transitions and motion design work.

JJ Lyon
Dive in ↗

Heading 1

Heading 2

Heading 3

Heading 4

Heading 5
Heading 6

Lorem ipsum dolor sit amet, consectetur adipiscing elit, sed do eiusmod tempor incididunt ut labore et dolore magna aliqua. Ut enim ad minim veniam, quis nostrud exercitation ullamco laboris nisi ut aliquip ex ea commodo consequat. Duis aute irure dolor in reprehenderit in voluptate velit esse cillum dolore eu fugiat nulla pariatur.

Block quote

Ordered list

  1. Item 1
  2. Item 2
  3. Item 3

Unordered list

  • Item A
  • Item B
  • Item C

Text link

Bold text

Emphasis

Superscript

Subscript

This is some text inside of a div block.

New in Krotos Studio: Games, Toys & Equipment Pack

Games, Toys & Equipment Pack for Krotos Studio includes 35 performance-ready presets covering everything from board games and toy movement to full-blown cartoon chaos.

JJ Lyon
Dive in ↗

Heading 1

Heading 2

Heading 3

Heading 4

Heading 5
Heading 6

Lorem ipsum dolor sit amet, consectetur adipiscing elit, sed do eiusmod tempor incididunt ut labore et dolore magna aliqua. Ut enim ad minim veniam, quis nostrud exercitation ullamco laboris nisi ut aliquip ex ea commodo consequat. Duis aute irure dolor in reprehenderit in voluptate velit esse cillum dolore eu fugiat nulla pariatur.

Block quote

Ordered list

  1. Item 1
  2. Item 2
  3. Item 3

Unordered list

  • Item A
  • Item B
  • Item C

Text link

Bold text

Emphasis

Superscript

Subscript

This is some text inside of a div block.

Best Tools for Sound Design

The best software for sound design depends on three things: what you’re making, how you work, and how much time you’re willing to invest learning it.

JJ Lyon
Dive in ↗

Heading 1

Heading 2

Heading 3

Heading 4

Heading 5
Heading 6

Lorem ipsum dolor sit amet, consectetur adipiscing elit, sed do eiusmod tempor incididunt ut labore et dolore magna aliqua. Ut enim ad minim veniam, quis nostrud exercitation ullamco laboris nisi ut aliquip ex ea commodo consequat. Duis aute irure dolor in reprehenderit in voluptate velit esse cillum dolore eu fugiat nulla pariatur.

Block quote

Ordered list

  1. Item 1
  2. Item 2
  3. Item 3

Unordered list

  • Item A
  • Item B
  • Item C

Text link

Bold text

Emphasis

Superscript

Subscript

This is some text inside of a div block.

Krotos Studio: Technology & Communications Pack

Design realistic technology sound effects in seconds. The new Krotos Studio pack includes 31 presets for phones, radios, computers and lab atmospheres.

JJ Lyon
Dive in ↗

Heading 1

Heading 2

Heading 3

Heading 4

Heading 5
Heading 6

Lorem ipsum dolor sit amet, consectetur adipiscing elit, sed do eiusmod tempor incididunt ut labore et dolore magna aliqua. Ut enim ad minim veniam, quis nostrud exercitation ullamco laboris nisi ut aliquip ex ea commodo consequat. Duis aute irure dolor in reprehenderit in voluptate velit esse cillum dolore eu fugiat nulla pariatur.

Block quote

Ordered list

  1. Item 1
  2. Item 2
  3. Item 3

Unordered list

  • Item A
  • Item B
  • Item C

Text link

Bold text

Emphasis

Superscript

Subscript

This is some text inside of a div block.

Ultimate Guide to Foley Sound Effects: From Studio Basics to Fast, Usable Packs for Editors

Ultimate Guide to Foley Sound Effects: From Studio Basics to Fast, Usable Packs for Editors

JJ Lyon
Dive in ↗

Heading 1

Heading 2

Heading 3

Heading 4

Heading 5
Heading 6

Lorem ipsum dolor sit amet, consectetur adipiscing elit, sed do eiusmod tempor incididunt ut labore et dolore magna aliqua. Ut enim ad minim veniam, quis nostrud exercitation ullamco laboris nisi ut aliquip ex ea commodo consequat. Duis aute irure dolor in reprehenderit in voluptate velit esse cillum dolore eu fugiat nulla pariatur.

Block quote

Ordered list

  1. Item 1
  2. Item 2
  3. Item 3

Unordered list

  • Item A
  • Item B
  • Item C

Text link

Bold text

Emphasis

Superscript

Subscript

This is some text inside of a div block.

How to record and mix usable footsteps sound effects

Learn how to record, layer and mix realistic footsteps sound effects for film, TV and games quickly using foley, libraries and light processing.

JJ Lyon
Dive in ↗

Heading 1

Heading 2

Heading 3

Heading 4

Heading 5
Heading 6

Lorem ipsum dolor sit amet, consectetur adipiscing elit, sed do eiusmod tempor incididunt ut labore et dolore magna aliqua. Ut enim ad minim veniam, quis nostrud exercitation ullamco laboris nisi ut aliquip ex ea commodo consequat. Duis aute irure dolor in reprehenderit in voluptate velit esse cillum dolore eu fugiat nulla pariatur.

Block quote

Ordered list

  1. Item 1
  2. Item 2
  3. Item 3

Unordered list

  • Item A
  • Item B
  • Item C

Text link

Bold text

Emphasis

Superscript

Subscript

This is some text inside of a div block.

Film Sound Effects: A Practical, Creator-First Guide to Designing, Sourcing and Mixing SFX Fast

Film Sound Effects: A Practical, Creator-First Guide to Designing, Sourcing and Mixing SFX Fast

JJ Lyon
Dive in ↗

Heading 1

Heading 2

Heading 3

Heading 4

Heading 5
Heading 6

Lorem ipsum dolor sit amet, consectetur adipiscing elit, sed do eiusmod tempor incididunt ut labore et dolore magna aliqua. Ut enim ad minim veniam, quis nostrud exercitation ullamco laboris nisi ut aliquip ex ea commodo consequat. Duis aute irure dolor in reprehenderit in voluptate velit esse cillum dolore eu fugiat nulla pariatur.

Block quote

Ordered list

  1. Item 1
  2. Item 2
  3. Item 3

Unordered list

  • Item A
  • Item B
  • Item C

Text link

Bold text

Emphasis

Superscript

Subscript

This is some text inside of a div block.

International Women’s Day Spotlight: Tal Avital on Creativity, Sound Design, and Her Journey in Audio

Tal Avital is a music producer and sound designer whose work spans commercial campaigns, original scoring, and record production. With credits including major brand campaigns and Super Bowl ads for Base44 and Artlist, her sound has helped shape some of the most widely seen advertising in the world.

Sammi Leaver
Dive in ↗

Heading 1

Heading 2

Heading 3

Heading 4

Heading 5
Heading 6

Lorem ipsum dolor sit amet, consectetur adipiscing elit, sed do eiusmod tempor incididunt ut labore et dolore magna aliqua. Ut enim ad minim veniam, quis nostrud exercitation ullamco laboris nisi ut aliquip ex ea commodo consequat. Duis aute irure dolor in reprehenderit in voluptate velit esse cillum dolore eu fugiat nulla pariatur.

Block quote

Ordered list

  1. Item 1
  2. Item 2
  3. Item 3

Unordered list

  • Item A
  • Item B
  • Item C

Text link

Bold text

Emphasis

Superscript

Subscript

This is some text inside of a div block.

What is Sound Design? A Practical Guide for Creators Who Need Great Audio

What is Sound Design? A Practical Guide for Creators Who Need Great Audio

JJ Lyon
Dive in ↗

Heading 1

Heading 2

Heading 3

Heading 4

Heading 5
Heading 6

Lorem ipsum dolor sit amet, consectetur adipiscing elit, sed do eiusmod tempor incididunt ut labore et dolore magna aliqua. Ut enim ad minim veniam, quis nostrud exercitation ullamco laboris nisi ut aliquip ex ea commodo consequat. Duis aute irure dolor in reprehenderit in voluptate velit esse cillum dolore eu fugiat nulla pariatur.

Block quote

Ordered list

  1. Item 1
  2. Item 2
  3. Item 3

Unordered list

  • Item A
  • Item B
  • Item C

Text link

Bold text

Emphasis

Superscript

Subscript

This is some text inside of a div block.

From Placeholder to Playable: Real-Time Sound Design Workflows That Supercharge Indie Game Development

This guide walks through a practical, indie-friendly workflow using Krotos Studio (plus optional Krotos tools) so the audio can move from placeholder to playable fast without sacrificing quality.

JJ Lyon
Dive in ↗

Heading 1

Heading 2

Heading 3

Heading 4

Heading 5
Heading 6

Lorem ipsum dolor sit amet, consectetur adipiscing elit, sed do eiusmod tempor incididunt ut labore et dolore magna aliqua. Ut enim ad minim veniam, quis nostrud exercitation ullamco laboris nisi ut aliquip ex ea commodo consequat. Duis aute irure dolor in reprehenderit in voluptate velit esse cillum dolore eu fugiat nulla pariatur.

Block quote

Ordered list

  1. Item 1
  2. Item 2
  3. Item 3

Unordered list

  • Item A
  • Item B
  • Item C

Text link

Bold text

Emphasis

Superscript

Subscript

This is some text inside of a div block.

Create sound effects for games with faster workflows

Quick workflows to craft usable sound effects for games — foley, whooshes and ambience you can export to Unreal, Unity or middleware like FMOD

JJ Lyon
Dive in ↗

Heading 1

Heading 2

Heading 3

Heading 4

Heading 5
Heading 6

Lorem ipsum dolor sit amet, consectetur adipiscing elit, sed do eiusmod tempor incididunt ut labore et dolore magna aliqua. Ut enim ad minim veniam, quis nostrud exercitation ullamco laboris nisi ut aliquip ex ea commodo consequat. Duis aute irure dolor in reprehenderit in voluptate velit esse cillum dolore eu fugiat nulla pariatur.

Block quote

Ordered list

  1. Item 1
  2. Item 2
  3. Item 3

Unordered list

  • Item A
  • Item B
  • Item C

Text link

Bold text

Emphasis

Superscript

Subscript

This is some text inside of a div block.

Inside the Sound: Formula on Crafting an Armani Campaign with Krotos Studio

A behind-the-scenes look at how creative production company Formula approached sound design for an Armani campaign using Krotos Studio.

JJ Lyon
Dive in ↗

Heading 1

Heading 2

Heading 3

Heading 4

Heading 5
Heading 6

Lorem ipsum dolor sit amet, consectetur adipiscing elit, sed do eiusmod tempor incididunt ut labore et dolore magna aliqua. Ut enim ad minim veniam, quis nostrud exercitation ullamco laboris nisi ut aliquip ex ea commodo consequat. Duis aute irure dolor in reprehenderit in voluptate velit esse cillum dolore eu fugiat nulla pariatur.

Block quote

Ordered list

  1. Item 1
  2. Item 2
  3. Item 3

Unordered list

  • Item A
  • Item B
  • Item C

Text link

Bold text

Emphasis

Superscript

Subscript

This is some text inside of a div block.

Krotos Studio Basics: The Interface & Performing Sounds

If you’ve just installed Krotos Studio and you’re staring at the interface thinking, “Right then,” this walkthrough was made for you.

JJ Lyon
Dive in ↗

Heading 1

Heading 2

Heading 3

Heading 4

Heading 5
Heading 6

Lorem ipsum dolor sit amet, consectetur adipiscing elit, sed do eiusmod tempor incididunt ut labore et dolore magna aliqua. Ut enim ad minim veniam, quis nostrud exercitation ullamco laboris nisi ut aliquip ex ea commodo consequat. Duis aute irure dolor in reprehenderit in voluptate velit esse cillum dolore eu fugiat nulla pariatur.

Block quote

Ordered list

  1. Item 1
  2. Item 2
  3. Item 3

Unordered list

  • Item A
  • Item B
  • Item C

Text link

Bold text

Emphasis

Superscript

Subscript

This is some text inside of a div block.

How Professionals Work with Sound Effects

Sound design plays a vital role in how we experience film, television, games, and immersive media.

James Russell
Dive in ↗

Heading 1

Heading 2

Heading 3

Heading 4

Heading 5
Heading 6

Lorem ipsum dolor sit amet, consectetur adipiscing elit, sed do eiusmod tempor incididunt ut labore et dolore magna aliqua. Ut enim ad minim veniam, quis nostrud exercitation ullamco laboris nisi ut aliquip ex ea commodo consequat. Duis aute irure dolor in reprehenderit in voluptate velit esse cillum dolore eu fugiat nulla pariatur.

Block quote

Ordered list

  1. Item 1
  2. Item 2
  3. Item 3

Unordered list

  • Item A
  • Item B
  • Item C

Text link

Bold text

Emphasis

Superscript

Subscript

This is some text inside of a div block.

What is Diegetic Sound? Explanation and Examples

Learn what people mean when they use the term, with video examples to help you understand what diegetic and non-diegetic sounds are, what differentiates them, and how they can be used for unique cinematic effects

James Russell
Dive in ↗

Heading 1

Heading 2

Heading 3

Heading 4

Heading 5
Heading 6

Lorem ipsum dolor sit amet, consectetur adipiscing elit, sed do eiusmod tempor incididunt ut labore et dolore magna aliqua. Ut enim ad minim veniam, quis nostrud exercitation ullamco laboris nisi ut aliquip ex ea commodo consequat. Duis aute irure dolor in reprehenderit in voluptate velit esse cillum dolore eu fugiat nulla pariatur.

Block quote

Ordered list

  1. Item 1
  2. Item 2
  3. Item 3

Unordered list

  • Item A
  • Item B
  • Item C

Text link

Bold text

Emphasis

Superscript

Subscript

This is some text inside of a div block.

What Does ‘Royalty Free’ Mean for Sound Effects and Sound Design?

Learn about copyrights, licenses, royalties and other legal points in the context of sound effects and sound design for film and games

James Russell
Dive in ↗

Heading 1

Heading 2

Heading 3

Heading 4

Heading 5
Heading 6

Lorem ipsum dolor sit amet, consectetur adipiscing elit, sed do eiusmod tempor incididunt ut labore et dolore magna aliqua. Ut enim ad minim veniam, quis nostrud exercitation ullamco laboris nisi ut aliquip ex ea commodo consequat. Duis aute irure dolor in reprehenderit in voluptate velit esse cillum dolore eu fugiat nulla pariatur.

Block quote

Ordered list

  1. Item 1
  2. Item 2
  3. Item 3

Unordered list

  • Item A
  • Item B
  • Item C

Text link

Bold text

Emphasis

Superscript

Subscript

This is some text inside of a div block.

Working with Sound Effects in Premiere Pro

Discover how you can confidently work with audio in Adobe’s professional video editing software, and elevate your project’s sound

James Russell
Dive in ↗

Heading 1

Heading 2

Heading 3

Heading 4

Heading 5
Heading 6

Lorem ipsum dolor sit amet, consectetur adipiscing elit, sed do eiusmod tempor incididunt ut labore et dolore magna aliqua. Ut enim ad minim veniam, quis nostrud exercitation ullamco laboris nisi ut aliquip ex ea commodo consequat. Duis aute irure dolor in reprehenderit in voluptate velit esse cillum dolore eu fugiat nulla pariatur.

Block quote

Ordered list

  1. Item 1
  2. Item 2
  3. Item 3

Unordered list

  • Item A
  • Item B
  • Item C

Text link

Bold text

Emphasis

Superscript

Subscript

This is some text inside of a div block.

Working with Sound Effects in Davinci Resolve

Learn how to command audio clips and functions in the Blackmagic NLE software, and come out with better, more polished audio channels and tracks

James Russell
Dive in ↗

Heading 1

Heading 2

Heading 3

Heading 4

Heading 5
Heading 6

Lorem ipsum dolor sit amet, consectetur adipiscing elit, sed do eiusmod tempor incididunt ut labore et dolore magna aliqua. Ut enim ad minim veniam, quis nostrud exercitation ullamco laboris nisi ut aliquip ex ea commodo consequat. Duis aute irure dolor in reprehenderit in voluptate velit esse cillum dolore eu fugiat nulla pariatur.

Block quote

Ordered list

  1. Item 1
  2. Item 2
  3. Item 3

Unordered list

  • Item A
  • Item B
  • Item C

Text link

Bold text

Emphasis

Superscript

Subscript

This is some text inside of a div block.

What's the YouTube Sound Effects Library and How Does it Work?

Discover how to get sound effects and music from this free resource for creators, and see when the YouTube Audio Library is best to use and best to avoid

James Russell
Dive in ↗

Heading 1

Heading 2

Heading 3

Heading 4

Heading 5
Heading 6

Lorem ipsum dolor sit amet, consectetur adipiscing elit, sed do eiusmod tempor incididunt ut labore et dolore magna aliqua. Ut enim ad minim veniam, quis nostrud exercitation ullamco laboris nisi ut aliquip ex ea commodo consequat. Duis aute irure dolor in reprehenderit in voluptate velit esse cillum dolore eu fugiat nulla pariatur.

Block quote

Ordered list

  1. Item 1
  2. Item 2
  3. Item 3

Unordered list

  • Item A
  • Item B
  • Item C

Text link

Bold text

Emphasis

Superscript

Subscript

This is some text inside of a div block.

The Power of Silence: Times When Less was More in Sound Design

We’re all about getting the sound design right, but when does that mean taking away more sounds from a scene than you leave in? When is less more?

James Russell
Dive in ↗

Heading 1

Heading 2

Heading 3

Heading 4

Heading 5
Heading 6

Lorem ipsum dolor sit amet, consectetur adipiscing elit, sed do eiusmod tempor incididunt ut labore et dolore magna aliqua. Ut enim ad minim veniam, quis nostrud exercitation ullamco laboris nisi ut aliquip ex ea commodo consequat. Duis aute irure dolor in reprehenderit in voluptate velit esse cillum dolore eu fugiat nulla pariatur.

Block quote

Ordered list

  1. Item 1
  2. Item 2
  3. Item 3

Unordered list

  • Item A
  • Item B
  • Item C

Text link

Bold text

Emphasis

Superscript

Subscript

This is some text inside of a div block.

Working with Sound Effects and Audio Clips in Final Cut Pro

Work better with sound files and audio in general in Apple’s NLE software, and come out with better audio for your video, film or YouTube channel

James Russell
Dive in ↗

Heading 1

Heading 2

Heading 3

Heading 4

Heading 5
Heading 6

Lorem ipsum dolor sit amet, consectetur adipiscing elit, sed do eiusmod tempor incididunt ut labore et dolore magna aliqua. Ut enim ad minim veniam, quis nostrud exercitation ullamco laboris nisi ut aliquip ex ea commodo consequat. Duis aute irure dolor in reprehenderit in voluptate velit esse cillum dolore eu fugiat nulla pariatur.

Block quote

Ordered list

  1. Item 1
  2. Item 2
  3. Item 3

Unordered list

  • Item A
  • Item B
  • Item C

Text link

Bold text

Emphasis

Superscript

Subscript

This is some text inside of a div block.

Performable Human Sound Design, Now in Krotos Studio

We’re excited to introduce the Human Soundboard, the latest content release now available in Krotos Studio.

JJ Lyon
Dive in ↗

Heading 1

Heading 2

Heading 3

Heading 4

Heading 5
Heading 6

Lorem ipsum dolor sit amet, consectetur adipiscing elit, sed do eiusmod tempor incididunt ut labore et dolore magna aliqua. Ut enim ad minim veniam, quis nostrud exercitation ullamco laboris nisi ut aliquip ex ea commodo consequat. Duis aute irure dolor in reprehenderit in voluptate velit esse cillum dolore eu fugiat nulla pariatur.

Block quote

Ordered list

  1. Item 1
  2. Item 2
  3. Item 3

Unordered list

  • Item A
  • Item B
  • Item C

Text link

Bold text

Emphasis

Superscript

Subscript

This is some text inside of a div block.

The Best Sound Effects to Download for Video Editors and Foley Artists

Don’t settle for sub-standard sounds. Browsing for SFX can sometimes feel like sorting the wheat from the chaff. We’ll tell you how to choose more quickly and easily, for the benefit of your end result

James Russell
Dive in ↗

Heading 1

Heading 2

Heading 3

Heading 4

Heading 5
Heading 6

Lorem ipsum dolor sit amet, consectetur adipiscing elit, sed do eiusmod tempor incididunt ut labore et dolore magna aliqua. Ut enim ad minim veniam, quis nostrud exercitation ullamco laboris nisi ut aliquip ex ea commodo consequat. Duis aute irure dolor in reprehenderit in voluptate velit esse cillum dolore eu fugiat nulla pariatur.

Block quote

Ordered list

  1. Item 1
  2. Item 2
  3. Item 3

Unordered list

  • Item A
  • Item B
  • Item C

Text link

Bold text

Emphasis

Superscript

Subscript

This is some text inside of a div block.

Where Sound Lives: Why the John Lewis Ad Proves Sound Is Memory

The new John Lewis Christmas advert has already started making people cry into their tea. And no, it’s not just the storyline.

JJ Lyon
Dive in ↗

Heading 1

Heading 2

Heading 3

Heading 4

Heading 5
Heading 6

Lorem ipsum dolor sit amet, consectetur adipiscing elit, sed do eiusmod tempor incididunt ut labore et dolore magna aliqua. Ut enim ad minim veniam, quis nostrud exercitation ullamco laboris nisi ut aliquip ex ea commodo consequat. Duis aute irure dolor in reprehenderit in voluptate velit esse cillum dolore eu fugiat nulla pariatur.

Block quote

Ordered list

  1. Item 1
  2. Item 2
  3. Item 3

Unordered list

  • Item A
  • Item B
  • Item C

Text link

Bold text

Emphasis

Superscript

Subscript

This is some text inside of a div block.

The Smartest Way to Work with Sound Effects and Foley in 2026

Sound design has been changing. Learn about the new ways Foley and sound effects are done in 2026 and stay ahead of the industry with this advice

James Russell
Dive in ↗

Heading 1

Heading 2

Heading 3

Heading 4

Heading 5
Heading 6

Lorem ipsum dolor sit amet, consectetur adipiscing elit, sed do eiusmod tempor incididunt ut labore et dolore magna aliqua. Ut enim ad minim veniam, quis nostrud exercitation ullamco laboris nisi ut aliquip ex ea commodo consequat. Duis aute irure dolor in reprehenderit in voluptate velit esse cillum dolore eu fugiat nulla pariatur.

Block quote

Ordered list

  1. Item 1
  2. Item 2
  3. Item 3

Unordered list

  • Item A
  • Item B
  • Item C

Text link

Bold text

Emphasis

Superscript

Subscript

This is some text inside of a div block.

What's the Best Sound Effects App for PC & Mac?

Discover the ideal software programs for working with sound: organizers, creators and browsers made for audio post, Foley and sound design apps for PC and Mac creators

James Russell
Dive in ↗

Heading 1

Heading 2

Heading 3

Heading 4

Heading 5
Heading 6

Lorem ipsum dolor sit amet, consectetur adipiscing elit, sed do eiusmod tempor incididunt ut labore et dolore magna aliqua. Ut enim ad minim veniam, quis nostrud exercitation ullamco laboris nisi ut aliquip ex ea commodo consequat. Duis aute irure dolor in reprehenderit in voluptate velit esse cillum dolore eu fugiat nulla pariatur.

Block quote

Ordered list

  1. Item 1
  2. Item 2
  3. Item 3

Unordered list

  • Item A
  • Item B
  • Item C

Text link

Bold text

Emphasis

Superscript

Subscript

This is some text inside of a div block.

Stranger Things sound effects - a few clicks away

Stranger things sound effects made with Krotos Studio, from Lorenzo Mastrocinque

JJ Lyon
Dive in ↗

Heading 1

Heading 2

Heading 3

Heading 4

Heading 5
Heading 6

Lorem ipsum dolor sit amet, consectetur adipiscing elit, sed do eiusmod tempor incididunt ut labore et dolore magna aliqua. Ut enim ad minim veniam, quis nostrud exercitation ullamco laboris nisi ut aliquip ex ea commodo consequat. Duis aute irure dolor in reprehenderit in voluptate velit esse cillum dolore eu fugiat nulla pariatur.

Block quote

Ordered list

  1. Item 1
  2. Item 2
  3. Item 3

Unordered list

  • Item A
  • Item B
  • Item C

Text link

Bold text

Emphasis

Superscript

Subscript

This is some text inside of a div block.

YouTube Audio Library is dead

Youtube Audio library is holding you back.

JJ Lyon
Dive in ↗

Heading 1

Heading 2

Heading 3

Heading 4

Heading 5
Heading 6

Lorem ipsum dolor sit amet, consectetur adipiscing elit, sed do eiusmod tempor incididunt ut labore et dolore magna aliqua. Ut enim ad minim veniam, quis nostrud exercitation ullamco laboris nisi ut aliquip ex ea commodo consequat. Duis aute irure dolor in reprehenderit in voluptate velit esse cillum dolore eu fugiat nulla pariatur.

Block quote

Ordered list

  1. Item 1
  2. Item 2
  3. Item 3

Unordered list

  • Item A
  • Item B
  • Item C

Text link

Bold text

Emphasis

Superscript

Subscript

This is some text inside of a div block.

How to Choose Sound Effects to Download

Too many SFX, too little time? Learn how to whittle down your options and what to look out for when selecting your perfect sound

James Russell
Dive in ↗

Heading 1

Heading 2

Heading 3

Heading 4

Heading 5
Heading 6

Lorem ipsum dolor sit amet, consectetur adipiscing elit, sed do eiusmod tempor incididunt ut labore et dolore magna aliqua. Ut enim ad minim veniam, quis nostrud exercitation ullamco laboris nisi ut aliquip ex ea commodo consequat. Duis aute irure dolor in reprehenderit in voluptate velit esse cillum dolore eu fugiat nulla pariatur.

Block quote

Ordered list

  1. Item 1
  2. Item 2
  3. Item 3

Unordered list

  • Item A
  • Item B
  • Item C

Text link

Bold text

Emphasis

Superscript

Subscript

This is some text inside of a div block.

Animal sound effects

When you need animal sound effects that feel real, cinematic, and totally under your control, Animals & Monsters for Krotos Studio is the fastest way to get there.

JJ Lyon
Dive in ↗

Heading 1

Heading 2

Heading 3

Heading 4

Heading 5
Heading 6

Lorem ipsum dolor sit amet, consectetur adipiscing elit, sed do eiusmod tempor incididunt ut labore et dolore magna aliqua. Ut enim ad minim veniam, quis nostrud exercitation ullamco laboris nisi ut aliquip ex ea commodo consequat. Duis aute irure dolor in reprehenderit in voluptate velit esse cillum dolore eu fugiat nulla pariatur.

Block quote

Ordered list

  1. Item 1
  2. Item 2
  3. Item 3

Unordered list

  • Item A
  • Item B
  • Item C

Text link

Bold text

Emphasis

Superscript

Subscript

This is some text inside of a div block.

Upgrade to Pro or Max this Black Friday

There's never been a better time to level up your sound design workflow with Krotos Studio

Matthew Collings
Dive in ↗

Heading 1

Heading 2

Heading 3

Heading 4

Heading 5
Heading 6

Lorem ipsum dolor sit amet, consectetur adipiscing elit, sed do eiusmod tempor incididunt ut labore et dolore magna aliqua. Ut enim ad minim veniam, quis nostrud exercitation ullamco laboris nisi ut aliquip ex ea commodo consequat. Duis aute irure dolor in reprehenderit in voluptate velit esse cillum dolore eu fugiat nulla pariatur.

Block quote

Ordered list

  1. Item 1
  2. Item 2
  3. Item 3

Unordered list

  • Item A
  • Item B
  • Item C

Text link

Bold text

Emphasis

Superscript

Subscript

This is some text inside of a div block.

Win Your Order Back

Buy during our Black Friday event for your chance to have your entire order refunded

JJ Lyon
Dive in ↗

Heading 1

Heading 2

Heading 3

Heading 4

Heading 5
Heading 6

Lorem ipsum dolor sit amet, consectetur adipiscing elit, sed do eiusmod tempor incididunt ut labore et dolore magna aliqua. Ut enim ad minim veniam, quis nostrud exercitation ullamco laboris nisi ut aliquip ex ea commodo consequat. Duis aute irure dolor in reprehenderit in voluptate velit esse cillum dolore eu fugiat nulla pariatur.

Block quote

Ordered list

  1. Item 1
  2. Item 2
  3. Item 3

Unordered list

  • Item A
  • Item B
  • Item C

Text link

Bold text

Emphasis

Superscript

Subscript

This is some text inside of a div block.

Developing new music production software for content creators using Artificial Intelligence.

This project was implemented within the framework of the "Development of Digital Products and Services" program of the National Recovery and Resilience Plan Greece 2.0

JJ Lyon
Dive in ↗

Heading 1

Heading 2

Heading 3

Heading 4

Heading 5
Heading 6

Lorem ipsum dolor sit amet, consectetur adipiscing elit, sed do eiusmod tempor incididunt ut labore et dolore magna aliqua. Ut enim ad minim veniam, quis nostrud exercitation ullamco laboris nisi ut aliquip ex ea commodo consequat. Duis aute irure dolor in reprehenderit in voluptate velit esse cillum dolore eu fugiat nulla pariatur.

Block quote

Ordered list

  1. Item 1
  2. Item 2
  3. Item 3

Unordered list

  • Item A
  • Item B
  • Item C

Text link

Bold text

Emphasis

Superscript

Subscript

This is some text inside of a div block.

How to Download Free Sound Effects and use Them in Your Projects

Looking for free SFX? Learn what to look and how to make your selections for when choosing what files and sounds to pick for your projects

James Russell
Dive in ↗

Heading 1

Heading 2

Heading 3

Heading 4

Heading 5
Heading 6

Lorem ipsum dolor sit amet, consectetur adipiscing elit, sed do eiusmod tempor incididunt ut labore et dolore magna aliqua. Ut enim ad minim veniam, quis nostrud exercitation ullamco laboris nisi ut aliquip ex ea commodo consequat. Duis aute irure dolor in reprehenderit in voluptate velit esse cillum dolore eu fugiat nulla pariatur.

Block quote

Ordered list

  1. Item 1
  2. Item 2
  3. Item 3

Unordered list

  • Item A
  • Item B
  • Item C

Text link

Bold text

Emphasis

Superscript

Subscript

This is some text inside of a div block.

Black Friday - What's New?

Explore our biggest sale of the year and see what's new for 2025

JJ Lyon
Dive in ↗

Heading 1

Heading 2

Heading 3

Heading 4

Heading 5
Heading 6

Lorem ipsum dolor sit amet, consectetur adipiscing elit, sed do eiusmod tempor incididunt ut labore et dolore magna aliqua. Ut enim ad minim veniam, quis nostrud exercitation ullamco laboris nisi ut aliquip ex ea commodo consequat. Duis aute irure dolor in reprehenderit in voluptate velit esse cillum dolore eu fugiat nulla pariatur.

Block quote

Ordered list

  1. Item 1
  2. Item 2
  3. Item 3

Unordered list

  • Item A
  • Item B
  • Item C

Text link

Bold text

Emphasis

Superscript

Subscript

This is some text inside of a div block.

Instant Render - Did you know?

Instant Render is guaranteed to save you hours of time. See how in this video

JJ Lyon
Dive in ↗

Heading 1

Heading 2

Heading 3

Heading 4

Heading 5
Heading 6

Lorem ipsum dolor sit amet, consectetur adipiscing elit, sed do eiusmod tempor incididunt ut labore et dolore magna aliqua. Ut enim ad minim veniam, quis nostrud exercitation ullamco laboris nisi ut aliquip ex ea commodo consequat. Duis aute irure dolor in reprehenderit in voluptate velit esse cillum dolore eu fugiat nulla pariatur.

Block quote

Ordered list

  1. Item 1
  2. Item 2
  3. Item 3

Unordered list

  • Item A
  • Item B
  • Item C

Text link

Bold text

Emphasis

Superscript

Subscript

This is some text inside of a div block.

Cinematic Sound Effects Design with Jason Yadlovski

Dragging Stock SFX is Dead: The Future of Sound Design is Here

JJ Lyon
Dive in ↗

Heading 1

Heading 2

Heading 3

Heading 4

Heading 5
Heading 6

Lorem ipsum dolor sit amet, consectetur adipiscing elit, sed do eiusmod tempor incididunt ut labore et dolore magna aliqua. Ut enim ad minim veniam, quis nostrud exercitation ullamco laboris nisi ut aliquip ex ea commodo consequat. Duis aute irure dolor in reprehenderit in voluptate velit esse cillum dolore eu fugiat nulla pariatur.

Block quote

Ordered list

  1. Item 1
  2. Item 2
  3. Item 3

Unordered list

  • Item A
  • Item B
  • Item C

Text link

Bold text

Emphasis

Superscript

Subscript

This is some text inside of a div block.

How to Balance Music and Sound Effects

See how to get the right balance between background music and SFX for your videos

James Russell
Dive in ↗

Heading 1

Heading 2

Heading 3

Heading 4

Heading 5
Heading 6

Lorem ipsum dolor sit amet, consectetur adipiscing elit, sed do eiusmod tempor incididunt ut labore et dolore magna aliqua. Ut enim ad minim veniam, quis nostrud exercitation ullamco laboris nisi ut aliquip ex ea commodo consequat. Duis aute irure dolor in reprehenderit in voluptate velit esse cillum dolore eu fugiat nulla pariatur.

Block quote

Ordered list

  1. Item 1
  2. Item 2
  3. Item 3

Unordered list

  • Item A
  • Item B
  • Item C

Text link

Bold text

Emphasis

Superscript

Subscript

This is some text inside of a div block.

Free Library of Environmental Sound Effects – Download WAV Sound Pack

Put yourself and your listeners in a new space with this pack of ambiences both indoor and outdoor made for video editors and

JJ Lyon
Dive in ↗

Heading 1

Heading 2

Heading 3

Heading 4

Heading 5
Heading 6

Lorem ipsum dolor sit amet, consectetur adipiscing elit, sed do eiusmod tempor incididunt ut labore et dolore magna aliqua. Ut enim ad minim veniam, quis nostrud exercitation ullamco laboris nisi ut aliquip ex ea commodo consequat. Duis aute irure dolor in reprehenderit in voluptate velit esse cillum dolore eu fugiat nulla pariatur.

Block quote

Ordered list

  1. Item 1
  2. Item 2
  3. Item 3

Unordered list

  • Item A
  • Item B
  • Item C

Text link

Bold text

Emphasis

Superscript

Subscript

This is some text inside of a div block.

The Best Places to Download Free Sound Effects on the Web

Discover the best sites for sounds with this list of the best locations online to access quality SFX without needing to pay for them

James Russell
Dive in ↗

Heading 1

Heading 2

Heading 3

Heading 4

Heading 5
Heading 6

Lorem ipsum dolor sit amet, consectetur adipiscing elit, sed do eiusmod tempor incididunt ut labore et dolore magna aliqua. Ut enim ad minim veniam, quis nostrud exercitation ullamco laboris nisi ut aliquip ex ea commodo consequat. Duis aute irure dolor in reprehenderit in voluptate velit esse cillum dolore eu fugiat nulla pariatur.

Block quote

Ordered list

  1. Item 1
  2. Item 2
  3. Item 3

Unordered list

  • Item A
  • Item B
  • Item C

Text link

Bold text

Emphasis

Superscript

Subscript

This is some text inside of a div block.

Discover the Best Royalty-Free Sound Effects Libraries For 2025

We list the sound effects libraries that don’t require royalty payments for commercial use

James Russell
Dive in ↗

Heading 1

Heading 2

Heading 3

Heading 4

Heading 5
Heading 6

Lorem ipsum dolor sit amet, consectetur adipiscing elit, sed do eiusmod tempor incididunt ut labore et dolore magna aliqua. Ut enim ad minim veniam, quis nostrud exercitation ullamco laboris nisi ut aliquip ex ea commodo consequat. Duis aute irure dolor in reprehenderit in voluptate velit esse cillum dolore eu fugiat nulla pariatur.

Block quote

Ordered list

  1. Item 1
  2. Item 2
  3. Item 3

Unordered list

  • Item A
  • Item B
  • Item C

Text link

Bold text

Emphasis

Superscript

Subscript

This is some text inside of a div block.

Designing Superman Sound Effects from Scratch

We redesign Superman sound effects from scratch, using only Krotos Studio.

JJ Lyon
Dive in ↗

Heading 1

Heading 2

Heading 3

Heading 4

Heading 5
Heading 6

Lorem ipsum dolor sit amet, consectetur adipiscing elit, sed do eiusmod tempor incididunt ut labore et dolore magna aliqua. Ut enim ad minim veniam, quis nostrud exercitation ullamco laboris nisi ut aliquip ex ea commodo consequat. Duis aute irure dolor in reprehenderit in voluptate velit esse cillum dolore eu fugiat nulla pariatur.

Block quote

Ordered list

  1. Item 1
  2. Item 2
  3. Item 3

Unordered list

  • Item A
  • Item B
  • Item C

Text link

Bold text

Emphasis

Superscript

Subscript

This is some text inside of a div block.

Working with Audio in Final Cut Pro – Every Feature Explained

Learn all the audio editing features of Apple’s big-hitting NLE software with this guide

James Russell
Dive in ↗

Heading 1

Heading 2

Heading 3

Heading 4

Heading 5
Heading 6

Lorem ipsum dolor sit amet, consectetur adipiscing elit, sed do eiusmod tempor incididunt ut labore et dolore magna aliqua. Ut enim ad minim veniam, quis nostrud exercitation ullamco laboris nisi ut aliquip ex ea commodo consequat. Duis aute irure dolor in reprehenderit in voluptate velit esse cillum dolore eu fugiat nulla pariatur.

Block quote

Ordered list

  1. Item 1
  2. Item 2
  3. Item 3

Unordered list

  • Item A
  • Item B
  • Item C

Text link

Bold text

Emphasis

Superscript

Subscript

This is some text inside of a div block.

Emmy-Winning Sound Designer on Music and Post with Krotos Studio

Ryan Hobler on Blending Music and Post production, with Krotos Studio

JJ Lyon
Dive in ↗

Heading 1

Heading 2

Heading 3

Heading 4

Heading 5
Heading 6

Lorem ipsum dolor sit amet, consectetur adipiscing elit, sed do eiusmod tempor incididunt ut labore et dolore magna aliqua. Ut enim ad minim veniam, quis nostrud exercitation ullamco laboris nisi ut aliquip ex ea commodo consequat. Duis aute irure dolor in reprehenderit in voluptate velit esse cillum dolore eu fugiat nulla pariatur.

Block quote

Ordered list

  1. Item 1
  2. Item 2
  3. Item 3

Unordered list

  • Item A
  • Item B
  • Item C

Text link

Bold text

Emphasis

Superscript

Subscript

This is some text inside of a div block.

THREE new content packs have landed in Krotos Studio

25 sound effects across three collections; beeps, rock & ceramics, and vehicle passbys.

JJ Lyon
Dive in ↗

Heading 1

Heading 2

Heading 3

Heading 4

Heading 5
Heading 6

Lorem ipsum dolor sit amet, consectetur adipiscing elit, sed do eiusmod tempor incididunt ut labore et dolore magna aliqua. Ut enim ad minim veniam, quis nostrud exercitation ullamco laboris nisi ut aliquip ex ea commodo consequat. Duis aute irure dolor in reprehenderit in voluptate velit esse cillum dolore eu fugiat nulla pariatur.

Block quote

Ordered list

  1. Item 1
  2. Item 2
  3. Item 3

Unordered list

  • Item A
  • Item B
  • Item C

Text link

Bold text

Emphasis

Superscript

Subscript

This is some text inside of a div block.

Sound Design in DaVinci Resolve with Jason Yadlovski

Resolve Certified Trainer Jason Yadlovski on how he approaches sound design with Resolve

JJ Lyon
Dive in ↗

Heading 1

Heading 2

Heading 3

Heading 4

Heading 5
Heading 6

Lorem ipsum dolor sit amet, consectetur adipiscing elit, sed do eiusmod tempor incididunt ut labore et dolore magna aliqua. Ut enim ad minim veniam, quis nostrud exercitation ullamco laboris nisi ut aliquip ex ea commodo consequat. Duis aute irure dolor in reprehenderit in voluptate velit esse cillum dolore eu fugiat nulla pariatur.

Block quote

Ordered list

  1. Item 1
  2. Item 2
  3. Item 3

Unordered list

  • Item A
  • Item B
  • Item C

Text link

Bold text

Emphasis

Superscript

Subscript

This is some text inside of a div block.

Production Expert Explore Video to Sound

Paul Maunder from Production Expert explores Video to Sound

JJ Lyon
Dive in ↗

Heading 1

Heading 2

Heading 3

Heading 4

Heading 5
Heading 6

Lorem ipsum dolor sit amet, consectetur adipiscing elit, sed do eiusmod tempor incididunt ut labore et dolore magna aliqua. Ut enim ad minim veniam, quis nostrud exercitation ullamco laboris nisi ut aliquip ex ea commodo consequat. Duis aute irure dolor in reprehenderit in voluptate velit esse cillum dolore eu fugiat nulla pariatur.

Block quote

Ordered list

  1. Item 1
  2. Item 2
  3. Item 3

Unordered list

  • Item A
  • Item B
  • Item C

Text link

Bold text

Emphasis

Superscript

Subscript

This is some text inside of a div block.

Krotos Video to Sound: A Scene In Action

See how this short warrior scene is transformed using Krotos Video to Sound

JJ Lyon
Dive in ↗

Heading 1

Heading 2

Heading 3

Heading 4

Heading 5
Heading 6

Lorem ipsum dolor sit amet, consectetur adipiscing elit, sed do eiusmod tempor incididunt ut labore et dolore magna aliqua. Ut enim ad minim veniam, quis nostrud exercitation ullamco laboris nisi ut aliquip ex ea commodo consequat. Duis aute irure dolor in reprehenderit in voluptate velit esse cillum dolore eu fugiat nulla pariatur.

Block quote

Ordered list

  1. Item 1
  2. Item 2
  3. Item 3

Unordered list

  • Item A
  • Item B
  • Item C

Text link

Bold text

Emphasis

Superscript

Subscript

This is some text inside of a div block.

Best Sound Design Software for Filmmakers on a Budget

You no longer need a Hollywood-sized budget to achieve Hollywood-level sound

JJ Lyon
Dive in ↗

Heading 1

Heading 2

Heading 3

Heading 4

Heading 5
Heading 6

Lorem ipsum dolor sit amet, consectetur adipiscing elit, sed do eiusmod tempor incididunt ut labore et dolore magna aliqua. Ut enim ad minim veniam, quis nostrud exercitation ullamco laboris nisi ut aliquip ex ea commodo consequat. Duis aute irure dolor in reprehenderit in voluptate velit esse cillum dolore eu fugiat nulla pariatur.

Block quote

Ordered list

  1. Item 1
  2. Item 2
  3. Item 3

Unordered list

  • Item A
  • Item B
  • Item C

Text link

Bold text

Emphasis

Superscript

Subscript

This is some text inside of a div block.

Krotos Video to Sound: A quick overview

Transform a silent video into a fully designed soundscape in with non-generative AI.

JJ Lyon
Dive in ↗

Heading 1

Heading 2

Heading 3

Heading 4

Heading 5
Heading 6

Lorem ipsum dolor sit amet, consectetur adipiscing elit, sed do eiusmod tempor incididunt ut labore et dolore magna aliqua. Ut enim ad minim veniam, quis nostrud exercitation ullamco laboris nisi ut aliquip ex ea commodo consequat. Duis aute irure dolor in reprehenderit in voluptate velit esse cillum dolore eu fugiat nulla pariatur.

Block quote

Ordered list

  1. Item 1
  2. Item 2
  3. Item 3

Unordered list

  • Item A
  • Item B
  • Item C

Text link

Bold text

Emphasis

Superscript

Subscript

This is some text inside of a div block.

Introducing Video to Sound: make space for the work only you can do

Krotos Video to Sound. Upload a video and get high-quality, real audio synced perfectly to every scene

JJ Lyon
Dive in ↗

Heading 1

Heading 2

Heading 3

Heading 4

Heading 5
Heading 6

Lorem ipsum dolor sit amet, consectetur adipiscing elit, sed do eiusmod tempor incididunt ut labore et dolore magna aliqua. Ut enim ad minim veniam, quis nostrud exercitation ullamco laboris nisi ut aliquip ex ea commodo consequat. Duis aute irure dolor in reprehenderit in voluptate velit esse cillum dolore eu fugiat nulla pariatur.

Block quote

Ordered list

  1. Item 1
  2. Item 2
  3. Item 3

Unordered list

  • Item A
  • Item B
  • Item C

Text link

Bold text

Emphasis

Superscript

Subscript

This is some text inside of a div block.

Cinematic Tension Free Sound Effects Library

Cinematic Tension is Free Library from Krotos, containing risers, impacts & more. Download it here!

JJ Lyon
Dive in ↗

Heading 1

Heading 2

Heading 3

Heading 4

Heading 5
Heading 6

Lorem ipsum dolor sit amet, consectetur adipiscing elit, sed do eiusmod tempor incididunt ut labore et dolore magna aliqua. Ut enim ad minim veniam, quis nostrud exercitation ullamco laboris nisi ut aliquip ex ea commodo consequat. Duis aute irure dolor in reprehenderit in voluptate velit esse cillum dolore eu fugiat nulla pariatur.

Block quote

Ordered list

  1. Item 1
  2. Item 2
  3. Item 3

Unordered list

  • Item A
  • Item B
  • Item C

Text link

Bold text

Emphasis

Superscript

Subscript

This is some text inside of a div block.

Krotos Studio Pro 2.5 Update

Krotos Studio Pro 2.5.0 is a huge advancement to an already intuitive and efficient tool.

JJ Lyon
Dive in ↗

Heading 1

Heading 2

Heading 3

Heading 4

Heading 5
Heading 6

Lorem ipsum dolor sit amet, consectetur adipiscing elit, sed do eiusmod tempor incididunt ut labore et dolore magna aliqua. Ut enim ad minim veniam, quis nostrud exercitation ullamco laboris nisi ut aliquip ex ea commodo consequat. Duis aute irure dolor in reprehenderit in voluptate velit esse cillum dolore eu fugiat nulla pariatur.

Block quote

Ordered list

  1. Item 1
  2. Item 2
  3. Item 3

Unordered list

  • Item A
  • Item B
  • Item C

Text link

Bold text

Emphasis

Superscript

Subscript

This is some text inside of a div block.

Iconic Battle and Fight Scenes Ranked

Join us as we dig into the most iconic and best sounding fight scenes in Recent Cinema

JJ Lyon
Dive in ↗

Heading 1

Heading 2

Heading 3

Heading 4

Heading 5
Heading 6

Lorem ipsum dolor sit amet, consectetur adipiscing elit, sed do eiusmod tempor incididunt ut labore et dolore magna aliqua. Ut enim ad minim veniam, quis nostrud exercitation ullamco laboris nisi ut aliquip ex ea commodo consequat. Duis aute irure dolor in reprehenderit in voluptate velit esse cillum dolore eu fugiat nulla pariatur.

Block quote

Ordered list

  1. Item 1
  2. Item 2
  3. Item 3

Unordered list

  • Item A
  • Item B
  • Item C

Text link

Bold text

Emphasis

Superscript

Subscript

This is some text inside of a div block.

Kings of Jo'burg - Interview with Bruce Mclaren-Lyall

Dive into the Netflix series with Post-Production studio owner Bruce McLaren-Lyall.

JJ Lyon
Dive in ↗

Heading 1

Heading 2

Heading 3

Heading 4

Heading 5
Heading 6

Lorem ipsum dolor sit amet, consectetur adipiscing elit, sed do eiusmod tempor incididunt ut labore et dolore magna aliqua. Ut enim ad minim veniam, quis nostrud exercitation ullamco laboris nisi ut aliquip ex ea commodo consequat. Duis aute irure dolor in reprehenderit in voluptate velit esse cillum dolore eu fugiat nulla pariatur.

Block quote

Ordered list

  1. Item 1
  2. Item 2
  3. Item 3

Unordered list

  • Item A
  • Item B
  • Item C

Text link

Bold text

Emphasis

Superscript

Subscript

This is some text inside of a div block.

New to Krotos Studio Pro

We built Krotos Studio Pro for professionals who don’t have time to waste but refuse to compromise on quality.

JJ Lyon
Dive in ↗

Heading 1

Heading 2

Heading 3

Heading 4

Heading 5
Heading 6

Lorem ipsum dolor sit amet, consectetur adipiscing elit, sed do eiusmod tempor incididunt ut labore et dolore magna aliqua. Ut enim ad minim veniam, quis nostrud exercitation ullamco laboris nisi ut aliquip ex ea commodo consequat. Duis aute irure dolor in reprehenderit in voluptate velit esse cillum dolore eu fugiat nulla pariatur.

Block quote

Ordered list

  1. Item 1
  2. Item 2
  3. Item 3

Unordered list

  • Item A
  • Item B
  • Item C

Text link

Bold text

Emphasis

Superscript

Subscript

This is some text inside of a div block.

Ben Jacquier - Sound Designs Using Krotos Max

See Ben Jacquier's sound design process with Krotos Studio Max.

JJ Lyon
Dive in ↗

Heading 1

Heading 2

Heading 3

Heading 4

Heading 5
Heading 6

Lorem ipsum dolor sit amet, consectetur adipiscing elit, sed do eiusmod tempor incididunt ut labore et dolore magna aliqua. Ut enim ad minim veniam, quis nostrud exercitation ullamco laboris nisi ut aliquip ex ea commodo consequat. Duis aute irure dolor in reprehenderit in voluptate velit esse cillum dolore eu fugiat nulla pariatur.

Block quote

Ordered list

  1. Item 1
  2. Item 2
  3. Item 3

Unordered list

  • Item A
  • Item B
  • Item C

Text link

Bold text

Emphasis

Superscript

Subscript

This is some text inside of a div block.

Tips for the Modern Content Creator

When your video lands in someone's feed, it needs to hook them immediately. Here's how

JJ Lyon
Dive in ↗

Heading 1

Heading 2

Heading 3

Heading 4

Heading 5
Heading 6

Lorem ipsum dolor sit amet, consectetur adipiscing elit, sed do eiusmod tempor incididunt ut labore et dolore magna aliqua. Ut enim ad minim veniam, quis nostrud exercitation ullamco laboris nisi ut aliquip ex ea commodo consequat. Duis aute irure dolor in reprehenderit in voluptate velit esse cillum dolore eu fugiat nulla pariatur.

Block quote

Ordered list

  1. Item 1
  2. Item 2
  3. Item 3

Unordered list

  • Item A
  • Item B
  • Item C

Text link

Bold text

Emphasis

Superscript

Subscript

This is some text inside of a div block.

Using Krotos Studio for Creature FX

JJ Lyon
Dive in ↗

Heading 1

Heading 2

Heading 3

Heading 4

Heading 5
Heading 6

Lorem ipsum dolor sit amet, consectetur adipiscing elit, sed do eiusmod tempor incididunt ut labore et dolore magna aliqua. Ut enim ad minim veniam, quis nostrud exercitation ullamco laboris nisi ut aliquip ex ea commodo consequat. Duis aute irure dolor in reprehenderit in voluptate velit esse cillum dolore eu fugiat nulla pariatur.

Block quote

Ordered list

  1. Item 1
  2. Item 2
  3. Item 3

Unordered list

  • Item A
  • Item B
  • Item C

Text link

Bold text

Emphasis

Superscript

Subscript

This is some text inside of a div block.

Premiere Gal Checks out Krotos Studio

Premiere Gal takes a video from start to finish with Krotos Studio

JJ Lyon
Dive in ↗

Heading 1

Heading 2

Heading 3

Heading 4

Heading 5
Heading 6

Lorem ipsum dolor sit amet, consectetur adipiscing elit, sed do eiusmod tempor incididunt ut labore et dolore magna aliqua. Ut enim ad minim veniam, quis nostrud exercitation ullamco laboris nisi ut aliquip ex ea commodo consequat. Duis aute irure dolor in reprehenderit in voluptate velit esse cillum dolore eu fugiat nulla pariatur.

Block quote

Ordered list

  1. Item 1
  2. Item 2
  3. Item 3

Unordered list

  • Item A
  • Item B
  • Item C

Text link

Bold text

Emphasis

Superscript

Subscript

This is some text inside of a div block.

Design Cinematic Sound Effects for Trailers

Molly and Matt Recreate the 28 Years Later trailer using Krotos Studio Pro

JJ Lyon
Dive in ↗

Heading 1

Heading 2

Heading 3

Heading 4

Heading 5
Heading 6

Lorem ipsum dolor sit amet, consectetur adipiscing elit, sed do eiusmod tempor incididunt ut labore et dolore magna aliqua. Ut enim ad minim veniam, quis nostrud exercitation ullamco laboris nisi ut aliquip ex ea commodo consequat. Duis aute irure dolor in reprehenderit in voluptate velit esse cillum dolore eu fugiat nulla pariatur.

Block quote

Ordered list

  1. Item 1
  2. Item 2
  3. Item 3

Unordered list

  • Item A
  • Item B
  • Item C

Text link

Bold text

Emphasis

Superscript

Subscript

This is some text inside of a div block.

Dune Part 2 Sound ReDesign

Check out Brandon Hendricks over at nobelvisualz using Krotos Studio in this Dune Part 2 Resound design

JJ Lyon
Dive in ↗

Heading 1

Heading 2

Heading 3

Heading 4

Heading 5
Heading 6

Lorem ipsum dolor sit amet, consectetur adipiscing elit, sed do eiusmod tempor incididunt ut labore et dolore magna aliqua. Ut enim ad minim veniam, quis nostrud exercitation ullamco laboris nisi ut aliquip ex ea commodo consequat. Duis aute irure dolor in reprehenderit in voluptate velit esse cillum dolore eu fugiat nulla pariatur.

Block quote

Ordered list

  1. Item 1
  2. Item 2
  3. Item 3

Unordered list

  • Item A
  • Item B
  • Item C

Text link

Bold text

Emphasis

Superscript

Subscript

This is some text inside of a div block.

Call of Duty Black Ops 6: Cinematic Sound Effects with Krotos Studio

This high octane clip sounds enormous, with sound designer Oguzhan Akgul relying heavily on Krotos Studio Pro for the sound effects.

JJ Lyon
Dive in ↗

Heading 1

Heading 2

Heading 3

Heading 4

Heading 5
Heading 6

Lorem ipsum dolor sit amet, consectetur adipiscing elit, sed do eiusmod tempor incididunt ut labore et dolore magna aliqua. Ut enim ad minim veniam, quis nostrud exercitation ullamco laboris nisi ut aliquip ex ea commodo consequat. Duis aute irure dolor in reprehenderit in voluptate velit esse cillum dolore eu fugiat nulla pariatur.

Block quote

Ordered list

  1. Item 1
  2. Item 2
  3. Item 3

Unordered list

  • Item A
  • Item B
  • Item C

Text link

Bold text

Emphasis

Superscript

Subscript

This is some text inside of a div block.

Mario Sound Effects Using Krotos Studio

Mario Sound Effects re-designed in Krotos Studio by Sound Designer Marek Klemczak - Check out the finished result

JJ Lyon
Dive in ↗

Heading 1

Heading 2

Heading 3

Heading 4

Heading 5
Heading 6

Lorem ipsum dolor sit amet, consectetur adipiscing elit, sed do eiusmod tempor incididunt ut labore et dolore magna aliqua. Ut enim ad minim veniam, quis nostrud exercitation ullamco laboris nisi ut aliquip ex ea commodo consequat. Duis aute irure dolor in reprehenderit in voluptate velit esse cillum dolore eu fugiat nulla pariatur.

Block quote

Ordered list

  1. Item 1
  2. Item 2
  3. Item 3

Unordered list

  • Item A
  • Item B
  • Item C

Text link

Bold text

Emphasis

Superscript

Subscript

This is some text inside of a div block.

The Krotos Story

Let's take you back to where it all began...

JJ Lyon
Dive in ↗

Heading 1

Heading 2

Heading 3

Heading 4

Heading 5
Heading 6

Lorem ipsum dolor sit amet, consectetur adipiscing elit, sed do eiusmod tempor incididunt ut labore et dolore magna aliqua. Ut enim ad minim veniam, quis nostrud exercitation ullamco laboris nisi ut aliquip ex ea commodo consequat. Duis aute irure dolor in reprehenderit in voluptate velit esse cillum dolore eu fugiat nulla pariatur.

Block quote

Ordered list

  1. Item 1
  2. Item 2
  3. Item 3

Unordered list

  • Item A
  • Item B
  • Item C

Text link

Bold text

Emphasis

Superscript

Subscript

This is some text inside of a div block.

From Student Project To Hollywood

Taking a Student Project to Hollywood - By Orfeas Boteas, Founder & CEO

JJ Lyon
Dive in ↗

Heading 1

Heading 2

Heading 3

Heading 4

Heading 5
Heading 6

Lorem ipsum dolor sit amet, consectetur adipiscing elit, sed do eiusmod tempor incididunt ut labore et dolore magna aliqua. Ut enim ad minim veniam, quis nostrud exercitation ullamco laboris nisi ut aliquip ex ea commodo consequat. Duis aute irure dolor in reprehenderit in voluptate velit esse cillum dolore eu fugiat nulla pariatur.

Block quote

Ordered list

  1. Item 1
  2. Item 2
  3. Item 3

Unordered list

  • Item A
  • Item B
  • Item C

Text link

Bold text

Emphasis

Superscript

Subscript

This is some text inside of a div block.

Creating Sound Effects for an Immersive Audio Drama

Working in a non-visual medium presents an interesting challenge: How do you make an entire world come alive, when there's nothing to see?

JJ Lyon
Dive in ↗

Heading 1

Heading 2

Heading 3

Heading 4

Heading 5
Heading 6

Lorem ipsum dolor sit amet, consectetur adipiscing elit, sed do eiusmod tempor incididunt ut labore et dolore magna aliqua. Ut enim ad minim veniam, quis nostrud exercitation ullamco laboris nisi ut aliquip ex ea commodo consequat. Duis aute irure dolor in reprehenderit in voluptate velit esse cillum dolore eu fugiat nulla pariatur.

Block quote

Ordered list

  1. Item 1
  2. Item 2
  3. Item 3

Unordered list

  • Item A
  • Item B
  • Item C

Text link

Bold text

Emphasis

Superscript

Subscript

This is some text inside of a div block.

Elevating Blue Bloods Post Production with Isaac Derfel

As the sole Re-recording Mixer for the hit CBS show Blue Bloods, Emmy-winner Isaac Derfel has found a way to make his sound design workflow more efficient.

JJ Lyon
Dive in ↗

Heading 1

Heading 2

Heading 3

Heading 4

Heading 5
Heading 6

Lorem ipsum dolor sit amet, consectetur adipiscing elit, sed do eiusmod tempor incididunt ut labore et dolore magna aliqua. Ut enim ad minim veniam, quis nostrud exercitation ullamco laboris nisi ut aliquip ex ea commodo consequat. Duis aute irure dolor in reprehenderit in voluptate velit esse cillum dolore eu fugiat nulla pariatur.

Block quote

Ordered list

  1. Item 1
  2. Item 2
  3. Item 3

Unordered list

  • Item A
  • Item B
  • Item C

Text link

Bold text

Emphasis

Superscript

Subscript

This is some text inside of a div block.

The Four Seasons Netflix - Interview with Sound Effects Editor

Behind the sound of The Four Seasons Miniseries: Interview with Sound Effects Editor James David Redding III

JJ Lyon
Dive in ↗

Heading 1

Heading 2

Heading 3

Heading 4

Heading 5
Heading 6

Lorem ipsum dolor sit amet, consectetur adipiscing elit, sed do eiusmod tempor incididunt ut labore et dolore magna aliqua. Ut enim ad minim veniam, quis nostrud exercitation ullamco laboris nisi ut aliquip ex ea commodo consequat. Duis aute irure dolor in reprehenderit in voluptate velit esse cillum dolore eu fugiat nulla pariatur.

Block quote

Ordered list

  1. Item 1
  2. Item 2
  3. Item 3

Unordered list

  • Item A
  • Item B
  • Item C

Text link

Bold text

Emphasis

Superscript

Subscript

This is some text inside of a div block.

May the 4th 2025 at Krotos

Star Wars day means we get to release some amazing sci-fi themed presets

JJ Lyon
Dive in ↗

Heading 1

Heading 2

Heading 3

Heading 4

Heading 5
Heading 6

Lorem ipsum dolor sit amet, consectetur adipiscing elit, sed do eiusmod tempor incididunt ut labore et dolore magna aliqua. Ut enim ad minim veniam, quis nostrud exercitation ullamco laboris nisi ut aliquip ex ea commodo consequat. Duis aute irure dolor in reprehenderit in voluptate velit esse cillum dolore eu fugiat nulla pariatur.

Block quote

Ordered list

  1. Item 1
  2. Item 2
  3. Item 3

Unordered list

  • Item A
  • Item B
  • Item C

Text link

Bold text

Emphasis

Superscript

Subscript

This is some text inside of a div block.

Introducing Everyday Vehicles - Car Sound Effects

7 essential, day to day cars, meticulously recorded for Krotos Studio. Now you can create incredibly realistic car sound effects at speed

JJ Lyon
Dive in ↗

Heading 1

Heading 2

Heading 3

Heading 4

Heading 5
Heading 6

Lorem ipsum dolor sit amet, consectetur adipiscing elit, sed do eiusmod tempor incididunt ut labore et dolore magna aliqua. Ut enim ad minim veniam, quis nostrud exercitation ullamco laboris nisi ut aliquip ex ea commodo consequat. Duis aute irure dolor in reprehenderit in voluptate velit esse cillum dolore eu fugiat nulla pariatur.

Block quote

Ordered list

  1. Item 1
  2. Item 2
  3. Item 3

Unordered list

  • Item A
  • Item B
  • Item C

Text link

Bold text

Emphasis

Superscript

Subscript

This is some text inside of a div block.

These Sound Designers Are About to Work Faster Than Ever Before

First come, first served. All the sound design power you could ask for in one package, for a very limited time

JJ Lyon
Dive in ↗

Heading 1

Heading 2

Heading 3

Heading 4

Heading 5
Heading 6

Lorem ipsum dolor sit amet, consectetur adipiscing elit, sed do eiusmod tempor incididunt ut labore et dolore magna aliqua. Ut enim ad minim veniam, quis nostrud exercitation ullamco laboris nisi ut aliquip ex ea commodo consequat. Duis aute irure dolor in reprehenderit in voluptate velit esse cillum dolore eu fugiat nulla pariatur.

Block quote

Ordered list

  1. Item 1
  2. Item 2
  3. Item 3

Unordered list

  • Item A
  • Item B
  • Item C

Text link

Bold text

Emphasis

Superscript

Subscript

This is some text inside of a div block.

Water Foley: Behind the Scenes of this Stunning Library

We go behind the scenes of our Water Foley sound effects pack with Sound Designer John Valasis, who recorded these sounds at his Athens Studio

John Valasis
Dive in ↗

Heading 1

Heading 2

Heading 3

Heading 4

Heading 5
Heading 6

Lorem ipsum dolor sit amet, consectetur adipiscing elit, sed do eiusmod tempor incididunt ut labore et dolore magna aliqua. Ut enim ad minim veniam, quis nostrud exercitation ullamco laboris nisi ut aliquip ex ea commodo consequat. Duis aute irure dolor in reprehenderit in voluptate velit esse cillum dolore eu fugiat nulla pariatur.

Block quote

Ordered list

  1. Item 1
  2. Item 2
  3. Item 3

Unordered list

  • Item A
  • Item B
  • Item C

Text link

Bold text

Emphasis

Superscript

Subscript

This is some text inside of a div block.

Perform water Foley Sound Effects in real time with Krotos Studio

With the Water Foley pack in Krotos Studio, you can perform dynamic, gestural water sound effects with ease

JJ Lyon
Dive in ↗

Heading 1

Heading 2

Heading 3

Heading 4

Heading 5
Heading 6

Lorem ipsum dolor sit amet, consectetur adipiscing elit, sed do eiusmod tempor incididunt ut labore et dolore magna aliqua. Ut enim ad minim veniam, quis nostrud exercitation ullamco laboris nisi ut aliquip ex ea commodo consequat. Duis aute irure dolor in reprehenderit in voluptate velit esse cillum dolore eu fugiat nulla pariatur.

Block quote

Ordered list

  1. Item 1
  2. Item 2
  3. Item 3

Unordered list

  • Item A
  • Item B
  • Item C

Text link

Bold text

Emphasis

Superscript

Subscript

Get the studio journal in your inbox

One email, every other week. New sound packs, workflow tips and the occasional field recording — no filler.

Subscribe
Thank you! Your submission has been received!
Oops! Something went wrong while submitting the form.

TODO: connect to ActiveCampaign — form is not wired up yet.